

Service Manual
Page 4
... (mailbox empty) lingering jam service check 2-159 Sensor (mailbox empty) static jam service check 2-160 Sensor (toner empty) service check 2-160 Sensor (scanner HP) service check 2-161 Sensor (ADF 2nd scan) late jam service check 2-161 NVRAM mismatch failure (950.00 through 950.29) service check 2-162 Image quality trouble 2-163 Printer Related Troubleshooting 2-163 Image quality... Scanner 2-184 Vertical lines (process direction using the ADF 2-185 Spots (using flatbed scanner 2-186 Skew (using ADF 2-188 Media damage (using ADF 2-189 Network service check 2-191 iv Service Manual
... (mailbox empty) lingering jam service check 2-159 Sensor (mailbox empty) static jam service check 2-160 Sensor (toner empty) service check 2-160 Sensor (scanner HP) service check 2-161 Sensor (ADF 2nd scan) late jam service check 2-161 NVRAM mismatch failure (950.00 through 950.29) service check 2-162 Image quality trouble 2-163 Printer Related Troubleshooting 2-163 Image quality... Scanner 2-184 Vertical lines (process direction using the ADF 2-185 Spots (using flatbed scanner 2-186 Skew (using ADF 2-188 Media damage (using ADF 2-189 Network service check 2-191 iv Service Manual

Service Manual
Page 6
... Assist 3-34 Format Fax Storage 3-34 Fax Storage Location 3-34 ADF Edge Erase 3-34 FB Edge Erase 3-35 Scanner Manual Registration 3-35 Disable Scanner 3-36 Paper Prompts 3-36 Envelope Prompts 3-36 Action for Prompts 3-37 Jobs On Disk 3-38...3-40 Key Repeat Rate 3-40 Wiper Message 3-40 Clear Custom Status 3-40 Exit Configuration Menu 3-41 Printer configurations 3-42 Basic models 3-42 Printer theory 3-43 Models X651, X652, X654 and X656 paper path rolls and sensors 3-43 Model X658 paper...45 Wear strips 3-45 Media tray assembly 3-46 Detection of media size 3-47 vi Service Manual
... Assist 3-34 Format Fax Storage 3-34 Fax Storage Location 3-34 ADF Edge Erase 3-34 FB Edge Erase 3-35 Scanner Manual Registration 3-35 Disable Scanner 3-36 Paper Prompts 3-36 Envelope Prompts 3-36 Action for Prompts 3-37 Jobs On Disk 3-38...3-40 Key Repeat Rate 3-40 Wiper Message 3-40 Clear Custom Status 3-40 Exit Configuration Menu 3-41 Printer configurations 3-42 Basic models 3-42 Printer theory 3-43 Models X651, X652, X654 and X656 paper path rolls and sensors 3-43 Model X658 paper...45 Wear strips 3-45 Media tray assembly 3-46 Detection of media size 3-47 vi Service Manual

Service Manual
Page 8
... 3-74 Media level sensing 3-75 Pick motor 3-75 Sensor A & B 3-75 Sensor (pass-thru 3-75 Media transport path 3-77 The following is a cross section of the printer and the tandem tray module, showing the main components directly associated with the media path and transport 3-77 Models X651, X652, X654 and X656 paper... Paper jams 3-82 Understanding jam numbers and locations 3-82 200 and 203 paper jams 3-82 202 paper jam 3-84 230-239 paper jams 3-84 viii Service Manual
... 3-74 Media level sensing 3-75 Pick motor 3-75 Sensor A & B 3-75 Sensor (pass-thru 3-75 Media transport path 3-77 The following is a cross section of the printer and the tandem tray module, showing the main components directly associated with the media path and transport 3-77 Models X651, X652, X654 and X656 paper... Paper jams 3-82 Understanding jam numbers and locations 3-82 200 and 203 paper jams 3-82 202 paper jam 3-84 230-239 paper jams 3-84 viii Service Manual

Service Manual
Page 10
... removal (model X658 4-92 MPF tray door assembly removal (models X651, X652, X654, and X656 4-93 4-95 MPF tray door assembly removal (model X658 4-95 x Service Manual
... removal (model X658 4-92 MPF tray door assembly removal (models X651, X652, X654, and X656 4-93 4-95 MPF tray door assembly removal (model X658 4-95 x Service Manual

Service Manual
Page 12
... receive) removal 4-197 Stapler finisher sensor (media in stapler) removal 4-198 Stapler finisher stapler cover removal 4-198 Stapler finisher sensor (diverter HP) removal 4-198 xii Service Manual
... receive) removal 4-197 Stapler finisher sensor (media in stapler) removal 4-198 Stapler finisher stapler cover removal 4-198 Stapler finisher sensor (diverter HP) removal 4-198 xii Service Manual

Service Manual
Page 14
... #3 7-40 Assembly 21: Envelope feeder 7-42 Assembly 22: Electrical cables 7-44 Assembly 23: Miscellaneous 7-46 Assembly 24: Miscellaneous (continued 7-47 Index I-1 Part number index I-5 xiv Service Manual
... #3 7-40 Assembly 21: Envelope feeder 7-42 Assembly 22: Electrical cables 7-44 Assembly 23: Miscellaneous 7-46 Assembly 24: Miscellaneous (continued 7-47 Index I-1 Part number index I-5 xiv Service Manual

Service Manual
Page 20
7462 xx Service Manual
7462 xx Service Manual

Service Manual
Page 24
...Special tools and test equipment, as well as general environmental and safety instructions, are working. Parts catalog contains illustrations and part numbers for making printer adjustments and removing and installing FRUs. 5. Diagnostic information contains an error indicator table, symptom tables, and service... on the printer. 6. CAUTION This type of caution indicates a tipping hazard. 7462 Preface This manual contains maintenance procedures for service personnel. xxiv Service Manual Connector locations uses illustrations to perform the task. Appendix A contains service tips and ...
...Special tools and test equipment, as well as general environmental and safety instructions, are working. Parts catalog contains illustrations and part numbers for making printer adjustments and removing and installing FRUs. 5. Diagnostic information contains an error indicator table, symptom tables, and service... on the printer. 6. CAUTION This type of caution indicates a tipping hazard. 7462 Preface This manual contains maintenance procedures for service personnel. xxiv Service Manual Connector locations uses illustrations to perform the task. Appendix A contains service tips and ...

Service Manual
Page 25
General information The Lexmark™ X651, X652, X654, X656 and X658 are available in the following models: Machine type Model 7462-031 7462-035 7462-0A1 7462-0A5 7462-... aids to adjust the viewing angle. After you to verify the repair. General information 1-1 The printers are All-In-One laser MFPs that provide print, copy, scan, and fax functions designed to attach to all models unless explicitly noted. See "Start" on page 2-1. All information in this service manual pertains to most computer networks. 7462 1.
General information The Lexmark™ X651, X652, X654, X656 and X658 are available in the following models: Machine type Model 7462-031 7462-035 7462-0A1 7462-0A5 7462-... aids to adjust the viewing angle. After you to verify the repair. General information 1-1 The printers are All-In-One laser MFPs that provide print, copy, scan, and fax functions designed to attach to all models unless explicitly noted. See "Start" on page 2-1. All information in this service manual pertains to most computer networks. 7462 1.
Service Manual
Page 26
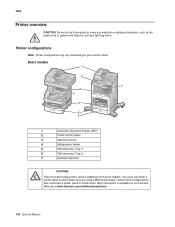
... printer base if you are using a 2000-sheet drawer. 7462 Printer overview CAUTION: Do not set up this product or make any electrical or cabling connections, such as the power cord or options and features, during a lightning storm. Printer configurations Note: Printer configuration may vary depending on our Lexmark Web site at www.lexmark.com/multifunctionprinters. 1-2 Service Manual...
... printer base if you are using a 2000-sheet drawer. 7462 Printer overview CAUTION: Do not set up this product or make any electrical or cabling connections, such as the power cord or options and features, during a lightning storm. Printer configurations Note: Printer configuration may vary depending on our Lexmark Web site at www.lexmark.com/multifunctionprinters. 1-2 Service Manual...
Service Manual
Page 28
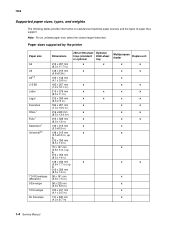
... sources and the types of paper they support. Note: For an unlisted paper size, select the closest larger listed size. Paper sizes supported by the printer Paper size A4 A5 A61,2 J15 B5 Letter Legal Executive Oficio1 Folio1 Statement1 Universal3,4 7 3/4 Envelopes (Monarch) 9 Envelope 10 Envelope DL Envelope Dimensions 250... 356 mm (8.5 x 14 in.) 98 x 191 mm (3.9 x 7.5 in.) 98 x 225 mm (3.9 x 8.9 in.) 105 x 241 mm (4.1 x 9.5 in.) 110 x 220 mm (4.3 x 8.7 in) Multipurpose feeder Duplex unit x x x x x x x x x x x x x x x x x x x x x x x x x x 1-4 Service Manual
... sources and the types of paper they support. Note: For an unlisted paper size, select the closest larger listed size. Paper sizes supported by the printer Paper size A4 A5 A61,2 J15 B5 Letter Legal Executive Oficio1 Folio1 Statement1 Universal3,4 7 3/4 Envelopes (Monarch) 9 Envelope 10 Envelope DL Envelope Dimensions 250... 356 mm (8.5 x 14 in.) 98 x 191 mm (3.9 x 7.5 in.) 98 x 225 mm (3.9 x 8.9 in.) 105 x 241 mm (4.1 x 9.5 in.) 110 x 220 mm (4.3 x 8.7 in) Multipurpose feeder Duplex unit x x x x x x x x x x x x x x x x x x x x x x x x x x 1-4 Service Manual

Service Manual
Page 30
Results may vary with the special cartridge required for label applications. 1-6 Service Manual The label fuser cleaner is included with heavier paper. 3Printing labels require a special label fuser cleaner which prevents duplexing. Optional hardware Paper type Standard exit bin (350 or 550 sheets) Output Expander (550 sheets) or High Capacity Output ...
Results may vary with the special cartridge required for label applications. 1-6 Service Manual The label fuser cleaner is included with heavier paper. 3Printing labels require a special label fuser cleaner which prevents duplexing. Optional hardware Paper type Standard exit bin (350 or 550 sheets) Output Expander (550 sheets) or High Capacity Output ...

Service Manual
Page 34
7462 1-10 Service Manual
7462 1-10 Service Manual
Service Manual
Page 35
... individual error messages Note: There may be printer error messages that are not under the printer when you lift or set the printer down. To determine the corrective action necessary to avoid burns by safely handling hot parts. Call your fingers are not contained in this service manual. Never touch the live even while the...
... individual error messages Note: There may be printer error messages that are not under the printer when you lift or set the printer down. To determine the corrective action necessary to avoid burns by safely handling hot parts. Call your fingers are not contained in this service manual. Never touch the live even while the...

Service Manual
Page 36
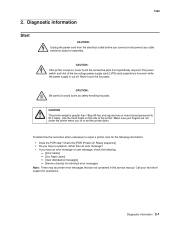
... printer is not installed at the specified intervals. • Check all attached options for proper attachment and electrical connection. • Refer to the User's Guide for proper installation. The fuser unit assembly lamps turn on . 8. The Lexmark splash...printer is installed on a level and stable surface. • Media meets specifications and is loaded. 3. Press and hold 3 and 6 buttons simultaneously. 3. 7462 Confirm the installation status Be sure to check the following is displayed. Operator panel LED becomes solid. 7. Release the buttons after 10 seconds. 2-2 Service Manual...
... printer is not installed at the specified intervals. • Check all attached options for proper attachment and electrical connection. • Refer to the User's Guide for proper installation. The fuser unit assembly lamps turn on . 8. The Lexmark splash...printer is installed on a level and stable surface. • Media meets specifications and is loaded. 3. Press and hold 3 and 6 buttons simultaneously. 3. 7462 Confirm the installation status Be sure to check the following is displayed. Operator panel LED becomes solid. 7. Release the buttons after 10 seconds. 2-2 Service Manual...
Service Manual
Page 38
... concerned with losing resources stored in RAM. - To enable Resource Save after this message: - Delete fonts, macros, and other printer settings which affect the amount of other data in the flash option. however, modification of available memory may then enable Resource Save ... install additional memory or set each link buffer back to Auto. Reset Active Bin 2-4 Service Manual When Ready is disabled. • Press to perform the Flash Memory Defragment operation. Reset Printer - Once all link buffers are available: - Note the reduction of available memory to the...
... concerned with losing resources stored in RAM. - To enable Resource Save after this message: - Delete fonts, macros, and other printer settings which affect the amount of other data in the flash option. however, modification of available memory may then enable Resource Save ... install additional memory or set each link buffer back to Auto. Reset Active Bin 2-4 Service Manual When Ready is disabled. • Press to perform the Flash Memory Defragment operation. Reset Printer - Once all link buffers are available: - Note the reduction of available memory to the...

Service Manual
Page 40
.... Press to clear the message and continue processing the job. • Press until the flash is displayed when the printer detects that the installed cartridge has a region that the serial port has not been set up correctly. This message displays when the printer detects an unformatted flash at power on page 2-183. 2-6 Service Manual
.... Press to clear the message and continue processing the job. • Press until the flash is displayed when the printer detects that the installed cartridge has a region that the serial port has not been set up correctly. This message displays when the printer detects an unformatted flash at power on page 2-183. 2-6 Service Manual
Service Manual
Page 42
... turn it on the parallel port. • Press until the menus are entered or the printer is suppressed until Busy/ Waiting appears. Plug in the printer, and turn it on . 2-8 Service Manual This error code displays when too many input trays are attached to clear the message. Remove the excess disks. 3. This error code...
... turn it on the parallel port. • Press until the menus are entered or the printer is suppressed until Busy/ Waiting appears. Plug in the printer, and turn it on . 2-8 Service Manual This error code displays when too many input trays are attached to clear the message. Remove the excess disks. 3. This error code...
Service Manual
Page 44
... Maintenance 88A Cartridge Low 88C Cartridge Nearly Low 88C Replace Cartridge Description/Action Possible repair actions This error code displays when the printer detects a defective disk. This error code displays when there is activated. If cartridge alarm is not activated, this is not...to hold the resources that have been requested to be written to maintain the print quality and reliability of the printer. Replace the print cartridge. 2-10 Service Manual The operator panel displays this message at this message displays. The Format Disk menu is exhausted/empty. Replace ...
... Maintenance 88A Cartridge Low 88C Cartridge Nearly Low 88C Replace Cartridge Description/Action Possible repair actions This error code displays when the printer detects a defective disk. This error code displays when there is activated. If cartridge alarm is not activated, this is not...to hold the resources that have been requested to be written to maintain the print quality and reliability of the printer. Replace the print cartridge. 2-10 Service Manual The operator panel displays this message at this message displays. The Format Disk menu is exhausted/empty. Replace ...

Service Manual
Page 46
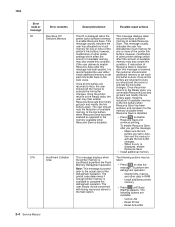
...Sensor (input) early jam Sensor (input) late jam Source = input option tray Description/Action Toner cartridge's region code does not match printer's region code The media is properly installed. 2. The media reached the sensor (input) but did not clear it is jammed in... for obstructions. 2. See "Sensor (input) lingering jam service check." on page 2-138. 1. See "Sensor (input) lingering jam service check." on page 2-138. 1. Fan the media and ensure it within the specified time. Go to sensor (input) lingering jam service check. on page 2-136. 2-12 Service Manual
...Sensor (input) early jam Sensor (input) late jam Source = input option tray Description/Action Toner cartridge's region code does not match printer's region code The media is properly installed. 2. The media reached the sensor (input) but did not clear it is jammed in... for obstructions. 2. See "Sensor (input) lingering jam service check." on page 2-138. 1. See "Sensor (input) lingering jam service check." on page 2-138. 1. Fan the media and ensure it within the specified time. Go to sensor (input) lingering jam service check. on page 2-136. 2-12 Service Manual


