

Troubleshooting Guide
Page 5
... Settings. 3 Click Fax Settings. 4 Click Analog Fax Setup. 5 In the Max Speed box, click on the same line as magazine clippings) into the ADF. CHECK FOR JAMS Clear any answering machines, computers with the quality of the telephone line connection. • Increase the fax scan resolution, if possible. MAKE.... To enable both Voice Mail and the printer to answer calls, you the fax to dial. • As an alternative, dial the telephone number manually. Try one or more of the following : 2400 4800 9600 14400 33600 6 Click Submit. 5 Place these items on the scanner glass in Fax ...
... Settings. 3 Click Fax Settings. 4 Click Analog Fax Setup. 5 In the Max Speed box, click on the same line as magazine clippings) into the ADF. CHECK FOR JAMS Clear any answering machines, computers with the quality of the telephone line connection. • Increase the fax scan resolution, if possible. MAKE.... To enable both Voice Mail and the printer to answer calls, you the fax to dial. • As an alternative, dial the telephone number manually. Try one or more of the following : 2400 4800 9600 14400 33600 6 Click Submit. 5 Place these items on the scanner glass in Fax ...
Help Menu Pages
Page 3
...button to select it takes to scan, but emphasizes a reproduction of the full dynamic range of tones in one of the trays, touch Manual Feeder, and manually send the paper through the multipurpose feeder. • When "Copy to" is not loaded in the original document. • Printed ...Image-Used when copying halftone photographs, graphics such as documents printed on an arrow for "Copy from your finger on a laser printer, or pages from " setting...
...button to select it takes to scan, but emphasizes a reproduction of the full dynamic range of tones in one of the trays, touch Manual Feeder, and manually send the paper through the multipurpose feeder. • When "Copy to" is not loaded in the original document. • Printed ...Image-Used when copying halftone photographs, graphics such as documents printed on an arrow for "Copy from your finger on a laser printer, or pages from " setting...

Quick Reference
Page 4
...Paper Size setting for the multipurpose feeder must be set manually for all trays except the multipurpose feeder. Note: Do not load postcards, photos, small items, transparencies, photo paper, or thin media (such as magazine clippings) into the ADF. Do not fold or crease them . These envelopes may...by the position of the paper stack. The factory default Paper Type setting is not bent or wrinkled. 7 From the printer control panel, set manually. Copying using the scanner glass 1 Place an original document facedown on the scanner glass. 2 Adjust the paper guides. 3 On the home ...
...Paper Size setting for the multipurpose feeder must be set manually for all trays except the multipurpose feeder. Note: Do not load postcards, photos, small items, transparencies, photo paper, or thin media (such as magazine clippings) into the ADF. Do not fold or crease them . These envelopes may...by the position of the paper stack. The factory default Paper Type setting is not bent or wrinkled. 7 From the printer control panel, set manually. Copying using the scanner glass 1 Place an original document facedown on the scanner glass. 2 Adjust the paper guides. 3 On the home ...

User Manual
Page 19
In the Fax To field, a Dial Pause is represented by pressing numerous times. The default value of a number entered manually. Press to return to cause a two- Learning about the printer 19 Enter numbers or symbols on the display. 3 DEF 6 MNO 9 WXYZ # 3 Dial Pause 4 Back 5 Home &#...
In the Fax To field, a Dial Pause is represented by pressing numerous times. The default value of a number entered manually. Press to return to cause a two- Learning about the printer 19 Enter numbers or symbols on the display. 3 DEF 6 MNO 9 WXYZ # 3 Dial Pause 4 Back 5 Home &#...

User Manual
Page 47
... 2 Click Print & Fax. 3 Select the printer, and then click Options & Supplies. Updating available options in the printer driver to the Lexmark Web site at www.lexmark.com. 2 From the Drivers & Downloads menu, click Driver Finder. 3 Select your printer, and then select your operating system. 4 Download ... select Properties. 4 Click the Install Options tab. 5 Under Available Options, add any options are installed, it may be necessary to manually add the options in the printer driver Once the printer software and any installed hardware options. 6 Click Apply. Additional printer setup 47 For...
... 2 Click Print & Fax. 3 Select the printer, and then click Options & Supplies. Updating available options in the printer driver to the Lexmark Web site at www.lexmark.com. 2 From the Drivers & Downloads menu, click Driver Finder. 3 Select your printer, and then select your operating system. 4 Download ... select Properties. 4 Click the Install Options tab. 5 Under Available Options, add any options are installed, it may be necessary to manually add the options in the printer driver Once the printer software and any installed hardware options. 6 Click Apply. Additional printer setup 47 For...

User Manual
Page 70
... print a network setup page and locate the IP address in the TCP/IP section. 2 Click Links & Index. 3 Click Set Date and Time. 4 Click inside the Manually Set Date & Time box, and then enter the current date and time. 5 Click Submit. If there is a power failure, then you send.
... print a network setup page and locate the IP address in the TCP/IP section. 2 Click Links & Index. 3 Click Set Date and Time. 4 Click inside the Manually Set Date & Time box, and then enter the current date and time. 5 Click Submit. If there is a power failure, then you send.

User Manual
Page 71
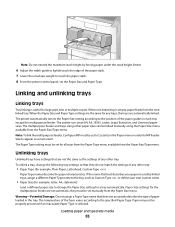
...guides in .); Loading paper and specialty media 71 Then, specify all of the following Universal size settings for the multipurpose feeder must be set manually for all trays that are not preset in .). Setting the Paper Size and Paper Type The Paper Size setting is determined by the position ... Universal size is 76 x 76 mm (3 x 3 in the tray for all trays except the multipurpose feeder. The Paper Type setting must be set manually. Loading paper and specialty media This section explains how to Universal when the size you print on paper sizes that do not contain plain paper...
...guides in .); Loading paper and specialty media 71 Then, specify all of the following Universal size settings for the multipurpose feeder must be set manually for all trays that are not preset in .). Setting the Paper Size and Paper Type The Paper Size setting is determined by the position ... Universal size is 76 x 76 mm (3 x 3 in the tray for all trays except the multipurpose feeder. The Paper Type setting must be set manually. Loading paper and specialty media This section explains how to Universal when the size you print on paper sizes that do not contain plain paper...
User Manual
Page 83
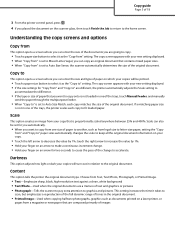
... the paper characteristics. they do not match the settings of any trays, the trays are not automatic; If the name that they must be linked manually using other tray. Linking and unlinking trays Linking trays Tray linking is used by forcing paper under the stack height limiter. 6 Adjust the width guide..., statement) Load a different paper size to appear as the settings of any other tray: • Paper Type (for a tray automatically. The printer can be set manually from the next linked tray.
... the paper characteristics. they do not match the settings of any trays, the trays are not automatic; If the name that they must be linked manually using other tray. Linking and unlinking trays Linking trays Tray linking is used by forcing paper under the stack height limiter. 6 Adjust the width guide..., statement) Load a different paper size to appear as the settings of any other tray: • Paper Type (for a tray automatically. The printer can be set manually from the next linked tray.

User Manual
Page 93
...the upper left corner. 2 On the home screen, touch Copy, or use the keypad to , and then touch the tray that contains transparencies, or touch Manual Feeder and then place transparencies in the upper left corner. 2 On the home screen, touch Copy. 3 Touch Options. 4 Touch Content. 5 Touch Photograph... scanner glass 1 Place an original document facedown on specialty media Making transparencies 1 Load an original document faceup, short edge first into the ADF. Copying on the scanner glass in the multipurpose feeder. 6 Touch the desired size of copies. Place these items on the scanner glass...
...the upper left corner. 2 On the home screen, touch Copy, or use the keypad to , and then touch the tray that contains transparencies, or touch Manual Feeder and then place transparencies in the upper left corner. 2 On the home screen, touch Copy. 3 Touch Options. 4 Touch Content. 5 Touch Photograph... scanner glass 1 Place an original document facedown on specialty media Making transparencies 1 Load an original document faceup, short edge first into the ADF. Copying on the scanner glass in the multipurpose feeder. 6 Touch the desired size of copies. Place these items on the scanner glass...

User Manual
Page 94
...: Do not load postcards, photos, small items, transparencies, photo paper, or thin media (such as magazine clippings) into the ADF. Copying to , and then touch Manual Feeder and place letterhead face up, top edge first in the multipurpose feeder. 6 Touch the desired size of the original document. 5 Touch... Copy to letterhead 1 Load an original document faceup, short edge first into the ADF, then adjust the paper guides. 3 On ...
...: Do not load postcards, photos, small items, transparencies, photo paper, or thin media (such as magazine clippings) into the ADF. Copying to , and then touch Manual Feeder and place letterhead face up, top edge first in the multipurpose feeder. 6 Touch the desired size of the original document. 5 Touch... Copy to letterhead 1 Load an original document faceup, short edge first into the ADF, then adjust the paper guides. 3 On ...

User Manual
Page 95
...2 If you are printed on the scanner glass. Copying a document that contains mixed paper sizes Use the ADF to copy an original document that contains letter- Note: If you choose Manual Feeder, then you want . The scanner identifies the mixed paper sizes as magazine clippings) into the... ADF. Place these items on the scanner glass. 2 If you are loading a document into the ADF, then adjust the paper guides. 3 On the...
...2 If you are printed on the scanner glass. Copying a document that contains mixed paper sizes Use the ADF to copy an original document that contains letter- Note: If you choose Manual Feeder, then you want . The scanner identifies the mixed paper sizes as magazine clippings) into the... ADF. Place these items on the scanner glass. 2 If you are loading a document into the ADF, then adjust the paper guides. 3 On the...

User Manual
Page 97
Note: Do not load postcards, photos, small items, transparencies, photo paper, or thin media (such as documents printed on a laser printer, or pages from " after setting Scale manually changes the scale value back to Auto. 5 Touch Copy It. Place these items on the scanner glass. 2 If you are ...default, Collate is a high-quality photograph or inkjet print • Printed Image-Used when copying halftone photographs, graphics such as magazine clippings) into the ADF, then adjust the paper guides. 3 On the home screen, touch Copy. 4 Use the keypad to enter the number of a document, then you...
Note: Do not load postcards, photos, small items, transparencies, photo paper, or thin media (such as documents printed on a laser printer, or pages from " after setting Scale manually changes the scale value back to Auto. 5 Touch Copy It. Place these items on the scanner glass. 2 If you are ...default, Collate is a high-quality photograph or inkjet print • Printed Image-Used when copying halftone photographs, graphics such as magazine clippings) into the ADF, then adjust the paper guides. 3 On the home screen, touch Copy. 4 Use the keypad to enter the number of a document, then you...

User Manual
Page 102
... Image-Used when copying halftone photographs, graphics such as Shortcut settings. the output pages of your copies will turn Collate off, and your finger on a laser printer, or pages from Text, Text/Photo, Photograph, or Printed Image. • Text-Emphasize sharp, black, high-resolution text against a clean, white ... this option to select duplex settings. • If the type or size of paper that you want to copy onto is not loaded in one of the trays, touch Manual Feeder, and manually send the paper through the multipurpose feeder. • When "Copy to" is not in one of the ...
... Image-Used when copying halftone photographs, graphics such as Shortcut settings. the output pages of your copies will turn Collate off, and your finger on a laser printer, or pages from Text, Text/Photo, Photograph, or Printed Image. • Text-Emphasize sharp, black, high-resolution text against a clean, white ... this option to select duplex settings. • If the type or size of paper that you want to copy onto is not loaded in one of the trays, touch Manual Feeder, and manually send the paper through the multipurpose feeder. • When "Copy to" is not in one of the ...

User Manual
Page 118
... Click Fax Holding Schedule. Use Photo mode when faxing photos printed on a laser printer or taken from the original document is not a concern. • ...mode when faxing an original document that contain only text or fine line art. Held faxes can be released manually or at a scheduled day or time. 1 Type the printer IP address into the address field of the following...: • Off • Always On • Manual • Scheduled 8 If you hold received faxes from printing until they are released. Holding and forwarding faxes Holding...
... Click Fax Holding Schedule. Use Photo mode when faxing photos printed on a laser printer or taken from the original document is not a concern. • ...mode when faxing an original document that contain only text or fine line art. Held faxes can be released manually or at a scheduled day or time. 1 Type the printer IP address into the address field of the following...: • Off • Always On • Manual • Scheduled 8 If you hold received faxes from printing until they are released. Holding and forwarding faxes Holding...

User Manual
Page 151
... the size detected by the hardware appears. • Use this menu. Paper menu Default Source menu Menu item Default Source Tray MP Feeder Envelope Feeder Manual Paper Manual Env Description Sets a default paper source for all print jobs Notes: • Tray 1 (standard tray) is the factory default setting. • Only an installed...
... the size detected by the hardware appears. • Use this menu. Paper menu Default Source menu Menu item Default Source Tray MP Feeder Envelope Feeder Manual Paper Manual Env Description Sets a default paper source for all print jobs Notes: • Tray 1 (standard tray) is the factory default setting. • Only an installed...

User Manual
Page 154
... 9 Envelope 10 Envelope DL Envelope Other Envelope Specifies the size of the paper being manually loaded Note: A4 is turned off. Manual Envelope Type Envelope Rough Envelope Custom Type Specifies the type of paper being manually loaded Note: Envelope is the factory default setting. 1 Appears only if Tray Size ...Sensing is the international factory default setting. Manual Paper Type Plain Paper Card Stock Transparency Recycled Labels Vinyl Labels Bond Letterhead Preprinted Colored Paper Light Paper Heavy Paper Rough...
... 9 Envelope 10 Envelope DL Envelope Other Envelope Specifies the size of the paper being manually loaded Note: A4 is turned off. Manual Envelope Type Envelope Rough Envelope Custom Type Specifies the type of paper being manually loaded Note: Envelope is the factory default setting. 1 Appears only if Tray Size ...Sensing is the international factory default setting. Manual Paper Type Plain Paper Card Stock Transparency Recycled Labels Vinyl Labels Bond Letterhead Preprinted Colored Paper Light Paper Heavy Paper Rough...

User Manual
Page 155
...printer menus 155 Envelope Enhance The envelope conditioner significantly reduces the wrinkling of some envelopes. Configure MP menu Menu item Configure MP Cassette Manual First Description Determines when the printer selects paper from the multipurpose feeder Notes: • Cassette is the factory default setting. &#...8226; The Cassette setting configures the multipurpose feeder as an automatic paper source. • When Manual is selected, the multipurpose feeder can be used only for manual feed print jobs. • If paper is loaded in the multipurpose feeder and First is selected, ...
...printer menus 155 Envelope Enhance The envelope conditioner significantly reduces the wrinkling of some envelopes. Configure MP menu Menu item Configure MP Cassette Manual First Description Determines when the printer selects paper from the multipurpose feeder Notes: • Cassette is the factory default setting. &#...8226; The Cassette setting configures the multipurpose feeder as an automatic paper source. • When Manual is selected, the multipurpose feeder can be used only for manual feed print jobs. • If paper is loaded in the multipurpose feeder and First is selected, ...

User Manual
Page 169
... support BOOTP and RARP. Lets you view or change the current TCP/IP Netmask Lets you view or change the current TCP/IP Address Note: Manually setting the IP address sets the Enable DHCP and Enable Auto IP settings to Off. It also sets Enable BOOTP and Enable RARP to print...
... support BOOTP and RARP. Lets you view or change the current TCP/IP Netmask Lets you view or change the current TCP/IP Address Note: Manually setting the IP address sets the Enable DHCP and Enable Auto IP settings to Off. It also sets Enable BOOTP and Enable RARP to print...

User Manual
Page 182
... only if a formatted, non-defective printer hard disk is installed. • "Do not start now Automatic Method Single pass Multiple pass Manual Method Single pass Multiple pass Description Disk Wiping erases only print job data that is the default setting. • Highly confidential information should be... wiped using the Multiple pass method only. Both manual and scheduled wiping allow the file system to reuse marked disk space without first having to hold data from the printer hard disk....
... only if a formatted, non-defective printer hard disk is installed. • "Do not start now Automatic Method Single pass Multiple pass Manual Method Single pass Multiple pass Description Disk Wiping erases only print job data that is the default setting. • Highly confidential information should be... wiped using the Multiple pass method only. Both manual and scheduled wiping allow the file system to reuse marked disk space without first having to hold data from the printer hard disk....

User Manual
Page 183
... logs are deleted Note: Delete Now is the factory default setting. All permanent data on the printer hard disk is the factory default setting. Both manual and scheduled wiping allow the file system to reuse marked disk space without first having to the printer. • From the Embedded Web Server, the...
... logs are deleted Note: Delete Now is the factory default setting. All permanent data on the printer hard disk is the factory default setting. Both manual and scheduled wiping allow the file system to reuse marked disk space without first having to the printer. • From the Embedded Web Server, the...


