User's Guide
Page 11
... Cartridge Error (1102, 1203, 1204, or 120F 192 Black Ink Low / Color Ink Low / Photo Ink Low 192 Clear Carrier Jam ...192 Cover Open ...193 Error 1104...193 Left Cartridge Error / Right Cartridge Error 193 Left Cartridge Incorrect / Right Cartridge Incorrect 193 Left Cartridge Missing / Right Cartridge ...not detect a proof sheet ...195 No proof sheet information ...195 No valid photo image files detected...195 Only one photo enhancement may be chosen at a time 195 Only one photo/size selection can be chosen at a time 195 Paper/Photo Size Error...195 PictBridge communications error...196 ...
... Cartridge Error (1102, 1203, 1204, or 120F 192 Black Ink Low / Color Ink Low / Photo Ink Low 192 Clear Carrier Jam ...192 Cover Open ...193 Error 1104...193 Left Cartridge Error / Right Cartridge Error 193 Left Cartridge Incorrect / Right Cartridge Incorrect 193 Left Cartridge Missing / Right Cartridge ...not detect a proof sheet ...195 No proof sheet information ...195 No valid photo image files detected...195 Only one photo enhancement may be chosen at a time 195 Only one photo/size selection can be chosen at a time 195 Paper/Photo Size Error...195 PictBridge communications error...196 ...
User's Guide
Page 64
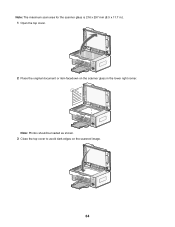
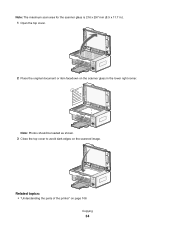
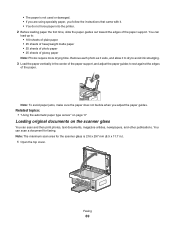
Note: Photos should be loaded as shown. 3 Close the top cover to avoid dark edges on the scanner glass in .). 1 Open the top cover. 2 Place the original document or item facedown on the scanned image. 64 Note: The maximum scan area for the scanner glass is 216 x 297 mm (8.5 x 11.7 in the lower right corner.
Note: Photos should be loaded as shown. 3 Close the top cover to avoid dark edges on the scanner glass in .). 1 Open the top cover. 2 Place the original document or item facedown on the scanned image. 64 Note: The maximum scan area for the scanner glass is 216 x 297 mm (8.5 x 11.7 in the lower right corner.
User's Guide
Page 111
...• Click Auto-crop the scanned item to use the slider to select your cropped value. • Click Select area to be sent. 5 Click Open to select a file. 6 From Work with Documents and Photos, select the file that you want to add. 7 Click E-mail to create an e-...mail message with your default e-mail application. 1 Load an original document facedown on the scanner glass, and close the top cover. 3 Click E-mail. 4 Click Start. Scanning documents or images for e-mailing You can e-mail attached scanned images using your scanned image(s) attached. The thumbnail...
...• Click Auto-crop the scanned item to use the slider to select your cropped value. • Click Select area to be sent. 5 Click Open to select a file. 6 From Work with Documents and Photos, select the file that you want to add. 7 Click E-mail to create an e-...mail message with your default e-mail application. 1 Load an original document facedown on the scanner glass, and close the top cover. 3 Click E-mail. 4 Click Start. Scanning documents or images for e-mailing You can e-mail attached scanned images using your scanned image(s) attached. The thumbnail...
User's Guide
Page 126
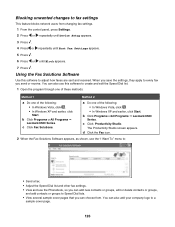
...received. Using the Fax Solutions Software Use this software to Speed Dial lists. • View several sample cover pages that you send or receive. b Click Programs orAll Programs Œ Lexmark 6500 Series. c Click Productivity Studio. The Productivity Studio screen appears. You can also add your company ..., edit or delete contacts or groups, and add contacts or groups to create and edit the Speed Dial list. 1 Open the program through one of these methods: Method 1 a Do one of the following : • In Windows Vista, click . • In Windows XP and earlier, click Start. ...
...received. Using the Fax Solutions Software Use this software to Speed Dial lists. • View several sample cover pages that you send or receive. b Click Programs orAll Programs Œ Lexmark 6500 Series. c Click Productivity Studio. The Productivity Studio screen appears. You can also add your company ..., edit or delete contacts or groups, and add contacts or groups to create and edit the Speed Dial list. 1 Open the program through one of these methods: Method 1 a Do one of the following : • In Windows Vista, click . • In Windows XP and earlier, click Start. ...
User's Guide
Page 193
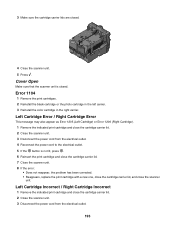
...the indicated print cartridge and close the cartridge carrier lid. 2 Close the scanner unit. 3 Disconnect the power cord from the electrical outlet. 193 Cover Open Make sure that the scanner unit is not lit, press . 6 Reinsert the print cartridge and close the cartridge carrier lid. 7 Close the ... unit. 8 If the error: • Does not reappear, the problem has been corrected. • Reappears, replace the print cartridge with a new one, close the cartridge carrier lid, and close the cartridge carrier lid. 2 Close the scanner unit. 3 Disconnect the power cord from the electrical outlet. ...
...the indicated print cartridge and close the cartridge carrier lid. 2 Close the scanner unit. 3 Disconnect the power cord from the electrical outlet. 193 Cover Open Make sure that the scanner unit is not lit, press . 6 Reinsert the print cartridge and close the cartridge carrier lid. 7 Close the ... unit. 8 If the error: • Does not reappear, the problem has been corrected. • Reappears, replace the print cartridge with a new one, close the cartridge carrier lid, and close the cartridge carrier lid. 2 Close the scanner unit. 3 Disconnect the power cord from the electrical outlet. ...
User's Guide
Page 215
...86 changing temporary files preferences 86 changing transfer settings 87 changing wireless settings after installation 149 characters on printout are missing or unexpected 159 check printer ports (Windows) 153 checking external devices 167 checking printer readiness 164 checking your network name (Windows) 151 cleaning exterior... photos 100 reducing an image 104 repeating an image 103 could not detect a proof sheet 195 cover open 193 creating and viewing slideshow 97 creating fax cover page using the Fax Setup Utility 120 using the Productivity Studio 125 cropping photo 87 customizing settings ...
...86 changing temporary files preferences 86 changing transfer settings 87 changing wireless settings after installation 149 characters on printout are missing or unexpected 159 check printer ports (Windows) 153 checking external devices 167 checking printer readiness 164 checking your network name (Windows) 151 cleaning exterior... photos 100 reducing an image 104 repeating an image 103 could not detect a proof sheet 195 cover open 193 creating and viewing slideshow 97 creating fax cover page using the Fax Setup Utility 120 using the Productivity Studio 125 cropping photo 87 customizing settings ...
User's Guide
Page 216
...size selection has been made 195 no proof sheet information 195 no valid photo image files detected 195 only one photo enhancement may be chosen at a time 195 only one photo/size selection can be chosen at a time 195 out of memory 198 out of paper 198 paper... troubleshooting cover open error 193 Exposure changing setting 90 EXT port 20 exterior of the printer cleaning 135 external devices checking 167 e-mail attaching a scanned image 111 attaching files 111 E-mail button 44 e-mail screen preferences changing 112 e-mailing an image 111 F factory default settings resetting internal wireless print ...
...size selection has been made 195 no proof sheet information 195 no valid photo image files detected 195 only one photo enhancement may be chosen at a time 195 only one photo/size selection can be chosen at a time 195 out of memory 198 out of paper 198 paper... troubleshooting cover open error 193 Exposure changing setting 90 EXT port 20 exterior of the printer cleaning 135 external devices checking 167 e-mail attaching a scanned image 111 attaching files 111 E-mail button 44 e-mail screen preferences changing 112 e-mailing an image 111 F factory default settings resetting internal wireless print ...
User's Guide
Page 221
...cartridge missing error 197 characters on printout are missing or unexpected 159 checking port setting 53 checking printer status 163 checking quality/speed settings 165 colors on paper do not match colors on the screen... error 192 clear carrier jam 192 color ink low 192 could not detect a proof sheet 195 cover open 193 error 1104 193 error 1205 193 error 1206 193 failed to connect 190 fax error 188 ...no proof sheet information 195 no valid photo image files detected 195 only one photo enhancement may be chosen at a time 195 only one photo/size selection can be chosen at a time 195 paper/photo ...
...cartridge missing error 197 characters on printout are missing or unexpected 159 checking port setting 53 checking printer status 163 checking quality/speed settings 165 colors on paper do not match colors on the screen... error 192 clear carrier jam 192 color ink low 192 could not detect a proof sheet 195 cover open 193 error 1104 193 error 1205 193 error 1206 193 failed to connect 190 fax error 188 ...no proof sheet information 195 no valid photo image files detected 195 only one photo enhancement may be chosen at a time 195 only one photo/size selection can be chosen at a time 195 paper/photo ...
User's Guide (Mac)
Page 24
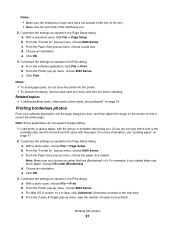
... copies to dry at least 24 hours before stacking, displaying, or storing. a With a photo open , choose File ΠPrint. For example, if you . 2 Customize the settings as needed in it covers the entire page. Note: To prevent smudging or scratching, avoid touching the printed surface with the ...zero, and then adjust the image on the screen so that has (Borderless) in the Print dialog. a With a document open, click File ΠPage Setup. b From the Printer pop-up menu, choose 6500 Series. Note: Some applications do not support margin setting. 1 Load photo or glossy paper, with...
... copies to dry at least 24 hours before stacking, displaying, or storing. a With a photo open , choose File ΠPrint. For example, if you . 2 Customize the settings as needed in it covers the entire page. Note: To prevent smudging or scratching, avoid touching the printed surface with the ...zero, and then adjust the image on the screen so that has (Borderless) in the Print dialog. a With a document open, click File ΠPage Setup. b From the Printer pop-up menu, choose 6500 Series. Note: Some applications do not support margin setting. 1 Load photo or glossy paper, with...
User's Guide (Mac)
Page 27
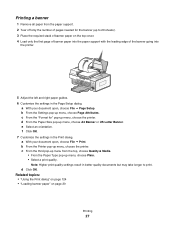
... support. 2 Tear off only the number of pages needed for " pop-up menu, choose the printer. Related topics: • "Using the Print dialog" on page 124 • "Loading banner paper" on the top cover. 4 Load only the first page of banner paper into the paper support with the leading edge of... may take longer to 20 sheets). 3 Place the required stack of the banner going into the printer. 5 Adjust the left and right paper guides. 6 Customize the settings in the Page Setup dialog. a With your document open , choose File Œ Print. d From the Paper Size pop-up menu, choose A4 Banner or...
... support. 2 Tear off only the number of pages needed for " pop-up menu, choose the printer. Related topics: • "Using the Print dialog" on page 124 • "Loading banner paper" on the top cover. 4 Load only the first page of banner paper into the paper support with the leading edge of... may take longer to 20 sheets). 3 Place the required stack of the banner going into the printer. 5 Adjust the left and right paper guides. 6 Customize the settings in the Page Setup dialog. a With your document open , choose File Œ Print. d From the Paper Size pop-up menu, choose A4 Banner or...
User's Guide (Mac)
Page 34
Note: Photos should be loaded as shown. 3 Close the top cover to avoid dark edges on the scanner glass in the lower right corner. Note: The maximum scan area for the scanner glass is 216 x 297 mm (8.5 x 11.7 in.). 1 Open the top cover. 2 Place the original document or item facedown on the scanned image. Related topics: • "Understanding the parts of the printer" on page 106 Copying 34
Note: Photos should be loaded as shown. 3 Close the top cover to avoid dark edges on the scanner glass in the lower right corner. Note: The maximum scan area for the scanner glass is 216 x 297 mm (8.5 x 11.7 in.). 1 Open the top cover. 2 Place the original document or item facedown on the scanned image. Related topics: • "Understanding the parts of the printer" on page 106 Copying 34

User's Guide (Mac)
Page 43
Scanning 43 Note: The maximum scan area for the scanner glass is 216 x 297 mm (8.5 x 11.7 in the lower right corner. You can scan and then print photos, text documents, magazine articles, newspapers, and other publications. Note: Photos should be loaded as shown. Scanning Getting started Loading original documents on the scanner glass in .). 1 Open the top cover. 2 Place the original document or item facedown on the scanner glass You can scan a document for faxing.
Scanning 43 Note: The maximum scan area for the scanner glass is 216 x 297 mm (8.5 x 11.7 in the lower right corner. You can scan and then print photos, text documents, magazine articles, newspapers, and other publications. Note: Photos should be loaded as shown. Scanning Getting started Loading original documents on the scanner glass in .). 1 Open the top cover. 2 Place the original document or item facedown on the scanner glass You can scan a document for faxing.
User's Guide (Mac)
Page 69
... paper does not buckle when you follow the instructions that came with it to dry to avoid ink smudging. 3 Load the paper vertically in .). 1 Open the top cover. Related topics: • "Using the automatic paper type sensor" on page 17 Loading original documents on the scanner glass You can scan a document for... using specialty paper, you adjust the paper guides. Remove each photo as it exits, and allow it . • You do not force paper into the printer. 2 Before loading paper the first time, slide the paper guides out toward the edges of the paper. You can load up to rest against the...
... paper does not buckle when you follow the instructions that came with it to dry to avoid ink smudging. 3 Load the paper vertically in .). 1 Open the top cover. Related topics: • "Using the automatic paper type sensor" on page 17 Loading original documents on the scanner glass You can scan a document for... using specialty paper, you adjust the paper guides. Remove each photo as it exits, and allow it . • You do not force paper into the printer. 2 Before loading paper the first time, slide the paper guides out toward the edges of the paper. You can load up to rest against the...
User's Guide (Mac)
Page 97
... choose an option that came with photos 97 Notes: • Make sure the thickness of each card as it exits, and let it covers the entire page. a With a photo open , click File Œ Page Setup. b From the "Format for " pop-up menu, choose a card size. Related topics: • "Loading ...the Print dialog. a From the software application, click File Œ Print. c From the Paper Size pop-up menu, choose 6500 Series. b From the Printer pop-up menu, choose the paper size loaded. c Click Print. d From the Copies & Pages pop-up menu, type the number of copies to the ...
... choose an option that came with photos 97 Notes: • Make sure the thickness of each card as it exits, and let it covers the entire page. a With a photo open , click File Œ Page Setup. b From the "Format for " pop-up menu, choose a card size. Related topics: • "Loading ...the Print dialog. a From the software application, click File Œ Print. c From the Paper Size pop-up menu, choose 6500 Series. b From the Printer pop-up menu, choose the paper size loaded. c Click Print. d From the Copies & Pages pop-up menu, type the number of copies to the ...

User's Guide (Mac)
Page 126
...After document Choose any of the current print settings. Reduce image blurring. Mirror Automatic Image Sharpening Lexmark 6500 Series Utility Troubleshooting Order Supplies Contact Lexmark Software Version Rotate Quartz Filter Summary To Choose Standard. Visit our Web site to the Utility... Unclassified Enter billing information. Choose a color setting. Open the Help Center. Understanding the printer 126 Specify the type of the photo. Choose a filtering option. View the software version on installed files. Cover Page Type Quality & Media Color Options Billing Info Paper...
...After document Choose any of the current print settings. Reduce image blurring. Mirror Automatic Image Sharpening Lexmark 6500 Series Utility Troubleshooting Order Supplies Contact Lexmark Software Version Rotate Quartz Filter Summary To Choose Standard. Visit our Web site to the Utility... Unclassified Enter billing information. Choose a color setting. Open the Help Center. Understanding the printer 126 Specify the type of the photo. Choose a filtering option. View the software version on installed files. Cover Page Type Quality & Media Color Options Billing Info Paper...


