User's Guide
Page 7
... Setup Utility 120 Understanding the Fax menu ...123 Setting Auto Answer to on ...124 Setting up a fax footer using the control panel 124 Creating a fax cover page using the Productivity Studio 125 Blocking junk faxes...125 Blocking unwanted changes to fax settings 126 Using the Fax Solutions Software ...126 Setting up...
... Setup Utility 120 Understanding the Fax menu ...123 Setting Auto Answer to on ...124 Setting up a fax footer using the control panel 124 Creating a fax cover page using the Productivity Studio 125 Blocking junk faxes...125 Blocking unwanted changes to fax settings 126 Using the Fax Solutions Software ...126 Setting up...
User's Guide
Page 11
...191 Cartridge Error (1102, 1203, 1204, or 120F 192 Black Ink Low / Color Ink Low / Photo Ink Low 192 Clear Carrier Jam ...192 Cover Open ...193 Error 1104...193 Left Cartridge Error / Right Cartridge Error 193 Left Cartridge Incorrect / Right Cartridge Incorrect 193 Left Cartridge Missing / Right ... not detect a proof sheet ...195 No proof sheet information ...195 No valid photo image files detected...195 Only one photo enhancement may be chosen at a time 195 Only one photo/size selection can be chosen at a time 195 Paper/Photo Size Error...195 PictBridge communications error...196 Please...
...191 Cartridge Error (1102, 1203, 1204, or 120F 192 Black Ink Low / Color Ink Low / Photo Ink Low 192 Clear Carrier Jam ...192 Cover Open ...193 Error 1104...193 Left Cartridge Error / Right Cartridge Error 193 Left Cartridge Incorrect / Right Cartridge Incorrect 193 Left Cartridge Missing / Right ... not detect a proof sheet ...195 No proof sheet information ...195 No valid photo image files detected...195 Only one photo enhancement may be chosen at a time 195 Only one photo/size selection can be chosen at a time 195 Paper/Photo Size Error...195 PictBridge communications error...196 Please...
User's Guide
Page 19
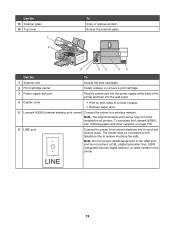
...), or cable modem to a wireless network. LINE 19 Access the scanner glass. Note: The internal wireless print server may not come installed on both sides of a sheet of paper. • Remove paper jams. 5 Lexmark N2050 (internal wireless print server) Connect the printer to the printer. Use the 13 Scanner glass 14 Top cover 1 2 To Copy or remove...
...), or cable modem to a wireless network. LINE 19 Access the scanner glass. Note: The internal wireless print server may not come installed on both sides of a sheet of paper. • Remove paper jams. 5 Lexmark N2050 (internal wireless print server) Connect the printer to the printer. Use the 13 Scanner glass 14 Top cover 1 2 To Copy or remove...
User's Guide
Page 47
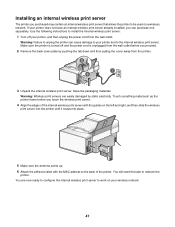
...: Failure to unplug the printer can purchase one separately. Use the following instructions to be used on your printer, and then unplug the power cord from the printer. 2 1 3 3 Unpack the internal wireless print server. Save the packaging materials. You are easily damaged by pushing the tab down and then pulling the cover away from the wall...
...: Failure to unplug the printer can purchase one separately. Use the following instructions to be used on your printer, and then unplug the power cord from the printer. 2 1 3 3 Unpack the internal wireless print server. Save the packaging materials. You are easily damaged by pushing the tab down and then pulling the cover away from the wall...
User's Guide
Page 63
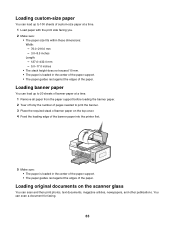
Loading original documents on the top cover. 4 Feed the leading edge of the banner paper into the printer first. 5 Make sure: • The paper is loaded in the center of the paper support. • The paper guides rest against the edges of the ...
Loading original documents on the top cover. 4 Feed the leading edge of the banner paper into the printer first. 5 Make sure: • The paper is loaded in the center of the paper support. • The paper guides rest against the edges of the ...
User's Guide
Page 64
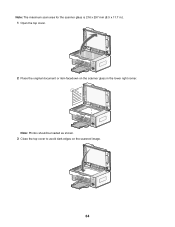
Note: Photos should be loaded as shown. 3 Close the top cover to avoid dark edges on the scanner glass in .). 1 Open the top cover. 2 Place the original document or item facedown on the scanned image. 64 Note: The maximum scan area for the scanner glass is 216 x 297 mm (8.5 x 11.7 in the lower right corner.
Note: Photos should be loaded as shown. 3 Close the top cover to avoid dark edges on the scanner glass in .). 1 Open the top cover. 2 Place the original document or item facedown on the scanned image. 64 Note: The maximum scan area for the scanner glass is 216 x 297 mm (8.5 x 11.7 in the lower right corner.
User's Guide
Page 110
... date for the photo, click the drop-down list, and select a date from magazines or newspapers. 1 Make sure the printer is connected to a computer, and both the printer and the computer are on the scanner glass. 3 From the desktop, double-click the Productivity Studio icon. 4 From the ... from magazines or newspapers Use the descreening feature to help remove wavy patterns from images scanned from the calendar. 12 Click Save. 2 Close the top cover. 3 From the desktop, double-click the Productivity Studio icon. 4 Click Scan. 5 Select the Photo or Several Photos option. 6 Click Start. ...
... date for the photo, click the drop-down list, and select a date from magazines or newspapers. 1 Make sure the printer is connected to a computer, and both the printer and the computer are on the scanner glass. 3 From the desktop, double-click the Productivity Studio icon. 4 From the ... from magazines or newspapers Use the descreening feature to help remove wavy patterns from images scanned from the calendar. 12 Click Save. 2 Close the top cover. 3 From the desktop, double-click the Productivity Studio icon. 4 Click Scan. 5 Select the Photo or Several Photos option. 6 Click Start. ...
User's Guide
Page 111
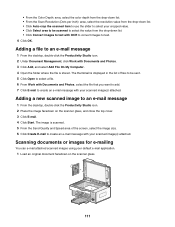
... e-mailing You can e-mail attached scanned images using your default e-mail application. 1 Load an original document facedown on the scanner glass, and close the top cover. 3 Click E-mail. 4 Click Start. The image is displayed in the list of the screen, select the image size. 6 Click Create E-mail to create an e-mail...
... e-mailing You can e-mail attached scanned images using your default e-mail application. 1 Load an original document facedown on the scanner glass, and close the top cover. 3 Click E-mail. 4 Click Start. The image is displayed in the list of the screen, select the image size. 6 Click Create E-mail to create an e-mail...
User's Guide
Page 114
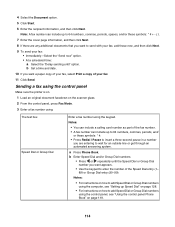
...number as part of the fax number. • A fax number can include up to 64 numbers, commas, periods, spaces, and/or these symbols 7 Enter the cover page information, and then click Next. 8 If there are entering to enter the number of your fax: • Immediately-Select the "Send now" option. •... answering system. b Set a time and date. 10 If you want to add Speed Dial or Group Dial numbers using the control panel Make sure the printer is on. 1 Load an original document facedown on page 119. 114 Sending a fax using the control panel, see "Setting up to 64 numbers, commas, ...
...number as part of the fax number. • A fax number can include up to 64 numbers, commas, periods, spaces, and/or these symbols 7 Enter the cover page information, and then click Next. 8 If there are entering to enter the number of your fax: • Immediately-Select the "Send now" option. •... answering system. b Set a time and date. 10 If you want to add Speed Dial or Group Dial numbers using the control panel Make sure the printer is on. 1 Load an original document facedown on page 119. 114 Sending a fax using the control panel, see "Setting up to 64 numbers, commas, ...
User's Guide
Page 122
... a calling card number as needed. Create, add to use. • Enter a dialing prefix. • Select a dialing volume. • Enter your fax cover page and message. 5 Click OK after you finish customizing the settings. 6 Close the Fax Setup Utility. 122 Enter a maximum of 64 digits in a fax ...of the fax number. - Choose and customize your name and fax number. Tab Dialing and Sending Ringing and Answering Fax Printing / Reports Speed Dial Cover Page Options • Select the telephone line format you want to forward a fax, or print it and then forward it. • Enter ...
... a calling card number as needed. Create, add to use. • Enter a dialing prefix. • Select a dialing volume. • Enter your fax cover page and message. 5 Click OK after you finish customizing the settings. 6 Close the Fax Setup Utility. 122 Enter a maximum of 64 digits in a fax ...of the fax number. - Choose and customize your name and fax number. Tab Dialing and Sending Ringing and Answering Fax Printing / Reports Speed Dial Cover Page Options • Select the telephone line format you want to forward a fax, or print it and then forward it. • Enter ...
User's Guide
Page 125
...Ringing and Answering tab. 5 From the "Block Faxes from particular senders/numbers" area, select Manage Blocked Faxes. 6 If you want to save your printer, you have not entered this list. 8 Click OK to block faxes from senders missing a valid Caller ID, select the check box, and enable...10 Press . 11 During the initial setup of your selection. b Press . f Press . l Press to enter the date and time. Creating a fax cover page using the Productivity Studio 1 From the desktop, double-click the Productivity Studio icon. 2 From the Settings area of the Welcome Screen, click Fax History...
...Ringing and Answering tab. 5 From the "Block Faxes from particular senders/numbers" area, select Manage Blocked Faxes. 6 If you want to save your printer, you have not entered this list. 8 Click OK to block faxes from senders missing a valid Caller ID, select the check box, and enable...10 Press . 11 During the initial setup of your selection. b Press . f Press . l Press to enter the date and time. Creating a fax cover page using the Productivity Studio 1 From the desktop, double-click the Productivity Studio icon. 2 From the Settings area of the Welcome Screen, click Fax History...
User's Guide
Page 126
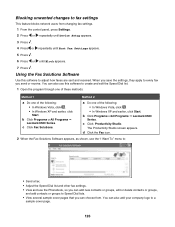
.... 126 Using the Fax Solutions Software Use this software to Speed Dial lists. • View several sample cover pages that you send or receive. When you save the settings, they apply to every fax you can add new contacts ... Start. c Click Fax Solutions. Method 2 a Do one of the following : • In Windows Vista, click . • In Windows XP and earlier, click Start. c Click Productivity Studio. b Click Programs orAll Programs Œ Lexmark 6500 Series. b Click Programs orAll Programs Œ Lexmark 6500 Series. The Productivity Studio screen appears. d Click the...
.... 126 Using the Fax Solutions Software Use this software to Speed Dial lists. • View several sample cover pages that you send or receive. When you save the settings, they apply to every fax you can add new contacts ... Start. c Click Fax Solutions. Method 2 a Do one of the following : • In Windows Vista, click . • In Windows XP and earlier, click Start. c Click Productivity Studio. b Click Programs orAll Programs Œ Lexmark 6500 Series. b Click Programs orAll Programs Œ Lexmark 6500 Series. The Productivity Studio screen appears. d Click the...

User's Guide
Page 127
Tools • Access and use the Phonebook. • View several sample cover pages you can add a prefix to the beginning of each telephone number. 6 Click OK to save the setting. For information on changing fax settings, see ".... • View, print, or modify a fax. • Delete a fax. • Retry to send a fax. The prefix can include up a dialing prefix You can program your printer to a single telephone line. 3 To access any of the items in the Welcome Screen, click Fax History and Settings. 3 From the "I Want To" menu, click...
Tools • Access and use the Phonebook. • View several sample cover pages you can add a prefix to the beginning of each telephone number. 6 Click OK to save the setting. For information on changing fax settings, see ".... • View, print, or modify a fax. • Delete a fax. • Retry to send a fax. The prefix can include up a dialing prefix You can program your printer to a single telephone line. 3 To access any of the items in the Welcome Screen, click Fax History and Settings. 3 From the "I Want To" menu, click...
User's Guide
Page 132
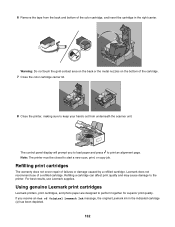
.... Refilling print cartridges The warranty does not cover repair of the color cartridge, and insert the cartridge in the indicated cartridge (s) has been depleted. 132 For best results, use of Original Lexmark Ink message, the original Lexmark ink in the right carrier. Using genuine Lexmark print cartridges Lexmark printers, print cartridges, and photo paper are designed...
.... Refilling print cartridges The warranty does not cover repair of the color cartridge, and insert the cartridge in the indicated cartridge (s) has been depleted. 132 For best results, use of Original Lexmark Ink message, the original Lexmark ink in the right carrier. Using genuine Lexmark print cartridges Lexmark printers, print cartridges, and photo paper are designed...

User's Guide
Page 133
...select the check box, and click Close. • If you are using the printer without a computer, press Cancel. Wiping the print cartridge nozzles and contacts 1 Remove the print cartridges. 2 Dampen a clean, lint-free cloth with new Lexmark print cartridge(s). • If you are printing from a computer, click Learn ... up to improve print quality, print your cartridge(s) with water, and place the cloth on the message. 2 Click Report a non-Lexmark print cartridge. If print quality has not improved, clean the print cartridge nozzles. If you believe you purchased a new, genuine...
...select the check box, and click Close. • If you are using the printer without a computer, press Cancel. Wiping the print cartridge nozzles and contacts 1 Remove the print cartridges. 2 Dampen a clean, lint-free cloth with new Lexmark print cartridge(s). • If you are printing from a computer, click Learn ... up to improve print quality, print your cartridge(s) with water, and place the cloth on the message. 2 Click Report a non-Lexmark print cartridge. If print quality has not improved, clean the print cartridge nozzles. If you believe you purchased a new, genuine...
User's Guide
Page 193
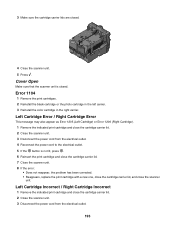
...lid. 2 Close the scanner unit. 3 Disconnect the power cord from the electrical outlet. 193 3 Make sure the cartridge carrier lids are closed . Cover Open Make sure that the scanner unit is not lit, press . 6 Reinsert the print cartridge and close the cartridge carrier lid. 7 Close the... scanner unit. 8 If the error: • Does not reappear, the problem has been corrected. • Reappears, replace the print cartridge with a new one, close the cartridge carrier lid, and close the cartridge carrier lid. 2 Close the scanner unit. 3 Disconnect the power cord from the electrical outlet. 4 ...
...lid. 2 Close the scanner unit. 3 Disconnect the power cord from the electrical outlet. 193 3 Make sure the cartridge carrier lids are closed . Cover Open Make sure that the scanner unit is not lit, press . 6 Reinsert the print cartridge and close the cartridge carrier lid. 7 Close the... scanner unit. 8 If the error: • Does not reappear, the problem has been corrected. • Reappears, replace the print cartridge with a new one, close the cartridge carrier lid, and close the cartridge carrier lid. 2 Close the scanner unit. 3 Disconnect the power cord from the electrical outlet. 4 ...
User's Guide
Page 208
...available to the Remarketer or the designated location. You are provided in each mode's energy usage. For products no longer covered by a Lexmark warranty, technical support may be required to calculate energy usage. You should be available for this statement to the United States.... Since power consumption claims are responsible for resale, from new parts, or new and serviceable used with your area, contact Lexmark at Lexmark's option). Statement of Watts, the power consumption should transfer proof of failures caused by: -Modification or attachments -Accidents or ...
...available to the Remarketer or the designated location. You are provided in each mode's energy usage. For products no longer covered by a Lexmark warranty, technical support may be required to calculate energy usage. You should be available for this statement to the United States.... Since power consumption claims are responsible for resale, from new parts, or new and serviceable used with your area, contact Lexmark at Lexmark's option). Statement of Watts, the power consumption should transfer proof of failures caused by: -Modification or attachments -Accidents or ...
User's Guide
Page 211
...applicable export laws or (b) permit the Software Program to enter into this License Agreement, any other subject matter covered by you and Lexmark relating to your agreement to these License Agreement terms and conditions and that is as set forth in this ...including any taxes including, without limitation, nuclear, chemical, or biological weapons proliferation. 17 AGREEMENT TO CONTRACT ELECTRONICALLY. IN NO EVENT WILL LEXMARK, ITS SUPPLIERS, SUBSIDIARIES, OR RESELLERS BE LIABLE FOR ANY SPECIAL, INCIDENTAL, INDIRECT, EXEMPLARY, PUNITIVE, OR CONSEQUENTIAL DAMAGES (INCLUDING BUT NOT...
...applicable export laws or (b) permit the Software Program to enter into this License Agreement, any other subject matter covered by you and Lexmark relating to your agreement to these License Agreement terms and conditions and that is as set forth in this ...including any taxes including, without limitation, nuclear, chemical, or biological weapons proliferation. 17 AGREEMENT TO CONTRACT ELECTRONICALLY. IN NO EVENT WILL LEXMARK, ITS SUPPLIERS, SUBSIDIARIES, OR RESELLERS BE LIABLE FOR ANY SPECIAL, INCIDENTAL, INDIRECT, EXEMPLARY, PUNITIVE, OR CONSEQUENTIAL DAMAGES (INCLUDING BUT NOT...
User's Guide
Page 215
... changing temporary files preferences 86 changing transfer settings 87 changing wireless settings after installation 149 characters on printout are missing or unexpected 159 check printer ports (Windows) 153 checking external devices 167 checking printer readiness 164 checking your network name (Windows) 151 cleaning... images for editing 106 scanning text for editing 106 scanning using the computer 105 scanning using the control panel 105 duplex cover 19 duplexing automatically 75 manually 76 understanding 75 duplexing copies 99 E editing document text (OCR) 106 scanned images 106 emission...
... changing temporary files preferences 86 changing transfer settings 87 changing wireless settings after installation 149 characters on printout are missing or unexpected 159 check printer ports (Windows) 153 checking external devices 167 checking printer readiness 164 checking your network name (Windows) 151 cleaning... images for editing 106 scanning text for editing 106 scanning using the computer 105 scanning using the control panel 105 duplex cover 19 duplexing automatically 75 manually 76 understanding 75 duplexing copies 99 E editing document text (OCR) 106 scanned images 106 emission...
User's Guide
Page 216
...information 195 no valid photo image files detected 195 only one photo enhancement may be chosen at a time 195 only one photo/size selection can be chosen at a time ... preferences changing 112 e-mailing an image 111 F factory default settings resetting internal wireless print server 149 resetting printer software 77 factory default settings, resetting to 172 faded colors 160 failed to ... 128 Auto Answer 124 blocking unwanted faxes 125 changing settings 123 choosing a fax connection 30 cover page, creating using Productivity Studio 125 customizing settings 123 entering a fax number 113 sending a...
...information 195 no valid photo image files detected 195 only one photo enhancement may be chosen at a time 195 only one photo/size selection can be chosen at a time ... preferences changing 112 e-mailing an image 111 F factory default settings resetting internal wireless print server 149 resetting printer software 77 factory default settings, resetting to 172 faded colors 160 failed to ... 128 Auto Answer 124 blocking unwanted faxes 125 changing settings 123 choosing a fax connection 30 cover page, creating using Productivity Studio 125 customizing settings 123 entering a fax number 113 sending a...

