User's Guide
Page 3
... system notice...16 Wireless network compatibility...16 Setting up the printer 17 Checking the box contents...17 Understanding the parts of the printer 18 Standalone setup...20 Installing the printer on additional network computers 25 Setting up the printer on a Windows operating system 26 Getting the printer ready to fax...27...
... system notice...16 Wireless network compatibility...16 Setting up the printer 17 Checking the box contents...17 Understanding the parts of the printer 18 Standalone setup...20 Installing the printer on additional network computers 25 Setting up the printer on a Windows operating system 26 Getting the printer ready to fax...27...
User's Guide
Page 4
What information do I need and where do I find it 51 Finding the MAC address ...51 Printing a network setup page ...52 Finding a printer/print server located on remote subnets 52 Direct IP printing ...52 Checking the port setting...53 Wireless networking...53 Using a... network...55 Sharing the printer on a network ...55 Configure network printers ...56 Types of wireless networks ...56 Tips for using network adapters ...57 Advanced wireless setup...57 Creating an ad hoc wireless network using Windows 57 Adding a printer to an existing ad hoc wireless network using Windows 59 Loading paper and...
What information do I need and where do I find it 51 Finding the MAC address ...51 Printing a network setup page ...52 Finding a printer/print server located on remote subnets 52 Direct IP printing ...52 Checking the port setting...53 Wireless networking...53 Using a... network...55 Sharing the printer on a network ...55 Configure network printers ...56 Types of wireless networks ...56 Tips for using network adapters ...57 Advanced wireless setup...57 Creating an ad hoc wireless network using Windows 57 Adding a printer to an existing ad hoc wireless network using Windows 59 Loading paper and...
User's Guide
Page 7
... Phone Book...119 Using the control panel Phone Book ...119 Using the computer Phone Book...120 Customizing fax settings...120 Customizing settings using the Fax Setup Utility 120 Understanding the Fax menu ...123 Setting Auto Answer to on ...124 Setting up a fax footer using the control panel 124 Creating a fax cover...
... Phone Book...119 Using the control panel Phone Book ...119 Using the computer Phone Book...120 Customizing fax settings...120 Customizing settings using the Fax Setup Utility 120 Understanding the Fax menu ...123 Setting Auto Answer to on ...124 Setting up a fax footer using the control panel 124 Creating a fax cover...
User's Guide
Page 8
...129 Maintaining the printer 130 Removing a used print cartridge...130 Installing print cartridges...130 Refilling print cartridges...132 Using genuine Lexmark print cartridges 132 Aligning print cartridges...133 Cleaning the print cartridge nozzles 133 Wiping the print cartridge nozzles and contacts ...the exterior of the printer 135 Ordering supplies...135 Ordering print cartridges...135 Ordering paper and other supplies ...136 Troubleshooting...137 Setup Troubleshooting...137 Incorrect language appears on the display 137 Power button is not lit ...138 Software does not install ...138 Page...
...129 Maintaining the printer 130 Removing a used print cartridge...130 Installing print cartridges...130 Refilling print cartridges...132 Using genuine Lexmark print cartridges 132 Aligning print cartridges...133 Cleaning the print cartridge nozzles 133 Wiping the print cartridge nozzles and contacts ...the exterior of the printer 135 Ordering supplies...135 Ordering print cartridges...135 Ordering paper and other supplies ...136 Troubleshooting...137 Setup Troubleshooting...137 Incorrect language appears on the display 137 Power button is not lit ...138 Software does not install ...138 Page...
User's Guide
Page 9
Ping the access point ...152 Ping the printer ...152 Run the Wireless Setup Utility (Windows users only 153 Check printer ports (Windows users only 153 Print troubleshooting...154 Partial 4 x 6 in. (10 x 15 cm) photo prints when using a PictBridge-... seem to go down too quickly ...159 A blank or incorrect page prints...159 Characters on printout are missing or unexpected 159 Colors on printout are faded or differ from colors on the screen 160 Glossy photo paper or transparencies stick together 160 Page prints with different fonts ...160 Print is too dark...
Ping the access point ...152 Ping the printer ...152 Run the Wireless Setup Utility (Windows users only 153 Check printer ports (Windows users only 153 Print troubleshooting...154 Partial 4 x 6 in. (10 x 15 cm) photo prints when using a PictBridge-... seem to go down too quickly ...159 A blank or incorrect page prints...159 Characters on printout are missing or unexpected 159 Colors on printout are faded or differ from colors on the screen 160 Glossy photo paper or transparencies stick together 160 Page prints with different fonts ...160 Print is too dark...
User's Guide
Page 13
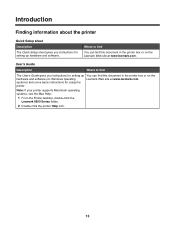
...Finding information about the printer Quick Setup sheet Description The Quick Setup sheet gives you instructions for setting up hardware and software. Note: If your printer supports Macintosh operating systems, see the Mac Help: 1 From the Finder desktop, double-click the Lexmark 6500 Series folder. 2 Double-click...gives you instructions for using the printer. Where to find this document in the printer box or on Windows operating Lexmark Web site at www.lexmark.com. User's Guide Description Where to find You can find this document in the printer box or on the ...
...Finding information about the printer Quick Setup sheet Description The Quick Setup sheet gives you instructions for setting up hardware and software. Note: If your printer supports Macintosh operating systems, see the Mac Help: 1 From the Finder desktop, double-click the Lexmark 6500 Series folder. 2 Double-click...gives you instructions for using the printer. Where to find this document in the printer box or on Windows operating Lexmark Web site at www.lexmark.com. User's Guide Description Where to find You can find this document in the printer box or on the ...
User's Guide
Page 14
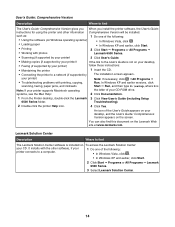
...information Comprehensive Version will be installed. systems, see the Mac Help: 2 Click Documentation. 1 From the Finder desktop, double-click the Lexmark 3 Click View User's Guide (including Setup 6500 Series folder. such as: 1 Do one of the following : • In Windows Vista, click . • In Windows... paper jams, and misfeeds Start Œ Run, and then type D:\setup, where D is included on the Lexmark Web site at www.lexmark.com. An icon of your CD. You can also find The Lexmark Solution Center software is Note: If your printer supports Macintosh operating the letter...
...information Comprehensive Version will be installed. systems, see the Mac Help: 2 Click Documentation. 1 From the Finder desktop, double-click the Lexmark 3 Click View User's Guide (including Setup 6500 Series folder. such as: 1 Do one of the following : • In Windows Vista, click . • In Windows... paper jams, and misfeeds Start Œ Run, and then type D:\setup, where D is included on the Lexmark Web site at www.lexmark.com. An icon of your CD. You can also find The Lexmark Solution Center software is Note: If your printer supports Macintosh operating the letter...
User's Guide
Page 17
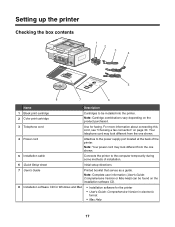
...the printer. Setting up the printer Checking the box contents 1 2 3 4 1 2 3 5 8 7 6 Name Description 1 Black print cartridge 2 Color print cartridge Cartridges to be found on the installation software CD. 8 Installation software CD for Windows and Mac • Installation software for faxing. Your telephone...from the one shown. 4 Power cord Attaches to the power supply port located at the back of installation. 6 Quick Setup sheet Initial setup directions 7 User's Guide Printed booklet that serves as a guide. Note: Cartridge combinations vary depending on page 30. ...
...the printer. Setting up the printer Checking the box contents 1 2 3 4 1 2 3 5 8 7 6 Name Description 1 Black print cartridge 2 Color print cartridge Cartridges to be found on the installation software CD. 8 Installation software CD for Windows and Mac • Installation software for faxing. Your telephone...from the one shown. 4 Power cord Attaches to the power supply port located at the back of installation. 6 Quick Setup sheet Initial setup directions 7 User's Guide Printed booklet that serves as a guide. Note: Cartridge combinations vary depending on page 30. ...
User's Guide
Page 20
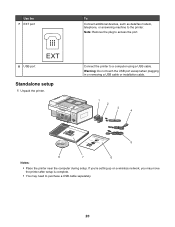
... except when plugging in or removing a USB cable or installation cable. 1 2 3 4 1 2 3 5 8 7 6 Notes: • Place the printer near the computer during setup. Note: Remove the plug to the printer. Connect the printer to purchase a USB cable separately. 20 If you're setting up on a wireless network, you... may move the printer after setup is complete. • You may need to a computer using a USB cable. Use the 7 EXT port 8 USB port EXT Standalone setup 1 Unpack the printer.
... except when plugging in or removing a USB cable or installation cable. 1 2 3 4 1 2 3 5 8 7 6 Notes: • Place the printer near the computer during setup. Note: Remove the plug to the printer. Connect the printer to purchase a USB cable separately. 20 If you're setting up on a wireless network, you... may move the printer after setup is complete. • You may need to a computer using a USB cable. Use the 7 EXT port 8 USB port EXT Standalone setup 1 Unpack the printer.

User's Guide
Page 26
...communicate with your CD-ROM drive. 3 Follow the instructions on , and then insert the CD for the install screen to work properly. Lexmark XXXX Series Installation Welcome... Wait several seconds for Windows. This is trying to communicate. Click Install to set up the printer on a Windows... operating system 1 Before you that Lexmark software is necessary for the printer to appear. Note: If the install screen does not appear automatically, click Start ΠRun, and ...
...communicate with your CD-ROM drive. 3 Follow the instructions on , and then insert the CD for the install screen to work properly. Lexmark XXXX Series Installation Welcome... Wait several seconds for Windows. This is trying to communicate. Click Install to set up the printer on a Windows... operating system 1 Before you that Lexmark software is necessary for the printer to appear. Note: If the install screen does not appear automatically, click Start ΠRun, and ...
User's Guide
Page 30
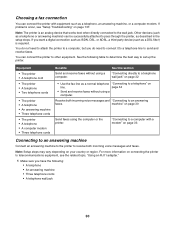
... Send and receive faxes without using a computer. machine" on page 137. For more information on connecting the printer to telecommunications equipment, see "Setup Troubleshooting" on page 30 Send faxes using a computer. If you want a digital connection such as ISDN, DSL, or ADSL, a third-party... answering machine, or a computer modem. Receive both incoming voice messages and faxes. Note: Setup steps may vary depending on page 32 • Use the fax line as described in the setup steps. Choosing a fax connection You can connect the printer to send and receive faxes. ...
... Send and receive faxes without using a computer. machine" on page 137. For more information on connecting the printer to telecommunications equipment, see "Setup Troubleshooting" on page 30 Send faxes using a computer. If you want a digital connection such as ISDN, DSL, or ADSL, a third-party... answering machine, or a computer modem. Receive both incoming voice messages and faxes. Note: Setup steps may vary depending on page 32 • Use the fax line as described in the setup steps. Choosing a fax connection You can connect the printer to send and receive faxes. ...
User's Guide
Page 33
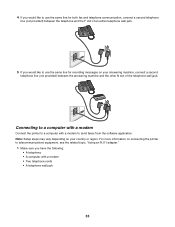
.... 5 If you have the following: • A telephone • A computer with a modem to a computer with a modem • Two telephone cords • A telephone wall jack 33 Note: Setup steps may vary depending on your country or region. Connecting to a computer with a modem Connect the printer to send faxes from the software application.
.... 5 If you have the following: • A telephone • A computer with a modem to a computer with a modem • Two telephone cords • A telephone wall jack 33 Note: Setup steps may vary depending on your country or region. Connecting to a computer with a modem Connect the printer to send faxes from the software application.

User's Guide
Page 35
Note: Setup steps may vary depending on connecting the printer to telecommunications equipment, see the related topic, "Using an RJ11 adapter." 1 Make sure you have the following: • A telephone • Two telephone cords • A telephone wall jack 2 Connect one telephone cord to the LINE port of the printer, and then plug it into an active telephone wall jack. 3 Remove the protective plug from the EXT port of the printer. 4 Connect the other telephone cord to a telephone, and then plug it into the EXT port of the printer. 35 For more information on your country or region.
Note: Setup steps may vary depending on connecting the printer to telecommunications equipment, see the related topic, "Using an RJ11 adapter." 1 Make sure you have the following: • A telephone • Two telephone cords • A telephone wall jack 2 Connect one telephone cord to the LINE port of the printer, and then plug it into an active telephone wall jack. 3 Remove the protective plug from the EXT port of the printer. 4 Connect the other telephone cord to a telephone, and then plug it into the EXT port of the printer. 35 For more information on your country or region.

User's Guide
Page 40
... change and save various printer settings. Note: When you perform maintenance functions and also change the timeout feature: 1 Press Settings. 2 Press or repeatedly until Device Setup appears. 3 Press . 4 Press or repeatedly until Clear Settings Timeout appears. 5 Press . 6 Press or repeatedly until Use Current appears. 7 Press . Understanding the Settings menu The Settings...
... change and save various printer settings. Note: When you perform maintenance functions and also change the timeout feature: 1 Press Settings. 2 Press or repeatedly until Device Setup appears. 3 Press . 4 Press or repeatedly until Clear Settings Timeout appears. 5 Press . 6 Press or repeatedly until Use Current appears. 7 Press . Understanding the Settings menu The Settings...

User's Guide
Page 41
...8226; Caller ID Pattern to the factory default settings. Pattern 2 (DTMF) For more information, see "Using Caller ID from one of the color cartridge. If phones in your country use two detection patterns, call your telecommunications company to change the language setting. • Country to set ..., resets to choose from the control panel" on the country or region you selected during initial setup. Select: • Language to change default settings. From here Maintenance Paper Setup Device Setup Defaults You can Select: • Ink Level to either On or Off. Press or to view...
...8226; Caller ID Pattern to the factory default settings. Pattern 2 (DTMF) For more information, see "Using Caller ID from one of the color cartridge. If phones in your country use two detection patterns, call your telecommunications company to change the language setting. • Country to set ..., resets to choose from the control panel" on the country or region you selected during initial setup. Select: • Language to change default settings. From here Maintenance Paper Setup Device Setup Defaults You can Select: • Ink Level to either On or Off. Press or to view...
User's Guide
Page 42
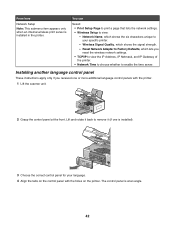
... your language. 4 Align the tabs on the printer. Reset Network Adapter to Factory Defaults, which shows the signal strength. - From here Network Setup Note: This submenu item appears only when an internal wireless print server is at the front. You can Select: • Print... Setup Page to print a page that lists the network settings. • Wireless Setup to enable the time server. Installing another language control panel These instructions apply only if you reset the wireless...
... your language. 4 Align the tabs on the printer. Reset Network Adapter to Factory Defaults, which shows the signal strength. - From here Network Setup Note: This submenu item appears only when an internal wireless print server is at the front. You can Select: • Print... Setup Page to print a page that lists the network settings. • Wireless Setup to enable the time server. Installing another language control panel These instructions apply only if you reset the wireless...

User's Guide
Page 45
... Do one of the following methods. Print projects such as photos, envelopes, cards, banners, iron-on the Solution Center icon. 2 Click Setup and diagnose printer. The Solution Center appears with the Maintenance tab open the Solution Center, use one of the following : • In Windows... Vista, click . • In Windows XP and earlier, click Start. 2 Click Programs orAll Programs Œ Lexmark 6500 Series. 3 Select Solution Center. Click To Poster Details Print a photo as printing photos, troubleshooting printing problems, installing print cartridges, and performing ...
... Do one of the following methods. Print projects such as photos, envelopes, cards, banners, iron-on the Solution Center icon. 2 Click Setup and diagnose printer. The Solution Center appears with the Maintenance tab open the Solution Center, use one of the following : • In Windows... Vista, click . • In Windows XP and earlier, click Start. 2 Click Programs orAll Programs Œ Lexmark 6500 Series. 3 Select Solution Center. Click To Poster Details Print a photo as printing photos, troubleshooting printing problems, installing print cartridges, and performing ...
User's Guide
Page 48
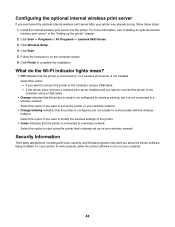
... connect the printer to run on your printer was already set up the printer" chapter. 2 Click Start ΠPrograms or All Programs ΠLexmark 6500 Series. 3 Click Wireless Setup. 4 Click Start. 5 Follow the instructions on , or a wireless print server is unable to complete the installation. Select this option if you want to...
... connect the printer to run on your printer was already set up the printer" chapter. 2 Click Start ΠPrograms or All Programs ΠLexmark 6500 Series. 3 Click Wireless Setup. 4 Click Start. 5 Follow the instructions on , or a wireless print server is unable to complete the installation. Select this option if you want to...
User's Guide
Page 52
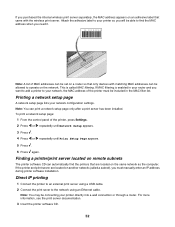
...: A list of the printer, press Settings. 2 Press or repeatedly until Network Setup appears. 3 Press . 4 Press or repeatedly until Print Setup Page appears. 5 Press . 6 Press again. To print a network setup page: 1 From the control panel of MAC addresses can automatically find the MAC ...that are located on an adhesive label that came with matching MAC addresses can print a network setup page only after a print server has been installed. Printing a network setup page A network setup page lists your printer directly into a wall connection or through a router. Note: You ...
...: A list of the printer, press Settings. 2 Press or repeatedly until Network Setup appears. 3 Press . 4 Press or repeatedly until Print Setup Page appears. 5 Press . 6 Press again. To print a network setup page: 1 From the control panel of MAC addresses can automatically find the MAC ...that are located on an adhesive label that came with matching MAC addresses can print a network setup page only after a print server has been installed. Printing a network setup page A network setup page lists your printer directly into a wall connection or through a router. Note: You ...
User's Guide
Page 53
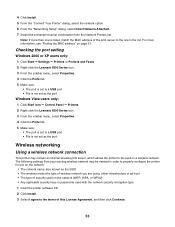
...This printer may be used on page 51. Windows Vista users only: 1 Click Start icon Œ Control Panel Œ Printers. 2 Right-click the Lexmark 6500 Series icon. 3 From the sidebar menu, select Properties. 4 Click the Ports tab. 5 Make sure: • The port is set to a...address" on a wireless network. 4 Click Install. 5 From the "Connect Your Printer" dialog, select the network option. 6 From the "Networking Setup" dialog, select Direct Network Attached. 7 Select the printer/print server combination from your existing wireless network may contain an internal wireless print server, which...
...This printer may be used on page 51. Windows Vista users only: 1 Click Start icon Œ Control Panel Œ Printers. 2 Right-click the Lexmark 6500 Series icon. 3 From the sidebar menu, select Properties. 4 Click the Ports tab. 5 Make sure: • The port is set to a...address" on a wireless network. 4 Click Install. 5 From the "Connect Your Printer" dialog, select the network option. 6 From the "Networking Setup" dialog, select Direct Network Attached. 7 Select the printer/print server combination from your existing wireless network may contain an internal wireless print server, which...


