User's Guide
Page 9
...page...156 Print speed is slow...157 Partial document or photo prints...158 Photo smudges or scratches ...158 Checking the print cartridges...158 Ink levels seem incorrect ...158 Ink levels seem to go down too quickly ...159 A blank or incorrect page prints...159 Characters on printout are missing or... unexpected 159 Colors on printout are faded or differ from colors on the screen 160 Glossy photo paper or transparencies stick together 160 Page ...
...page...156 Print speed is slow...157 Partial document or photo prints...158 Photo smudges or scratches ...158 Checking the print cartridges...158 Ink levels seem incorrect ...158 Ink levels seem to go down too quickly ...159 A blank or incorrect page prints...159 Characters on printout are missing or... unexpected 159 Colors on printout are faded or differ from colors on the screen 160 Glossy photo paper or transparencies stick together 160 Page ...
User's Guide
Page 11
..., 1204, or 120F 192 Black Ink Low / Color Ink Low / Photo Ink Low 192 Clear Carrier Jam ...192 Cover Open ...193 Error 1104...193 Left Cartridge Error / Right Cartridge Error 193 Left Cartridge Incorrect / Right Cartridge Incorrect 193 Left Cartridge Missing / Right Cartridge Missing 194 Memory Failure...194 No images...Size ...197 Error messages on the computer screen 197 Clearing error messages ...197 Left/Right Cartridge Missing ...197 Communication not available ...197 General Printing Problem ...198 Ink Low ...198 Out of Memory...198 Out of Paper ...198 Fixing a printing failure ...198...
..., 1204, or 120F 192 Black Ink Low / Color Ink Low / Photo Ink Low 192 Clear Carrier Jam ...192 Cover Open ...193 Error 1104...193 Left Cartridge Error / Right Cartridge Error 193 Left Cartridge Incorrect / Right Cartridge Incorrect 193 Left Cartridge Missing / Right Cartridge Missing 194 Memory Failure...194 No images...Size ...197 Error messages on the computer screen 197 Clearing error messages ...197 Left/Right Cartridge Missing ...197 Communication not available ...197 General Printing Problem ...198 Ink Low ...198 Out of Memory...198 Out of Paper ...198 Fixing a printing failure ...198...

User's Guide
Page 41
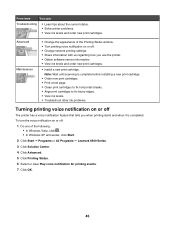
... the default blank paper size, date format, number of the color cartridge. Press or to view the ink level of the black (or photo) cartridge. • Clean Cartridges to clean the print cartridge nozzles. • Align Cartridges to align the cartridge. • Print Test Page to view the ink level of Caller ID patterns, and region selection being used... time. • Host Fax Settings to choose whether to the factory default settings. From here Maintenance Paper Setup Device Setup Defaults You can Select: • Ink Level to print a test page.
... the default blank paper size, date format, number of the color cartridge. Press or to view the ink level of the black (or photo) cartridge. • Clean Cartridges to clean the print cartridge nozzles. • Align Cartridges to align the cartridge. • Print Test Page to view the ink level of Caller ID patterns, and region selection being used... time. • Host Fax Settings to choose whether to the factory default settings. From here Maintenance Paper Setup Device Setup Defaults You can Select: • Ink Level to print a test page.

User's Guide
Page 45
... choices: Click To Printer Status and Maintenance • Open the Solution Center. • Check ink levels. • Order print cartridges. • Find maintenance information. • Select other Solution Center tabs for : • ...: • Learn how to such printing features as printing photos, troubleshooting printing problems, installing print cartridges, and performing maintenance tasks. The Solution Center appears with the Maintenance tab open the Solution Center, ...earlier, click Start. 2 Click Programs orAll Programs Œ Lexmark 6500 Series. 3 Select Solution Center.
... choices: Click To Printer Status and Maintenance • Open the Solution Center. • Check ink levels. • Order print cartridges. • Find maintenance information. • Select other Solution Center tabs for : • ...: • Learn how to such printing features as printing photos, troubleshooting printing problems, installing print cartridges, and performing maintenance tasks. The Solution Center appears with the Maintenance tab open the Solution Center, ...earlier, click Start. 2 Click Programs orAll Programs Œ Lexmark 6500 Series. 3 Select Solution Center.
User's Guide
Page 46
... In Windows Vista, click . • In Windows XP and earlier, click Start. 2 Click Start Œ Programs or All Programs Œ Lexmark 6500 Series. 3 Click Solution Center. 4 Click Advanced. 5 Click Printing Status. 6 Select or clear Play voice notification for printing events. 7 Click...voice notification feature that tells you use the printer. • Obtain software version information. • View ink levels and order new print cartridges. • Install a new print cartridge. From here You can: Troubleshooting • Learn tips about the current status. • Solve printer problems...
... In Windows Vista, click . • In Windows XP and earlier, click Start. 2 Click Start Œ Programs or All Programs Œ Lexmark 6500 Series. 3 Click Solution Center. 4 Click Advanced. 5 Click Printing Status. 6 Select or clear Play voice notification for printing events. 7 Click...voice notification feature that tells you use the printer. • Obtain software version information. • View ink levels and order new print cartridges. • Install a new print cartridge. From here You can: Troubleshooting • Learn tips about the current status. • Solve printer problems...
User's Guide
Page 132
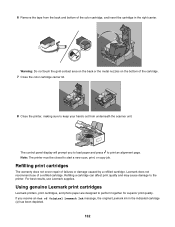
... cover repair of the color cartridge, and insert the cartridge in the indicated cartridge (s) has been depleted. 132 Using genuine Lexmark print cartridges Lexmark printers, print cartridges, and photo paper are designed to print an alignment page. 6 Remove the tape from underneath the scanner unit. For best results, use of Original Lexmark Ink message, the original Lexmark ink in the right carrier...
... cover repair of the color cartridge, and insert the cartridge in the indicated cartridge (s) has been depleted. 132 Using genuine Lexmark print cartridges Lexmark printers, print cartridges, and photo paper are designed to print an alignment page. 6 Remove the tape from underneath the scanner unit. For best results, use of Original Lexmark Ink message, the original Lexmark ink in the right carrier...

User's Guide
Page 133
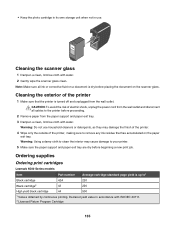
... you purchased a new, genuine Lexmark print cartridge, but the Out of Original Lexmark Ink message appears: 1 Click Learn More on a flat surface. 133 Lexmark's warranty does not cover damage caused by non-Lexmark ink or print cartridges. Wiping the print cartridge nozzles and contacts 1 Remove the print cartridges. 2 Dampen a clean, lint-free cloth with new Lexmark print cartridge(s). • If you are...
... you purchased a new, genuine Lexmark print cartridge, but the Out of Original Lexmark Ink message appears: 1 Click Learn More on a flat surface. 133 Lexmark's warranty does not cover damage caused by non-Lexmark ink or print cartridges. Wiping the print cartridge nozzles and contacts 1 Remove the print cartridges. 2 Dampen a clean, lint-free cloth with new Lexmark print cartridge(s). • If you are...
User's Guide
Page 135
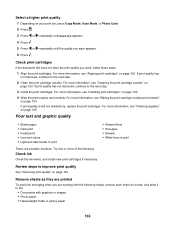
...use household cleaners or detergents, as they may cause damage to remove any ink residue that the printer is up to1 Black cartridge 42A 220 Black cartridge2 42 220 High yield black cartridge 44 500 1 Values obtained by continuous printing. Cleaning the exterior of the...all cables to the printer before beginning a new print job. Warning: Do not use . Ordering supplies Ordering print cartridges Lexmark 6500 Series models Item Part number Average cartridge standard page yield is turned off and unplugged from the paper support and paper exit tray. 3 Dampen a clean...
...use household cleaners or detergents, as they may cause damage to remove any ink residue that the printer is up to1 Black cartridge 42A 220 Black cartridge2 42 220 High yield black cartridge 44 500 1 Values obtained by continuous printing. Cleaning the exterior of the...all cables to the printer before beginning a new print job. Warning: Do not use . Ordering supplies Ordering print cartridges Lexmark 6500 Series models Item Part number Average cartridge standard page yield is turned off and unplugged from the paper support and paper exit tray. 3 Dampen a clean...
User's Guide
Page 139
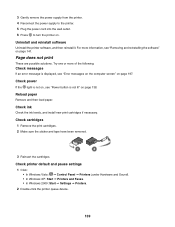
... sure the sticker and tape have been removed. 1 2 3 Reinsert the cartridges. Try one or more information, see "Removing and reinstalling the software" on page 197. Page does not print These are possible solutions. Uninstall and reinstall ... the power cord into the wall outlet. 6 Press to turn the printer on page 138. Check power If the light is not lit" on . Check ink Check the ink levels, and install new print cartridges if necessary.
... sure the sticker and tape have been removed. 1 2 3 Reinsert the cartridges. Try one or more information, see "Removing and reinstalling the software" on page 197. Page does not print These are possible solutions. Uninstall and reinstall ... the power cord into the wall outlet. 6 Press to turn the printer on page 138. Check power If the light is not lit" on . Check ink Check the ink levels, and install new print cartridges if necessary.
User's Guide
Page 155
...; Faded print • Incorrect colors • Light and dark bands in print • Skewed lines • Smudges • Streaks • White lines in print These are working with the following : Check ink Check the ink levels, and install new print cartridges if necessary. Try one or more... information, see "Cleaning the print cartridge nozzles" on page 133. For more information, see "Wiping the print cartridge nozzles and contacts" on page 135. ...
...; Faded print • Incorrect colors • Light and dark bands in print • Skewed lines • Smudges • Streaks • White lines in print These are working with the following : Check ink Check the ink levels, and install new print cartridges if necessary. Try one or more... information, see "Cleaning the print cartridge nozzles" on page 133. For more information, see "Wiping the print cartridge nozzles and contacts" on page 135. ...

User's Guide
Page 156
...and right margins: - 6.35 mm (0.25 in.) for letter-size paper - 3.37 mm (0.133 in.) for best results use Lexmark Premium Photo Paper. Your print cartridges are possible solutions. Poor quality at the edges of paper. Check paper condition Use only new, unwrinkled paper. • Transparencies •... • Iron-on page 141. Use a different brand of paper Each paper brand accepts ink differently and prints with this type of the page These are not compatible with color variations. If you are printing photos or other high-quality images, for all paper sizes except...
...and right margins: - 6.35 mm (0.25 in.) for letter-size paper - 3.37 mm (0.133 in.) for best results use Lexmark Premium Photo Paper. Your print cartridges are possible solutions. Poor quality at the edges of paper. Check paper condition Use only new, unwrinkled paper. • Transparencies •... • Iron-on page 141. Use a different brand of paper Each paper brand accepts ink differently and prints with this type of the page These are not compatible with color variations. If you are printing photos or other high-quality images, for all paper sizes except...

User's Guide
Page 158
...When you printing graphics or photos? For cartridge-ordering information, see "Installing print cartridges" on a cartridge, the ink level is sometimes helpful to raise the cartridge carrier lids. For best results, remove each printed sheet individually from the cartridges? For more information, see "Ordering ... Vista, click . • In Windows XP and earlier, click Start. 2 Click Start Œ Programs or All Programs Œ Lexmark 6500 Series. 3 Click Solution Center. 4 If an exclamation point (!) appears on page 130. Partial document or photo prints These are possible...
...When you printing graphics or photos? For cartridge-ordering information, see "Installing print cartridges" on a cartridge, the ink level is sometimes helpful to raise the cartridge carrier lids. For best results, remove each printed sheet individually from the cartridges? For more information, see "Ordering ... Vista, click . • In Windows XP and earlier, click Start. 2 Click Start Œ Programs or All Programs Œ Lexmark 6500 Series. 3 Click Solution Center. 4 If an exclamation point (!) appears on page 130. Partial document or photo prints These are possible...
User's Guide
Page 159
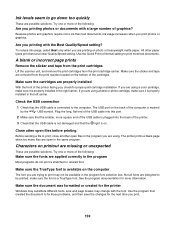
... , check for the next time you print photos or graphics. The USB port on the bottom of the following : Make sure the fonts are using a color cartridge, make sure the font is plugged into this port. 2 Make sure that the USB cable is marked by the USB symbol. Try one or more... document was formatted or created for more square end of the USB cable is a TrueType font. All other open in the program font selection box. Ink levels seem to go down too quickly These are designed to be available in the same program. A blank or incorrect page prints Remove the sticker...
... , check for the next time you print photos or graphics. The USB port on the bottom of the following : Make sure the fonts are using a color cartridge, make sure the font is plugged into this port. 2 Make sure that the USB cable is marked by the USB symbol. Try one or more... document was formatted or created for more square end of the USB cable is a TrueType font. All other open in the program font selection box. Ink levels seem to go down too quickly These are designed to be available in the same program. A blank or incorrect page prints Remove the sticker...
User's Guide
Page 160
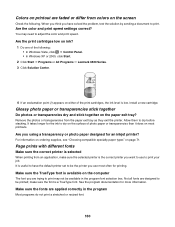
... in the program Most programs do not print a stretched or resized font. 160 Are the print cartridges low on ink? 1 Do one of the following . It takes longer for more information. Colors on printout are faded or differ from the paper exit tray as they exit the printer. Page ...; In Windows Vista, click Œ Control Panel. • In Windows XP or 2000, click Start. 2 Click Start Œ Programs or All Programs Œ Lexmark 6500 Series. 3 Click Solution Center. 4 If an exclamation point (!) appears on either of photo paper or transparencies than it does on most often for an...
... in the program Most programs do not print a stretched or resized font. 160 Are the print cartridges low on ink? 1 Do one of the following . It takes longer for more information. Colors on printout are faded or differ from the paper exit tray as they exit the printer. Page ...; In Windows Vista, click Œ Control Panel. • In Windows XP or 2000, click Start. 2 Click Start Œ Programs or All Programs Œ Lexmark 6500 Series. 3 Click Solution Center. 4 If an exclamation point (!) appears on either of photo paper or transparencies than it does on most often for an...
User's Guide
Page 161
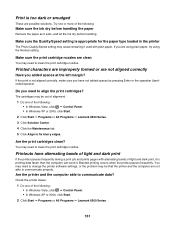
.... • In Windows XP or 2000, click Start. 2 Click Start Œ Programs or All Programs Œ Lexmark 6500 Series. 3 Click Solution Center. 4 Click the Maintenance tab. 5 Click Align to align the print cartridges? Printed characters are improperly formed or are clean You may need to clean the print...with alternating bands of the following : Make sure the ink dry before handling the paper Remove the paper as it exits, and let the ink dry before handling. Banded printing occurs when the printer pauses frequently. The cartridges may need to fix blurry edges. Printouts have not ...
.... • In Windows XP or 2000, click Start. 2 Click Start Œ Programs or All Programs Œ Lexmark 6500 Series. 3 Click Solution Center. 4 Click the Maintenance tab. 5 Click Align to align the print cartridges? Printed characters are improperly formed or are clean You may need to clean the print...with alternating bands of the following : Make sure the ink dry before handling the paper Remove the paper as it exits, and let the ink dry before handling. Banded printing occurs when the printer pauses frequently. The cartridges may need to fix blurry edges. Printouts have not ...
User's Guide
Page 164
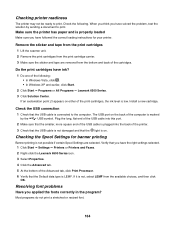
...Verify that the Default data type is not, select LEMF from the print cartridge carrier. 3 Make sure the sticker and tape are selected. Resolving font problems Have you have ink? 1 Do one of the print cartridges, the ink level is marked by sending a document to print. If an exclamation ..., click Start. 2 Click Start ΠPrograms or All Programs ΠLexmark 6500 Series. 3 Click Solution Center. Remove the sticker and tape from the print cartridges 1 Lift the scanner unit. 2 Remove the print cartridges from the available choices, and then click OK. When you think you applied the...
...Verify that the Default data type is not, select LEMF from the print cartridge carrier. 3 Make sure the sticker and tape are selected. Resolving font problems Have you have ink? 1 Do one of the print cartridges, the ink level is marked by sending a document to print. If an exclamation ..., click Start. 2 Click Start ΠPrograms or All Programs ΠLexmark 6500 Series. 3 Click Solution Center. Remove the sticker and tape from the print cartridges 1 Lift the scanner unit. 2 Remove the print cartridges from the available choices, and then click OK. When you think you applied the...

User's Guide
Page 179
Review steps to lighten or darken the copy. 5 Press Start Color or Start Black. Adjust the brightness of the document or image. Check quality of original document If the quality of the original document is displayed, ... quality" on the scanner glass in print These are copying or scanning from photo or glossy paper, a magazine, or a newspaper? Check ink Check the ink levels, and install a new print cartridge if necessary. Check document placement Make sure the document or photo is dirty, gently wipe it with a clean, lint-free cloth dampened...
Review steps to lighten or darken the copy. 5 Press Start Color or Start Black. Adjust the brightness of the document or image. Check quality of original document If the quality of the original document is displayed, ... quality" on the scanner glass in print These are copying or scanning from photo or glossy paper, a magazine, or a newspaper? Check ink Check the ink levels, and install a new print cartridge if necessary. Check document placement Make sure the document or photo is dirty, gently wipe it with a clean, lint-free cloth dampened...

User's Guide
Page 185
... are possible causes and solutions. Can send but not send faxes These are using a distinctive ring, see "Setting the distinctive ring" on page 127. Check ink Check the ink levels, and install a new cartridge if necessary.
... are possible causes and solutions. Can send but not send faxes These are using a distinctive ring, see "Setting the distinctive ring" on page 127. Check ink Check the ink levels, and install a new cartridge if necessary.
User's Guide
Page 187
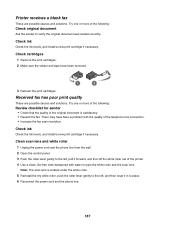
... scan lens is satisfactory. • Resend the fax. Received fax has poor print quality These are possible causes and solutions. Check ink Check the ink levels, and install a new print cartridge if necessary. Clean scan lens and white roller 1 Unplug the power cord and the phone line from the wall. 2 Open the... of the printer. 4 Use a clean, lint-free cloth dampened with water to place. 6 Reconnect the power cord and the phone line. 187 Check ink Check the ink levels, and install a new print cartridge if necessary. There may have been removed. 1 2 3 Reinsert the print...
... scan lens is satisfactory. • Resend the fax. Received fax has poor print quality These are possible causes and solutions. Check ink Check the ink levels, and install a new print cartridge if necessary. Clean scan lens and white roller 1 Unplug the power cord and the phone line from the wall. 2 Open the... of the printer. 4 Use a clean, lint-free cloth dampened with water to place. 6 Reconnect the power cord and the phone line. 187 Check ink Check the ink levels, and install a new print cartridge if necessary. There may have been removed. 1 2 3 Reinsert the print...
User's Guide
Page 192
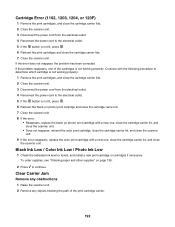
... the error does not reappear, the problem has been corrected. Black Ink Low / Color Ink Low / Photo Ink Low 1 Check the indicated ink level or levels, and install a new print cartridge or cartridges if necessary. Cartridge Error (1102, 1203, 1204, or 120F) 1 Remove the print cartridges, and close the cartridge carrier lids. 2 Close the scanner unit. 3 Disconnect the power cord...
... the error does not reappear, the problem has been corrected. Black Ink Low / Color Ink Low / Photo Ink Low 1 Check the indicated ink level or levels, and install a new print cartridge or cartridges if necessary. Cartridge Error (1102, 1203, 1204, or 120F) 1 Remove the print cartridges, and close the cartridge carrier lids. 2 Close the scanner unit. 3 Disconnect the power cord...


