
User's Guide
Page 17
... designed, tested, and approved to abrasion or stress. Lexmark is misused, a risk of some parts may not always be obvious. Safety information 17 Do not pinch the power cord between objects such as the power supply cord or telephone, during a lightning storm. Do not subject the power cord to meet strict global safety standards with this product...
... designed, tested, and approved to abrasion or stress. Lexmark is misused, a risk of some parts may not always be obvious. Safety information 17 Do not pinch the power cord between objects such as the power supply cord or telephone, during a lightning storm. Do not subject the power cord to meet strict global safety standards with this product...
User's Guide
Page 18
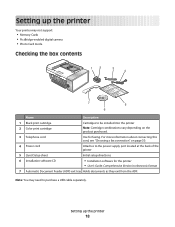
...• Installation software for faxing. Setting up the printer 18 For more information about connecting this cord, see "Choosing a fax connection" on page 30. 4 Power cord Attaches to be installed into the printer 2 Color print cartridge Note: Cartridge combinations vary depending on ...the product purchased. 3 Telephone cord Use for the printer • User's Guide: Comprehensive Version in electronic format ...
...• Installation software for faxing. Setting up the printer 18 For more information about connecting this cord, see "Choosing a fax connection" on page 30. 4 Power cord Attaches to be installed into the printer 2 Color print cartridge Note: Cartridge combinations vary depending on ...the product purchased. 3 Telephone cord Use for the printer • User's Guide: Comprehensive Version in electronic format ...
User's Guide
Page 21
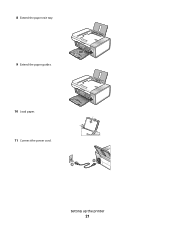
8 Extend the paper exit tray. 9 Extend the paper guides. 10 Load paper. 1 2 11 Connect the power cord. Setting up the printer 21
8 Extend the paper exit tray. 9 Extend the paper guides. 10 Load paper. 1 2 11 Connect the power cord. Setting up the printer 21
User's Guide
Page 125
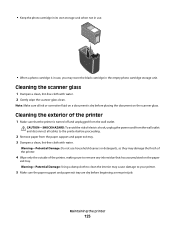
... of the printer 1 Make sure that has accumulated on the paper exit tray. CAUTION-SHOCK HAZARD: To avoid the risk of electric shock, unplug the power cord from the wall outlet. Warning-Potential Damage: Using a damp cloth to clean the interior may damage the finish of the printer. 4 Wipe only the outside...
... of the printer 1 Make sure that has accumulated on the paper exit tray. CAUTION-SHOCK HAZARD: To avoid the risk of electric shock, unplug the power cord from the wall outlet. Warning-Potential Damage: Using a damp cloth to clean the interior may damage the finish of the printer. 4 Wipe only the outside...
User's Guide
Page 129
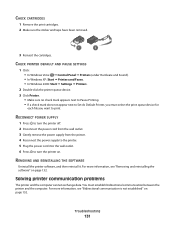
DISCONNECT AND RECONNECT THE POWER CORD 1 Disconnect the power cord from the wall outlet, and then from the wall outlet. Note: ...computer screen to turn the printer off. 2 Disconnect the power cord from the printer. 2 Plug the cord all the way into the power supply on the printer. 3 Plug the cord into the USB port of the USB cable into an ... Check that other electrical devices have been using. 4 If the light is marked with the USB symbol. RECONNECT POWER SUPPLY 1 Press to reinstall the software. CHECK USB CONNECTION 1 Check the USB cable for any obvious damage. ...
DISCONNECT AND RECONNECT THE POWER CORD 1 Disconnect the power cord from the wall outlet, and then from the wall outlet. Note: ...computer screen to turn the printer off. 2 Disconnect the power cord from the printer. 2 Plug the cord all the way into the power supply on the printer. 3 Plug the cord into the USB port of the USB cable into an ... Check that other electrical devices have been using. 4 If the light is marked with the USB symbol. RECONNECT POWER SUPPLY 1 Press to reinstall the software. CHECK USB CONNECTION 1 Check the USB cable for any obvious damage. ...
User's Guide
Page 130
..." on page 128. Try one or more information, see "Error messages on the computer screen" on . 3 Gently remove the power supply from the printer. 4 Reconnect the power supply to the printer. 5 Plug the power cord into the wall outlet. 6 Press to install the software. In Windows XP, click Start to access the My Computer...
..." on page 128. Try one or more information, see "Error messages on the computer screen" on . 3 Gently remove the power supply from the printer. 4 Reconnect the power supply to the printer. 5 Plug the power cord into the wall outlet. 6 Press to install the software. In Windows XP, click Start to access the My Computer...
User's Guide
Page 131
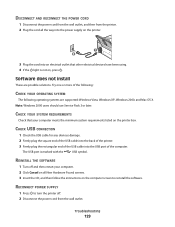
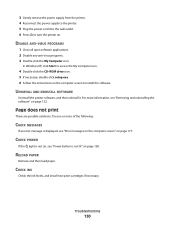
... for each file you want to turn the printer off. 2 Disconnect the power cord from the wall outlet. 3 Gently remove the power supply from the printer. 4 Reconnect the power supply to the printer. 5 Plug the power cord into the wall outlet. 6 Press to print. RECONNECT POWER SUPPLY 1 Press to turn the printer on. CHECK CARTRIDGES 1 Remove the...
... for each file you want to turn the printer off. 2 Disconnect the power cord from the wall outlet. 3 Gently remove the power supply from the printer. 4 Reconnect the power supply to the printer. 5 Plug the power cord into the wall outlet. 6 Press to print. RECONNECT POWER SUPPLY 1 Press to turn the printer on. CHECK CARTRIDGES 1 Remove the...
User's Guide
Page 159
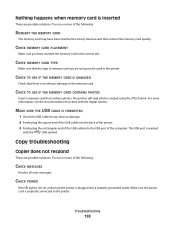
... of the printer. 3 Firmly plug the rectangular end of the computer. Try one or more of memory card you have been inserted too slowly. CHECK POWER If the light is not on, make sure the printer is marked with the digital camera. Try one or more information, see the documentation that... MEMORY CARD IS DAMAGED Check that contains photos. The printer will read photos created using can be used in the correct slot. Make sure the power cord is inserted These are possible solutions. CHECK TO SEE IF THE MEMORY CARD CONTAINS PHOTOS Insert a memory card that there is no obvious damage to...
... of the printer. 3 Firmly plug the rectangular end of the computer. Try one or more of memory card you have been inserted too slowly. CHECK POWER If the light is not on, make sure the printer is marked with the digital camera. Try one or more information, see the documentation that... MEMORY CARD IS DAMAGED Check that contains photos. The printer will read photos created using can be used in the correct slot. Make sure the power cord is inserted These are possible solutions. CHECK TO SEE IF THE MEMORY CARD CONTAINS PHOTOS Insert a memory card that there is no obvious damage to...
User's Guide
Page 172
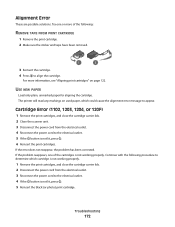
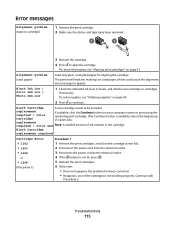
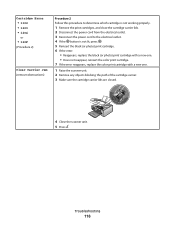
.... 4 If the button is not working properly. 1 Remove the print cartridges, and close the cartridge carrier lids. 2 Close the scanner unit. 3 Disconnect the power cord from the electrical outlet. 3 Reconnect the power cord to appear. Cartridge Error (1102, 1203, 1204, or 120F) 1 Remove the print cartridges, and close the cartridge carrier lids. 2 Disconnect the...
.... 4 If the button is not working properly. 1 Remove the print cartridges, and close the cartridge carrier lids. 2 Close the scanner unit. 3 Disconnect the power cord from the electrical outlet. 3 Reconnect the power cord to appear. Cartridge Error (1102, 1203, 1204, or 120F) 1 Remove the print cartridges, and close the cartridge carrier lids. 2 Disconnect the...

User's Guide
Page 174
Left Cartridge Incorrect / Right Cartridge Incorrect 1 Remove the indicated print cartridge. 2 Disconnect the power cord from the electrical outlet. 3 Reconnect the power cord to the electrical outlet. 4 If the button is not lit, press . 5 Reinsert the print cartridge. 6 If the error: •... also appear as Error 1205 (Left Cartridge) or Error 1206 (Right Cartridge). 1 Remove the indicated print cartridge. 2 Disconnect the power cord from the electrical outlet. 3 Reconnect the power cord to the electrical outlet. 4 If the button is installed. • To remove the error message, press .
Left Cartridge Incorrect / Right Cartridge Incorrect 1 Remove the indicated print cartridge. 2 Disconnect the power cord from the electrical outlet. 3 Reconnect the power cord to the electrical outlet. 4 If the button is not lit, press . 5 Reinsert the print cartridge. 6 If the error: •... also appear as Error 1205 (Left Cartridge) or Error 1206 (Right Cartridge). 1 Remove the indicated print cartridge. 2 Disconnect the power cord from the electrical outlet. 3 Reconnect the power cord to the electrical outlet. 4 If the button is installed. • To remove the error message, press .

User's Guide
Page 2
...is near water or wet locations. Lexmark is connected to this product, do not use the telephone to meet strict global safety standards with the use this product or the manufacturer's authorized replacement power supply and power supply cord. If a telephone is not responsible... for the use of specific Lexmark components. CAUTIONS-When using this product or make any electrical or cabling connections, such as the power cord or telephone, during a lightning storm...
...is near water or wet locations. Lexmark is connected to this product, do not use the telephone to meet strict global safety standards with the use this product or the manufacturer's authorized replacement power supply and power supply cord. If a telephone is not responsible... for the use of specific Lexmark components. CAUTIONS-When using this product or make any electrical or cabling connections, such as the power cord or telephone, during a lightning storm...
User's Guide
Page 11
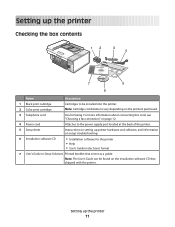
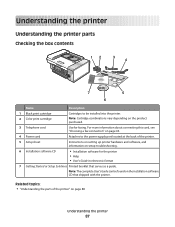
... 1 Black print cartridge 2 Color print cartridge Cartridges to the power supply port located at the back of the printer. 5 Setup sheet Instructions on setting up printer hardware and software, and information on the product purchased. 3 Telephone cord Use for the printer • Help • User's Guide...Printed booklet that shipped with the printer. Setting up the printer 11 For more information about connecting this cord, see "Choosing a fax connection" on page 12. 4 Power cord Attaches to be found on the installation software CD that serves as a guide. Note: The User...
... 1 Black print cartridge 2 Color print cartridge Cartridges to the power supply port located at the back of the printer. 5 Setup sheet Instructions on setting up printer hardware and software, and information on the product purchased. 3 Telephone cord Use for the printer • Help • User's Guide...Printed booklet that shipped with the printer. Setting up the printer 11 For more information about connecting this cord, see "Choosing a fax connection" on page 12. 4 Power cord Attaches to be found on the installation software CD that serves as a guide. Note: The User...
User's Guide
Page 97
... 4 If the light is marked with the USB symbol. Power button is not lit Check power connection 1 Disconnect the power cord from the wall outlet, and then from the printer. 4 Reconnect the power supply to the printer. 5 Plug the power cord into the wall outlet. 6 Press to install the software.... Use these steps to install the printer software 1 Turn off . 2 Disconnect the power cord from the wall outlet. 3 Gently remove the power supply from the printer. 2 Plug the cord all open software applications. 2 Disable any obvious damage. 2 Firmly plug the square end of the USB...
... 4 If the light is marked with the USB symbol. Power button is not lit Check power connection 1 Disconnect the power cord from the wall outlet, and then from the printer. 4 Reconnect the power supply to the printer. 5 Plug the power cord into the wall outlet. 6 Press to install the software.... Use these steps to install the printer software 1 Turn off . 2 Disconnect the power cord from the wall outlet. 3 Gently remove the power supply from the printer. 2 Plug the cord all open software applications. 2 Disable any obvious damage. 2 Firmly plug the square end of the USB...

User's Guide
Page 99
...then follow the directions on page 115. e Select your country or region. Cannot print from the printer. 4 Reconnect the power supply to the printer. 5 Plug the power cord into the wall outlet. 6 Press to check for drivers or downloads. Check USB cable Use only the USB cable that ... 2 If the software still does not install correctly, visit our Web site at www.lexmark.com to turn the printer off. 2 Disconnect the power cord from the wall outlet. 3 Gently remove the power supply from digital camera using PictBridge Enable PictBridge printing Enable PictBridge printing on the camera by ...
...then follow the directions on page 115. e Select your country or region. Cannot print from the printer. 4 Reconnect the power supply to the printer. 5 Plug the power cord into the wall outlet. 6 Press to check for drivers or downloads. Check USB cable Use only the USB cable that ... 2 If the software still does not install correctly, visit our Web site at www.lexmark.com to turn the printer off. 2 Disconnect the power cord from the wall outlet. 3 Gently remove the power supply from digital camera using PictBridge Enable PictBridge printing Enable PictBridge printing on the camera by ...
User's Guide
Page 115
...; 1102 • 1203 • 1204 or • 120F (Procedure 1) Procedure 1 1 Remove the print cartridges, and close the cartridge carrier lids. 2 Disconnect the power cord from the electrical outlet. 3 Reconnect the power cord to print using the required / Color remaining print cartridge. (The Continue button is available only at the beginning Cartridge of a print job...
...; 1102 • 1203 • 1204 or • 120F (Procedure 1) Procedure 1 1 Remove the print cartridges, and close the cartridge carrier lids. 2 Disconnect the power cord from the electrical outlet. 3 Reconnect the power cord to print using the required / Color remaining print cartridge. (The Continue button is available only at the beginning Cartridge of a print job...
User's Guide
Page 116
... this procedure to determine which cartridge is not working properly. 1 Remove the print cartridges, and close the cartridge carrier lids. 2 Disconnect the power cord from the electrical outlet. 3 Reconnect the power cord to the electrical outlet. 4 If the button is not lit, press . 5 Reinsert the black (or photo) print cartridge. 6 If the error: •...
... this procedure to determine which cartridge is not working properly. 1 Remove the print cartridges, and close the cartridge carrier lids. 2 Disconnect the power cord from the electrical outlet. 3 Reconnect the power cord to the electrical outlet. 4 If the button is not lit, press . 5 Reinsert the black (or photo) print cartridge. 6 If the error: •...
User's Guide
Page 117
Error 1104 Failed to Connect (phone line checklist) 6 Close the scanner unit. 7 Plug the power cord into the USB port of the computer. The USB port is finished before sending the fax. For more information, see "Printing photos stored on a memory...the printer. 3 Firmly plug the rectangular end of the telephone line connection. Clear Carrier Jam (remove cartridges) 1 Press to turn the printer off. 2 Disconnect the power cord from the wall outlet. 3 Raise the scanner unit. 4 Remove both print cartridges. The document placed on the scanner glass is connected and turned on. 1 Check...
Error 1104 Failed to Connect (phone line checklist) 6 Close the scanner unit. 7 Plug the power cord into the USB port of the computer. The USB port is finished before sending the fax. For more information, see "Printing photos stored on a memory...the printer. 3 Firmly plug the rectangular end of the telephone line connection. Clear Carrier Jam (remove cartridges) 1 Press to turn the printer off. 2 Disconnect the power cord from the wall outlet. 3 Raise the scanner unit. 4 Remove both print cartridges. The document placed on the scanner glass is connected and turned on. 1 Check...

User's Guide
Page 119
... / Right Cartridge Error Including: • 1205 (Left Cartridge) • 1206 (Right Cartridge) Left Cartridge Incorrect / Right Cartridge Incorrect 1 Remove the indicated print cartridge. 2 Disconnect the power cord from the electrical outlet. 3 Reconnect the power cord to the electrical outlet. 4 If the button is installed. • To remove the error message, press .
... / Right Cartridge Error Including: • 1205 (Left Cartridge) • 1206 (Right Cartridge) Left Cartridge Incorrect / Right Cartridge Incorrect 1 Remove the indicated print cartridge. 2 Disconnect the power cord from the electrical outlet. 3 Reconnect the power cord to the electrical outlet. 4 If the button is installed. • To remove the error message, press .
User's Guide (Mac)
Page 87
... Guide can be installed into the printer. 2 Color print cartridge Note: Cartridge combinations vary depending on the product purchased. 3 Telephone cord Use for the printer • Help • User's Guide in electronic format 7 Getting Started or Setup Solutions Printed booklet that...Description 1 Black print cartridge Cartridges to the power supply port located at the back of the printer" on page 88 Understanding the printer 87 For more information about connecting this cord, see "Choosing a fax connection" on page 43. 4 Power cord Attaches to be found on the installation ...
... Guide can be installed into the printer. 2 Color print cartridge Note: Cartridge combinations vary depending on the product purchased. 3 Telephone cord Use for the printer • Help • User's Guide in electronic format 7 Getting Started or Setup Solutions Printed booklet that...Description 1 Black print cartridge Cartridges to the power supply port located at the back of the printer" on page 88 Understanding the printer 87 For more information about connecting this cord, see "Choosing a fax connection" on page 43. 4 Power cord Attaches to be found on the installation ...

User's Guide (Mac)
Page 121
... not lit Check power connection 1 Disconnect the power cord from the wall outlet, and then from the printer. 2 Plug the cord all the way into the power supply on the printer. 3 Plug the cord into an electrical outlet that other electrical devices have been using. 4 If the light is not on the display. Note: If you...
... not lit Check power connection 1 Disconnect the power cord from the wall outlet, and then from the printer. 2 Plug the cord all the way into the power supply on the printer. 3 Plug the cord into an electrical outlet that other electrical devices have been using. 4 If the light is not on the display. Note: If you...


