
User's Guide
Page 3
......25 Using the control panel...25 Saving settings ...28 Understanding the Settings menu ...28 Installing another language control panel 30 Installing the printer software...30 Understanding the printer software 31 Turning printing voice notification on or off 33 Security Information...34 Loading paper and original documents 35 Loading paper...35 Using the...
......25 Using the control panel...25 Saving settings ...28 Understanding the Settings menu ...28 Installing another language control panel 30 Installing the printer software...30 Understanding the printer software 31 Turning printing voice notification on or off 33 Security Information...34 Loading paper and original documents 35 Loading paper...35 Using the...
User's Guide
Page 4
...control panel 52 Canceling a fax after a document is loaded using the control panel 52 Faxing using the computer 53 Sending a fax using the software...53 Receiving a fax using the computer 53 Receiving a fax automatically using the computer 53 Setting a fax manual answer code using the computer ...54 Using Caller ID from the software...54 Receiving a fax with an answering machine using the computer 54 Forwarding faxes...55 Using the computer Phone Book...55 Customizing fax settings...
...control panel 52 Canceling a fax after a document is loaded using the control panel 52 Faxing using the computer 53 Sending a fax using the software...53 Receiving a fax using the computer 53 Receiving a fax automatically using the computer 53 Setting a fax manual answer code using the computer ...54 Using Caller ID from the software...54 Receiving a fax with an answering machine using the computer 54 Forwarding faxes...55 Using the computer Phone Book...55 Customizing fax settings...
User's Guide
Page 5
... on custom-size paper ...69 Printing transparencies...70 Printing a banner ...70 Watermark ...70 Changing printer settings...70 Saving and deleting print settings...70 Resetting printer software to factory default settings 71 Resetting the printer to factory default settings 71 Copying...73 Making a copy...73 Adjusting copy quality...73 Making a copy lighter...
... on custom-size paper ...69 Printing transparencies...70 Printing a banner ...70 Watermark ...70 Changing printer settings...70 Saving and deleting print settings...70 Resetting printer software to factory default settings 71 Resetting the printer to factory default settings 71 Copying...73 Making a copy...73 Adjusting copy quality...73 Making a copy lighter...
User's Guide
Page 9
...in the printer box or on Windows operating Lexmark Web site at www.lexmark.com. User's Guide Description Where to find You can find this document in the printer box or on the hardware and software (on the Lexmark Web site at www.lexmark.com. Note: If your printer supports ...Macintosh operating systems, see the Mac Help: 1 From the Finder desktop, double-click the Lexmark 5000 Series folder. 2 Double-click the printer Help icon. ...
...in the printer box or on Windows operating Lexmark Web site at www.lexmark.com. User's Guide Description Where to find You can find this document in the printer box or on the hardware and software (on the Lexmark Web site at www.lexmark.com. Note: If your printer supports ...Macintosh operating systems, see the Mac Help: 1 From the Finder desktop, double-click the Lexmark 5000 Series folder. 2 Double-click the printer Help icon. ...

User's Guide
Page 10
... appears on your desktop, and the User's Guide: Comprehensive Version appears on the Lexmark Web site at www.lexmark.com. Lexmark Solution Center Description Where to find The Lexmark Solution Center software is included on your desktop, • Faxing (if supported by your printer) ...and earlier, click Start. 2 Click Programs or All Programs Œ Lexmark 5000 Series. 3 Select Lexmark Solution Center. 10 It installs with printing, copying, Run. such as: 1 Do one of the following : • Using the software (on Windows operating systems) • In Windows Vista, click . &#...
... appears on your desktop, and the User's Guide: Comprehensive Version appears on the Lexmark Web site at www.lexmark.com. Lexmark Solution Center Description Where to find The Lexmark Solution Center software is included on your desktop, • Faxing (if supported by your printer) ...and earlier, click Start. 2 Click Programs or All Programs Œ Lexmark 5000 Series. 3 Select Lexmark Solution Center. 10 It installs with printing, copying, Run. such as: 1 Do one of the following : • Using the software (on Windows operating systems) • In Windows Vista, click . &#...
User's Guide
Page 12
For complete descriptions: • Windows users-See the User's Guide. • Macintosh users-If your product supports Macintosh, see the Mac Help installed with the printer software. 12 Record the following information (located on the store receipt and the back of the printer), and have it ready when you contact us so that we may serve you faster: • Machine Type number • Serial number • Date purchased • Store where purchased Operating system notice All features and functions are operating system-dependent.
For complete descriptions: • Windows users-See the User's Guide. • Macintosh users-If your product supports Macintosh, see the Mac Help installed with the printer software. 12 Record the following information (located on the store receipt and the back of the printer), and have it ready when you contact us so that we may serve you faster: • Machine Type number • Serial number • Date purchased • Store where purchased Operating system notice All features and functions are operating system-dependent.
User's Guide
Page 13
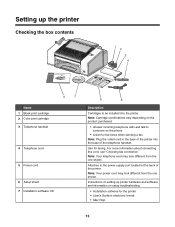
Note: Your telephone cord may look different from the one shown. Setting up printer hardware and software, and information on the phone • Listen for fax tones when sending a fax Note: Plug the coiled cord in electronic ... the box contents 1 2 3 4 1 2 3 Name 1 Black print cartridge 2 Color print cartridge 3 Telephone handset 8 7 4 Telephone cord 5 Power cord 6 Setup sheet 7 Installation software CD 6 5 Description Cartridges to be installed into the base of the printer. Note: Cartridge combinations vary depending on the product purchased. • Answer incoming telephone...
Note: Your telephone cord may look different from the one shown. Setting up printer hardware and software, and information on the phone • Listen for fax tones when sending a fax Note: Plug the coiled cord in electronic ... the box contents 1 2 3 4 1 2 3 Name 1 Black print cartridge 2 Color print cartridge 3 Telephone handset 8 7 4 Telephone cord 5 Power cord 6 Setup sheet 7 Installation software CD 6 5 Description Cartridges to be installed into the base of the printer. Note: Cartridge combinations vary depending on the product purchased. • Answer incoming telephone...
User's Guide
Page 14
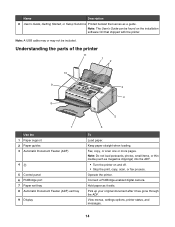
.... Note: Do not load postcards, photos, small items, or thin media (such as magazine clippings) into the ADF. • Turn the printer on the installation software CD that serves as it has gone through the ADF.
.... Note: Do not load postcards, photos, small items, or thin media (such as magazine clippings) into the ADF. • Turn the printer on the installation software CD that serves as it has gone through the ADF.
User's Guide
Page 23
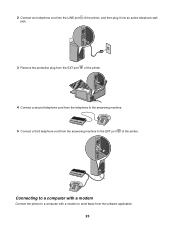
Connecting to a computer with a modem Connect the printer to a computer with a modem to send faxes from the answering machine to the EXT port of the printer. 4 Connect a second telephone cord from the telephone to the answering machine. 5 Connect a third telephone cord from the software application. 23 2 Connect one telephone cord into the LINE port of the printer, and then plug it into an active telephone wall jack. 3 Remove the protective plug from the EXT port of the printer.
Connecting to a computer with a modem Connect the printer to a computer with a modem to send faxes from the answering machine to the EXT port of the printer. 4 Connect a second telephone cord from the telephone to the answering machine. 5 Connect a third telephone cord from the software application. 23 2 Connect one telephone cord into the LINE port of the printer, and then plug it into an active telephone wall jack. 3 Remove the protective plug from the EXT port of the printer.

User's Guide
Page 29
... make changes in your location. • Date/Time to set the date and time. • Host Fax Settings to choose whether to allow the fax software from the control panel" on the country or region you selected during initial setup. Pattern 1 (FSK) - Pattern 2 (DTMF) For more information, see "Using Caller ID...
... make changes in your location. • Date/Time to set the date and time. • Host Fax Settings to choose whether to allow the fax software from the control panel" on the country or region you selected during initial setup. Pattern 1 (FSK) - Pattern 2 (DTMF) For more information, see "Using Caller ID...
User's Guide
Page 30
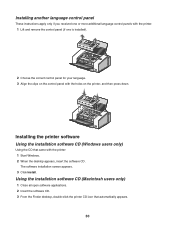
... (Windows users only) Using the CD that automatically appears. 30 Using the installation software CD (Macintosh users only) 1 Close all open software applications. 2 Insert the software CD. 3 From the Finder desktop, double-click the printer CD icon that came with the holes on the printer, and then press down. Installing another ... the correct control panel for your language. 3 Align the clips on the control panel with the printer: 1 Start Windows. 2 When the desktop appears, insert the software CD.
... (Windows users only) Using the CD that automatically appears. 30 Using the installation software CD (Macintosh users only) 1 Close all open software applications. 2 Insert the software CD. 3 From the Finder desktop, double-click the printer CD icon that came with the holes on the printer, and then press down. Installing another ... the correct control panel for your language. 3 Align the clips on the control panel with the printer: 1 Start Windows. 2 When the desktop appears, insert the software CD.

User's Guide
Page 31
... following: • In Windows Vista, click . • In Windows XP and earlier, click Start. 2 Click Programs or All Programs Œ Lexmark 5000 Series. 3 Select Productivity Studio. Understanding the printer software Using the software that installed with your printer, and do many other tasks. Click To Scan Copy Details • Scan a photo or document...
... following: • In Windows Vista, click . • In Windows XP and earlier, click Start. 2 Click Programs or All Programs Œ Lexmark 5000 Series. 3 Select Productivity Studio. Understanding the printer software Using the software that installed with your printer, and do many other tasks. Click To Scan Copy Details • Scan a photo or document...
User's Guide
Page 33
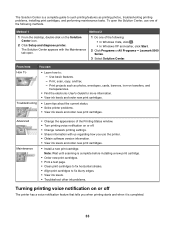
...of the following : • In Windows Vista, click . • In Windows XP and earlier, click Start. 2 Click Programs or All Programs Œ Lexmark 5000 Series. 3 Select Solution Center. The Solution Center is completed. 33 The Solution Center appears with us regarding how you when printing starts and when... . • Change network printing settings. • Share information with the Maintenance tab open the Solution Center, use the printer. • Obtain software version information. • View ink levels and order new print cartridges. • Install a new print cartridge.
...of the following : • In Windows Vista, click . • In Windows XP and earlier, click Start. 2 Click Programs or All Programs Œ Lexmark 5000 Series. 3 Select Solution Center. The Solution Center is completed. 33 The Solution Center appears with us regarding how you when printing starts and when... . • Change network printing settings. • Share information with the Maintenance tab open the Solution Center, use the printer. • Obtain software version information. • View ink levels and order new print cartridges. • Install a new print cartridge.
User's Guide
Page 34
... voice notification on your printer to work properly, allow the printer software to run on or off: 1 Do one of the following: • In Windows Vista, click . • In Windows XP and earlier, click Start. 2 Click Programs or All Programs Œ Lexmark 5000 Series. 3 Click Solution Center. 4 Click Advanced. 5 Click Printing Status...
... voice notification on your printer to work properly, allow the printer software to run on or off: 1 Do one of the following: • In Windows Vista, click . • In Windows XP and earlier, click Start. 2 Click Programs or All Programs Œ Lexmark 5000 Series. 3 Click Solution Center. 4 Click Advanced. 5 Click Printing Status...
User's Guide
Page 53
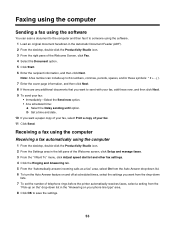
.... 6 Enter the recipient information, and then click Next. Note: A fax number can scan a document to the computer and then fax it to someone using the software. 1 Load an original document facedown in the "Answering on your phone line type" area. 8 Click OK to save the settings. 53 Receiving a fax using the... periods, spaces, and/or these now, and then click Next. 9 To send your fax. 11 Click Send. Faxing using the computer Sending a fax using the software You can include up on the" drop-down list. 6 To turn the Auto Answer feature on and off at scheduled times, select the settings you...
.... 6 Enter the recipient information, and then click Next. Note: A fax number can scan a document to the computer and then fax it to someone using the software. 1 Load an original document facedown in the "Answering on your phone line type" area. 8 Click OK to save the settings. 53 Receiving a fax using the... periods, spaces, and/or these now, and then click Next. 9 To send your fax. 11 Click Send. Faxing using the computer Sending a fax using the software You can include up on the" drop-down list. 6 To turn the Auto Answer feature on and off at scheduled times, select the settings you...

User's Guide
Page 54
... the Ringing and Answering tab. 5 From the "Answering on the display. For more information, see "Setting Auto Answer to use. When you want from the software Caller ID is a service provided by the country or region setting and only the number of times the telephone rings before receiving a fax automatically." See...
... the Ringing and Answering tab. 5 From the "Answering on the display. For more information, see "Setting Auto Answer to use. When you want from the software Caller ID is a service provided by the country or region setting and only the number of times the telephone rings before receiving a fax automatically." See...
User's Guide
Page 56
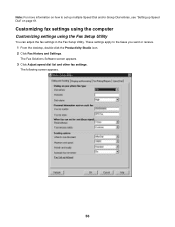
The Fax Solutions Software screen appears. 3 Click Adjust speed dial list and other fax settings. Customizing fax settings using the computer Customizing settings using the Fax Setup Utility You can adjust the fax settings in the Fax Setup Utility. The following screen appears. 56 These settings apply to set up multiple Speed Dial and/or Group Dial entries, see "Setting up Speed Dial" on page 61. Note: For more information on how to the faxes you send or receive. 1 From the desktop, double-click the Productivity Studio icon. 2 Click Fax History and Settings.
The Fax Solutions Software screen appears. 3 Click Adjust speed dial list and other fax settings. Customizing fax settings using the computer Customizing settings using the Fax Setup Utility You can adjust the fax settings in the Fax Setup Utility. The following screen appears. 56 These settings apply to set up multiple Speed Dial and/or Group Dial entries, see "Setting up Speed Dial" on page 61. Note: For more information on how to the faxes you send or receive. 1 From the desktop, double-click the Productivity Studio icon. 2 Click Fax History and Settings.
User's Guide
Page 58
..." on page 61. The Auto Answer light on the control panel comes on the cover page. 4 Click OK to save the setting. The Fax Solution Software appears. 3 From the "I Want To" menu, click Adjust speed dial list and other fax settings. 4 Click the Ringing and Answering tab. 5 From the "Block Faxes...
..." on page 61. The Auto Answer light on the control panel comes on the cover page. 4 Click OK to save the setting. The Fax Solution Software appears. 3 From the "I Want To" menu, click Adjust speed dial list and other fax settings. 4 Click the Ringing and Answering tab. 5 From the "Block Faxes...

User's Guide
Page 59
b Click Programs or All Programs Œ Lexmark 5000 Series. You can also add your company logo to a sample cover page. 3 To access any of the items in the "I Want To" menu to: &#...; In Windows Vista, click . • In Windows XP and earlier, click Start. b Click Programs or All Programs Œ Lexmark 5000 Series. d Click the Fax icon. 2 When the Fax Solutions Software appears, as shown, use this software to send a fax. 59 Using the Fax Solutions Software Use this software to every fax you send or receive.
b Click Programs or All Programs Œ Lexmark 5000 Series. You can also add your company logo to a sample cover page. 3 To access any of the items in the "I Want To" menu to: &#...; In Windows Vista, click . • In Windows XP and earlier, click Start. b Click Programs or All Programs Œ Lexmark 5000 Series. d Click the Fax icon. 2 When the Fax Solutions Software appears, as shown, use this software to send a fax. 59 Using the Fax Solutions Software Use this software to every fax you send or receive.
User's Guide
Page 60
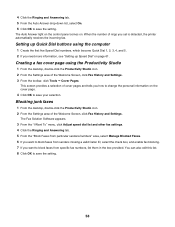
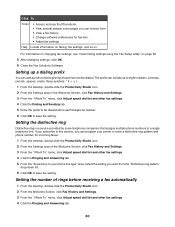
... Click OK to save the setting. If you subscribe to this service, you can choose from. • View a fax history. • Change software preferences for incoming faxes. 1 From the desktop, double-click the Productivity Studio icon. 2 From the Settings area of rings before each fax number dialed... information on faxing, fax settings, and so on page 56 5 After changing settings, click OK. 6 Close the Fax Solutions Software. Setting the distinctive ring Distinctive ring is a service provided by some telephone companies that assigns multiple phone numbers to a single telephone line.
... Click OK to save the setting. If you subscribe to this service, you can choose from. • View a fax history. • Change software preferences for incoming faxes. 1 From the desktop, double-click the Productivity Studio icon. 2 From the Settings area of rings before each fax number dialed... information on faxing, fax settings, and so on page 56 5 After changing settings, click OK. 6 Close the Fax Solutions Software. Setting the distinctive ring Distinctive ring is a service provided by some telephone companies that assigns multiple phone numbers to a single telephone line.


