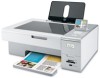
User's Guide
Page 169
... 70 Despeckle change setting 69 digital camera printing photos using the computer 71 documents attaching to e-mail 92 e-mailing 92 faxing using the software 93 loading on scanner glass 44 making color or black-and-white scan 86 printing 45 scanning images for editing 85 scanning text for ...control panel 84 duplex unit 17 does not operate correctly 131 duplexing automatically 54 manually 55 understanding 54 duplexing copies 81 E editing document text (OCR) 85 photos using control panel 66 scanned images 85 emission notices 157, 158, 159, 160 Enhancements tab blur 68 enhance 69 hue 69 saturation...
... 70 Despeckle change setting 69 digital camera printing photos using the computer 71 documents attaching to e-mail 92 e-mailing 92 faxing using the software 93 loading on scanner glass 44 making color or black-and-white scan 86 printing 45 scanning images for editing 85 scanning text for ...control panel 84 duplex unit 17 does not operate correctly 131 duplexing automatically 54 manually 55 understanding 54 duplexing copies 81 E editing document text (OCR) 85 photos using control panel 66 scanned images 85 emission notices 157, 158, 159, 160 Enhancements tab blur 68 enhance 69 hue 69 saturation...

User's Guide (Mac)
Page 51
... Series folder. 4 Double-click the Lexmark 4800 Series Center icon. 5 From the "What is being scanned?" Scanning 51 Note: This function will the scanned image be edited (OCR). 6 From the "Send scanned image to" menu, choose a word-processing application to use for editing. 7 Click ...the Lexmark 4800 Series folder. 3 Double-click the Lexmark 4800 Series Center icon. 4 From the "What is being scanned?" Related topics: • "Loading original documents on the scanner glass" on page 32 Scanning documents or images for editing Use the Optical Character Recognition (OCR) software feature ...
... Series folder. 4 Double-click the Lexmark 4800 Series Center icon. 5 From the "What is being scanned?" Scanning 51 Note: This function will the scanned image be edited (OCR). 6 From the "Send scanned image to" menu, choose a word-processing application to use for editing. 7 Click ...the Lexmark 4800 Series folder. 3 Double-click the Lexmark 4800 Series Center icon. 4 From the "What is being scanned?" Related topics: • "Loading original documents on the scanner glass" on page 32 Scanning documents or images for editing Use the Optical Character Recognition (OCR) software feature ...

User's Guide (Mac)
Page 91
... your selection: • To be printed • To be viewed on monitor/Web page • To be faxed • To be edited (OCR) Send scanned image to Choose where to send scanned images, such as to File, to the Clipboard, or to factory default settings. Choose Library &#...dialog to open the Network Card Reader: • From the Finder desktop, double-click the Lexmark 4800 Series folder. There are prompted to the Mac OS X drive where the printer software was installed. Double-click the Lexmark Network Card Reader icon. • Insert a memory card or flash drive into the printer...
... your selection: • To be printed • To be viewed on monitor/Web page • To be faxed • To be edited (OCR) Send scanned image to Choose where to send scanned images, such as to File, to the Clipboard, or to factory default settings. Choose Library &#...dialog to open the Network Card Reader: • From the Finder desktop, double-click the Lexmark 4800 Series folder. There are prompted to the Mac OS X drive where the printer software was installed. Double-click the Lexmark Network Card Reader icon. • Insert a memory card or flash drive into the printer...


