
Getting Started
Page 1
3500-4500 Series All-In-One Getting Started March 2007 www.lexmark.com Lexmark and Lexmark with diamond design are the property of Lexmark International, Inc., registered in the United States and/or other countries. All other trademarks are trademarks of their respective owners. © 2007 Lexmark International, Inc. All rights reserved. 740 West New Circle Road Lexington, Kentucky 40550
3500-4500 Series All-In-One Getting Started March 2007 www.lexmark.com Lexmark and Lexmark with diamond design are the property of Lexmark International, Inc., registered in the United States and/or other countries. All other trademarks are trademarks of their respective owners. © 2007 Lexmark International, Inc. All rights reserved. 740 West New Circle Road Lexington, Kentucky 40550

Getting Started
Page 2
...the manufacturer's authorized replacement power supply and power supply cord. This product is designed, tested, and approved to a professional service person. Lexmark is near the product and easily accessible. The safety features of some parts may not always be obvious. Refer service or repairs, other... replacement parts. Safety information Use only the power supply and power supply cord provided with the use of specific Lexmark components. Connect the power supply cord to an electrical outlet that is not responsible for the use of other than those described ...
...the manufacturer's authorized replacement power supply and power supply cord. This product is designed, tested, and approved to a professional service person. Lexmark is near the product and easily accessible. The safety features of some parts may not always be obvious. Refer service or repairs, other... replacement parts. Safety information Use only the power supply and power supply cord provided with the use of specific Lexmark components. Connect the power supply cord to an electrical outlet that is not responsible for the use of other than those described ...

Getting Started
Page 3
... Card menu ...31 Using the PictBridge menu ...32 Using the Settings menu ...33 Saving settings ...35 Learning about the software 37 Using the printer software...37 Using the Lexmark Imaging Studio...37 Using the Solution Center...38 Using Printing Preferences...40 Opening Printing Preferences ...40 Using the Save Settings menu ...40 Using...
... Card menu ...31 Using the PictBridge menu ...32 Using the Settings menu ...33 Saving settings ...35 Learning about the software 37 Using the printer software...37 Using the Lexmark Imaging Studio...37 Using the Solution Center...38 Using Printing Preferences...40 Opening Printing Preferences ...40 Using the Save Settings menu ...40 Using...
Getting Started
Page 4
...only) ...52 Wi-Fi indicator light is orange ...53 Wi-Fi indicator light is blinking orange during installation 54 Wireless network printer does not print ...57 Wireless printer is no longer working...58 Photos do not transfer from a memory card across a wireless network 63 Changing wireless settings after...an internal wireless print server to factory default settings 65 Uninstalling and reinstalling the software 66 Advanced wireless setup 68 Adding a printer to an existing ad hoc wireless network 68 Creating an ad hoc wireless network 69 Notices...72 Edition notice...72 Networking glossary...73 ...
...only) ...52 Wi-Fi indicator light is orange ...53 Wi-Fi indicator light is blinking orange during installation 54 Wireless network printer does not print ...57 Wireless printer is no longer working...58 Photos do not transfer from a memory card across a wireless network 63 Changing wireless settings after...an internal wireless print server to factory default settings 65 Uninstalling and reinstalling the software 66 Advanced wireless setup 68 Adding a printer to an existing ad hoc wireless network 68 Creating an ad hoc wireless network 69 Notices...72 Edition notice...72 Networking glossary...73 ...
Getting Started
Page 5
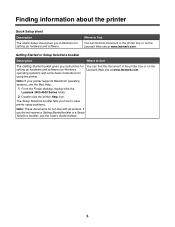
...receive a Getting Started booklet or a Setup Solutions booklet, see the Mac Help: 1 From the Finder desktop, double-click the Lexmark 3500-4500 Series folder. 2 Double-click the printer Help icon. Getting Started or Setup Solutions booklet Description Where to find this document in the... printer box or on the Lexmark Web site at www.lexmark.com. Finding information about the printer Quick Setup sheet Description The Quick Setup sheet gives you instructions for using the printer. The Setup Solutions booklet tells you how to...
...receive a Getting Started booklet or a Setup Solutions booklet, see the Mac Help: 1 From the Finder desktop, double-click the Lexmark 3500-4500 Series folder. 2 Double-click the printer Help icon. Getting Started or Setup Solutions booklet Description Where to find this document in the... printer box or on the Lexmark Web site at www.lexmark.com. Finding information about the printer Quick Setup sheet Description The Quick Setup sheet gives you instructions for using the printer. The Setup Solutions booklet tells you how to...
Getting Started
Page 6
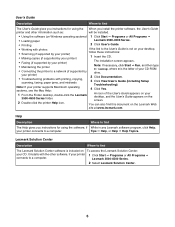
...: 4 Click Yes. 1 From the Finder desktop, double-click the Lexmark 3500-4500 Series folder. Lexmark 3500-4500 Series. 2 Select Lexmark Solution Center. 6 User's Guide Description Where to find The User's Guide gives you install the printer software, the User's Guide printer and other software, if your printer 1 Click Start ΠPrograms or All Programs Πconnects...
...: 4 Click Yes. 1 From the Finder desktop, double-click the Lexmark 3500-4500 Series folder. Lexmark 3500-4500 Series. 2 Select Lexmark Solution Center. 6 User's Guide Description Where to find The User's Guide gives you install the printer software, the User's Guide printer and other software, if your printer 1 Click Start ΠPrograms or All Programs Πconnects...
Getting Started
Page 7
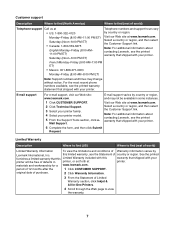
Visit our Web site at www.lexmark.com. period of Limited Warranty section, click Inkjet & All-In-One Printers. 4 Scroll through the Web page to view the warranty. 7 Select a country or region, and then select the Customer Support link. this warranty that shipped with your printer model. 5 From the Support Tools section, click e- Note: For...
Visit our Web site at www.lexmark.com. period of Limited Warranty section, click Inkjet & All-In-One Printers. 4 Scroll through the Web page to view the warranty. 7 Select a country or region, and then select the Customer Support link. this warranty that shipped with your printer model. 5 From the Support Tools section, click e- Note: For...

Getting Started
Page 8
Record the following information (located on the store receipt and the back of the printer), and have it ready when you contact us so that we may serve you faster: • Machine Type number • Serial number • Date purchased • Store where purchased 8
Record the following information (located on the store receipt and the back of the printer), and have it ready when you contact us so that we may serve you faster: • Machine Type number • Serial number • Date purchased • Store where purchased 8
Getting Started
Page 9
...up and working properly, and that your computer is connected to your wireless network. 2 Know the name (SSID) of your wireless network. Setting up the printer on page 19. Item SSID (name of your wireless network. 3 If your wireless network uses a security scheme, make sure you know the password that came... anything, locate the CD for Windows. 2 Make sure the computer is also known as security key, WEP key, or WPA key. Setting up the printer If you are going to use your printer for wireless printing, these are the things you need to know. Note: If you previously set up the...
...up and working properly, and that your computer is connected to your wireless network. 2 Know the name (SSID) of your wireless network. Setting up the printer on page 19. Item SSID (name of your wireless network. 3 If your wireless network uses a security scheme, make sure you know the password that came... anything, locate the CD for Windows. 2 Make sure the computer is also known as security key, WEP key, or WPA key. Setting up the printer If you are going to use your printer for wireless printing, these are the things you need to know. Note: If you previously set up the...
Getting Started
Page 10
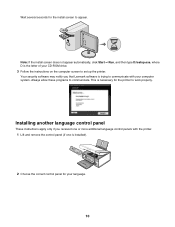
Always allow these programs to work properly. Your security software may notify you received one is the letter of your language. 10 This is necessary for the printer to communicate. Note: If the install screen does not appear automatically, click Start ΠRun, and then type D:\setup...to appear. Installing another language control panel These instructions apply only if you that Lexmark software is trying to communicate with the printer. 1 Lift and remove the control panel (if one or more additional language control panels with your computer system. Wait several seconds ...
Always allow these programs to work properly. Your security software may notify you received one is the letter of your language. 10 This is necessary for the printer to communicate. Note: If the install screen does not appear automatically, click Start ΠRun, and then type D:\setup...to appear. Installing another language control panel These instructions apply only if you that Lexmark software is trying to communicate with the printer. 1 Lift and remove the control panel (if one or more additional language control panels with your computer system. Wait several seconds ...
Getting Started
Page 11
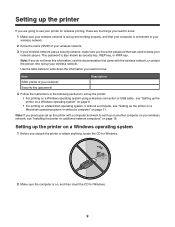
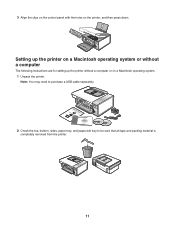
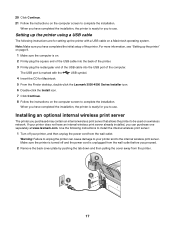
Setting up the printer on a Macintosh operating system or without a computer The following instructions are for setting up the printer without a computer or on the printer, and then press down. Note: You may need to purchase a USB cable separately. 1 2 3 2 Check the top, bottom, sides, paper tray, and paper exit tray to be sure that all tape and packing material is completely removed from the printer. 11 3 Align the clips on the control panel with the holes on a Macintosh operating system. 1 Unpack the printer.
Setting up the printer on a Macintosh operating system or without a computer The following instructions are for setting up the printer without a computer or on the printer, and then press down. Note: You may need to purchase a USB cable separately. 1 2 3 2 Check the top, bottom, sides, paper tray, and paper exit tray to be sure that all tape and packing material is completely removed from the printer. 11 3 Align the clips on the control panel with the holes on a Macintosh operating system. 1 Unpack the printer.
Getting Started
Page 13
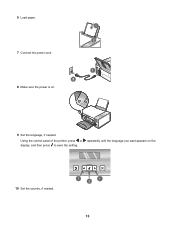
repeatedly until the language you want appears on . 9 Set the language, if needed . 1 1 2 13 6 Load paper. 1 2 7 Connect the power cord. 8 Make sure the power is on the 10 Set the country, if needed . Using the control panel of the printer, press or display, and then press to save the setting.
repeatedly until the language you want appears on . 9 Set the language, if needed . 1 1 2 13 6 Load paper. 1 2 7 Connect the power cord. 8 Make sure the power is on the 10 Set the country, if needed . Using the control panel of the printer, press or display, and then press to save the setting.
Getting Started
Page 14
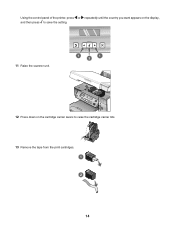
Using the control panel of the printer, press or repeatedly until the country you want appears on the display, and then press to save the setting. 11 Raise the scanner unit. 1 1 2 12 Press down on the cartridge carrier levers to raise the cartridge carrier lids. 13 Remove the tape from the print cartridges. 1 2 14
Using the control panel of the printer, press or repeatedly until the country you want appears on the display, and then press to save the setting. 11 Raise the scanner unit. 1 1 2 12 Press down on the cartridge carrier levers to raise the cartridge carrier lids. 13 Remove the tape from the print cartridges. 1 2 14
Getting Started
Page 15
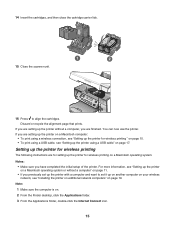
...3 From the Applications folder, double-click the Internet Connect icon. 15 For more information, see "Setting up the printer on a Macintosh operating system or without a computer, you previously set up the printer on a Macintosh computer: • To print using a USB cable" on a Macintosh operating system. Note: 1... Make sure the computer is on page 19. If you are setting up the printer without a computer" on page 11. • If you are setting up the printer with a computer and want to align the cartridges. Notes: • Make sure you are finished. You...
...3 From the Applications folder, double-click the Internet Connect icon. 15 For more information, see "Setting up the printer on a Macintosh operating system or without a computer, you previously set up the printer on a Macintosh computer: • To print using a USB cable" on a Macintosh operating system. Note: 1... Make sure the computer is on page 19. If you are setting up the printer without a computer" on page 11. • If you are setting up the printer with a computer and want to align the cartridges. Notes: • Make sure you are finished. You...
Getting Started
Page 16
... protect your wireless network. If you are using the WEP type of security you must enter a hexadecimal key. For instructions on the back of the printer. • You will be restored when you do not know this information, see the documentation that came with the wireless network, or contact the person... 10.3, but is the last six digits of your original network. 17 Insert the CD for Macintosh. 18 From the Finder desktop, double-click the Lexmark 3500-4500 Series Installer icon. 19 Double-click the Install icon. 16 Note: The application is referred to your network (SSID).
... protect your wireless network. If you are using the WEP type of security you must enter a hexadecimal key. For instructions on the back of the printer. • You will be restored when you do not know this information, see the documentation that came with the wireless network, or contact the person... 10.3, but is the last six digits of your original network. 17 Insert the CD for Macintosh. 18 From the Finder desktop, double-click the Lexmark 3500-4500 Series Installer icon. 19 Double-click the Install icon. 16 Note: The application is referred to your network (SSID).
Getting Started
Page 17
... not have completed the initial setup of the computer. When you have completed the installation, the printer is ready for Macintosh. 5 From the Finder desktop, double-click the Lexmark 3500-4500 Series Installer icon. 6 Double-click the Install icon. 7 Click Continue. 8 Follow the instructions on...down and then pulling the cover away from the wall outlet. Warning: Failure to unplug the printer can purchase one separately at www.lexmark.com. For more information, see "Setting up the printer with the USB symbol. 4 Insert the CD for you to install the internal wireless print ...
... not have completed the initial setup of the computer. When you have completed the installation, the printer is ready for Macintosh. 5 From the Finder desktop, double-click the Lexmark 3500-4500 Series Installer icon. 6 Double-click the Install icon. 7 Click Continue. 8 Follow the instructions on...down and then pulling the cover away from the wall outlet. Warning: Failure to unplug the printer can purchase one separately at www.lexmark.com. For more information, see "Setting up the printer with the USB symbol. 4 Insert the CD for you to install the internal wireless print ...

Getting Started
Page 18
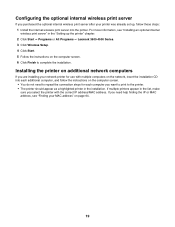
...to the back of the printer. b Click Wireless Setup. Touch something metal such as the printer frame before you purchased the optional internal wireless print server separately and have already installed the printer: a Click Start ΠPrograms or All Programs ΠLexmark 3500-4500 Series. 3 Unpack... the internal wireless print server. c Follow the prompts on the left and right, and then slide the wireless print server into the printer until it snaps into ...
...to the back of the printer. b Click Wireless Setup. Touch something metal such as the printer frame before you purchased the optional internal wireless print server separately and have already installed the printer: a Click Start ΠPrograms or All Programs ΠLexmark 3500-4500 Series. 3 Unpack... the internal wireless print server. c Follow the prompts on the left and right, and then slide the wireless print server into the printer until it snaps into ...
Getting Started
Page 19
For more information, see "Finding your printer was already set up the printer" chapter. 2 Click Start ΠPrograms or All Programs ΠLexmark 3500-4500 Series. 3 Click Wireless Setup. 4 Click Start. 5 Follow the instructions on the computer screen. 6 Click Finish to repeat the... connection steps for use with the correct IP address/MAC address. If you select the printer with multiple computers on the network...
For more information, see "Finding your printer was already set up the printer" chapter. 2 Click Start ΠPrograms or All Programs ΠLexmark 3500-4500 Series. 3 Click Wireless Setup. 4 Click Start. 5 Follow the instructions on the computer screen. 6 Click Finish to repeat the... connection steps for use with the correct IP address/MAC address. If you select the printer with multiple computers on the network...
Getting Started
Page 20
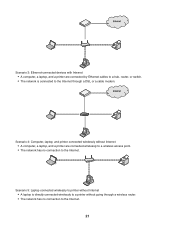
... be connected to the Internet through a wireless connection. The printers in the following diagrams represent Lexmark printers with Internet • A computer is connected to a wireless router by Lexmark to enable Lexmark printers to be able to receive and transmit radio waves. Scenario 1: Laptop and printer connected wirelessly with Lexmark internal print servers built in or installed in all...
... be connected to the Internet through a wireless connection. The printers in the following diagrams represent Lexmark printers with Internet • A computer is connected to a wireless router by Lexmark to enable Lexmark printers to be able to receive and transmit radio waves. Scenario 1: Laptop and printer connected wirelessly with Lexmark internal print servers built in or installed in all...
Getting Started
Page 21
... a DSL or a cable modem. Scenario 3: Ethernet-connected devices with Internet • A computer, a laptop, and a printer are connected wirelessly to a wireless access point. • The network has no connection to the Internet. 21 Scenario 5: Laptop connected wirelessly to... printer without Internet • A laptop is directly connected wirelessly to a printer without Internet • A computer, a laptop, and a printer are connected by Ethernet cables to a hub, router, or switch. • The...
... a DSL or a cable modem. Scenario 3: Ethernet-connected devices with Internet • A computer, a laptop, and a printer are connected wirelessly to a wireless access point. • The network has no connection to the Internet. 21 Scenario 5: Laptop connected wirelessly to... printer without Internet • A laptop is directly connected wirelessly to a printer without Internet • A computer, a laptop, and a printer are connected by Ethernet cables to a hub, router, or switch. • The...
