
Clearing Jams Guide
Page 1
Lexmark™ X342 Clearing Jams Guide Avoiding jams The following hints can cause print quality problems. 3 Remove the jammed paper by the stack line on the labels in the trays are not placed too tightly against the stack of the MFP, ...
Lexmark™ X342 Clearing Jams Guide Avoiding jams The following hints can cause print quality problems. 3 Remove the jammed paper by the stack line on the labels in the trays are not placed too tightly against the stack of the MFP, ...
Troubleshooting Guide
Page 1
...complete the installation. Removing and reinstalling the drivers software If the software is not functioning properly or a communications error message appears, you may need to access the My... anti-virus software. If the problems persist, follow these tips to the MFP and the computer. Display is only available on the X342n. Note: After installing the software... straighten the paper before loading. • Make sure the adjustable paper guides are properly configured. Lexmark™ X34x Troubleshooting Guide Setup troubleshooting Incorrect language appears on the display 1 Press Menu. 2...
...complete the installation. Removing and reinstalling the drivers software If the software is not functioning properly or a communications error message appears, you may need to access the My... anti-virus software. If the problems persist, follow these tips to the MFP and the computer. Display is only available on the X342n. Note: After installing the software... straighten the paper before loading. • Make sure the adjustable paper guides are properly configured. Lexmark™ X34x Troubleshooting Guide Setup troubleshooting Incorrect language appears on the display 1 Press Menu. 2...

Troubleshooting Guide
Page 4
or Click Start Control Panel Printers and Other Hardware Printers and Faxes. 2 Double-click the Lexmark X340/X340n/ X342n icon. 3 Click Printer, and make sure that it directly to the telephone line. Disconnect any answering machines, computers with modems, or telephone line ... until the other device is an error message, see the User's Guide. • If replacing the toner cartridge does not correct the problem, replace the photoconductor. If there is finished before sending the scan job. Can send but not send faxes • Make sure the document...
or Click Start Control Panel Printers and Other Hardware Printers and Faxes. 2 Double-click the Lexmark X340/X340n/ X342n icon. 3 Click Printer, and make sure that it directly to the telephone line. Disconnect any answering machines, computers with modems, or telephone line ... until the other device is an error message, see the User's Guide. • If replacing the toner cartridge does not correct the problem, replace the photoconductor. If there is finished before sending the scan job. Can send but not send faxes • Make sure the document...
Troubleshooting Guide
Page 5
... quality Ask that the sender: • Check that you would like to dial. - repeatedly until Prefix 6 Press . 7 Enter the numbers you wish to have been a problem with the quality of the original document is satisfactory. • Resend the fax. 4 Press . 5 Press or appears.
... quality Ask that the sender: • Check that you would like to dial. - repeatedly until Prefix 6 Press . 7 Enter the numbers you wish to have been a problem with the quality of the original document is satisfactory. • Resend the fax. 4 Press . 5 Press or appears.

User's Guide
Page 14
Follow the instructions on page 72. If problems occur, see Setup troubleshooting on the computer screen to the public switched telephone network. Note: The printer is required. Connecting directly to a telephone wall jack CAUTION: Use only a 26 AWG or larger telecommunications (RJ-11) cord when connecting...into the LINE port of the MFP. 3 When the software installation screen appears, click Install or Install Now. You can connect the printer to send and receive faxes. Getting the MFP ready to fax You can be successfully attached to equipment such as described in the ...
Follow the instructions on page 72. If problems occur, see Setup troubleshooting on the computer screen to the public switched telephone network. Note: The printer is required. Connecting directly to a telephone wall jack CAUTION: Use only a 26 AWG or larger telecommunications (RJ-11) cord when connecting...into the LINE port of the MFP. 3 When the software installation screen appears, click Install or Install Now. You can connect the printer to send and receive faxes. Getting the MFP ready to fax You can be successfully attached to equipment such as described in the ...
User's Guide
Page 31
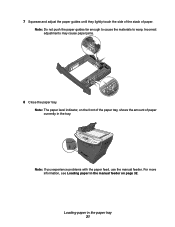
Note: If you experience problems with the paper feed, use the manual feeder. Loading paper in the manual feeder on the front of the paper tray, shows the amount of paper. Incorrect adjustments may cause paper jams. 8 Close the paper tray. Note: The paper level indicator, on page 32. 7 Squeeze and adjust the paper guides until they lightly touch the side of the stack of paper currently in the tray. Note: Do not push the paper guides far enough to cause the materials to warp. For more information, see Loading paper in the paper tray 31
Note: If you experience problems with the paper feed, use the manual feeder. Loading paper in the manual feeder on the front of the paper tray, shows the amount of paper. Incorrect adjustments may cause paper jams. 8 Close the paper tray. Note: The paper level indicator, on page 32. 7 Squeeze and adjust the paper guides until they lightly touch the side of the stack of paper currently in the tray. Note: Do not push the paper guides far enough to cause the materials to warp. For more information, see Loading paper in the paper tray 31
User's Guide
Page 38
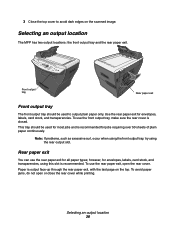
... be used for most jobs and is output face-up through the rear paper exit, with the last page on the scanned image. Note: If problems, such as excessive curl, occur when using the front output tray, try using this slot is closed. To use the rear paper exit for envelopes...
... be used for most jobs and is output face-up through the rear paper exit, with the last page on the scanned image. Note: If problems, such as excessive curl, occur when using the front output tray, try using this slot is closed. To use the rear paper exit for envelopes...
User's Guide
Page 67
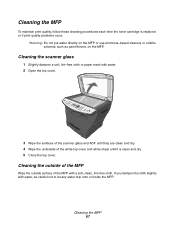
... the outside of the MFP Wipe the outside surface of the white top cover and white sheet until it is replaced or if print quality problems occur.
... the outside of the MFP Wipe the outside surface of the white top cover and white sheet until it is replaced or if print quality problems occur.
User's Guide
Page 74
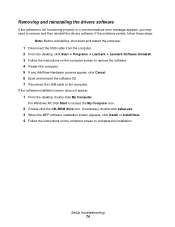
... Start to the computer. Setup troubleshooting 74 If the problems persist, follow these steps: Note: Before reinstalling, shut down and restart the computer. 1 Disconnect the USB cable from the computer. 2 From the desktop, click Start Æ Programs Æ Lexmark Æ Lexmark Software Uninstall. 3 Follow the instructions on the computer ... does not appear: 1 From the desktop, double-click My Computer. Removing and reinstalling the drivers software If the software is not functioning properly or a communications error message appears, you may need to complete the installation.
... Start to the computer. Setup troubleshooting 74 If the problems persist, follow these steps: Note: Before reinstalling, shut down and restart the computer. 1 Disconnect the USB cable from the computer. 2 From the desktop, click Start Æ Programs Æ Lexmark Æ Lexmark Software Uninstall. 3 Follow the instructions on the computer ... does not appear: 1 From the desktop, double-click My Computer. Removing and reinstalling the drivers software If the software is not functioning properly or a communications error message appears, you may need to complete the installation.
User's Guide
Page 77
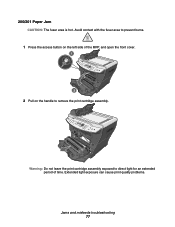
Extended light exposure can cause print quality problems. Jams and misfeeds troubleshooting 77 200/201 Paper Jam CAUTION: The fuser area is hot. Warning: Do not leave the print cartridge assembly exposed to direct light for an extended period of the MFP, and open the front cover. 1 2 2 Pull on the handle to prevent burns. 1 Press the access button on the left side of time. Avoid contact with the fuser area to remove the print cartridge assembly.
Extended light exposure can cause print quality problems. Jams and misfeeds troubleshooting 77 200/201 Paper Jam CAUTION: The fuser area is hot. Warning: Do not leave the print cartridge assembly exposed to direct light for an extended period of the MFP, and open the front cover. 1 2 2 Pull on the handle to prevent burns. 1 Press the access button on the left side of time. Avoid contact with the fuser area to remove the print cartridge assembly.
User's Guide
Page 84
...reinstall the software. Restart the computer. or Click Start Æ Control Panel Æ Printers and Other Hardware Æ Printers and Faxes. 2 Double-click the Lexmark X340/X340n/X342n icon. 3 Click Printer, and make sure no check mark appears next to Pause Printing. 4 Make sure ...Printers. If you are using the MFP. Minimize the number and size of graphics and images in use. Close all applications not in the document. If you are scanning a document, wait until scanning is complete before using the manual feeder, this is slow. Print and copy troubleshooting Problem...
...reinstall the software. Restart the computer. or Click Start Æ Control Panel Æ Printers and Other Hardware Æ Printers and Faxes. 2 Double-click the Lexmark X340/X340n/X342n icon. 3 Click Printer, and make sure no check mark appears next to Pause Printing. 4 Make sure ...Printers. If you are using the MFP. Minimize the number and size of graphics and images in use. Close all applications not in the document. If you are scanning a document, wait until scanning is complete before using the manual feeder, this is slow. Print and copy troubleshooting Problem...

User's Guide
Page 85
... to return to temporarily extend the toner cartridge life by redistributing the toner. For more information, see Redistributing toner on page 62. Print quality troubleshooting Problem Light or faded print AaBbCc AaBbCc AaBbCc AaBbCc AaBbCc Toner specs AaBbCc AaBbCc AaBbCc AaBbCc AaBbCc Print irregularities AaBbCc AaBbCc AaBbCc AaBbCc AaBbCc Vertical lines...
... to return to temporarily extend the toner cartridge life by redistributing the toner. For more information, see Redistributing toner on page 62. Print quality troubleshooting Problem Light or faded print AaBbCc AaBbCc AaBbCc AaBbCc AaBbCc Toner specs AaBbCc AaBbCc AaBbCc AaBbCc AaBbCc Print irregularities AaBbCc AaBbCc AaBbCc AaBbCc AaBbCc Vertical lines...

User's Guide
Page 86
... the paper type settings match the paper in the tray are aligned with the edges of the MFP on page 32. Replace the toner cartridge. Problem Horizontal stripes AaBbCc AaBbCc AaBbCc AaBbCc AaBbCc Gray background AaBbCc AaBbCc AaBbCc AaBbCc AaBbCc Toner smear Page skew AAAAaAaaaBaBBBbBbbbCbCCCCccccc Solution Replace the toner cartridge. For...
... the paper type settings match the paper in the tray are aligned with the edges of the MFP on page 32. Replace the toner cartridge. Problem Horizontal stripes AaBbCc AaBbCc AaBbCc AaBbCc AaBbCc Gray background AaBbCc AaBbCc AaBbCc AaBbCc AaBbCc Toner smear Page skew AAAAaAaaaBaBBBbBbbbCbCCCCccccc Solution Replace the toner cartridge. For...
User's Guide
Page 87
... the photoconductor. Print quality troubleshooting 87 For more information, see Installing a toner cartridge on page 62. Black pages Replace the toner cartridge. Problem Wrinkles or creases Solution Make sure paper is not too wet. The MFP may need to be serviced. Make sure the paper is loaded correctly. ...
... the photoconductor. Print quality troubleshooting 87 For more information, see Installing a toner cartridge on page 62. Black pages Replace the toner cartridge. Problem Wrinkles or creases Solution Make sure paper is not too wet. The MFP may need to be serviced. Make sure the paper is loaded correctly. ...

User's Guide
Page 88
...page 54. Scan troubleshooting 88 or Click Start Æ Control Panel Æ Printers and Other Hardware Æ Printers and Faxes. 2 Double-click the Lexmark X340/X340n/X342n icon. 3 Click Printer, and make sure no check mark appears next to Pause Printing. 4 Make ...sure a check mark appears next to use . If you want to Set As Default. Make sure the document is an error message, see Removing and reinstalling the drivers software on page 91. Scan troubleshooting Problem...
...page 54. Scan troubleshooting 88 or Click Start Æ Control Panel Æ Printers and Other Hardware Æ Printers and Faxes. 2 Double-click the Lexmark X340/X340n/X342n icon. 3 Click Printer, and make sure no check mark appears next to Pause Printing. 4 Make ...sure a check mark appears next to use . If you want to Set As Default. Make sure the document is an error message, see Removing and reinstalling the drivers software on page 91. Scan troubleshooting Problem...

User's Guide
Page 89
... any faxes that it directly to see Error messages troubleshooting on page 91. Check to the telephone line. To ensure the printer is working correctly, connect it is working correctly. Fax troubleshooting 89 Make sure cable connections for the following hardware are secure,... line splitters. Call your telephone company to make sure that have been stored in the printer. If the telephone line is finished before sending or receiving a fax. Fax troubleshooting Problem Solution Cannot send or receive a fax Check the display. Disable this feature before sending ...
... any faxes that it directly to see Error messages troubleshooting on page 91. Check to the telephone line. To ensure the printer is working correctly, connect it is working correctly. Fax troubleshooting 89 Make sure cable connections for the following hardware are secure,... line splitters. Call your telephone company to make sure that have been stored in the printer. If the telephone line is finished before sending or receiving a fax. Fax troubleshooting Problem Solution Cannot send or receive a fax Check the display. Disable this feature before sending ...
User's Guide
Page 90
.... 6 Press . 7 Enter the numbers you wish to the Ready prompt. There may have dialed before each telephone number. 8 Press . 9 Press Stop to return to dial. Problem Solution Can receive but not send faxes Make sure the document is satisfactory. • Resend the fax. For more information, see Setting up shortcuts on...sender: • Check that you would like to verify the original document was loaded correctly. MFP receives a blank fax Ask the sender to have been a problem with the quality of the original document is loaded correctly into the ADF or on page 42.
.... 6 Press . 7 Enter the numbers you wish to the Ready prompt. There may have dialed before each telephone number. 8 Press . 9 Press Stop to return to dial. Problem Solution Can receive but not send faxes Make sure the document is satisfactory. • Resend the fax. For more information, see Setting up shortcuts on...sender: • Check that you would like to verify the original document was loaded correctly. MFP receives a blank fax Ask the sender to have been a problem with the quality of the original document is loaded correctly into the ADF or on page 42.
User's Guide
Page 91
... call to the telephone number to which you still do not hear a dial tone,connect the printer to a different telephone jack. Close the front cover until it is connected to the unlock position... 91 To cancel the job, press Stop. Remove the defective toner cartridge, and install a new Lexmark toner cartridge. Note: To continue the job, press Start. If the fax still fails, see Loading... paper in the paper tray. Error messages troubleshooting Problem Change Media Close Front Door Load Manual Load Media USB Not Connected QLINK Not Found Digital...
... call to the telephone number to which you still do not hear a dial tone,connect the printer to a different telephone jack. Close the front cover until it is connected to the unlock position... 91 To cancel the job, press Stop. Remove the defective toner cartridge, and install a new Lexmark toner cartridge. Note: To continue the job, press Start. If the fax still fails, see Loading... paper in the paper tray. Error messages troubleshooting Problem Change Media Close Front Door Load Manual Load Media USB Not Connected QLINK Not Found Digital...
User's Guide
Page 92
... toner cartridge. For more information, see Redistributing toner on page 80. Note: • Clearing the error message in this way may truncate the print job. Problem Solution 34 Short paper Make sure the correct media type and size have enough memory to process the job. • Press Start to resume printing...
... toner cartridge. For more information, see Redistributing toner on page 80. Note: • Clearing the error message in this way may truncate the print job. Problem Solution 34 Short paper Make sure the correct media type and size have enough memory to process the job. • Press Start to resume printing...
User's Guide
Page 93
For authorized service representatives in your area, visit www.lexmark.com. Error messages troubleshooting 93 See 290/291/292 Scanner Jam on page 83. 1 Turn the power off for one minute. 2 Turn the power on page 82. If the error message reappears, call a Lexmark service representative. See 251 Paper Jam on . Problem 241.xx Paper Jam 242.xx Paper Jam 251.xx Paper Jam 290 Scanner Jam 291 Scanner Jam 292 Scanner Jam 9**.xx Service Solution See 241/242 Paper Jam on page 81.
For authorized service representatives in your area, visit www.lexmark.com. Error messages troubleshooting 93 See 290/291/292 Scanner Jam on page 83. 1 Turn the power off for one minute. 2 Turn the power on page 82. If the error message reappears, call a Lexmark service representative. See 251 Paper Jam on . Problem 241.xx Paper Jam 242.xx Paper Jam 251.xx Paper Jam 290 Scanner Jam 291 Scanner Jam 292 Scanner Jam 9**.xx Service Solution See 241/242 Paper Jam on page 81.


