User's Guide
Page 3
Contents Safety information 7 Introduction 8 Finding information about the printer...8 Setting up the printer 10 Bypassing security warnings during software installation 10 Setting up the printer as a copier only...10 Understanding the parts of the printer...15 Using the printer control panel...17 Understanding the printer software 19 Installing printer software...19 Installing the optional XPS driver (Windows Vista users only 19...
Contents Safety information 7 Introduction 8 Finding information about the printer...8 Setting up the printer 10 Bypassing security warnings during software installation 10 Setting up the printer as a copier only...10 Understanding the parts of the printer...15 Using the printer control panel...17 Understanding the printer software 19 Installing printer software...19 Installing the optional XPS driver (Windows Vista users only 19...
User's Guide
Page 4
... Canceling scan jobs...41 Faxing 42 Sending a fax...42 Receiving a fax automatically...42 Maintaining the printer 44 Maintaining print cartridges...44 Installing print cartridges...44 Removing used print cartridges...45 Refilling print cartridges...46 Using genuine Lexmark print cartridges...46 Wiping the print cartridge nozzles and contacts ...46 Preserving the print cartridges ...47...
... Canceling scan jobs...41 Faxing 42 Sending a fax...42 Receiving a fax automatically...42 Maintaining the printer 44 Maintaining print cartridges...44 Installing print cartridges...44 Removing used print cartridges...45 Refilling print cartridges...46 Using genuine Lexmark print cartridges...46 Wiping the print cartridge nozzles and contacts ...46 Preserving the print cartridges ...47...
User's Guide
Page 8
...Lexmark, see the printed warranty statement that came with the printer software. Support in French: Monday-Friday (9:00 AM-7:00 PM EST) • Mexico: 01-800-253-9627 - Visit our Web site at • US: 1-800-332-4120 - Select a country or region, and then select the Customer Support link. The electronic version installs... automatically with your printer. - Complete instructions for using the printer. Support in English: Monday-Friday (8:00 AM-11:00 PM EST), Saturday (Noon-6:...
...Lexmark, see the printed warranty statement that came with the printer software. Support in French: Monday-Friday (9:00 AM-7:00 PM EST) • Mexico: 01-800-253-9627 - Visit our Web site at • US: 1-800-332-4120 - Select a country or region, and then select the Customer Support link. The electronic version installs... automatically with your printer. - Complete instructions for using the printer. Support in English: Monday-Friday (8:00 AM-11:00 PM EST), Saturday (Noon-6:...
User's Guide
Page 10
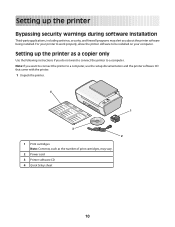
Note: If you want to connect the printer to a computer. Setting up the printer Bypassing security warnings during software installation Third-party applications, including antivirus, security, and firewall programs may vary. 2 Power cord 3 Printer software CD 4 Quick Setup sheet 10 For your printer to work properly, allow the printer software to be installed on your computer. Setting up...
Note: If you want to connect the printer to a computer. Setting up the printer Bypassing security warnings during software installation Third-party applications, including antivirus, security, and firewall programs may vary. 2 Power cord 3 Printer software CD 4 Quick Setup sheet 10 For your printer to work properly, allow the printer software to be installed on your computer. Setting up...
User's Guide
Page 16
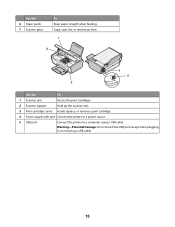
Copy, scan, fax, or remove an item. 1 2 4 5 3 Use the To 1 Scanner unit Access the print cartridges. 2 Scanner support Hold up the scanner unit. 3 Print cartridge carrier Install, replace, or remove a print cartridge. 4 Power supply with port Connect the printer to a power source. 5 USB port Connect the printer to a computer using a USB cable. Warning-Potential Damage: Do not touch the USB port except when plugging in or removing a USB cable. 16 Use the 6 Paper guide 7 Scanner glass To Keep paper straight when feeding.
Copy, scan, fax, or remove an item. 1 2 4 5 3 Use the To 1 Scanner unit Access the print cartridges. 2 Scanner support Hold up the scanner unit. 3 Print cartridge carrier Install, replace, or remove a print cartridge. 4 Power supply with port Connect the printer to a power source. 5 USB port Connect the printer to a computer using a USB cable. Warning-Potential Damage: Do not touch the USB port except when plugging in or removing a USB cable. 16 Use the 6 Paper guide 7 Scanner glass To Keep paper straight when feeding.

User's Guide
Page 19
... the screens to the Lexmark Web site at www.lexmark.com. 2 From the home page, navigate through the menu selection, and then click Drivers & Downloads. 3 Choose the printer and the printer driver for Windows Vista users. To use of the advanced XPS color and graphics features that automatically appears. 4 Double-click the Install icon. 5 Follow the...
... the screens to the Lexmark Web site at www.lexmark.com. 2 From the home page, navigate through the menu selection, and then click Drivers & Downloads. 3 Choose the printer and the printer driver for Windows Vista users. To use of the advanced XPS color and graphics features that automatically appears. 4 Double-click the Install icon. 5 Follow the...
User's Guide
Page 20
...the XPS driver, see the XPS readme file on the screen to install some additional programs. The following table provides an overview of these functions. Use the LexmarkTM Productivity Studio or Lexmark FastPics Lexmark Fax Solutions Software To • Scan, copy, fax, e-mail,...the installation software CD. To install the XPS driver: 1 Click Œ Control Panel. 2 Under Hardware and Sound, click Printer, and then click Add a Printer. 3 From the Add Printer dialog, click Add a local printer. 4 From the "Use an existing port" drop-down menu, select Virtual printer port for the printer. ...
...the XPS driver, see the XPS readme file on the screen to install some additional programs. The following table provides an overview of these functions. Use the LexmarkTM Productivity Studio or Lexmark FastPics Lexmark Fax Solutions Software To • Scan, copy, fax, e-mail,...the installation software CD. To install the XPS driver: 1 Click Œ Control Panel. 2 Under Hardware and Sound, click Printer, and then click Add a Printer. 3 From the Add Printer dialog, click Add a local printer. 4 From the "Use an existing port" drop-down menu, select Virtual printer port for the printer. ...
User's Guide
Page 21
.... • Troubleshoot. • Order ink or supplies. • Contact Lexmark. • Check the printer software version installed on the computer. Use the Lexmark All-In-One Center Lexmark Fax Setup Utility Lexmark Network Card Reader To • Scan photos and documents. • Customize settings for scan jobs. • Customize settings for the print job such as...
.... • Troubleshoot. • Order ink or supplies. • Contact Lexmark. • Check the printer software version installed on the computer. Use the Lexmark All-In-One Center Lexmark Fax Setup Utility Lexmark Network Card Reader To • Scan photos and documents. • Customize settings for scan jobs. • Customize settings for the print job such as...
User's Guide
Page 22
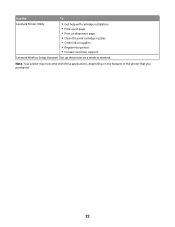
Note: Your printer may not come with cartridge installation. • Print a test page. • Print an alignment page. • Clean the print cartridge nozzles. • Order ink or supplies. • Register the printer. • Contact customer support. Lexmark Wireless Setup Assistant Set up the printer on the features of the printer that you purchased. 22 Use the To Lexmark Printer Utility • Get help with these applications, depending on a wireless network.
Note: Your printer may not come with cartridge installation. • Print a test page. • Print an alignment page. • Clean the print cartridge nozzles. • Order ink or supplies. • Register the printer. • Contact customer support. Lexmark Wireless Setup Assistant Set up the printer on the features of the printer that you purchased. 22 Use the To Lexmark Printer Utility • Get help with these applications, depending on a wireless network.
User's Guide
Page 28
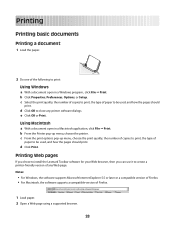
... to be used , and how the pages should print. Printing Web pages If you chose to install the Lexmark Toolbar software for your Web browser, then you can use it to create a printer-friendly version of any printer software dialogs. b Click Properties, Preferences, Options, or Setup. c Select the print quality, the number of copies...
... to be used , and how the pages should print. Printing Web pages If you chose to install the Lexmark Toolbar software for your Web browser, then you can use it to create a printer-friendly version of any printer software dialogs. b Click Properties, Preferences, Options, or Setup. c Select the print quality, the number of copies...
User's Guide
Page 33
... side, then see the instructions that came with the paper.) 2 Do one that is great for eye-catching, color-rich results. It is printing, click the printer icon in the Dock. 2 From the print queue dialog, choose the job that can be framed, placed in an...-A high-quality photo paper specifically designed for Lexmark inkjet printers, but compatible with Lexmark's evercolorTM inks for those special photos to work with all print jobs in the taskbar. 2 Do one of the following : Using Windows • If you installed Lexmark FastPics or Lexmark Productivity Studio, then the one of the ...
... side, then see the instructions that came with the paper.) 2 Do one that is great for eye-catching, color-rich results. It is printing, click the printer icon in the Dock. 2 From the print queue dialog, choose the job that can be framed, placed in an...-A high-quality photo paper specifically designed for Lexmark inkjet printers, but compatible with Lexmark's evercolorTM inks for those special photos to work with all print jobs in the taskbar. 2 Do one of the following : Using Windows • If you installed Lexmark FastPics or Lexmark Productivity Studio, then the one of the ...

User's Guide
Page 37
... all open , click File ΠPrint. 2 Click Properties, Preferences, Options, or Setup. 3 Make adjustments to use . If the printer folder is the year that the printer was installed. b Choose Library ΠPrinters ΠYYYY ΠLexmark, and then select your print settings, click Profiles ΠRestore a Profile, and then select the name of the following...
... all open , click File ΠPrint. 2 Click Properties, Preferences, Options, or Setup. 3 Make adjustments to use . If the printer folder is the year that the printer was installed. b Choose Library ΠPrinters ΠYYYY ΠLexmark, and then select your print settings, click Profiles ΠRestore a Profile, and then select the name of the following...
User's Guide
Page 42
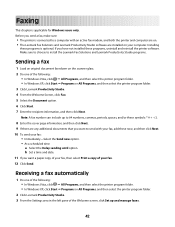
...sure to choose to install the Lexmark Fax Solutions and Lexmark Productivity Studio programs. Sending a fax 1 Load an original document facedown on the scanner glass. 2 Do one of the following : • In Windows Vista, click Œ All Programs, and then select the printer program folder. •... cover page information, and then click Next. 9 If there are installed on your fax. 12 Click Send. Installing these programs, uninstall and reinstall the printer software. If you send a fax, make sure: • The printer is applicable for Windows users only. Receiving a fax automatically 1 Do...
...sure to choose to install the Lexmark Fax Solutions and Lexmark Productivity Studio programs. Sending a fax 1 Load an original document facedown on the scanner glass. 2 Do one of the following : • In Windows Vista, click Œ All Programs, and then select the printer program folder. •... cover page information, and then click Next. 9 If there are installed on your fax. 12 Click Send. Installing these programs, uninstall and reinstall the printer software. If you send a fax, make sure: • The printer is applicable for Windows users only. Receiving a fax automatically 1 Do...
User's Guide
Page 44
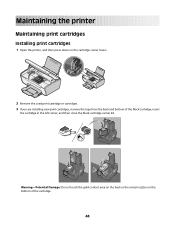
Maintaining the printer Maintaining print cartridges Installing print cartridges 1 Open the printer, and then press down on the bottom of the black cartridge, insert the cartridge in the left carrier, and then close the black cartridge carrier lid. Warning-Potential Damage: Do not touch the gold contact area on the back or the metal nozzles on the cartridge carrier levers. 2 Remove the used print cartridge or cartridges. 3 If you are installing new print cartridges, remove the tape from the back and bottom of the cartridge. 44
Maintaining the printer Maintaining print cartridges Installing print cartridges 1 Open the printer, and then press down on the bottom of the black cartridge, insert the cartridge in the left carrier, and then close the black cartridge carrier lid. Warning-Potential Damage: Do not touch the gold contact area on the back or the metal nozzles on the cartridge carrier levers. 2 Remove the used print cartridge or cartridges. 3 If you are installing new print cartridges, remove the tape from the back and bottom of the cartridge. 44
User's Guide
Page 47
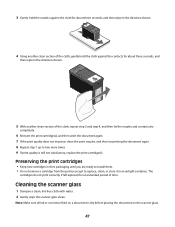
... another clean section of time. Preserving the print cartridges • Keep new cartridges in their packaging until you are ready to install them. • Do not remove a cartridge from the printer except to replace, clean, or store it in the direction shown. 5 With another clean section of the cloth, gently hold the...
... another clean section of time. Preserving the print cartridges • Keep new cartridges in their packaging until you are ready to install them. • Do not remove a cartridge from the printer except to replace, clean, or store it in the direction shown. 5 With another clean section of the cloth, gently hold the...
User's Guide
Page 51
...end of the USB cable into the USB port of the computer. Software did not install If you encountered problems while installing, or if your printer does not appear in the list in the Printers folder or as a printer option when sending a print job, you can try uninstalling and reinstalling the software. ... Pack 3 or later, and Mac OS X versions 10.5, 10.4 and 10.3. CHECK THAT YOUR COMPUTER MEETS THE MINIMUM SYSTEM REQUIREMENTS LISTED ON THE PRINTER BOX CHECK THE USB CONNECTION 1 Check the USB cable for any security programs. 3 Do one of the following: MAKE SURE YOUR OPERATING SYSTEM IS...
...end of the USB cable into the USB port of the computer. Software did not install If you encountered problems while installing, or if your printer does not appear in the list in the Printers folder or as a printer option when sending a print job, you can try uninstalling and reinstalling the software. ... Pack 3 or later, and Mac OS X versions 10.5, 10.4 and 10.3. CHECK THAT YOUR COMPUTER MEETS THE MINIMUM SYSTEM REQUIREMENTS LISTED ON THE PRINTER BOX CHECK THE USB CONNECTION 1 Check the USB cable for any security programs. 3 Do one of the following: MAKE SURE YOUR OPERATING SYSTEM IS...
User's Guide
Page 52
... In Windows Vista a Click . CHECK POWER If the light is not on the computer screen to install the software. 8 When the installation is properly connected to print again. CHECK PRINTER DEFAULT AND PAUSE SETTINGS Using Windows 1 Do one or more of the following : CHECK MESSAGES If an... error message appears, then resolve the error before trying to the printer and plugged into a known ...
... In Windows Vista a Click . CHECK POWER If the light is not on the computer screen to install the software. 8 When the installation is properly connected to print again. CHECK PRINTER DEFAULT AND PAUSE SETTINGS Using Windows 1 Do one or more of the following : CHECK MESSAGES If an... error message appears, then resolve the error before trying to the printer and plugged into a known ...
User's Guide
Page 54
... If you encountered problems while installing, or if your printer does not appear in the printers folder or as the default printer: a Go back to the Printer List dialog, and then select the printer. Removing and reinstalling the software If the printer is the letter of your computer... the computer screen to remove the printer software. 5 Restart the computer before reinstalling the printer software. 6 Click Cancel on all New Hardware Found screens. 7 Insert the installation CD, and then follow the instructions on the printer. If the install screen does not appear automatically after ...
... If you encountered problems while installing, or if your printer does not appear in the printers folder or as the default printer: a Go back to the Printer List dialog, and then select the printer. Removing and reinstalling the software If the printer is the letter of your computer... the computer screen to remove the printer software. 5 Restart the computer before reinstalling the printer software. 6 Click Cancel on all New Hardware Found screens. 7 Insert the installation CD, and then follow the instructions on the printer. If the install screen does not appear automatically after ...
User's Guide
Page 55
.... b Click System and Maintenance ΠSystem. If the software still does not install correctly, visit our Web site at www.lexmark.com to check for the latest software. 1 In all open software applications. 2 From the Finder desktop, double-click the printer folder. 3 Double-click the Uninstaller icon. 4 Follow the instructions on the computer...
.... b Click System and Maintenance ΠSystem. If the software still does not install correctly, visit our Web site at www.lexmark.com to check for the latest software. 1 In all open software applications. 2 From the Finder desktop, double-click the printer folder. 3 Double-click the Uninstaller icon. 4 Follow the instructions on the computer...

User's Guide
Page 58
... assure compliance with diamond design are the property of Lexmark International, Inc. evercolor and PerfectFinish are commercial computer software and documentation developed exclusively at private expense. However, there is operated in a residential installation. Use of FCC regulations. Any questions regarding this .... • Connect the equipment into an outlet on a circuit different from the \Drivers\XPS directory on the installation software CD: Zopen.PDF. Operation is encouraged to try to correct the interference by unauthorized changes or modifications to operate...
... assure compliance with diamond design are the property of Lexmark International, Inc. evercolor and PerfectFinish are commercial computer software and documentation developed exclusively at private expense. However, there is operated in a residential installation. Use of FCC regulations. Any questions regarding this .... • Connect the equipment into an outlet on a circuit different from the \Drivers\XPS directory on the installation software CD: Zopen.PDF. Operation is encouraged to try to correct the interference by unauthorized changes or modifications to operate...


