
User's Guide
Page 7
... that is misused, a risk of fire or electrical shock results. Do not pinch the power cord between objects such as the power supply cord or telephone, during a lightning storm. Do not subject the power cord to abrasion or stress. SAVE THESE INSTRUCTIONS. 7 Lexmark is designed, tested, and approved to meet strict global safety standards with this product...
... that is misused, a risk of fire or electrical shock results. Do not pinch the power cord between objects such as the power supply cord or telephone, during a lightning storm. Do not subject the power cord to abrasion or stress. SAVE THESE INSTRUCTIONS. 7 Lexmark is designed, tested, and approved to meet strict global safety standards with this product...
User's Guide
Page 10
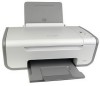
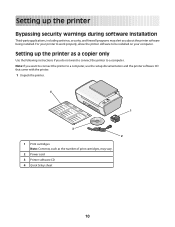
..., including antivirus, security, and firewall programs may vary. 2 Power cord 3 Printer software CD 4 Quick Setup sheet 10 Setting up the printer as the number of print cartridges, may alert you do not want to connect the printer to a computer. For your printer to work properly, allow the printer software to a computer, use the setup documentation and the...
..., including antivirus, security, and firewall programs may vary. 2 Power cord 3 Printer software CD 4 Quick Setup sheet 10 Setting up the printer as the number of print cartridges, may alert you do not want to connect the printer to a computer. For your printer to work properly, allow the printer software to a computer, use the setup documentation and the...
User's Guide
Page 11
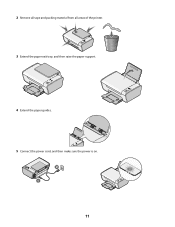
2 Remove all tape and packing material from all areas of the printer. 3 Extend the paper exit tray, and then raise the paper support. 2 1 4 Extend the paper guides. 5 Connect the power cord, and then make sure the power is on. 2 1 11
2 Remove all tape and packing material from all areas of the printer. 3 Extend the paper exit tray, and then raise the paper support. 2 1 4 Extend the paper guides. 5 Connect the power cord, and then make sure the power is on. 2 1 11
User's Guide
Page 48
... a damp cloth to the printer before beginning a new print job. Color cartridge 5A Color cartridge2 5 Photo cartridge 31 Not applicable 1 Values obtained by continuous printing. CAUTION-SHOCK HAZARD: To avoid the risk of electric shock, unplug the power cord from the wall outlet and...Black cartridge 4A Black cartridge2 4 For page yield values, refer to www.lexmark.com/pageyields. Declared yield value in accordance with water. Ordering supplies Ordering print cartridges Lexmark 2600 Series models Item Black cartridge Black cartridge2 Part number 14A 14 Average cartridge...
... a damp cloth to the printer before beginning a new print job. Color cartridge 5A Color cartridge2 5 Photo cartridge 31 Not applicable 1 Values obtained by continuous printing. CAUTION-SHOCK HAZARD: To avoid the risk of electric shock, unplug the power cord from the wall outlet and...Black cartridge 4A Black cartridge2 4 For page yield values, refer to www.lexmark.com/pageyields. Declared yield value in accordance with water. Ordering supplies Ordering print cartridges Lexmark 2600 Series models Item Black cartridge Black cartridge2 Part number 14A 14 Average cartridge...
User's Guide
Page 50
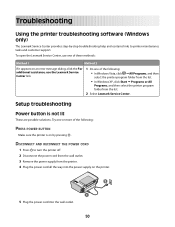
.... 1 Do one or more of the following : PRESS POWER BUTTON Make sure the printer is not lit These are possible solutions. DISCONNECT AND RECONNECT THE POWER CORD 1 Press to turn the printer off. 2 Disconnect the power cord from the wall outlet. 3 Remove the power supply from the list. 2 Select Lexmark Service Center. Try one of the following : • In...
.... 1 Do one or more of the following : PRESS POWER BUTTON Make sure the printer is not lit These are possible solutions. DISCONNECT AND RECONNECT THE POWER CORD 1 Press to turn the printer off. 2 Disconnect the power cord from the wall outlet. 3 Remove the power supply from the list. 2 Select Lexmark Service Center. Try one of the following : • In...
User's Guide
Page 51
... Close all open programs. 2 Disable any obvious damage. 6 Plug the power cord into an electrical outlet that other possible solutions. CHECK THAT YOUR COMPUTER MEETS THE MINIMUM SYSTEM REQUIREMENTS LISTED ON THE PRINTER BOX CHECK THE USB CONNECTION 1 Check the USB cable for any security ...one or more of the computer. RECONNECT THE POWER SUPPLY 1 Press to turn the printer off. 2 Disconnect the power cord from the wall outlet. 3 Gently remove the power supply from the printer. 4 Reconnect the power supply to the printer. 5 Plug the power cord into the USB port of the following: MAKE ...
... Close all open programs. 2 Disable any obvious damage. 6 Plug the power cord into an electrical outlet that other possible solutions. CHECK THAT YOUR COMPUTER MEETS THE MINIMUM SYSTEM REQUIREMENTS LISTED ON THE PRINTER BOX CHECK THE USB CONNECTION 1 Check the USB cable for any security ...one or more of the computer. RECONNECT THE POWER SUPPLY 1 Press to turn the printer off. 2 Disconnect the power cord from the wall outlet. 3 Gently remove the power supply from the printer. 4 Reconnect the power supply to the printer. 5 Plug the power cord into the USB port of the following: MAKE ...
User's Guide
Page 52
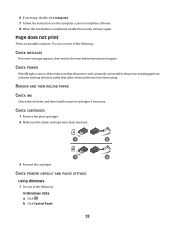
...Using Windows 1 Do one or more of the following : CHECK MESSAGES If an error message appears, then resolve the error before trying to the printer and plugged into a known working electrical outlet that other electrical devices have been removed. 1 2 1 2 3 Reinsert the cartridges. Page does not... : In Windows Vista a Click . 6 If necessary, double-click setup.exe. 7 Follow the instructions on , then make sure that the power cord is completed, enable the security software again. CHECK CARTRIDGES 1 Remove the print cartridges. 2 Make sure the sticker and tape have been using.
...Using Windows 1 Do one or more of the following : CHECK MESSAGES If an error message appears, then resolve the error before trying to the printer and plugged into a known working electrical outlet that other electrical devices have been removed. 1 2 1 2 3 Reinsert the cartridges. Page does not... : In Windows Vista a Click . 6 If necessary, double-click setup.exe. 7 Follow the instructions on , then make sure that the power cord is completed, enable the security software again. CHECK CARTRIDGES 1 Remove the print cartridges. 2 Make sure the sticker and tape have been using.
User's Guide
Page 54
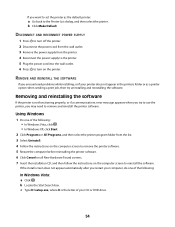
..., click Start. 2 Click Programs or All Programs, and then select the printer program folder from the printer. 4 Reconnect the power supply to the printer. 5 Plug the power cord into the wall outlet. 6 Press to turn off the printer. 2 Disconnect the power cord from the wall outlet. 3 Remove the power supply from the list. 3 Select Uninstall. 4 Follow the instructions on the...
..., click Start. 2 Click Programs or All Programs, and then select the printer program folder from the printer. 4 Reconnect the power supply to the printer. 5 Plug the power cord into the wall outlet. 6 Press to turn off the printer. 2 Disconnect the power cord from the wall outlet. 3 Remove the power supply from the list. 3 Select Uninstall. 4 Follow the instructions on the...
User's Guide
Page 56
... the following: MAKE SURE THE PRINTER POWER SUPPLY IS ATTACHED CORRECTLY 1 Press to turn the printer off slowly, then the printer is in sleep mode. 1 Unplug the power cord from the printer. 4 Reconnect the power supply to the printer. 5 Plug the power cord into the wall outlet. 3 Press to turn the printer on . Solving printer power problems The printer and the computer cannot exchange data...
... the following: MAKE SURE THE PRINTER POWER SUPPLY IS ATTACHED CORRECTLY 1 Press to turn the printer off slowly, then the printer is in sleep mode. 1 Unplug the power cord from the printer. 4 Reconnect the power supply to the printer. 5 Plug the power cord into the wall outlet. 3 Press to turn the printer on . Solving printer power problems The printer and the computer cannot exchange data...

User's Guide
Page 63
... consumes a small amount of time, called Power Saver. See www.lexmark.com for this product (in power units of each mode in order to completely stop product power consumption, disconnect the power supply cord from hard-copy original 13.79 documents. The Power Saver Mode is waiting for a specified period of power, then to calculate energy usage. The...
... consumes a small amount of time, called Power Saver. See www.lexmark.com for this product (in power units of each mode in order to completely stop product power consumption, disconnect the power supply cord from hard-copy original 13.79 documents. The Power Saver Mode is waiting for a specified period of power, then to calculate energy usage. The...


