User's Guide
Page 7
... to the All-In-One. To access the Readme file after you install the All-In-One software, click Start Æ Programs Æ Lexmark 2300 Series Æ Readme. http://support.lexmark.com Information on setup troubleshooting • Software for basic usage information • A Readme file This file provides last-minute updates about technical...
... to the All-In-One. To access the Readme file after you install the All-In-One software, click Start Æ Programs Æ Lexmark 2300 Series Æ Readme. http://support.lexmark.com Information on setup troubleshooting • Software for basic usage information • A Readme file This file provides last-minute updates about technical...
User's Guide
Page 9
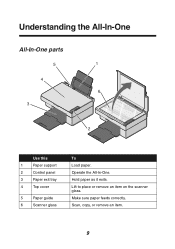
Make sure paper feeds correctly. Understanding the All-In-One All-In-One parts 5 1 4 6 3 2 Use this 1 Paper support 2 Control panel 3 Paper exit tray 4 Top cover 5 Paper guide 6 Scanner glass To Load paper. Hold paper as it exits. Lift to place or remove an item on the scanner glass. Scan, copy, or remove an item. 9 Operate the All-In-One.
Make sure paper feeds correctly. Understanding the All-In-One All-In-One parts 5 1 4 6 3 2 Use this 1 Paper support 2 Control panel 3 Paper exit tray 4 Top cover 5 Paper guide 6 Scanner glass To Load paper. Hold paper as it exits. Lift to place or remove an item on the scanner glass. Scan, copy, or remove an item. 9 Operate the All-In-One.
User's Guide
Page 10
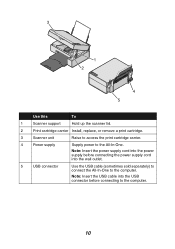
Note: Insert the USB cable into the USB connector before connecting the power supply cord into the power supply before connecting to the computer. 10 Note: Insert the power supply cord into the wall outlet. 5 USB connector Use the USB cable (sometimes sold separately) to connect the All-In-One to the All-In-One. 3 1 2 4 5 Use this To 1 Scanner support Hold up the scanner lid. 2 Print cartridge carrier Install, replace, or remove a print cartridge. 3 Scanner unit Raise to access the print cartridge carrier. 4 Power supply Supply power to the computer.
Note: Insert the USB cable into the USB connector before connecting the power supply cord into the power supply before connecting to the computer. 10 Note: Insert the power supply cord into the wall outlet. 5 USB connector Use the USB cable (sometimes sold separately) to connect the All-In-One to the All-In-One. 3 1 2 4 5 Use this To 1 Scanner support Hold up the scanner lid. 2 Print cartridge carrier Install, replace, or remove a print cartridge. 3 Scanner unit Raise to access the print cartridge carrier. 4 Power supply Supply power to the computer.
User's Guide
Page 18
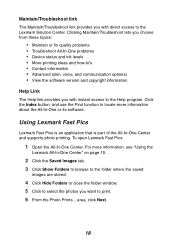
Click the Index button, and use the Find function to locate more information, see "Using the Lexmark All-In-One Center" on page 15. 2 Click the Saved Images tab. 3 Click Show Folders to browse to the folder where the saved images are ... information Help Link The Help link provides you with direct access to the Lexmark Solution Center. Using Lexmark Fast Pics Lexmark Fast Pics is an application that is part of the All-In-One Center and supports photo printing. To open Lexmark Fast Pics: 1 Open the All-In-One Center. For more information about the...
Click the Index button, and use the Find function to locate more information, see "Using the Lexmark All-In-One Center" on page 15. 2 Click the Saved Images tab. 3 Click Show Folders to browse to the folder where the saved images are ... information Help Link The Help link provides you with direct access to the Lexmark Solution Center. Using Lexmark Fast Pics Lexmark Fast Pics is an application that is part of the All-In-One Center and supports photo printing. To open Lexmark Fast Pics: 1 Open the All-In-One Center. For more information about the...
User's Guide
Page 27
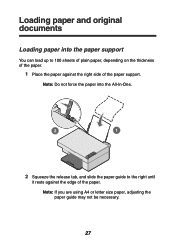
Note: If you are using A4 or letter size paper, adjusting the paper guide may not be necessary. 27 Note: Do not force the paper into the paper support You can load up to the right until it rests against the right side of the paper. Loading paper and original documents Loading paper into the All-In-One. 2 1 2 Squeeze the release tab, and slide the paper guide to 100 sheets of plain paper, depending on the thickness of the paper. 1 Place the paper against the edge of the paper support.
Note: If you are using A4 or letter size paper, adjusting the paper guide may not be necessary. 27 Note: Do not force the paper into the paper support You can load up to the right until it rests against the right side of the paper. Loading paper and original documents Loading paper into the All-In-One. 2 1 2 Squeeze the release tab, and slide the paper guide to 100 sheets of plain paper, depending on the thickness of the paper. 1 Place the paper against the edge of the paper support.

User's Guide
Page 28
...; The glossy or coated side is facing you read them carefully. • You load the photo paper vertically against the right side of the paper support. • The paper guide rests against the edge of the photo paper. paper (depending on transfer packaging. Note: To prevent smudging, remove each photo as...
...; The glossy or coated side is facing you read them carefully. • You load the photo paper vertically against the right side of the paper support. • The paper guide rests against the edge of the photo paper. paper (depending on transfer packaging. Note: To prevent smudging, remove each photo as...

User's Guide
Page 29
... is facing you. • The cards are loaded vertically against the right side of the paper support. • You do not force the cards into the All-In-One against the right side of the support, as shown. • You squeeze and slide the paper guide to the left side of •... and slide the paper guide to 25 sheets of the cards. 29 Load Banner paper Make sure • You remove any paper from the paper support before inserting banner paper. • You select A4 or letter size Banner paper in Print Properties. Note: Failure to choose the correct paper size will...
... is facing you. • The cards are loaded vertically against the right side of the paper support. • You do not force the cards into the All-In-One against the right side of the support, as shown. • You squeeze and slide the paper guide to the left side of •... and slide the paper guide to 25 sheets of the cards. 29 Load Banner paper Make sure • You remove any paper from the paper support before inserting banner paper. • You select A4 or letter size Banner paper in Print Properties. Note: Failure to choose the correct paper size will...
User's Guide
Page 30
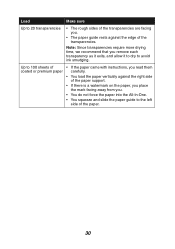
... to 20 transparencies • The rough sides of the transparencies are facing you. • The paper guide rests against the right side of the paper support. • If there is a watermark on the paper, you place the mark facing away from you. • You do not force the paper into the...
... to 20 transparencies • The rough sides of the transparencies are facing you. • The paper guide rests against the right side of the paper support. • If there is a watermark on the paper, you place the mark facing away from you. • You do not force the paper into the...

User's Guide
Page 31
Note: Do not load envelopes with: • Holes, perforations, or deep embossing • Metal clasps, string ties, or metal folding bars • Exposed flap adhesive 31 Load Up to 10 envelopes Make sure • The print side is facing you. • The envelopes are loaded vertically against the right side of the paper support. • The stamp location is in the upper left corner. • The paper guide rests against the edge of the envelopes.
Note: Do not load envelopes with: • Holes, perforations, or deep embossing • Metal clasps, string ties, or metal folding bars • Exposed flap adhesive 31 Load Up to 10 envelopes Make sure • The print side is facing you. • The envelopes are loaded vertically against the right side of the paper support. • The stamp location is in the upper left corner. • The paper guide rests against the edge of the envelopes.
User's Guide
Page 33
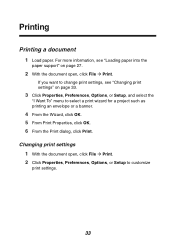
If you want to change print settings, see "Loading paper into the paper support" on page 33. 3 Click Properties, Preferences, Options, or Setup, and select the "I Want To" menu to customize print settings. 33 Changing print settings 1 With the ...
If you want to change print settings, see "Loading paper into the paper support" on page 33. 3 Click Properties, Preferences, Options, or Setup, and select the "I Want To" menu to customize print settings. 33 Changing print settings 1 With the ...
User's Guide
Page 52
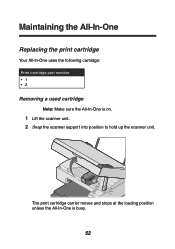
The print cartridge carrier moves and stops at the loading position unless the All-In-One is on. 1 Lift the scanner unit. 2 Snap the scanner support into position to hold up the scanner unit. Maintaining the All-In-One Replacing the print cartridge Your All-In-One uses the following cartridge: Print cartridge part number •1 •2 Removing a used cartridge Note: Make sure the All-In-One is busy. 52
The print cartridge carrier moves and stops at the loading position unless the All-In-One is on. 1 Lift the scanner unit. 2 Snap the scanner support into position to hold up the scanner unit. Maintaining the All-In-One Replacing the print cartridge Your All-In-One uses the following cartridge: Print cartridge part number •1 •2 Removing a used cartridge Note: Make sure the All-In-One is busy. 52
User's Guide
Page 55
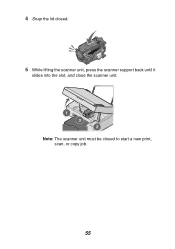
Note: The scanner unit must be closed . 5 While lifting the scanner unit, press the scanner support back until it slides into the slot, and close the scanner unit. 4 Snap the lid closed to start a new print, scan, or copy job. 55
Note: The scanner unit must be closed . 5 While lifting the scanner unit, press the scanner support back until it slides into the slot, and close the scanner unit. 4 Snap the lid closed to start a new print, scan, or copy job. 55
User's Guide
Page 56
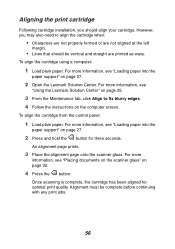
...installation, you may also need to fix blurry edges. 4 Follow the instructions on page 27. 2 Open the Lexmark Solution Center. For more information, see "Loading paper into the paper support" on page 27. 2 Press and hold the button for optimal print quality. For more information, see "Loading...using a computer: 1 Load plain paper. To align the cartridge from the control panel: 1 Load plain paper. For more information, see "Using the Lexmark Solution Center" on page 32. 4 Press the button. An alignment page prints. 3 Place the alignment page onto the scanner glass. Once scanning is ...
...installation, you may also need to fix blurry edges. 4 Follow the instructions on page 27. 2 Open the Lexmark Solution Center. For more information, see "Loading paper into the paper support" on page 27. 2 Press and hold the button for optimal print quality. For more information, see "Loading...using a computer: 1 Load plain paper. To align the cartridge from the control panel: 1 Load plain paper. For more information, see "Using the Lexmark Solution Center" on page 32. 4 Press the button. An alignment page prints. 3 Place the alignment page onto the scanner glass. Once scanning is ...

User's Guide
Page 57
.../Speed area, select a higher quality setting. 4 Print the document again. For more information, see "Loading paper into the paper support" on page 27. 2 Click Start Æ Programs Æ Lexmark 2300 Series Æ Lexmark Solution Center. 3 From the Maintenance tab, click Clean to verify that is a heavier weight, is bright white, or is coated...
.../Speed area, select a higher quality setting. 4 Print the document again. For more information, see "Loading paper into the paper support" on page 27. 2 Click Start Æ Programs Æ Lexmark 2300 Series Æ Lexmark Solution Center. 3 From the Maintenance tab, click Clean to verify that is a heavier weight, is bright white, or is coated...
User's Guide
Page 62
The following operating systems are supported: • Windows 98/Me • Windows 2000 • Windows XP 1 Remove the software CD. 2 Turn off the computer. 3 Restart the computer. 4 When the desktop appears, ...
The following operating systems are supported: • Windows 98/Me • Windows 2000 • Windows XP 1 Remove the software CD. 2 Turn off the computer. 3 Restart the computer. 4 When the desktop appears, ...
User's Guide
Page 65
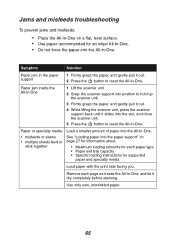
.... • Use paper recommended for an inkjet All-In-One. • Do not force the paper into the paper support" on page 27 for information about: • Maximum loading amounts for supported paper and specialty media Load paper with the print side facing you. Paper jam inside the All-In-One 1 Lift... the scanner unit. 2 Snap the scanner support into position to hold up the scanner unit. 3 Firmly grasp the paper, and gently pull it out. 4 While lifting the scanner unit, press the scanner...
.... • Use paper recommended for an inkjet All-In-One. • Do not force the paper into the paper support" on page 27 for information about: • Maximum loading amounts for supported paper and specialty media Load paper with the print side facing you. Paper jam inside the All-In-One 1 Lift... the scanner unit. 2 Snap the scanner support into position to hold up the scanner unit. 3 Firmly grasp the paper, and gently pull it out. 4 While lifting the scanner unit, press the scanner...
User's Guide
Page 69
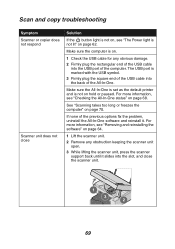
... and reinstalling the software" on . 1 Check the USB cable for any obstruction keeping the scanner unit open. 3 While lifting the scanner unit, press the scanner support back until it . See "Scanning takes too long or freezes the computer" on hold or paused. If none of the previous options fix the problem...
... and reinstalling the software" on . 1 Check the USB cable for any obstruction keeping the scanner unit open. 3 While lifting the scanner unit, press the scanner support back until it . See "Scanning takes too long or freezes the computer" on hold or paused. If none of the previous options fix the problem...
User's Guide
Page 71
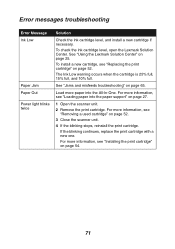
... cartridge. Load more information, see "Removing a used cartridge" on page 54. 71 See "Using the Lexmark Solution Center" on page 65. See "Jams and misfeeds troubleshooting" on page 25. For more paper into the paper support" on page 52. For more information, see "Loading paper into the All-In-One. The Ink... Out Power light blinks twice Solution Check the ink cartridge level, and install a new cartridge if necessary. To check the ink cartridge level, open the Lexmark Solution Center.
... cartridge. Load more information, see "Removing a used cartridge" on page 54. 71 See "Using the Lexmark Solution Center" on page 65. See "Jams and misfeeds troubleshooting" on page 25. For more paper into the paper support" on page 52. For more information, see "Loading paper into the All-In-One. The Ink... Out Power light blinks twice Solution Check the ink cartridge level, and install a new cartridge if necessary. To check the ink cartridge level, open the Lexmark Solution Center.

User's Guide
Page 73
.... 73 This feature will cut the energy used by up to reduce air pollution caused by the Director of Manufacturing and Technical Support, Lexmark International, S.A., Boigny, France. Japanese VCCI notice If this symbol appears on your product, the accompanying statement is proud to be... statement is a partnership effort with the requirements of the directives has been signed by power generation. As an ENERGY STAR Partner, Lexmark International, Inc. Companies participating in conformance with ISO 9296. 1-meter average sound pressure, dBA Printing 50 or less Idling 0 ENERGY...
.... 73 This feature will cut the energy used by up to reduce air pollution caused by the Director of Manufacturing and Technical Support, Lexmark International, S.A., Boigny, France. Japanese VCCI notice If this symbol appears on your product, the accompanying statement is proud to be... statement is a partnership effort with the requirements of the directives has been signed by power generation. As an ENERGY STAR Partner, Lexmark International, Inc. Companies participating in conformance with ISO 9296. 1-meter average sound pressure, dBA Printing 50 or less Idling 0 ENERGY...

User's Guide
Page 76
Printer Status 26 Troubleshooting 26 Lexmark Web site 60 loading 4 x 6 cards 29 banner paper 29 documents on scanner glass 32 envelopes 31 glossy paper 28 greeting cards 29...ordering supplies 60 out of paper 71 P paper exit tray 9 paper guide 9 paper jam 71 paper out 71 Paper Setup tab 24 paper support 9 paper, loading 27 photo cards 29 Photo Editor opening 20 task menus 21 using 20 photo paper 28 Photo Prints section 17 placing documents... 69 scanner glass cleaning 59 placing documents on 32 scanner unit 10 scanning 37 sending a fax 47 setup troubleshooting 61 software Lexmark All-In-One 76
Printer Status 26 Troubleshooting 26 Lexmark Web site 60 loading 4 x 6 cards 29 banner paper 29 documents on scanner glass 32 envelopes 31 glossy paper 28 greeting cards 29...ordering supplies 60 out of paper 71 P paper exit tray 9 paper guide 9 paper jam 71 paper out 71 Paper Setup tab 24 paper support 9 paper, loading 27 photo cards 29 Photo Editor opening 20 task menus 21 using 20 photo paper 28 Photo Prints section 17 placing documents... 69 scanner glass cleaning 59 placing documents on 32 scanner unit 10 scanning 37 sending a fax 47 setup troubleshooting 61 software Lexmark All-In-One 76

