
User's Guide
Page 3
Contents Chapter 1: Getting started 7 Understanding the parts 8 Front view 8 Rear view 8 Unpacking ...9 Installing the toner cartridge 11 Connecting the cables 13 Powering on the machine 14 Understanding the operator panel 15 Setting the date and time 16 Changing the ...Saver mode 18 Chapter 2: Installing software 19 Installing the drivers 19 Removing the drivers 20 Chapter 3: Loading paper and changing paper size 21 Selecting print materials 21 Guidelines for paper and specialty media 22 Loading the paper tray 24 Loading the manual bypass 28 Setting the paper type and size...
Contents Chapter 1: Getting started 7 Understanding the parts 8 Front view 8 Rear view 8 Unpacking ...9 Installing the toner cartridge 11 Connecting the cables 13 Powering on the machine 14 Understanding the operator panel 15 Setting the date and time 16 Changing the ...Saver mode 18 Chapter 2: Installing software 19 Installing the drivers 19 Removing the drivers 20 Chapter 3: Loading paper and changing paper size 21 Selecting print materials 21 Guidelines for paper and specialty media 22 Loading the paper tray 24 Loading the manual bypass 28 Setting the paper type and size...

User's Guide
Page 62
... onto any water drip onto or inside of the machine, be careful not to touch the transfer roller located under the toner cartridge. 9 Maintenance Cleaning the machine To maintain print quality, follow these cleaning procedures each time the toner cartridge is replaced or if print quality problems occur. Oil from your fingers can affect...
... onto any water drip onto or inside of the machine, be careful not to touch the transfer roller located under the toner cartridge. 9 Maintenance Cleaning the machine To maintain print quality, follow these cleaning procedures each time the toner cartridge is replaced or if print quality problems occur. Oil from your fingers can affect...

User's Guide
Page 63
...the black transfer roller. Warning: • To prevent damage to the toner cartridge, do not expose it with a piece of the machine During the printing process, paper, toner, and dust particles can cause print quality problems, such as toner specks or smearing. Cleaning the machine 63 This... buildup can accumulate inside of the toner cartridge. 3 Place the toner cartridge on the bottom of the machine ...
...the black transfer roller. Warning: • To prevent damage to the toner cartridge, do not expose it with a piece of the machine During the printing process, paper, toner, and dust particles can cause print quality problems, such as toner specks or smearing. Cleaning the machine 63 This... buildup can accumulate inside of the toner cartridge. 3 Place the toner cartridge on the bottom of the machine ...

User's Guide
Page 65
.... 3 Reinstall the cartridge and close the front cover. Ordering toner cartridges Within the United States or Canada, order a toner cartridge (P/N 18S0090) from any authorized Lexmark supplies dealer. In other countries, contact the place where you , call 1-800-438-2468. To temporarily reestablish print quality by redistributing the...up and the LCD displays the message TONER LOW. Redistributing toner When the toner cartridge is near the end of its life, white streaks or light print occurs. You can also visit our web site, www.lexmark.com. Note: If the toner gets on your machine.
.... 3 Reinstall the cartridge and close the front cover. Ordering toner cartridges Within the United States or Canada, order a toner cartridge (P/N 18S0090) from any authorized Lexmark supplies dealer. In other countries, contact the place where you , call 1-800-438-2468. To temporarily reestablish print quality by redistributing the...up and the LCD displays the message TONER LOW. Redistributing toner When the toner cartridge is near the end of its life, white streaks or light print occurs. You can also visit our web site, www.lexmark.com. Note: If the toner gets on your machine.

User's Guide
Page 66
Note: Return the empty toner cartridge to Lexmark for more information. Maintaining the toner cartridge 66 See page 68 for appropriate environmental handling. Note: Incoming faxes will not print if this message appears. To replace the toner cartridge: 1 Open the front cover. 2 Pull the toner cartridge out. Replacing the toner cartridge If the toner runs out, the message TONER EMPTY appears on the display and blank pages print.
Note: Return the empty toner cartridge to Lexmark for more information. Maintaining the toner cartridge 66 See page 68 for appropriate environmental handling. Note: Incoming faxes will not print if this message appears. To replace the toner cartridge: 1 Open the front cover. 2 Pull the toner cartridge out. Replacing the toner cartridge If the toner runs out, the message TONER EMPTY appears on the display and blank pages print.

User's Guide
Page 68
...then apply a prepaid return shipping label. (The shipping label is a free and easy way to return cartridges directly to Lexmark for country-specific instructions. The machine prints out a cleaning page. If the problem persists, repeat these steps. Your operator panel menu includes a Clean... Drum option that may help to improve the print quality. Returning the empty toner cartridge Using the Lexmark Cartridge Return Program is available online at www.lexmark.com/or at no charge. Visit our web site, www.lexmark.com/or for appropriate environmental handling.
...then apply a prepaid return shipping label. (The shipping label is a free and easy way to return cartridges directly to Lexmark for country-specific instructions. The machine prints out a cleaning page. If the problem persists, repeat these steps. Your operator panel menu includes a Clean... Drum option that may help to improve the print quality. Returning the empty toner cartridge Using the Lexmark Cartridge Return Program is available online at www.lexmark.com/or at no charge. Visit our web site, www.lexmark.com/or for appropriate environmental handling.

User's Guide
Page 77
Printing automatically resumes. Clearing paper jams 77 Avoid contact with the fuser area to prevent burns. 1 Open the front cover and remove the toner cartridge. 2 Remove the jammed paper by gently pulling it straight out. 3 Reinstall the toner cartridge and close the front cover. Fuser and toner cartridge areas (PAPER JAM 2) CAUTION: The fuser area is hot.
Printing automatically resumes. Clearing paper jams 77 Avoid contact with the fuser area to prevent burns. 1 Open the front cover and remove the toner cartridge. 2 Remove the jammed paper by gently pulling it straight out. 3 Reinstall the toner cartridge and close the front cover. Fuser and toner cartridge areas (PAPER JAM 2) CAUTION: The fuser area is hot.

User's Guide
Page 79
... in the manual Load print media into the manual bypass. No document loaded in the ADF. bypass and try again. See page 24. cartridge areas. process before the power failure. page 16. Toner cartridge has run out. Remove the toner cartridge and gently shake it back... in the feeding area of pages in the fuser unit. This temporarily reestablishes printing.
... in the manual Load print media into the manual bypass. No document loaded in the ADF. bypass and try again. See page 24. cartridge areas. process before the power failure. page 16. Toner cartridge has run out. Remove the toner cartridge and gently shake it back... in the feeding area of pages in the fuser unit. This temporarily reestablishes printing.

User's Guide
Page 81
...printer. Wait until scanning is not connected properly. Load paper. See page 11. Paper jam. Toner cartridge is not selected as your program. Install the toner cartridge. Configuration incorrect. No paper loaded. Connection cable between the computer and the machine is complete before ...cable. Paper size and the paper size Ensure that the print job is incorrect. • Check the Windows printer setting to make sure that the paper size in the tray. Machine is malfunctioning. Select Lexmark X215 as the default printer. Port setting is sent to ...
...printer. Wait until scanning is not connected properly. Load paper. See page 11. Paper jam. Toner cartridge is not selected as your program. Install the toner cartridge. Configuration incorrect. No paper loaded. Connection cable between the computer and the machine is complete before ...cable. Paper size and the paper size Ensure that the print job is incorrect. • Check the Windows printer setting to make sure that the paper size in the tray. Machine is malfunctioning. Select Lexmark X215 as the default printer. Port setting is sent to ...

User's Guide
Page 82
...82 LCD does not turn Machine is loose or defective. • Disconnect the printer cable, and then reconnect it. • Try a print job that it does not contain blank pages. Printer cable is not receiving on the original, clean the document glass and underside of toner.... • If necessary, replace the toner cartridge. Problem Possible cause Solution Machine prints, but the text is defective or • Redistribute the toner. Toner cartridge is wrong, garbled, or incomplete. Some parts, such as Bit Image selected in the On...
...82 LCD does not turn Machine is loose or defective. • Disconnect the printer cable, and then reconnect it. • Try a print job that it does not contain blank pages. Printer cable is not receiving on the original, clean the document glass and underside of toner.... • If necessary, replace the toner cartridge. Problem Possible cause Solution Machine prints, but the text is defective or • Redistribute the toner. Toner cartridge is wrong, garbled, or incomplete. Some parts, such as Bit Image selected in the On...
User's Guide
Page 85
...on other fax machine may be turned off, out of paper, or cannot answer fails to make a connection with only a small strip of text printed at the bottom of each page or on a incoming fax are stretched. Problem Possible cause and solution Incoming fax has blank spaces or is received... machine sending you the fax may be faulty. • Fax machine sending you a fax may have chosen the wrong paper settings. Replace the toner cartridge. Ask the receiving fax recipient to store the document. Blank areas appear at the top. You may not be enough memory to solve the problem.
...on other fax machine may be turned off, out of paper, or cannot answer fails to make a connection with only a small strip of text printed at the bottom of each page or on a incoming fax are stretched. Problem Possible cause and solution Incoming fax has blank spaces or is received... machine sending you the fax may be faulty. • Fax machine sending you a fax may have chosen the wrong paper settings. Replace the toner cartridge. Ask the receiving fax recipient to store the document. Blank areas appear at the top. You may not be enough memory to solve the problem.

User's Guide
Page 86
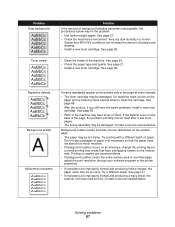
.... Try a different brand of faded or smeared defects may be able to temporarily extend the toner cartridge life. Print quality problems Problem Light or faded print AaBbCc AaBbCc AaBbCc AaBbCc AaBbCc Toner specs AaBbCc AaBbCc AaBbCc AaBbCc AaBbCc Solution If a vertical white streak or faded area ... and content. Try reprinting the job. • The moisture content of the paper is low. If this does not improve the print quality, install a new toner cartridge. • If these steps do not correct the problems, contact a service representative. See page 22. • If the entire...
.... Try a different brand of faded or smeared defects may be able to temporarily extend the toner cartridge life. Print quality problems Problem Light or faded print AaBbCc AaBbCc AaBbCc AaBbCc AaBbCc Toner specs AaBbCc AaBbCc AaBbCc AaBbCc AaBbCc Solution If a vertical white streak or faded area ... and content. Try reprinting the job. • The moisture content of the paper is low. If this does not improve the print quality, install a new toner cartridge. • If these steps do not correct the problems, contact a service representative. See page 22. • If the entire...
User's Guide
Page 87
.... Solving problems 87 Do not open packages of background shading. • Install a new toner cartridge. See page 63. • Check the paper type and quality. See page 68. Printing on seams can increase the amount of paper until necessary so that the paper does not absorb... too much moisture. • If background scatter occurs on an envelope, change the printing layout to avoid printing over areas that have the same problems, install a new toner cartridge. Problem Gray background AaBbCc AaBbCc AaBbCc AaBbCc AaBbCc Toner smear Solution If the amount of background ...
.... Solving problems 87 Do not open packages of background shading. • Install a new toner cartridge. See page 63. • Check the paper type and quality. See page 68. Printing on seams can increase the amount of paper until necessary so that the paper does not absorb... too much moisture. • If background scatter occurs on an envelope, change the printing layout to avoid printing over areas that have the same problems, install a new toner cartridge. Problem Gray background AaBbCc AaBbCc AaBbCc AaBbCc AaBbCc Toner smear Solution If the amount of background ...

User's Guide
Page 89
... aligned black streaks or smears appear: • The toner cartridge may be printing on the wrong surface of transparency. See page 65. • If the problem persists, the machine may require repair. You need to http://support.lexmark.com. or Canada, call for this information. See page 65...countries/ regions, refer to know your printer model type and serial number. See page 21. • Install a new toner cartridge. Remove the paper and turn it . • The toner cartridge may be solid black: • If you call 1-800-Lexmark (1-800-539-6275). Install a new toner...
... aligned black streaks or smears appear: • The toner cartridge may be printing on the wrong surface of transparency. See page 65. • If the problem persists, the machine may require repair. You need to http://support.lexmark.com. or Canada, call for this information. See page 65...countries/ regions, refer to know your printer model type and serial number. See page 21. • Install a new toner cartridge. Remove the paper and turn it . • The toner cartridge may be solid black: • If you call 1-800-Lexmark (1-800-539-6275). Install a new toner...


