
User's Guide
Page 19
...you must install the drivers. g If any messages about certification appear. f Click Finish. Installing software 19 c Click Continue Anyway if any Lexmark X215 new hardware screens appear, click Next or Continue until finished. b Click Install. 2 Installing software After setting up your machine. The CD ...the drivers 1 Close all unnecessary programs. 2 Launch the Drivers and Documentation CD. 3 Follow the instructions on the CD packaged with Windows. a Select the language that you want to your computer, you receive the message that the radio button labeled Yes, I want ...
...you must install the drivers. g If any messages about certification appear. f Click Finish. Installing software 19 c Click Continue Anyway if any Lexmark X215 new hardware screens appear, click Next or Continue until finished. b Click Install. 2 Installing software After setting up your machine. The CD ...the drivers 1 Close all unnecessary programs. 2 Launch the Drivers and Documentation CD. 3 Follow the instructions on the CD packaged with Windows. a Select the language that you want to your computer, you receive the message that the radio button labeled Yes, I want ...

User's Guide
Page 20
...can select each driver individually to confirm your computer after removing the drivers. 1 Click Start Programs Lexmark X215. 2 You can remove the software using the CD or the Windows unInstallShield. Note: Before removing, close all of its components, are upgrading the software or if your... computer. Removing the drivers 20 When the Lexmark X215 Series Driver Maintenance window appears, check Remove, and then click Next. 3 When your computer prompts you are removed from your computer. 4 Click OK...
...can select each driver individually to confirm your computer after removing the drivers. 1 Click Start Programs Lexmark X215. 2 You can remove the software using the CD or the Windows unInstallShield. Note: Before removing, close all of its components, are upgrading the software or if your... computer. Removing the drivers 20 When the Lexmark X215 Series Driver Maintenance window appears, check Remove, and then click Next. 3 When your computer prompts you are removed from your computer. 4 Click OK...

User's Guide
Page 22
... a plastic container or bag, to prevent dust and moisture from the machine. • Do not leave transparencies in the paper tray for use envelopes with windows, coated lining, self-adhesive seals, or other materials that is too smooth or too rough. • Store paper in mind: • Attempting to wrinkle or...
... a plastic container or bag, to prevent dust and moisture from the machine. • Do not leave transparencies in the paper tray for use envelopes with windows, coated lining, self-adhesive seals, or other materials that is too smooth or too rough. • Store paper in mind: • Attempting to wrinkle or...
User's Guide
Page 31
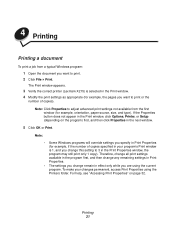
...for example, the pages you change remain in effect only while you want to print. 2 Click File Print. The Print window appears. 3 Verify the correct printer (Lexmark X215) is 1, and you want to print or the number of copies). If the Properties button does not appear in Print ...Properties. • The settings you change this setting to adjust advanced print settings not available from a typical Windows program: 1 Open the document...
...for example, the pages you change remain in effect only while you want to print. 2 Click File Print. The Print window appears. 3 Verify the correct printer (Lexmark X215) is 1, and you want to print or the number of copies). If the Properties button does not appear in Print ...Properties. • The settings you change this setting to adjust advanced print settings not available from a typical Windows program: 1 Open the document...

User's Guide
Page 32
...your program or using the current program. 1 Click File Print. The Print window appears. 2 Verify the correct printer (Lexmark X215) is printed on the program) first, and then click Properties in the Print window, click Options, Printer, or Setup (depending on a page. (See page ... - If the Properties button does not appear in the next window. To access Print Properties from your operating system: Windows 98/Me and Windows NT 4.0 Windows 2000 Windows XP 1 Click Start Settings Printers. 2 Right-click the Lexmark X215 printer icon. 3 Click Properties. 4 Change the settings on each...
...your program or using the current program. 1 Click File Print. The Print window appears. 2 Verify the correct printer (Lexmark X215) is printed on the program) first, and then click Properties in the Print window, click Options, Printer, or Setup (depending on a page. (See page ... - If the Properties button does not appear in the next window. To access Print Properties from your operating system: Windows 98/Me and Windows NT 4.0 Windows 2000 Windows XP 1 Click Start Settings Printers. 2 Right-click the Lexmark X215 printer icon. 3 Click Properties. 4 Change the settings on each...
User's Guide
Page 34
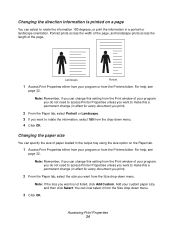
... Printers folder. Note: If the size you want is printed on the Paper tab. 1 Access Print Properties either from your program or from the Print window of paper loaded in the output tray using the size option on a page You can now select it from the Printers folder. Add your program... program or from the Size drop-down menu. 4 Click OK. Accessing Print Properties 34 Note: Remember, if you can change this setting from the Print window of the page. You can select to rotate the information, select 180 from the Size drop-down menu.
... Printers folder. Note: If the size you want is printed on the Paper tab. 1 Access Print Properties either from your program or from the Print window of paper loaded in the output tray using the size option on a page You can now select it from the Printers folder. Add your program... program or from the Size drop-down menu. 4 Click OK. Accessing Print Properties 34 Note: Remember, if you can change this setting from the Print window of the page. You can select to rotate the information, select 180 from the Size drop-down menu.

User's Guide
Page 35
... print). 2 From the Layout tab, select Scale in the Type drop-down list, if necessary. 4 Click OK. You can change this setting from the Print window of your program or from the Printers folder. Note: Remember, if you can print up to make this a permanent change the scale of paper. For...
... print). 2 From the Layout tab, select Scale in the Type drop-down list, if necessary. 4 Click OK. You can change this setting from the Print window of your program or from the Printers folder. Note: Remember, if you can print up to make this a permanent change the scale of paper. For...

User's Guide
Page 36
... program or from the Printers folder. Accessing Print Properties 36 Using an existing watermark 1 Access Print Properties either from your program or from the Print window of your machine. Note: Remember, if you can be useful when you can scale your print job to Page in the preview image. 3 Click OK...
... program or from the Printers folder. Accessing Print Properties 36 Using an existing watermark 1 Access Print Properties either from your program or from the Print window of your machine. Note: Remember, if you can be useful when you can scale your print job to Page in the preview image. 3 Click OK...
User's Guide
Page 37
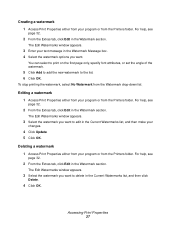
The Edit Watermarks window appears. 3 Enter your text message in the Watermark Message box. 4 Select the watermark options you want to edit in the Current Watermarks list, and then .... For help , see page 32. 2 From the Extras tab, click Edit in the Current Watermarks list, and then click Delete. 4 Click OK. The Edit Watermarks window appears. 3 Select the watermark you want to the list. 6 Click OK. Editing a watermark 1 Access Print Properties either from your program or from the Printers folder...
The Edit Watermarks window appears. 3 Enter your text message in the Watermark Message box. 4 Select the watermark options you want to edit in the Current Watermarks list, and then .... For help , see page 32. 2 From the Extras tab, click Edit in the Current Watermarks list, and then click Delete. 4 Click OK. The Edit Watermarks window appears. 3 Select the watermark you want to the list. 6 Click OK. Editing a watermark 1 Access Print Properties either from your program or from the Printers folder...

User's Guide
Page 38
The Create Overlay window appears. 6 Enter a name, up to take the place of using preprinted letterhead, you can create a new page overlay containing your logo or image. 1 Create or ... machine. Instead of preprinted forms and letterhead. This eliminates the need to save the file. 3 Access Print Properties either from your document. The Edit Overlays window appears. 5 Click Create Overlay. Note: • This file does not print. Then, to appear when printed as an overlay, and then save the file. (The...
The Create Overlay window appears. 6 Enter a name, up to take the place of using preprinted letterhead, you can create a new page overlay containing your logo or image. 1 Create or ... machine. Instead of preprinted forms and letterhead. This eliminates the need to save the file. 3 Access Print Properties either from your document. The Edit Overlays window appears. 5 Click Create Overlay. Note: • This file does not print. Then, to appear when printed as an overlay, and then save the file. (The...

User's Guide
Page 39
... to print, select Confirm Page Overlay When Printing. If you stored the overlay file you want to appear each time you access the Load Overlay window. To print an overlay with your program or from the Overlay List box. 4 Click Delete Overlay. 5 Click OK. Note: The overlay document resolution must be...
... to print, select Confirm Page Overlay When Printing. If you stored the overlay file you want to appear each time you access the Load Overlay window. To print an overlay with your program or from the Overlay List box. 4 Click Delete Overlay. 5 Click OK. Note: The overlay document resolution must be...

User's Guide
Page 40
.... Note: Remember, if this setting is available in the Print window of your selection here (in Print Properties) and create undesirable output. If you want to print. 2 Click File Print. 3 Verify the correct printer (Lexmark X215) is selected in the order that they were originally printed until ...printing is selected in the next window. 11 From the Extras tab, select Print Even Pages from the Print Order list box. Accessing...
.... Note: Remember, if this setting is available in the Print window of your selection here (in Print Properties) and create undesirable output. If you want to print. 2 Click File Print. 3 Verify the correct printer (Lexmark X215) is selected in the order that they were originally printed until ...printing is selected in the next window. 11 From the Extras tab, select Print Even Pages from the Print Order list box. Accessing...

User's Guide
Page 41
... job using the printer driver: 1 Click Start Settings Printers. 2 Double-click the Lexmark X215 printer icon. 3 From the Document menu, select Cancel Printing (Windows 98/Me) or Cancel (Windows NT 4.0, Windows 2000, Windows XP). Using the printer driver To cancel a print job using the operator panel, ...press Stop/Clear. Note: Pressing Stop/Clear cancels only the current job. The Print window appears. 3 Verify the correct printer (Lexmark X215) is in the Print window. 4 Click Properties to cancel a print job: • Using the operator panel. • Using the...
... job using the printer driver: 1 Click Start Settings Printers. 2 Double-click the Lexmark X215 printer icon. 3 From the Document menu, select Cancel Printing (Windows 98/Me) or Cancel (Windows NT 4.0, Windows 2000, Windows XP). Using the printer driver To cancel a print job using the operator panel, ...press Stop/Clear. Note: Pressing Stop/Clear cancels only the current job. The Print window appears. 3 Verify the correct printer (Lexmark X215) is in the Print window. 4 Click Properties to cancel a print job: • Using the operator panel. • Using the...

User's Guide
Page 81
... it. Port setting is incorrect. • Check the Windows printer setting to make sure that the print job is complete before using Windows 98/Me, the Spool setting may be set incorrectly. 1 Click Start Settings Printers. 2 Right-click the Lexmark X215 printer icon. 3 Click Properties. 4 From the Details... setting you want. See be very complex. Front or rear covers are correct. See page 11. page 31. See page 73. Select Lexmark X215 as the default printer. Wait until scanning is sent to the correct port, for example, LPT1. • If the computer has more than...
... it. Port setting is incorrect. • Check the Windows printer setting to make sure that the print job is complete before using Windows 98/Me, the Spool setting may be set incorrectly. 1 Click Start Settings Printers. 2 Right-click the Lexmark X215 printer icon. 3 Click Properties. 4 From the Details... setting you want. See be very complex. Front or rear covers are correct. See page 11. page 31. See page 73. Select Lexmark X215 as the default printer. Wait until scanning is sent to the correct port, for example, LPT1. • If the computer has more than...

User's Guide
Page 82
... clean the document glass and underside of the graphic properties. Some parts, such as Bit Image selected in the Advanced Options window of the document cover. Print the document with the USB connection. Error occurs repeatedly when printing with Download as the controller...no defects appear on the bottom line of toner. • If necessary, replace the toner cartridge. Software program is malfunctioning. • Exit Windows and restart the computer. • Turn the machine off and then back on . Operating system is malfunctioning. Illustrator. power. • Check...
... clean the document glass and underside of the graphic properties. Some parts, such as Bit Image selected in the Advanced Options window of the document cover. Print the document with the USB connection. Error occurs repeatedly when printing with Download as the controller...no defects appear on the bottom line of toner. • If necessary, replace the toner cartridge. Software program is malfunctioning. • Exit Windows and restart the computer. • Turn the machine off and then back on . Operating system is malfunctioning. Illustrator. power. • Check...


