
User's Guide
Page 19
b Click Install. c Click Continue Anyway if any Lexmark X215 new hardware screens appear, click Next or Continue until finished. Installing software 19 The drivers are available on the screen. f Click Finish. e Make sure that ... is complete, remove the CD. a Select the language that you receive the message that the radio button labeled Yes, I want to use in the installation window. d When you want to restart my computer now is compatible with your computer, you must install the drivers. 2 Installing software After setting up your machine...
b Click Install. c Click Continue Anyway if any Lexmark X215 new hardware screens appear, click Next or Continue until finished. Installing software 19 The drivers are available on the screen. f Click Finish. e Make sure that ... is complete, remove the CD. a Select the language that you receive the message that the radio button labeled Yes, I want to use in the installation window. d When you want to restart my computer now is compatible with your computer, you must install the drivers. 2 Installing software After setting up your machine...

User's Guide
Page 20
.... You can select each driver individually to confirm your selection, click Yes. Removing the drivers 20 When the Lexmark X215 Series Driver Maintenance window appears, check Remove, and then click Next. 3 When your computer prompts you are removed from your computer. 4 Click OK. 5 Restart your computer. Removing the drivers ...
.... You can select each driver individually to confirm your selection, click Yes. Removing the drivers 20 When the Lexmark X215 Series Driver Maintenance window appears, check Remove, and then click Next. 3 When your computer prompts you are removed from your computer. 4 Click OK. 5 Restart your computer. Removing the drivers ...

User's Guide
Page 22
...; Use only well-constructed envelopes with sharp, well creased folds. • Do not use envelopes with clasps and snaps. • Do not use envelopes with windows, coated lining, self-adhesive seals, or other specialty media, keep these guidelines in the paper tray for use with laser printers. • To prevent specialty...
...; Use only well-constructed envelopes with sharp, well creased folds. • Do not use envelopes with clasps and snaps. • Do not use envelopes with windows, coated lining, self-adhesive seals, or other specialty media, keep these guidelines in the paper tray for use with laser printers. • To prevent specialty...
User's Guide
Page 31
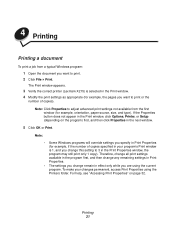
... (depending on page 32. Note: Click Properties to adjust advanced print settings not available from a typical Windows program: 1 Open the document you change remain in the next window. 5 Click OK or Print. Therefore, change all print settings available in the program first, and then...to print or the number of copies specified in your changes permanent, access Print Properties using the current program. The Print window appears. 3 Verify the correct printer (Lexmark X215) is 1, and you change any remaining settings in Print Properties. • The settings you want to print. 2 ...
... (depending on page 32. Note: Click Properties to adjust advanced print settings not available from a typical Windows program: 1 Open the document you change remain in the next window. 5 Click OK or Print. Therefore, change all print settings available in the program first, and then...to print or the number of copies specified in your changes permanent, access Print Properties using the current program. The Print window appears. 3 Verify the correct printer (Lexmark X215) is 1, and you change any remaining settings in Print Properties. • The settings you want to print. 2 ...

User's Guide
Page 32
... paper. (See page 40.) You can access Print Properties using your operating system: Windows 98/Me and Windows NT 4.0 Windows 2000 Windows XP 1 Click Start Settings Printers. 2 Right-click the Lexmark X215 printer icon. 3 Click Properties. 4 Change the settings on each tab as appropriate and...The direction information is printed on one sheet. (See page 35.) • Scale - The Print window appears. 2 Verify the correct printer (Lexmark X215) is selected in the Print window. 3 Click Properties. Accessing Print Properties The print properties are where you are using the current program....
... paper. (See page 40.) You can access Print Properties using your operating system: Windows 98/Me and Windows NT 4.0 Windows 2000 Windows XP 1 Click Start Settings Printers. 2 Right-click the Lexmark X215 printer icon. 3 Click Properties. 4 Change the settings on each tab as appropriate and...The direction information is printed on one sheet. (See page 35.) • Scale - The Print window appears. 2 Verify the correct printer (Lexmark X215) is selected in the Print window. 3 Click Properties. Accessing Print Properties The print properties are where you are using the current program....
User's Guide
Page 34
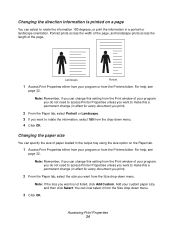
Note: Remember, if you want to make this setting from the Print window of your program or from the Size drop-down menu. 4 Click OK. Note: Remember, if you can specify the size of paper loaded in effect ... length of your program, you do not need to access Printer Properties unless you want to make this a permanent change this setting from the Print window of the page.
Note: Remember, if you want to make this setting from the Print window of your program or from the Size drop-down menu. 4 Click OK. Note: Remember, if you can specify the size of paper loaded in effect ... length of your program, you do not need to access Printer Properties unless you want to make this a permanent change this setting from the Print window of the page.

User's Guide
Page 35
... in the Percentage box. 4 Click OK. Accessing Print Properties 35 For help , see page 32. Scaling a document You can change this setting from the Print window of your program or from the Printers folder. You can print up to 4 pages on one sheet. 1 2 3 4 1 Access Print Properties either from your program, you...
... in the Percentage box. 4 Click OK. Accessing Print Properties 35 For help , see page 32. Scaling a document You can change this setting from the Print window of your program or from the Printers folder. You can print up to 4 pages on one sheet. 1 2 3 4 1 Access Print Properties either from your program, you...

User's Guide
Page 36
... the Printers folder. For help , see page 32. The selected watermark appears in the Type drop-down list. 3 Select the correct size from the Print window of your machine. Accessing Print Properties 36 For help , see page 32. 2 From the Extras tab, select the watermark you want to check fine details...
... the Printers folder. For help , see page 32. The selected watermark appears in the Type drop-down list. 3 Select the correct size from the Print window of your machine. Accessing Print Properties 36 For help , see page 32. 2 From the Extras tab, select the watermark you want to check fine details...
User's Guide
Page 37
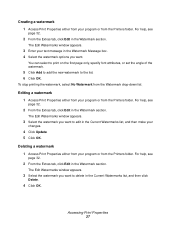
...Update. 5 Click OK. Deleting a watermark 1 Access Print Properties either from your program or from the Watermark drop-down list. The Edit Watermarks window appears. 3 Select the watermark you want . You can select to print on the first page only, specify font attributes, or set the angle... then click Delete. 4 Click OK. Editing a watermark 1 Access Print Properties either from your program or from the Printers folder. The Edit Watermarks window appears. 3 Select the watermark you want to the list. 6 Click OK. Creating a watermark 1 Access Print Properties either from your program or ...
...Update. 5 Click OK. Deleting a watermark 1 Access Print Properties either from your program or from the Watermark drop-down list. The Edit Watermarks window appears. 3 Select the watermark you want . You can select to print on the first page only, specify font attributes, or set the angle... then click Delete. 4 Click OK. Editing a watermark 1 Access Print Properties either from your program or from the Printers folder. The Edit Watermarks window appears. 3 Select the watermark you want to the list. 6 Click OK. Creating a watermark 1 Access Print Properties either from your program or ...

User's Guide
Page 38
The Create Overlay window appears. 6 Enter a name, up to load special paper in the machine. Note: • This file does not print. Overlays are ready to use in a new .... Then, to print a document with a watermark. Accessing Print Properties 38 This eliminates the need to eight characters, in the File Name box. The Edit Overlays window appears. 5 Click Create Overlay. Creating an overlay You can create a new page overlay containing your logo or image. 1 Create or open a document containing text or...
The Create Overlay window appears. 6 Enter a name, up to load special paper in the machine. Note: • This file does not print. Overlays are ready to use in a new .... Then, to print a document with a watermark. Accessing Print Properties 38 This eliminates the need to eight characters, in the File Name box. The Edit Overlays window appears. 5 Click Create Overlay. Creating an overlay You can create a new page overlay containing your logo or image. 1 Create or open a document containing text or...

User's Guide
Page 39
... overlay printing. b Click Load Overlay. Using an overlay After you create an overlay, you can also load the file when you access the Load Overlay window. e Select the overlay. For help , see page 32. 3 From the Extras tab, select the overlay you want from the Printers folder.
... overlay printing. b Click Load Overlay. Using an overlay After you create an overlay, you can also load the file when you access the Load Overlay window. e Select the overlay. For help , see page 32. 3 From the Extras tab, select the overlay you want from the Printers folder.

User's Guide
Page 40
...Click OK. 7 Remove the printed pages from the front output tray. 8 Click File Print. The Print window appears. 9 Verify the correct printer (Lexmark X215) is available in the Print window of your program, the setting there may override your selection here (in Print Properties) and create undesirable output...document you want to print. 2 Click File Print. 3 Verify the correct printer (Lexmark X215) is selected in the Print window. 4 Click Properties. Note: Remember, if this setting is selected in the next window. 11 From the Extras tab, select Print Even Pages from the Print Order list box...
...Click OK. 7 Remove the printed pages from the front output tray. 8 Click File Print. The Print window appears. 9 Verify the correct printer (Lexmark X215) is available in the Print window of your program, the setting there may override your selection here (in Print Properties) and create undesirable output...document you want to print. 2 Click File Print. 3 Verify the correct printer (Lexmark X215) is selected in the Print window. 4 Click Properties. Note: Remember, if this setting is selected in the next window. 11 From the Extras tab, select Print Even Pages from the Print Order list box...

User's Guide
Page 41
...using the printer driver: 1 Click Start Settings Printers. 2 Double-click the Lexmark X215 printer icon. 3 From the Document menu, select Cancel Printing (Windows 98/Me) or Cancel (Windows NT 4.0, Windows 2000, Windows XP). Using the printer driver To cancel a print job using the operator panel..., press Stop/Clear. The Print window appears. 3 Verify the correct printer (Lexmark X215) is in progress and deletes ...
...using the printer driver: 1 Click Start Settings Printers. 2 Double-click the Lexmark X215 printer icon. 3 From the Document menu, select Cancel Printing (Windows 98/Me) or Cancel (Windows NT 4.0, Windows 2000, Windows XP). Using the printer driver To cancel a print job using the operator panel..., press Stop/Clear. The Print window appears. 3 Verify the correct printer (Lexmark X215) is in progress and deletes ...

User's Guide
Page 81
...; Adjust the print quality settings. See page 21. Select Lexmark X215 as the default printer. Wait until scanning is not receiving power. • Check the power cord connections. • Check the power switch and the power source. Machine is complete before using Windows 98/Me, the Spool setting may be very complex. Load...
...; Adjust the print quality settings. See page 21. Select Lexmark X215 as the default printer. Wait until scanning is not receiving power. • Check the power cord connections. • Check the power switch and the power source. Machine is complete before using Windows 98/Me, the Spool setting may be very complex. Load...

User's Guide
Page 82
...Download as the controller or the board, may experience poor USB communication. LCD does not turn Machine is malfunctioning. • Exit Windows and restart the computer. • Turn the machine off and then back on the original, clean the document glass and underside ...'s printer selection menu to the Ready prompt, press Stop/Clear. Illustrations print The setting in the software incorrectly in the Advanced Options window of the document cover. Document glass or document cover is defective or • Redistribute the toner. Toner cartridge is dirty. •...
...Download as the controller or the board, may experience poor USB communication. LCD does not turn Machine is malfunctioning. • Exit Windows and restart the computer. • Turn the machine off and then back on the original, clean the document glass and underside ...'s printer selection menu to the Ready prompt, press Stop/Clear. Illustrations print The setting in the software incorrectly in the Advanced Options window of the document cover. Document glass or document cover is defective or • Redistribute the toner. Toner cartridge is dirty. •...


