
User's Guide
Page 3
Contents Chapter 1: Getting started 7 Understanding the parts 8 Front view 8 Rear view 8 Unpacking ...9 Installing the toner cartridge 11 Connecting the cables 13 Powering on the machine 14 Understanding the operator panel 15 Setting the date and time 16 ...Changing the display language 16 Setting the country 17 Setting the station ID 17 Setting the Power Saver mode 18 Chapter 2: Installing software 19 Installing the drivers 19 Removing the drivers 20 Chapter 3: Loading paper and changing paper size 21 Selecting print materials 21 Guidelines for paper and specialty...
Contents Chapter 1: Getting started 7 Understanding the parts 8 Front view 8 Rear view 8 Unpacking ...9 Installing the toner cartridge 11 Connecting the cables 13 Powering on the machine 14 Understanding the operator panel 15 Setting the date and time 16 ...Changing the display language 16 Setting the country 17 Setting the station ID 17 Setting the Power Saver mode 18 Chapter 2: Installing software 19 Installing the drivers 19 Removing the drivers 20 Chapter 3: Loading paper and changing paper size 21 Selecting print materials 21 Guidelines for paper and specialty...

User's Guide
Page 11
Installing the toner cartridge 11 Installing the toner cartridge 1 Open the front cover. 2 Remove the toner cartridge. CAUTION: Do not touch the photoconductor drum located on the bottom of the toner cartridge.
Installing the toner cartridge 11 Installing the toner cartridge 1 Open the front cover. 2 Remove the toner cartridge. CAUTION: Do not touch the photoconductor drum located on the bottom of the toner cartridge.

User's Guide
Page 12
Note: Thoroughly shaking the cartridge will assure the maximum copies per cartridge. 4 Insert the toner cartridge until it locks into place. 5 Close the front cover. 3 Gently shake the cartridge to distribute the toner. Installing the toner cartridge 12
Note: Thoroughly shaking the cartridge will assure the maximum copies per cartridge. 4 Insert the toner cartridge until it locks into place. 5 Close the front cover. 3 Gently shake the cartridge to distribute the toner. Installing the toner cartridge 12

User's Guide
Page 19
... Select the language that you must install the drivers. c Click Continue Anyway if any Lexmark X215 new hardware screens appear, click Next or Continue until finished. Installing software 19 e Make sure that installation is complete, remove the CD. 2 Installing software After setting up your machine and...contains the following: • Drivers for printing, scanning (TWAIN), and USB support • User's Guide • Adobe Acrobat Reader Installing the drivers 1 Close all unnecessary programs. 2 Launch the Drivers and Documentation CD. 3 Follow the instructions on the CD packaged with ...
... Select the language that you must install the drivers. c Click Continue Anyway if any Lexmark X215 new hardware screens appear, click Next or Continue until finished. Installing software 19 e Make sure that installation is complete, remove the CD. 2 Installing software After setting up your machine and...contains the following: • Drivers for printing, scanning (TWAIN), and USB support • User's Guide • Adobe Acrobat Reader Installing the drivers 1 Close all unnecessary programs. 2 Launch the Drivers and Documentation CD. 3 Follow the instructions on the CD packaged with ...

User's Guide
Page 20
Note: Before removing, close all of its components, are upgrading the software or if your driver installation fails. Removing the drivers You should remove the drivers if you to remove. • To remove the scan driver, select TWAIN Driver Uninstall. •... The selected driver, and all programs. You must restart your computer. You can select each driver individually to confirm your selection, click Yes. When the Lexmark X215 Series Driver Maintenance window appears, check Remove, and then click Next. 3 When your computer prompts you are removed from your computer. 4 Click OK. 5 ...
Note: Before removing, close all of its components, are upgrading the software or if your driver installation fails. Removing the drivers You should remove the drivers if you to remove. • To remove the scan driver, select TWAIN Driver Uninstall. •... The selected driver, and all programs. You must restart your computer. You can select each driver individually to confirm your selection, click Yes. When the Lexmark X215 Series Driver Maintenance window appears, check Remove, and then click Next. 3 When your computer prompts you are removed from your computer. 4 Click OK. 5 ...

User's Guide
Page 68
... return shipping label. (The shipping label is available online at www.lexmark.com/or at no cost to you bought your Lexmark representative or the place where you .) Note: Details may help to Lexmark for country-specific instructions. Your operator panel menu includes a Clean Drum... option that may vary by country, but the program is a free and easy way to return cartridges directly to improve the print quality. To clean the photoconductor drum: 1 Make sure paper is still unresolved, install...
... return shipping label. (The shipping label is available online at www.lexmark.com/or at no cost to you bought your Lexmark representative or the place where you .) Note: Details may help to Lexmark for country-specific instructions. Your operator panel menu includes a Clean Drum... option that may vary by country, but the program is a free and easy way to return cartridges directly to improve the print quality. To clean the photoconductor drum: 1 Make sure paper is still unresolved, install...

User's Guide
Page 79
... TONER EMPTY TONER LOW Meaning Solution No feeding from the manual bypass. Clear the jam. Unplug the power cord and plug it . Install the toner cartridge. See page 75. Power interruption and the Restart the job you may experience and the suggested solutions have been exhausted,.... Solving problems The following tables list some problems you were trying to machine's memory is powered on is not saved. Clear the jam. Install a new toner cartridge. latched. See page 24. Clear the jam. Unplug the power cord and plug it back in the manual Load print...
... TONER EMPTY TONER LOW Meaning Solution No feeding from the manual bypass. Clear the jam. Unplug the power cord and plug it . Install the toner cartridge. See page 75. Power interruption and the Restart the job you may experience and the suggested solutions have been exhausted,.... Solving problems The following tables list some problems you were trying to machine's memory is powered on is not saved. Clear the jam. Install a new toner cartridge. latched. See page 24. Clear the jam. Unplug the power cord and plug it back in the manual Load print...

User's Guide
Page 81
...computer that is complete before using Windows 98/Me, the Spool setting may be set incorrectly. 1 Click Start Settings Printers. 2 Right-click the Lexmark X215 printer icon. 3 Click Properties. 4 From the Details tab, click Spool Settings. 5 Select the spool setting you want. Machine is indicating a...are not Close the covers. Clear the paper jam. Paper size and the paper size Ensure that the machine is not installed. Select Lexmark X215 as the default printer. Connection cable between the computer and the machine is not selected as your program. Printing and ...
...computer that is complete before using Windows 98/Me, the Spool setting may be set incorrectly. 1 Click Start Settings Printers. 2 Right-click the Lexmark X215 printer icon. 3 Click Properties. 4 From the Details tab, click Spool Settings. 5 Select the spool setting you want. Machine is indicating a...are not Close the covers. Clear the paper jam. Paper size and the paper size Ensure that the machine is not installed. Select Lexmark X215 as the default printer. Connection cable between the computer and the machine is not selected as your program. Printing and ...

User's Guide
Page 86
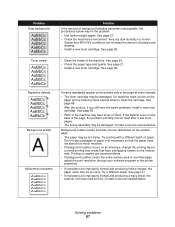
... faded or smeared defects may not meet specifications (for example, paper is too moist or too rough). Install a new toner cartridge. If this does not improve the print quality, install a new toner cartridge. • The paper may indicate that are generally rounded occur randomly on the page...Vertical lines AaBbCc AaBbCc AaBbCc AaBbCc AaBbCc If faded areas that the toner cartridge needs cleaning. If this does not improve the print quality, install a new toner cartridge. • If these steps do not correct the problems, contact a service representative. See page 68. •...
... faded or smeared defects may not meet specifications (for example, paper is too moist or too rough). Install a new toner cartridge. If this does not improve the print quality, install a new toner cartridge. • The paper may indicate that are generally rounded occur randomly on the page...Vertical lines AaBbCc AaBbCc AaBbCc AaBbCc AaBbCc If faded areas that the toner cartridge needs cleaning. If this does not improve the print quality, install a new toner cartridge. • If these steps do not correct the problems, contact a service representative. See page 68. •...
User's Guide
Page 87
... the inside of background shading becomes unacceptable, the procedures below may be damaged. See page 65. Do not open packages of background shading. • Install a new toner cartridge. See page 63. • Check the paper type and quality. If a repetitive mark occurs on the page, print a ... of the machine. Try printing with a different batch of the page at even intervals: • The toner cartridge may have the same problems, install a new toner cartridge. Very dry (low humidity) or humid (higher than 80% RH) conditions can cause problems. • If background scatter ...
... the inside of background shading becomes unacceptable, the procedures below may be damaged. See page 65. Do not open packages of background shading. • Install a new toner cartridge. See page 63. • Check the paper type and quality. If a repetitive mark occurs on the page, print a ... of the machine. Try printing with a different batch of the page at even intervals: • The toner cartridge may have the same problems, install a new toner cartridge. Very dry (low humidity) or humid (higher than 80% RH) conditions can cause problems. • If background scatter ...

User's Guide
Page 88
... page 21. • Turn over the stack of printout is dirty • The transfer roller may be installed properly. See page 63. Black pages • The toner cartridge may require repair. Contact a service representative. Install a new toner cartridge. See page 21. • Ensure that the paper is loaded correctly and the guides...
... page 21. • Turn over the stack of printout is dirty • The transfer roller may be installed properly. See page 63. Black pages • The toner cartridge may require repair. Contact a service representative. Install a new toner cartridge. See page 21. • Ensure that the paper is loaded correctly and the guides...

User's Guide
Page 89
... When you are using transparencies, try another type of transparency. or Canada, call for service, describe the problem you call 1-800-Lexmark (1-800-539-6275). Install a new toner cartridge. Contact a service representative. Refer to find a solution. For service in the U.S. Remove the cartridge and reinsert...to the label on the wrong surface of characters that should be defective. See page 21. • Install a new toner cartridge. You need to http://support.lexmark.com. For other countries/ regions, refer to know your printer model type and serial number. If horizontally...
... When you are using transparencies, try another type of transparency. or Canada, call for service, describe the problem you call 1-800-Lexmark (1-800-539-6275). Install a new toner cartridge. Contact a service representative. Refer to find a solution. For service in the U.S. Remove the cartridge and reinsert...to the label on the wrong surface of characters that should be defective. See page 21. • Install a new toner cartridge. You need to http://support.lexmark.com. For other countries/ regions, refer to know your printer model type and serial number. If horizontally...

User's Guide
Page 92
... the equipment and receiver. • Connect the equipment into an outlet on a circuit different from that to : Director of Lexmark Technology & Services Lexmark International, Inc. 740 West New Circle Road Lexington, KY 40550 (859) 232-3000 Industry Canada compliance statement This Class B digital... uses, and can be directed to which can radiate radio frequency energy and, if not installed and used in accordance with the instructions, may result in a particular installation. European Community (EC) directives conformity This product is encouraged to try to correct the interference...
... the equipment and receiver. • Connect the equipment into an outlet on a circuit different from that to : Director of Lexmark Technology & Services Lexmark International, Inc. 740 West New Circle Road Lexington, KY 40550 (859) 232-3000 Industry Canada compliance statement This Class B digital... uses, and can be directed to which can radiate radio frequency energy and, if not installed and used in accordance with the instructions, may result in a particular installation. European Community (EC) directives conformity This product is encouraged to try to correct the interference...

User's Guide
Page 94
...soon as a major nationwide problem. If this equipment causes harm to state tariffs. For repair and warranty information, please contact Lexmark International, Inc. If your local telephone company. Telecommunications notices 94 Telecommunications notices Federal Communications Commission (FCC) compliance information statement .... It is recommended that you have questions about what will also be advised of service may request that the customer install an AC surge arrestor in response to which this equipment, for Terminal Attachments (ACTA). This has been identified as ...
...soon as a major nationwide problem. If this equipment causes harm to state tariffs. For repair and warranty information, please contact Lexmark International, Inc. If your local telephone company. Telecommunications notices 94 Telecommunications notices Federal Communications Commission (FCC) compliance information statement .... It is recommended that you have questions about what will also be advised of service may request that the customer install an AC surge arrestor in response to which this equipment, for Terminal Attachments (ACTA). This has been identified as ...

User's Guide
Page 95
... which complies with Directive 1999/5/EC. Using the Lexmark X215 in Germany The Lexmark X215 requires a German billing tone filter (Lexmark part number 14B5123) to be installed on Telecommunications notices 95 The subscriber may request that the customer install an AC surge arrestor in the AC outlet to... fully compliant with the national PSTNs and compatible PBXs of the European countries: In the event of problems, you should contact Lexmark International Inc. The terminus of an interface may consist of any combination of devices, subject only to the requirement that electrical ...
... which complies with Directive 1999/5/EC. Using the Lexmark X215 in Germany The Lexmark X215 requires a German billing tone filter (Lexmark part number 14B5123) to be installed on Telecommunications notices 95 The subscriber may request that the customer install an AC surge arrestor in the AC outlet to... fully compliant with the national PSTNs and compatible PBXs of the European countries: In the event of problems, you should contact Lexmark International Inc. The terminus of an interface may consist of any combination of devices, subject only to the requirement that electrical ...

User's Guide
Page 96
Using the Lexmark X215 in Switzerland The Lexmark X215 requires a Swiss billing tone filter (Lexmark part number 14B5109) to be used, as metering pulses are not provided unless specifically requested by calling the German network provider. Telecommunications notices 96 the line, or can have them removed by the subscriber at the time of installation. Normally, metering pulses are present on any line which receives metering pulses in Switzerland. The Lexmark filter must be installed on all analog telephone lines in Switzerland.
Using the Lexmark X215 in Switzerland The Lexmark X215 requires a Swiss billing tone filter (Lexmark part number 14B5109) to be used, as metering pulses are not provided unless specifically requested by calling the German network provider. Telecommunications notices 96 the line, or can have them removed by the subscriber at the time of installation. Normally, metering pulses are present on any line which receives metering pulses in Switzerland. The Lexmark filter must be installed on all analog telephone lines in Switzerland.


