
Setup Sheet
Page 1
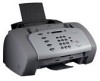
X125 All-In-One 1Connect the power cord. 2 1 Before you begin, read the safety information on the back of this sheet. 2 Extend the paper exit tray and the paper support. www.lexmark.com 3 Attach and extend the document exit tray. 4 Load plain inkjet paper. 5 Open the cartridge access doors. 6 Remove the sticker and tape. 7 Install the cartridges.
X125 All-In-One 1Connect the power cord. 2 1 Before you begin, read the safety information on the back of this sheet. 2 Extend the paper exit tray and the paper support. www.lexmark.com 3 Attach and extend the document exit tray. 4 Load plain inkjet paper. 5 Open the cartridge access doors. 6 Remove the sticker and tape. 7 Install the cartridges.

User's Guide
Page 83
... each page as it exits the All-In-One and let it dry completely before stacking. • Use transparencies or photo papers designed for an inkjet printer. For help, see 100 sheets of custom size paper. • You select the envelope size from the Quality/Color tab of print settings.... may be incorrect. For a list of supported paper sizes, see Customizing the black and white instead of the Settings dialog box. • Clean the cartridge nozzles. For help , see Wiping the print cartridge nozzles and contacts. color. www.lexmark.com Lexmark X125 For help , see Cleaning the print...
... each page as it exits the All-In-One and let it dry completely before stacking. • Use transparencies or photo papers designed for an inkjet printer. For help, see 100 sheets of custom size paper. • You select the envelope size from the Quality/Color tab of print settings.... may be incorrect. For a list of supported paper sizes, see Customizing the black and white instead of the Settings dialog box. • Clean the cartridge nozzles. For help , see Wiping the print cartridge nozzles and contacts. color. www.lexmark.com Lexmark X125 For help , see Cleaning the print...


