
User's Guide
Page 13
...Printing Status window and turn printing voice notification on the World Wide Web. • Change the appearance of the screen. To open the Lexmark Photo Editor, click Start Programs Lexmark X1100 Series Lexmark Photo Editor. Use the touch-up tools 9 Lexmark Photo ...Editor Touch-up tools to edit your pointer over the tool for a description. The Lexmark Photo Editor displays. Using the Lexmark Photo Editor Use the Lexmark Photo Editor software...
...Printing Status window and turn printing voice notification on the World Wide Web. • Change the appearance of the screen. To open the Lexmark Photo Editor, click Start Programs Lexmark X1100 Series Lexmark Photo Editor. Use the touch-up tools 9 Lexmark Photo ...Editor Touch-up tools to edit your pointer over the tool for a description. The Lexmark Photo Editor displays. Using the Lexmark Photo Editor Use the Lexmark Photo Editor software...
User's Guide
Page 25
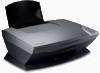
... double-click the My Computer icon, and then double-click the CD-ROM drive icon. If the problem continues, remove and then reinstall the software. Windows XP users, click Start to the setup documentation. 2 Unplug the All-In-One from the print cartridges. Make sure the black print cartridge ...is secure in the right carrier if you installed both ends of the USB cable. For help , see page 26. Installation appears incomplete The software may not be installed properly. Alignment page does not print 1 Make sure you remove the sticker and transparent tape from the electrical wall outlet...
... double-click the My Computer icon, and then double-click the CD-ROM drive icon. If the problem continues, remove and then reinstall the software. Windows XP users, click Start to the setup documentation. 2 Unplug the All-In-One from the print cartridges. Make sure the black print cartridge ...is secure in the right carrier if you installed both ends of the USB cable. For help , see page 26. Installation appears incomplete The software may not be installed properly. Alignment page does not print 1 Make sure you remove the sticker and transparent tape from the electrical wall outlet...
User's Guide
Page 26
... Try lowering the scanning resolution. 3 If you are too low, you are present under the Other Devices category. 5 Insert the CD, and install the software again. For help , see page 7. 3 Try printing a smaller file. Printing troubleshooting All-In-One prints slowly 1 Close all programs not in the All... there are present. Note: Photographs typically have a larger file size. Note: The Other Devices category displays only when unknown devices are any Lexmark items unless they are using Windows 98 or Windows Me, click the Device Manager tab. For help, see page 6 or page 4. 22
... Try lowering the scanning resolution. 3 If you are too low, you are present under the Other Devices category. 5 Insert the CD, and install the software again. For help , see page 7. 3 Try printing a smaller file. Printing troubleshooting All-In-One prints slowly 1 Close all programs not in the All... there are present. Note: Photographs typically have a larger file size. Note: The Other Devices category displays only when unknown devices are any Lexmark items unless they are using Windows 98 or Windows Me, click the Device Manager tab. For help, see page 6 or page 4. 22
User's Guide
Page 34
... tab 7 Save Settings menu 7 tabs 7 printing 10 banners 6 envelopes 6 photos 6 posters 6 Printing Status window changing appearance of 9 Q Quality/Copies tab 7 R reinstalling software 26 removing software 26 S safety information ii Save Settings menu 7 saved images viewing 5 Scan button 2 scan settings 4 scanner ...a Copy...section 5 voice notification turning on the glass 13 settings, saving for future use 7 setup 1 setup troubleshooting 20 software reinstalling 26 removing 26 sound, see voice notification Status tab 8 T top cover 1 transparencies 10 troubleshooting copying problems 24 faxing...
... tab 7 Save Settings menu 7 tabs 7 printing 10 banners 6 envelopes 6 photos 6 posters 6 Printing Status window changing appearance of 9 Q Quality/Copies tab 7 R reinstalling software 26 removing software 26 S safety information ii Save Settings menu 7 saved images viewing 5 Scan button 2 scan settings 4 scanner ...a Copy...section 5 voice notification turning on the glass 13 settings, saving for future use 7 setup 1 setup troubleshooting 20 software reinstalling 26 removing 26 sound, see voice notification Status tab 8 T top cover 1 transparencies 10 troubleshooting copying problems 24 faxing...


