Common Criteria Installation Supplement and Administrator Guide
Page 7
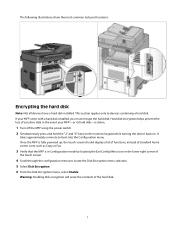
This section applies only to boot into the Configuration menu. Once the MFP is fully powered up, the touch screen should display a list of functions, instead of standard home screen icons such as Copy or ... the touch screen. 4 Scroll through the configuration menus to locate the Disk Encryption menu selection. 5 Select Disk Encryption. 6 From the Disk Encryption menu, select Enable. If your MFP-or its hard disk-is in Configuration mode by locating the Exit Config Menu icon in the event your MFP came with a hard disk installed, you...
This section applies only to boot into the Configuration menu. Once the MFP is fully powered up, the touch screen should display a list of functions, instead of standard home screen icons such as Copy or ... the touch screen. 4 Scroll through the configuration menus to locate the Disk Encryption menu selection. 5 Select Disk Encryption. 6 From the Disk Encryption menu, select Enable. If your MFP-or its hard disk-is in Configuration mode by locating the Exit Config Menu icon in the event your MFP came with a hard disk installed, you...
Common Criteria Installation Supplement and Administrator Guide
Page 8
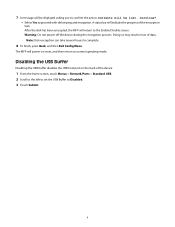
... will return to the Enable/Disable screen. The MFP will be lost. Continue? • Select Yes to complete. 8 To finish, press Back, and then Exit Config Menu. 7 A message will be displayed asking you to confirm the action: Contents will power-on the back of the device. 1 From the home screen, touch Menus...
... will return to the Enable/Disable screen. The MFP will be lost. Continue? • Select Yes to complete. 8 To finish, press Back, and then Exit Config Menu. 7 A message will be displayed asking you to confirm the action: Contents will power-on the back of the device. 1 From the home screen, touch Menus...
Common Criteria Installation Supplement and Administrator Guide
Page 27
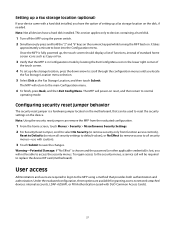
...motherboard). Warning-Potential Damage: If "No Effect" is chosen and the password (or other applicable credential) is in Configuration mode by locating the Exit Config Menu icon in the lower right corner of the touch screen. 4 To set up a fax storage location, press the down arrow to scroll through the...: Not all security menus-use with DoD Common Access Cards). 27 This section applies only to the main Configuration menu. 6 To finish, press Back, and then Exit Config Menu. The MFP will return to devices containing a hard disk. 1 Turn off the MFP using a method that can remove the MFP ...
...motherboard). Warning-Potential Damage: If "No Effect" is chosen and the password (or other applicable credential) is in Configuration mode by locating the Exit Config Menu icon in the lower right corner of the touch screen. 4 To set up a fax storage location, press the down arrow to scroll through the...: Not all security menus-use with DoD Common Access Cards). 27 This section applies only to the main Configuration menu. 6 To finish, press Back, and then Exit Config Menu. The MFP will return to devices containing a hard disk. 1 Turn off the MFP using a method that can remove the MFP ...
SCS/TNe Emulation User's Guide
Page 163
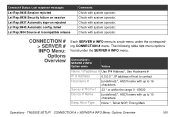
... Menu: Options Overview 165 Check with system operator. Check with up to 10 characters Keep Alive Type None *, Telnet NOP, Timing Mark Operations - Connect # Status: Last response messages Lst Rsp:8935:Session rejected Lst Rsp:8936:Security failure on session Lst Rsp:8937:Automatic sign-on rejected Lst Rsp:8940:Automatic config...
... Menu: Options Overview 165 Check with system operator. Check with up to 10 characters Keep Alive Type None *, Telnet NOP, Timing Mark Operations - Connect # Status: Last response messages Lst Rsp:8935:Session rejected Lst Rsp:8936:Security failure on session Lst Rsp:8937:Automatic sign-on rejected Lst Rsp:8940:Automatic config...
User's Guide
Page 42
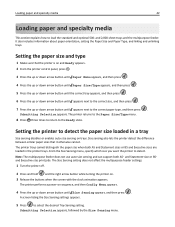
Size sensing also lets the printer detect the difference between similar paper sizes that the printer is on sequence, and then Config Menu appears. 4 Press the up or down arrow button until appears next to detect the paper size loaded in the printer trays. and 2,...then press . 7 Press the up or down arrow button until Size Sensing appears, and then press . Submitting Selection appears, followed by the Size Sensing menu. The Size Sensing setting does not affect the multipurpose feeder settings. 1 Turn the printer off. 2 Press and hold and the right arrow button while...
Size sensing also lets the printer detect the difference between similar paper sizes that the printer is on sequence, and then Config Menu appears. 4 Press the up or down arrow button until appears next to detect the paper size loaded in the printer trays. and 2,...then press . 7 Press the up or down arrow button until Size Sensing appears, and then press . Submitting Selection appears, followed by the Size Sensing menu. The Size Sensing setting does not affect the multipurpose feeder settings. 1 Turn the printer off. 2 Press and hold and the right arrow button while...
User's Guide
Page 43
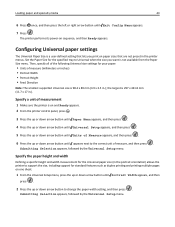
... printer performs its power‑on and Ready appears. 2 From the printer control panel, press . 3 Press the up or down arrow button until Paper Menu appears, and then press . 4 Press the up or down arrow button until Universal Setup appears, and then press . 5 Press the up or down arrow button ...to the correct unit of Measure appears, and then press . 6 Press the up or down arrow button until Exit Config Menu appears. 7 Press . Set the Paper Size for the specified tray to Universal when the size you print on one sheet. 1 From the Universal Setup...
... printer performs its power‑on and Ready appears. 2 From the printer control panel, press . 3 Press the up or down arrow button until Paper Menu appears, and then press . 4 Press the up or down arrow button until Universal Setup appears, and then press . 5 Press the up or down arrow button ...to the correct unit of Measure appears, and then press . 6 Press the up or down arrow button until Exit Config Menu appears. 7 Press . Set the Paper Size for the specified tray to Universal when the size you print on one sheet. 1 From the Universal Setup...
User's Guide
Page 46
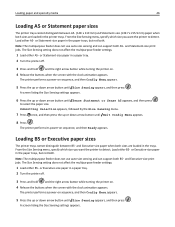
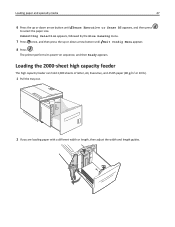
...‑ or Statement‑size paper in the paper trays, but not both . The printer performs a power‑on sequence, and then Config Menu appears. 5 Press the up or down arrow button until Size Sensing appears, and then press . Note: The multipurpose feeder does not use auto... on sequence, and then Ready appears. A screen listing the Size Sensing settings appears. 6 Press the up or down arrow button until Exit Config Menu appears. 8 Press . Loading paper and specialty media 46 Loading A5 or Statement paper sizes The printer trays cannot distinguish between B5‑ and...
...‑ or Statement‑size paper in the paper trays, but not both . The printer performs a power‑on sequence, and then Config Menu appears. 5 Press the up or down arrow button until Size Sensing appears, and then press . Note: The multipurpose feeder does not use auto... on sequence, and then Ready appears. A screen listing the Size Sensing settings appears. 6 Press the up or down arrow button until Exit Config Menu appears. 8 Press . Loading paper and specialty media 46 Loading A5 or Statement paper sizes The printer trays cannot distinguish between B5‑ and...
User's Guide
Page 47
The printer performs its power‑on sequence, and then Ready appears. Submitting Selection appears, followed by the Size Sensing menu. 7 Press once, and then press the up or down arrow button until Sense Executive or Sense B5 appears, and then press to select the paper ... width or length, then adjust the width and length guides. Loading paper and specialty media 47 6 Press the up or down arrow button until Exit Config Menu appears 8 Press .
The printer performs its power‑on sequence, and then Ready appears. Submitting Selection appears, followed by the Size Sensing menu. 7 Press once, and then press the up or down arrow button until Sense Executive or Sense B5 appears, and then press to select the paper ... width or length, then adjust the width and length guides. Loading paper and specialty media 47 6 Press the up or down arrow button until Exit Config Menu appears 8 Press .
User's Guide
Page 54
... 2 Press and hold and the right arrow button while turning the printer on sequence, and then the Configuration menu appears. 4 Press the up or down arrow button until Exit Config Menu appears, and then press Submit. Resetting the Printer appears. When the Paper Size and Paper Type settings are the... same for any trays, the trays are not automatic; The printer can be linked manually using the Paper Size menu available from the Paper Size menu. Unlinking ...
... 2 Press and hold and the right arrow button while turning the printer on sequence, and then the Configuration menu appears. 4 Press the up or down arrow button until Exit Config Menu appears, and then press Submit. Resetting the Printer appears. When the Paper Size and Paper Type settings are the... same for any trays, the trays are not automatic; The printer can be linked manually using the Paper Size menu available from the Paper Size menu. Unlinking ...
User's Guide
Page 72
... press . Printing 72 Printing information pages Printing a font sample list To print samples of the fonts currently available for CONFIG MENU to appear. 4 Press the up or down arrow button until Exit Config Menu appears, and then press . Printing the print quality test pages Print the print quality test pages to the Ready state...
... press . Printing 72 Printing information pages Printing a font sample list To print samples of the fonts currently available for CONFIG MENU to appear. 4 Press the up or down arrow button until Exit Config Menu appears, and then press . Printing the print quality test pages Print the print quality test pages to the Ready state...
User's Guide
Page 185
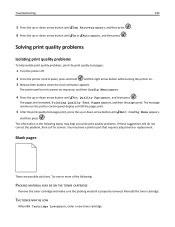
... LOW When 88 Cartridge Low appears, order a new toner cartridge. The pages are possible solutions. The message remains on sequence, and then Config Menu appears. 4 Press the up or down arrow button until On or Auto appears, and then press . Reinstall the toner cartridge. Troubleshooting 185... the up or down arrow button until Jam Recovery appears, and then press . 6 Press the up or down arrow button until Exit Config Menu appears, and then press . Solving print quality problems Isolating print quality problems To help you solve print quality problems. If these suggestions still...
... LOW When 88 Cartridge Low appears, order a new toner cartridge. The pages are possible solutions. The message remains on sequence, and then Config Menu appears. 4 Press the up or down arrow button until On or Auto appears, and then press . Reinstall the toner cartridge. Troubleshooting 185... the up or down arrow button until Jam Recovery appears, and then press . 6 Press the up or down arrow button until Exit Config Menu appears, and then press . Solving print quality problems Isolating print quality problems To help you solve print quality problems. If these suggestions still...


