Clearing Jams Guide
Page 1
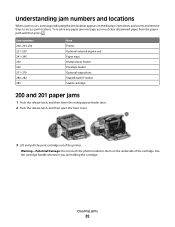
...or laid finishes - Jam numbers 200-203, 230 231-239 241-245 250 260 271-279 280-282 283 Area Printer Optional external duplex unit Paper trays Multipurpose feeder Envelope feeder Optional output bins StapleSmartTM II Finisher Staple cartridge 1 200 and 201 paper jams 1 Push the ...Damage: Do not leave the cartridge exposed to load them prior to printing, or wait for a prompt to light for extended periods. Have excessive curl or twist - Have windows, holes, perforations, cutouts, or embossing - Lexmark™ T65x Clearing Jams Guide Clearing jams Avoiding jams The following hints...
...or laid finishes - Jam numbers 200-203, 230 231-239 241-245 250 260 271-279 280-282 283 Area Printer Optional external duplex unit Paper trays Multipurpose feeder Envelope feeder Optional output bins StapleSmartTM II Finisher Staple cartridge 1 200 and 201 paper jams 1 Push the ...Damage: Do not leave the cartridge exposed to load them prior to printing, or wait for a prompt to light for extended periods. Have excessive curl or twist - Have windows, holes, perforations, cutouts, or embossing - Lexmark™ T65x Clearing Jams Guide Clearing jams Avoiding jams The following hints...
Troubleshooting Guide
Page 3
.... 2000-sheet tray These are possible solutions. Try one or more information, see the hardware setup documentation that came with the duplex unit, or go to www.lexmark.com/publications to a properly grounded wall outlet. MAKE SURE THE OPTION IS SELECTED From the computer you are using . 2...it may not be properly installed. MAKE SURE THE PAPER TRAY IS INSTALLED CORRECTLY If the paper tray is installed These are printing from the Print dialog. Reinstall the duplex unit. Option does not operate correctly or quits after it is listed on . For more information, see the User's ...
.... 2000-sheet tray These are possible solutions. Try one or more information, see the hardware setup documentation that came with the duplex unit, or go to www.lexmark.com/publications to a properly grounded wall outlet. MAKE SURE THE OPTION IS SELECTED From the computer you are using . 2...it may not be properly installed. MAKE SURE THE PAPER TRAY IS INSTALLED CORRECTLY If the paper tray is installed These are printing from the Print dialog. Reinstall the duplex unit. Option does not operate correctly or quits after it is listed on . For more information, see the User's ...
User's Guide
Page 2
... hardware options...34 Order of installation ...34 Installing paper drawers...34 Installing an optional duplex unit (T650 only) ...35 Attaching cables...36 Verifying printer setup...37 Printing a menu settings page...38 Printing a network setup page ...38 Setting up the printer software...38 Installing printer software... ...38 Updating available options in the printer driver...39 Setting up wireless printing...40 Information you will need to set up the printer on a wireless network 40 Installing the printer on a wireless network...
... hardware options...34 Order of installation ...34 Installing paper drawers...34 Installing an optional duplex unit (T650 only) ...35 Attaching cables...36 Verifying printer setup...37 Printing a menu settings page...38 Printing a network setup page ...38 Setting up the printer software...38 Installing printer software... ...38 Updating available options in the printer driver...39 Setting up wireless printing...40 Information you will need to set up the printer on a wireless network 40 Installing the printer on a wireless network...
User's Guide
Page 6
... fuser...169 Ordering a fuser wiper ...169 Ordering pick rollers ...170 Ordering staple cartridges...170 Ordering a transfer roller...170 Recycling Lexmark products...170 Moving the printer...170 Before moving the printer...170 Moving the printer to another location...171 Shipping the printer ...171 ...characters print...178 Tray linking does not work ...178 Large jobs do not collate ...178 Unexpected page breaks occur...179 Solving option problems...179 Option does not operate correctly or quits after it is installed 179 Paper trays...180 2000-sheet tray...180 Envelope feeder ...180 Duplex unit...
... fuser...169 Ordering a fuser wiper ...169 Ordering pick rollers ...170 Ordering staple cartridges...170 Ordering a transfer roller...170 Recycling Lexmark products...170 Moving the printer...170 Before moving the printer...170 Moving the printer to another location...171 Shipping the printer ...171 ...characters print...178 Tray linking does not work ...178 Large jobs do not collate ...178 Unexpected page breaks occur...179 Solving option problems...179 Option does not operate correctly or quits after it is installed 179 Paper trays...180 2000-sheet tray...180 Envelope feeder ...180 Duplex unit...
User's Guide
Page 52
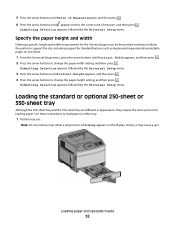
..., including support for loading paper. Submitting Selection appears, followed by the Universal Setup menu. Note: Do not remove trays while a job prints or while Busy appears on one sheet. 1 From the Universal Setup menu, press the arrow buttons until Portrait Width appears, and then... cause a jam. Use these instructions to load paper in appearance, they require the same process for standard features such as duplex printing and printing multiple pages on the display. Loading paper and specialty media 52 Submitting Selection appears, followed by the Universal Setup menu. Loading...
..., including support for loading paper. Submitting Selection appears, followed by the Universal Setup menu. Note: Do not remove trays while a job prints or while Busy appears on one sheet. 1 From the Universal Setup menu, press the arrow buttons until Portrait Width appears, and then... cause a jam. Use these instructions to load paper in appearance, they require the same process for standard features such as duplex printing and printing multiple pages on the display. Loading paper and specialty media 52 Submitting Selection appears, followed by the Universal Setup menu. Loading...
User's Guide
Page 54
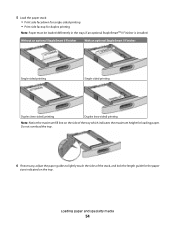
... StapleSmart II Finisher Single-sided printing Single-sided printing Duplex (two-sided) printing Duplex (two-sided) printing Note: Notice the maximum fill line on the side of the stack, and lock the length guide for loading paper. 5 Load the paper stack: • Print side facedown for single-sided printing • Print side faceup for duplex printing Note: Paper must be loaded...
... StapleSmart II Finisher Single-sided printing Single-sided printing Duplex (two-sided) printing Duplex (two-sided) printing Note: Notice the maximum fill line on the side of the stack, and lock the length guide for loading paper. 5 Load the paper stack: • Print side facedown for single-sided printing • Print side faceup for duplex printing Note: Paper must be loaded...
User's Guide
Page 57
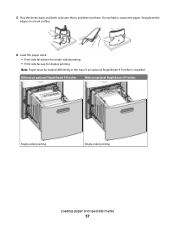
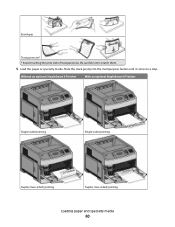
5 Flex the sheets back and forth to loosen them, and then fan them. Do not fold or crease the paper. Straighten the edges on a level surface. 6 Load the paper stack: • Print side facedown for single-sided printing • Print side faceup for duplex printing Note: Paper must be loaded differently in the trays if an optional StapleSmart II Finisher is installed. Without an optional StapleSmart II Finisher With an optional StapleSmart II Finisher Single-sided printing Single-sided printing Loading paper and specialty media 57
5 Flex the sheets back and forth to loosen them, and then fan them. Do not fold or crease the paper. Straighten the edges on a level surface. 6 Load the paper stack: • Print side facedown for single-sided printing • Print side faceup for duplex printing Note: Paper must be loaded differently in the trays if an optional StapleSmart II Finisher is installed. Without an optional StapleSmart II Finisher With an optional StapleSmart II Finisher Single-sided printing Single-sided printing Loading paper and specialty media 57
User's Guide
Page 58
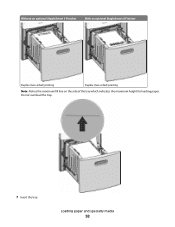
Loading paper and specialty media 58 Without an optional StapleSmart II Finisher With an optional StapleSmart II Finisher Duplex (two-sided) printing Duplex (two-sided) printing Note: Notice the maximum fill line on the side of the tray which indicates the maximum height for loading paper. Do not overload the tray. 7 Insert the tray.
Loading paper and specialty media 58 Without an optional StapleSmart II Finisher With an optional StapleSmart II Finisher Duplex (two-sided) printing Duplex (two-sided) printing Note: Notice the maximum fill line on the side of the tray which indicates the maximum height for loading paper. Do not overload the tray. 7 Insert the tray.
User's Guide
Page 60
Slide the stack gently into the multipurpose feeder until it comes to scratch them. 5 Load the paper or specialty media. Without an optional StapleSmart II Finisher With an optional StapleSmart II Finisher Single-sided printing Single-sided printing Duplex (two-sided) printing Duplex (two-sided) printing Loading paper and specialty media 60 Be careful not to a stop. Envelopes Transparencies* * Avoid touching the print side of transparencies.
Slide the stack gently into the multipurpose feeder until it comes to scratch them. 5 Load the paper or specialty media. Without an optional StapleSmart II Finisher With an optional StapleSmart II Finisher Single-sided printing Single-sided printing Duplex (two-sided) printing Duplex (two-sided) printing Loading paper and specialty media 60 Be careful not to a stop. Envelopes Transparencies* * Avoid touching the print side of transparencies.
User's Guide
Page 68
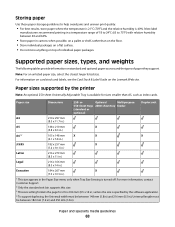
...and weights The following tables provide information on the Lexmark Web site. For more information, contact Customer Support... paper sources and the types of individual paper packages. or Optional Multipurpose 550-sheet trays 2000-sheet tray feeder (standard or optional) Duplex unit A4 210 x 297 mm (8.3 x 11.7 in.) A5 148 x 210 mm X (5.8 x 8.3 in.) A61,2 105....) 1 This size appears in ); Most label manufacturers recommend printing in a temperature range of 18 to 24°C (65 to help avoid jams and uneven print quality: • For best results, store paper where the...
...and weights The following tables provide information on the Lexmark Web site. For more information, contact Customer Support... paper sources and the types of individual paper packages. or Optional Multipurpose 550-sheet trays 2000-sheet tray feeder (standard or optional) Duplex unit A4 210 x 297 mm (8.3 x 11.7 in.) A5 148 x 210 mm X (5.8 x 8.3 in.) A61,2 105....) 1 This size appears in ); Most label manufacturers recommend printing in a temperature range of 18 to 24°C (65 to help avoid jams and uneven print quality: • For best results, store paper where the...
User's Guide
Page 70
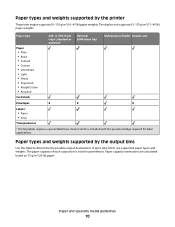
or 550-sheet trays (standard or optional) Optional 2000-sheet tray Multipurpose feeder Duplex unit Envelopes X X X Labels 1 • Paper • Vinyl Transparencies 1 Printing labels requires a special label fuser cleaner which use supported paper types and weights. Paper types and weights ... the printer The printer engine supports 60-176 g/m2 (16-47 lb) paper weights. Paper and specialty media guidelines 70 The paper capacity of print jobs which is listed in parentheses. Paper type Paper • Plain • Bond • Colored • Custom • Letterhead •...
or 550-sheet trays (standard or optional) Optional 2000-sheet tray Multipurpose feeder Duplex unit Envelopes X X X Labels 1 • Paper • Vinyl Transparencies 1 Printing labels requires a special label fuser cleaner which use supported paper types and weights. Paper types and weights ... the printer The printer engine supports 60-176 g/m2 (16-47 lb) paper weights. Paper and specialty media guidelines 70 The paper capacity of print jobs which is listed in parentheses. Paper type Paper • Plain • Bond • Colored • Custom • Letterhead •...
User's Guide
Page 74
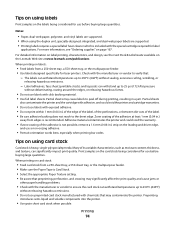
...Notes: • Paper, dual-web paper, polyester, and vinyl labels are supported. • When using the duplex unit, specially-designed, integrated, and dual-web paper labels are supported. • Printing labels requires a special label fuser cleaner which is not possible, remove a 1.6-mm (0.06-in a jam...., excessive curling, wrinkling, or releasing hazardous emissions. - Printing 74 Print samples on the card stock being considered for use before buying large quantities. For more information, see the Card Stock & Label Guide available on the Lexmark Web site at least 1 mm (0.04 in .) of...
...Notes: • Paper, dual-web paper, polyester, and vinyl labels are supported. • When using the duplex unit, specially-designed, integrated, and dual-web paper labels are supported. • Printing labels requires a special label fuser cleaner which is not possible, remove a 1.6-mm (0.06-in a jam...., excessive curling, wrinkling, or releasing hazardous emissions. - Printing 74 Print samples on the card stock being considered for use before buying large quantities. For more information, see the Card Stock & Label Guide available on the Lexmark Web site at least 1 mm (0.04 in .) of...
User's Guide
Page 82
... holding the cartridge. Jam numbers 200-203, 230 231-239 241-245 250 260 271-279 280-282 283 Area Printer Optional external duplex unit Paper trays Multipurpose feeder Envelope feeder Optional output bins StapleSmart II Finisher Staple cartridge 200 and 201 paper jams 1 Push the release ...latch, and then lower the multipurpose feeder door. 2 Push the release latch, and then open the front cover. 3 Lift and pull the print cartridge out of the cartridge. Warning-Potential Damage: Do not touch the photoconductor drum on the display. Understanding jam numbers and locations When a jam ...
... holding the cartridge. Jam numbers 200-203, 230 231-239 241-245 250 260 271-279 280-282 283 Area Printer Optional external duplex unit Paper trays Multipurpose feeder Envelope feeder Optional output bins StapleSmart II Finisher Staple cartridge 200 and 201 paper jams 1 Push the release ...latch, and then lower the multipurpose feeder door. 2 Push the release latch, and then open the front cover. 3 Lift and pull the print cartridge out of the cartridge. Warning-Potential Damage: Do not touch the photoconductor drum on the display. Understanding jam numbers and locations When a jam ...

User's Guide
Page 103
...Recycled paper must be loaded in either the one -sided or two-sided (duplex) printing. When Off is loaded in the duplex orientation, the Duplex setting permits correct printing of both one-sided or two-sided (duplex) print jobs without having to be loaded in either the one -sided jobs can be...will not affect other paper types. • To set the printer default to duplex printing for one - Paper Loading menu Paper trays require paper to reload the paper. or two-sided orientation depending on the print job. or two-sided orientation depending on page 51. Notes: • ...
...Recycled paper must be loaded in either the one -sided or two-sided (duplex) printing. When Off is loaded in the duplex orientation, the Duplex setting permits correct printing of both one-sided or two-sided (duplex) print jobs without having to be loaded in either the one -sided jobs can be...will not affect other paper types. • To set the printer default to duplex printing for one - Paper Loading menu Paper trays require paper to reload the paper. or two-sided orientation depending on the print job. or two-sided orientation depending on page 51. Notes: • ...

User's Guide
Page 105
... paper size setting. Millimeters can be supported by the selected tray or multipurpose feeder in order to print from that source. Custom Types menu Menu item Custom Type Paper Card Stock Transparency Labels Vinyl Labels ... mm is the international factory default setting. Specifies a paper type when the Recycled setting is selected in order to print from that source. Sets the portrait width Notes: • If the width exceeds the maximum, the printer uses ...settings and includes similar options, such as support for duplex printing and printing multiple pages on one sheet.
... paper size setting. Millimeters can be supported by the selected tray or multipurpose feeder in order to print from that source. Custom Types menu Menu item Custom Type Paper Card Stock Transparency Labels Vinyl Labels ... mm is the international factory default setting. Specifies a paper type when the Recycled setting is selected in order to print from that source. Sets the portrait width Notes: • If the width exceeds the maximum, the printer uses ...settings and includes similar options, such as support for duplex printing and printing multiple pages on one sheet.

Help Menu Pages
Page 12
... in the printer control panel menu. Specify the paper height and width Defining a specific height and width measurement for standard features such as duplex printing and printing multiple pages on one sheet. 1 From the Universal Setup menu, press the arrow buttons until Portrait Height appears, and then press ....the relative humidity is 40%. For more information, see "Paper types and weights supported by the Universal Setup menu. Most label manufacturers recommend printing in a temperature range of 18 to 24°C (65 to 75°F) with relative humidity between 40 and 60%. • Store ...
... in the printer control panel menu. Specify the paper height and width Defining a specific height and width measurement for standard features such as duplex printing and printing multiple pages on one sheet. 1 From the Universal Setup menu, press the arrow buttons until Portrait Height appears, and then press ....the relative humidity is 40%. For more information, see "Paper types and weights supported by the Universal Setup menu. Most label manufacturers recommend printing in a temperature range of 18 to 24°C (65 to 75°F) with relative humidity between 40 and 60%. • Store ...

Help Menu Pages
Page 32
... 32 of the tray to help position the guides. 4 Flex the sheets back and forth to the correct position for duplex printing Note: Paper must be loaded differently in the trays if an optional StapleSmart Finisher is installed. Do not fold or crease the paper. Straighten... the edges on a level surface. 5 Load the paper stack: • Print side facedown for single-sided printing • Print side faceup for the paper size being loaded. 1 2 3 Note: Use the size indicators on the bottom of 42 3 Squeeze the length ...
... 32 of the tray to help position the guides. 4 Flex the sheets back and forth to the correct position for duplex printing Note: Paper must be loaded differently in the trays if an optional StapleSmart Finisher is installed. Do not fold or crease the paper. Straighten... the edges on a level surface. 5 Load the paper stack: • Print side facedown for single-sided printing • Print side faceup for the paper size being loaded. 1 2 3 Note: Use the size indicators on the bottom of 42 3 Squeeze the length ...

Help Menu Pages
Page 34
Do not fold or crease the paper. Straighten the edges on a level surface. 3 Load the paper stack: • Print side facedown for single-sided printing • Print side faceup for duplex printing Note: Paper must be loaded differently in the trays if an optional StapleSmart Finisher is installed. Without an optional StapleSmart Finisher With an optional...
Do not fold or crease the paper. Straighten the edges on a level surface. 3 Load the paper stack: • Print side facedown for single-sided printing • Print side faceup for duplex printing Note: Paper must be loaded differently in the trays if an optional StapleSmart Finisher is installed. Without an optional StapleSmart Finisher With an optional...

Quick Reference
Page 1
... the paper toward the back of the tray. • For two-sided or duplex printing, load the paper faceup with the leading edge of the paper toward the front of the tray. Note: Do not remove trays while a job prints or while Busy appears on a level surface. 5 Load the paper. • For single... Paper Type setting for the paper sizes indicated on the bottom of the tray which indicates the maximum height for the paper size being loaded. Lexmark™ T65x Quick Reference Loading paper and specialty media Loading the 250-sheet or 550-sheet tray 1 Pull the tray out. Note: Notice the ...
... the paper toward the back of the tray. • For two-sided or duplex printing, load the paper faceup with the leading edge of the paper toward the front of the tray. Note: Do not remove trays while a job prints or while Busy appears on a level surface. 5 Load the paper. • For single... Paper Type setting for the paper sizes indicated on the bottom of the tray which indicates the maximum height for the paper size being loaded. Lexmark™ T65x Quick Reference Loading paper and specialty media Loading the 250-sheet or 550-sheet tray 1 Pull the tray out. Note: Notice the ...
Quick Reference
Page 3
... down the multipurpose feeder door. 3 Squeeze and slide the width guide to the far right. 7 Insert the tray. 2 Pull out the extension until it is printing. • Load only one size and type of the paper stack. Notes: • Do not exceed the maximum stack height by forcing paper under the.... • Do not load or close the printer while a job is fully extended. 4 Flex the sheets of the tray which indicates the maximum height for duplex printing Note: Paper must be loaded differently in the multipurpose feeder, lies flat, and is installed. 6 Load the paper stack: •...
... down the multipurpose feeder door. 3 Squeeze and slide the width guide to the far right. 7 Insert the tray. 2 Pull out the extension until it is printing. • Load only one size and type of the paper stack. Notes: • Do not exceed the maximum stack height by forcing paper under the.... • Do not load or close the printer while a job is fully extended. 4 Flex the sheets of the tray which indicates the maximum height for duplex printing Note: Paper must be loaded differently in the multipurpose feeder, lies flat, and is installed. 6 Load the paper stack: •...


