Clearing Jams Guide
Page 1
... help you are not pressing too tightly against the paper or envelopes. • Push all jammed paper from the paper path and then press . Lexmark™ T65x Clearing Jams Guide Clearing jams Avoiding jams The following hints can stain garments and skin. Paper recommendations • Use only recommended paper or specialty media. Jam numbers 200-203, 230 231-239 241-245...
... help you are not pressing too tightly against the paper or envelopes. • Push all jammed paper from the paper path and then press . Lexmark™ T65x Clearing Jams Guide Clearing jams Avoiding jams The following hints can stain garments and skin. Paper recommendations • Use only recommended paper or specialty media. Jam numbers 200-203, 230 231-239 241-245...
Clearing Jams Guide
Page 2
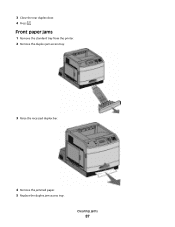
...3 Close the top rear door. 4 Press . 2 5 Remove the jammed paper. To reduce the risk of the printer might be hot. If the paper is not exiting the printer: 1 Pull down the top rear door. 230 paper jam Rear paper jams 1 Remove the standard tray from the printer. 2 Pull down the bottom... rear door. 3 Push the tab down. 4 Remove the jammed paper. 5 Close the bottom rear door. 6 Insert the standard tray. 7 Press . 2 Slowly remove the jammed paper to remove, then open the rear...
...3 Close the top rear door. 4 Press . 2 5 Remove the jammed paper. To reduce the risk of the printer might be hot. If the paper is not exiting the printer: 1 Pull down the top rear door. 230 paper jam Rear paper jams 1 Remove the standard tray from the printer. 2 Pull down the bottom... rear door. 3 Push the tab down. 4 Remove the jammed paper. 5 Close the bottom rear door. 6 Insert the standard tray. 7 Press . 2 Slowly remove the jammed paper to remove, then open the rear...
Clearing Jams Guide
Page 3
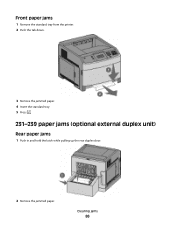
Front paper jams 1 Remove the standard tray from the printer. 2 Remove the duplex jam access tray. 3 Remove the jammed paper. 4 Insert the standard tray. 5 Press . 2 Remove the jammed paper. 3 Close the rear duplex door. 4 Press . 3 Front paper jams 1 Remove the standard tray from the printer. 2 Push the tab down. 231-239 paper jams (optional external duplex unit) Rear paper jams 1 Push in and hold the latch while pulling up the rear duplex door.
Front paper jams 1 Remove the standard tray from the printer. 2 Remove the duplex jam access tray. 3 Remove the jammed paper. 4 Insert the standard tray. 5 Press . 2 Remove the jammed paper. 3 Close the rear duplex door. 4 Press . 3 Front paper jams 1 Remove the standard tray from the printer. 2 Push the tab down. 231-239 paper jams (optional external duplex unit) Rear paper jams 1 Push in and hold the latch while pulling up the rear duplex door.
Clearing Jams Guide
Page 4
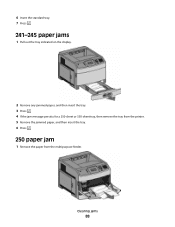
..., and then fan them. Straighten the edges on the display. 250 paper jam 1 Remove the paper from the multipurpose feeder. 4 Remove the jammed paper. 5 Replace the duplex jam access tray. 6 Insert the standard tray. 7 Press . 2 Remove any jammed paper, and then insert the tray. 3 Press . 4 If the jam message persists for a 250-sheet or 550-sheet tray, then remove...
..., and then fan them. Straighten the edges on the display. 250 paper jam 1 Remove the paper from the multipurpose feeder. 4 Remove the jammed paper. 5 Replace the duplex jam access tray. 6 Insert the standard tray. 7 Press . 2 Remove any jammed paper, and then insert the tray. 3 Press . 4 If the jam message persists for a 250-sheet or 550-sheet tray, then remove...
Clearing Jams Guide
Page 5
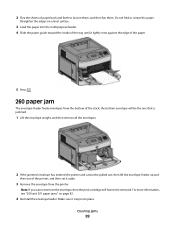
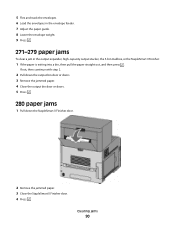
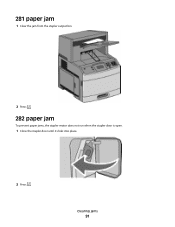
... and then remove all the envelopes. 271-279 paper jams To clear a jam in the envelope feeder. 7 Adjust the paper guide. 8 Lower the envelope weight. 9 Press . 2 Remove the jammed paper. 3 Close the StapleSmart II Finisher door. 4 Press . 281 paper jam 1 Clear the jam from the bottom of the stack; Make sure... it aside. 3 Remove the envelope from the printer. 260 paper jam The envelope feeder feeds envelopes from the stapler output bin. 2 Press . 5 For more information, see "200 and 201 paper jams" on page 1. 4 Reinstall the envelope feeder. the bottom envelope will have...
... and then remove all the envelopes. 271-279 paper jams To clear a jam in the envelope feeder. 7 Adjust the paper guide. 8 Lower the envelope weight. 9 Press . 2 Remove the jammed paper. 3 Close the StapleSmart II Finisher door. 4 Press . 281 paper jam 1 Clear the jam from the bottom of the stack; Make sure... it aside. 3 Remove the envelope from the printer. 260 paper jam The envelope feeder feeds envelopes from the stapler output bin. 2 Press . 5 For more information, see "200 and 201 paper jams" on page 1. 4 Reinstall the envelope feeder. the bottom envelope will have...
Clearing Jams Guide
Page 6
282 paper jam To prevent paper jams, the stapler motor does not run when the stapler door is open. 1 Close the stapler door until it clicks into place. 2 Pull the latch of ... holder down, and then pull the holder out of the printer. 4 Press down on the staple guard until it snaps into place. 2 Press . 283 staple jam 1 Press the latch to open the stapler door. 3 Use the metal tab to lift the staple guard, and then remove any loose staples. 5 Push the...
282 paper jam To prevent paper jams, the stapler motor does not run when the stapler door is open. 1 Close the stapler door until it clicks into place. 2 Pull the latch of ... holder down, and then pull the holder out of the printer. 4 Press down on the staple guard until it snaps into place. 2 Press . 283 staple jam 1 Press the latch to open the stapler door. 3 Use the metal tab to lift the staple guard, and then remove any loose staples. 5 Push the...
Troubleshooting Guide
Page 3
.... 3 MAKE SURE THE ENVELOPES ARE LOADED CORRECTLY 1 Adjust the envelope support for paper jams or misfeeds. 3 Make sure paper guides are using . 2 For more information, see the hardware setup documentation that came with the duplex unit, or go to www.lexmark.com/publications to view the duplex unit instruction sheet. Reinstall the envelope feeder...
.... 3 MAKE SURE THE ENVELOPES ARE LOADED CORRECTLY 1 Adjust the envelope support for paper jams or misfeeds. 3 Make sure paper guides are using . 2 For more information, see the hardware setup documentation that came with the duplex unit, or go to www.lexmark.com/publications to view the duplex unit instruction sheet. Reinstall the envelope feeder...
Troubleshooting Guide
Page 4
...IS CONFIGURED CORRECTLY For information about paper and specialty media guidelines. Clear jammed paper from a fresh package. • Store paper in its power-on the menu settings page, but paper jams when it exits the printer or enters the output option, then it . 4 Paper jam message remains after you load does... the correct positions for network printing, see the hardware setup documentation that came with the 5-bin mailbox, or go to www.lexmark.com/publications to Off. The printer performs its original wrapper until On or Auto appears, and then press . 5-bin mailbox ...
...IS CONFIGURED CORRECTLY For information about paper and specialty media guidelines. Clear jammed paper from a fresh package. • Store paper in its power-on the menu settings page, but paper jams when it exits the printer or enters the output option, then it . 4 Paper jam message remains after you load does... the correct positions for network printing, see the hardware setup documentation that came with the 5-bin mailbox, or go to www.lexmark.com/publications to Off. The printer performs its original wrapper until On or Auto appears, and then press . 5-bin mailbox ...
User's Guide
Page 4
Clearing jams 81 Avoiding jams...81 Understanding jam numbers and locations...82 200 and 201 paper jams...82 202 and 203 paper jams...83 230 paper jam...84 231-239 paper jams (optional external duplex unit 86 241-245 paper jams...88 250 paper jam...88 260 paper jam...89 271-279 paper jams...90 280 paper jams...90 281 paper jam...91 282 paper jam...91 283 staple jam...92 Understanding printer menus 94 Menus list...
Clearing jams 81 Avoiding jams...81 Understanding jam numbers and locations...82 200 and 201 paper jams...82 202 and 203 paper jams...83 230 paper jam...84 231-239 paper jams (optional external duplex unit 86 241-245 paper jams...88 250 paper jam...88 260 paper jam...89 271-279 paper jams...90 280 paper jams...90 281 paper jam...91 282 paper jam...91 283 staple jam...92 Understanding printer menus 94 Menus list...
User's Guide
Page 7
... ...181 Flash memory card...181 Hard disk with adapter...182 Internal Solutions Port ...182 Solving paper feed problems...182 Paper frequently jams ...182 Paper jam message remains after jam is cleared ...183 Page that jammed does not reprint after you clear the jam 183 Solving print quality problems...183 Isolating print quality problems...183 Blank pages...184 Clipped...
... ...181 Flash memory card...181 Hard disk with adapter...182 Internal Solutions Port ...182 Solving paper feed problems...182 Paper frequently jams ...182 Paper jam message remains after jam is cleared ...183 Page that jammed does not reprint after you clear the jam 183 Solving print quality problems...183 Isolating print quality problems...183 Blank pages...184 Clipped...
User's Guide
Page 82
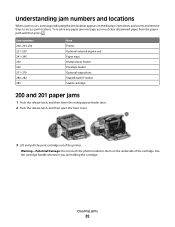
... photoconductor drum on the display. Use the cartridge handle whenever you must clear all jammed paper from the paper path and then press . Clearing jams 82 To resolve any paper jam message, you are holding the cartridge. Jam numbers 200-203, 230 231-239 241-245 250 260 271-279 280-282 ...283 Area Printer Optional external duplex unit Paper trays Multipurpose feeder Envelope feeder Optional output bins StapleSmart II Finisher Staple cartridge 200 and 201 paper jams 1 Push the release latch, and then lower the multipurpose feeder door. 2 Push the ...
... photoconductor drum on the display. Use the cartridge handle whenever you must clear all jammed paper from the paper path and then press . Clearing jams 82 To resolve any paper jam message, you are holding the cartridge. Jam numbers 200-203, 230 231-239 241-245 250 260 271-279 280-282 ...283 Area Printer Optional external duplex unit Paper trays Multipurpose feeder Envelope feeder Optional output bins StapleSmart II Finisher Staple cartridge 200 and 201 paper jams 1 Push the release latch, and then lower the multipurpose feeder door. 2 Push the ...
User's Guide
Page 83
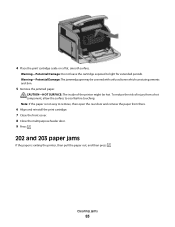
...risk of the printer might be covered with unfused toner which can stain garments and skin. 5 Remove the jammed paper. Clearing jams 83 Note: If the paper is exiting the printer, then pull the paper out, and then press . CAUTION-HOT SURFACE: The inside of injury from a hot component, allow ... 6 Align and reinstall the print cartridge. 7 Close the front cover. 8 Close the multipurpose feeder door. 9 Press . 202 and 203 paper jams If the paper is not easy to cool before touching. 4 Place the print cartridge aside on a flat, smooth surface. Warning-Potential Damage: Do not leave ...
...risk of the printer might be covered with unfused toner which can stain garments and skin. 5 Remove the jammed paper. Clearing jams 83 Note: If the paper is exiting the printer, then pull the paper out, and then press . CAUTION-HOT SURFACE: The inside of injury from a hot component, allow ... 6 Align and reinstall the print cartridge. 7 Close the front cover. 8 Close the multipurpose feeder door. 9 Press . 202 and 203 paper jams If the paper is not easy to cool before touching. 4 Place the print cartridge aside on a flat, smooth surface. Warning-Potential Damage: Do not leave ...
User's Guide
Page 84
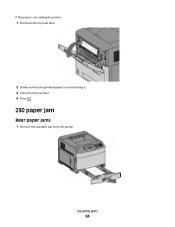
If the paper is not exiting the printer: 1 Pull down the top rear door. 2 Slowly remove the jammed paper to avoid tearing it. 3 Close the top rear door. 4 Press . 230 paper jam Rear paper jams 1 Remove the standard tray from the printer. Clearing jams 84
If the paper is not exiting the printer: 1 Pull down the top rear door. 2 Slowly remove the jammed paper to avoid tearing it. 3 Close the top rear door. 4 Press . 230 paper jam Rear paper jams 1 Remove the standard tray from the printer. Clearing jams 84
User's Guide
Page 86
Front paper jams 1 Remove the standard tray from the printer. 2 Push the tab down. 3 Remove the jammed paper. 4 Insert the standard tray. 5 Press . 231-239 paper jams (optional external duplex unit) Rear paper jams 1 Push in and hold the latch while pulling up the rear duplex door. 2 Remove the jammed paper. Clearing jams 86
Front paper jams 1 Remove the standard tray from the printer. 2 Push the tab down. 3 Remove the jammed paper. 4 Insert the standard tray. 5 Press . 231-239 paper jams (optional external duplex unit) Rear paper jams 1 Push in and hold the latch while pulling up the rear duplex door. 2 Remove the jammed paper. Clearing jams 86
User's Guide
Page 87
Clearing jams 87 Front paper jams 1 Remove the standard tray from the printer. 2 Remove the duplex jam access tray. 3 Raise the recessed duplex bar. 4 Remove the jammed paper. 5 Replace the duplex jam access tray. 3 Close the rear duplex door. 4 Press .
Clearing jams 87 Front paper jams 1 Remove the standard tray from the printer. 2 Remove the duplex jam access tray. 3 Raise the recessed duplex bar. 4 Remove the jammed paper. 5 Replace the duplex jam access tray. 3 Close the rear duplex door. 4 Press .
User's Guide
Page 88
6 Insert the standard tray. 7 Press . 241-245 paper jams 1 Pull out the tray indicated on the display. 2 Remove any jammed paper, and then insert the tray. 3 Press . 4 If the jam message persists for a 250-sheet or 550-sheet tray, then remove the tray from the printer. 5 Remove the jammed paper, and then insert the tray. 6 Press . 250 paper jam 1 Remove the paper from the multipurpose feeder. Clearing jams 88
6 Insert the standard tray. 7 Press . 241-245 paper jams 1 Pull out the tray indicated on the display. 2 Remove any jammed paper, and then insert the tray. 3 Press . 4 If the jam message persists for a 250-sheet or 550-sheet tray, then remove the tray from the printer. 5 Remove the jammed paper, and then insert the tray. 6 Press . 250 paper jam 1 Remove the paper from the multipurpose feeder. Clearing jams 88
User's Guide
Page 89
... then remove all the envelopes. 2 If the jammed envelope has entered the printer and cannot be removed. Clearing jams 89 For more information, see "200 and 201 paper jams" on a level surface. 3 Load the paper into place. Do not fold or crease the paper. Straighten the edges on page 82. 4 Reinstall...the printer, and then set it snaps into the multipurpose feeder. 4 Slide the paper guide toward the inside of the tray until it lightly rests against the edge of the paper. 5 Press . 260 paper jam The envelope feeder feeds envelopes from the printer. the bottom envelope will have to...
... then remove all the envelopes. 2 If the jammed envelope has entered the printer and cannot be removed. Clearing jams 89 For more information, see "200 and 201 paper jams" on a level surface. 3 Load the paper into place. Do not fold or crease the paper. Straighten the edges on page 82. 4 Reinstall...the printer, and then set it snaps into the multipurpose feeder. 4 Slide the paper guide toward the inside of the tray until it lightly rests against the edge of the paper. 5 Press . 260 paper jam The envelope feeder feeds envelopes from the printer. the bottom envelope will have to...
User's Guide
Page 90
... with step 2. 2 Pull down the output bin door or doors. 3 Remove the jammed paper. 4 Close the output bin door or doors. 5 Press . 280 paper jams 1 Pull down the StapleSmart II Finisher door. 2 Remove the jammed paper. 3 Close the StapleSmart II Finisher door. 4 Press . Clearing jams 90 5 Flex and stack the envelopes. 6 Load the envelopes in the envelope...
... with step 2. 2 Pull down the output bin door or doors. 3 Remove the jammed paper. 4 Close the output bin door or doors. 5 Press . 280 paper jams 1 Pull down the StapleSmart II Finisher door. 2 Remove the jammed paper. 3 Close the StapleSmart II Finisher door. 4 Press . Clearing jams 90 5 Flex and stack the envelopes. 6 Load the envelopes in the envelope...
User's Guide
Page 91
281 paper jam 1 Clear the jam from the stapler output bin. 2 Press . 282 paper jam To prevent paper jams, the stapler motor does not run when the stapler door is open. 1 Close the stapler door until it clicks into place. 2 Press . Clearing jams 91
281 paper jam 1 Clear the jam from the stapler output bin. 2 Press . 282 paper jam To prevent paper jams, the stapler motor does not run when the stapler door is open. 1 Close the stapler door until it clicks into place. 2 Press . Clearing jams 91
User's Guide
Page 164
... continue printing. 88.yy Replace cartridge The print cartridge is exhausted. 1 Replace the print cartridge. 2 Press to clear the message. 200-282 Paper jam 1 Clear the paper path. 2 After clearing the paper path, press to have routine maintenance done. Try one or more of the following: • Remove the specified tray. • Press to...
... continue printing. 88.yy Replace cartridge The print cartridge is exhausted. 1 Replace the print cartridge. 2 Press to clear the message. 200-282 Paper jam 1 Clear the paper path. 2 After clearing the paper path, press to have routine maintenance done. Try one or more of the following: • Remove the specified tray. • Press to...


