Troubleshooting Guide
Page 6
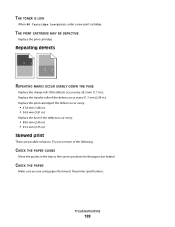
... setting is too dark These are possible solutions. THE TONER MAY BE LOW When 88 Cartridge low appears or when the print becomes faded, replace the print cartridge. THE PAPER HAS ABSORBED MOISTURE DUE TO HIGH HUMIDITY • Load paper from a fresh package. • Store paper ... For Windows users, specify the type from Print Properties. • For Macintosh users, specify the type from the Print dialog. THE FUSER MAY BE WORN OR DEFECTIVE Replace the fuser. Print is too high. • From the printer control panel, change these settings from the Quality menu. • For Windows users...
... setting is too dark These are possible solutions. THE TONER MAY BE LOW When 88 Cartridge low appears or when the print becomes faded, replace the print cartridge. THE PAPER HAS ABSORBED MOISTURE DUE TO HIGH HUMIDITY • Load paper from a fresh package. • Store paper ... For Windows users, specify the type from Print Properties. • For Macintosh users, specify the type from the Print dialog. THE FUSER MAY BE WORN OR DEFECTIVE Replace the fuser. Print is too high. • From the printer control panel, change these settings from the Quality menu. • For Windows users...
Troubleshooting Guide
Page 7
...a fresh package. • Store paper in its original wrapper until you are possible solutions. Replace the print cartridge if the defects occur every: • 47.8 mm (1.88 in.) • 96.8 mm (3.81 in.) Replace the fuser if the defects occur every: • 88.0 mm (3.46 in.) • 95.2 mm... these settings from Print Properties. • For Macintosh users, change these settings from the Print dialog. THE PRINT CARTRIDGE MAY BE DEFECTIVE Replace the print cartridge. THE PAPER HAS ABSORBED MOISTURE DUE TO HIGH HUMIDITY • Load paper from the Print dialog. THE TONER IS LOW...
...a fresh package. • Store paper in its original wrapper until you are possible solutions. Replace the print cartridge if the defects occur every: • 47.8 mm (1.88 in.) • 96.8 mm (3.81 in.) Replace the fuser if the defects occur every: • 88.0 mm (3.46 in.) • 95.2 mm... these settings from Print Properties. • For Macintosh users, change these settings from the Print dialog. THE PRINT CARTRIDGE MAY BE DEFECTIVE Replace the print cartridge. THE PAPER HAS ABSORBED MOISTURE DUE TO HIGH HUMIDITY • Load paper from the Print dialog. THE TONER IS LOW...
User's Guide
Page 155
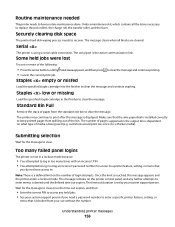
... setting in the Setup menu and the custom settings in the printer memory are deleted. Try one or more of the following: • Replace the fuser wiper. • Press the arrow buttons until Continue appears, and then press to restore all held jobs. Resetting the printer Wait for the...not restore appears, and then press . You selected No from the specified bin. The printer automatically senses paper removal and resumes printing. Replace wiper Try one of jobs being restored. Understanding printer messages 155 Remove paper from Remove the paper from the "Verify PC unit...
... setting in the Setup menu and the custom settings in the printer memory are deleted. Try one or more of the following: • Replace the fuser wiper. • Press the arrow buttons until Continue appears, and then press to restore all held jobs. Resetting the printer Wait for the...not restore appears, and then press . You selected No from the specified bin. The printer automatically senses paper removal and resumes printing. Replace wiper Try one of jobs being restored. Understanding printer messages 155 Remove paper from Remove the paper from the "Verify PC unit...
User's Guide
Page 156
... standard exit bin to clear the message. Understanding printer messages 156 The message clears when all the items necessary to replace the pick rollers, the charge roll, the transfer roller, and the fuser. Staples empty or misfed to recover. Standard Bin Full Remove the stack of media is displayed. The printer may...
... standard exit bin to clear the message. Understanding printer messages 156 The message clears when all the items necessary to replace the pick rollers, the charge roll, the transfer roller, and the fuser. Staples empty or misfed to recover. Standard Bin Full Remove the stack of media is displayed. The printer may...
User's Guide
Page 164
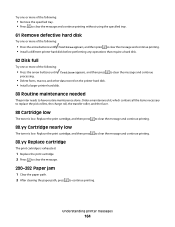
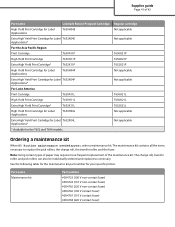
Order a maintenance kit, which contains all the items necessary to replace the pick rollers, the charge roll, the transfer roller, and the fuser. 88 Cartridge low The toner is exhausted. 1 Replace the print cartridge. 2 Press to clear the message. 200-282 Paper jam 1 Clear the paper path. 2 After... clearing the paper path, press to continue printing. Replace the print cartridge, and then press ...
Order a maintenance kit, which contains all the items necessary to replace the pick rollers, the charge roll, the transfer roller, and the fuser. 88 Cartridge low The toner is exhausted. 1 Replace the print cartridge. 2 Press to clear the message. 200-282 Paper jam 1 Clear the paper path. 2 After... clearing the paper path, press to continue printing. Replace the print cartridge, and then press ...
User's Guide
Page 168
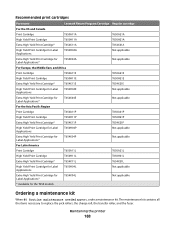
Maintaining the printer 168 The maintenance kit contains all the items necessary to replace the pick rollers, the charge roll, the transfer roller, and the fuser. Recommended print cartridges Part name For the US and Canada Print Cartridge Lexmark Return Program Cartridge Regular cartridge T650A11A T650A21A High Yield Print Cartridge T650H11A T650H21A Extra High...
Maintaining the printer 168 The maintenance kit contains all the items necessary to replace the pick rollers, the charge roll, the transfer roller, and the fuser. Recommended print cartridges Part name For the US and Canada Print Cartridge Lexmark Return Program Cartridge Regular cartridge T650A11A T650A21A High Yield Print Cartridge T650H11A T650H21A Extra High...
User's Guide
Page 169
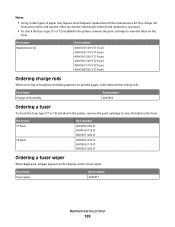
Notes: • Using certain types of paper may require more frequent replacement of the maintenance kit. Part name Maintenance kit Part number 40X4723 (100 V T1 fuser) 40X4724 (110 V T1 fuser) 40X4765 (220 V T1 fuser) 40X4766 (100 V T2 fuser) 40X4767 (110 V T2 fuser) 40X4768 (220 V T2 fuser) Ordering charge rolls When toner fog or background shading appears on the...
Notes: • Using certain types of paper may require more frequent replacement of the maintenance kit. Part name Maintenance kit Part number 40X4723 (100 V T1 fuser) 40X4724 (110 V T1 fuser) 40X4765 (220 V T1 fuser) 40X4766 (100 V T2 fuser) 40X4767 (110 V T2 fuser) 40X4768 (220 V T2 fuser) Ordering charge rolls When toner fog or background shading appears on the...

User's Guide
Page 187
... type from the Print dialog and pop-up menus. THE TONER MAY BE LOW When 88 Cartridge low appears or when the print becomes faded, replace the print cartridge. Try one or more of the following: CHECK THE DARKNESS, BRIGHTNESS, AND CONTRAST SETTINGS The Toner Darkness setting is too dark, the... too dark, or the Contrast setting is too dark These are possible solutions. CHECK THE PAPER Avoid textured paper with rough finishes. Troubleshooting 187 THE FUSER MAY BE WORN OR DEFECTIVE Replace the fuser.
... type from the Print dialog and pop-up menus. THE TONER MAY BE LOW When 88 Cartridge low appears or when the print becomes faded, replace the print cartridge. Try one or more of the following: CHECK THE DARKNESS, BRIGHTNESS, AND CONTRAST SETTINGS The Toner Darkness setting is too dark, the... too dark, or the Contrast setting is too dark These are possible solutions. CHECK THE PAPER Avoid textured paper with rough finishes. Troubleshooting 187 THE FUSER MAY BE WORN OR DEFECTIVE Replace the fuser.
User's Guide
Page 189
... print cartridge if the defects occur every: • 47.8 mm (1.88 in.) • 96.8 mm (3.81 in.) Replace the fuser if the defects occur every: • 88.0 mm (3.46 in.) • 95.2 mm (3.75 in the tray to the correct positions for the paper size ... are possible solutions. THE TONER IS LOW When 88 Cartridge Low appears, order a new print cartridge. Repeating defects REPEATING MARKS OCCUR EVENLY DOWN THE PAGE Replace the charge rolls if the defects occur every 28.3 mm (1.11 in .). Try one or more of the following: CHECK THE PAPER GUIDES Move the...
... print cartridge if the defects occur every: • 47.8 mm (1.88 in.) • 96.8 mm (3.81 in.) Replace the fuser if the defects occur every: • 88.0 mm (3.46 in.) • 95.2 mm (3.75 in the tray to the correct positions for the paper size ... are possible solutions. THE TONER IS LOW When 88 Cartridge Low appears, order a new print cartridge. Repeating defects REPEATING MARKS OCCUR EVENLY DOWN THE PAGE Replace the charge rolls if the defects occur every 28.3 mm (1.11 in .). Try one or more of the following: CHECK THE PAPER GUIDES Move the...
User's Guide
Page 215
...bin 153 Reattach bin - 153 Reattach envelope feeder 154 recycled paper using 67 recycling Lexmark products 170 WEEE statement 198 Remote Management Active 154 Remove packaging material, check 154 ... printing for Windows users 75 Resetting active bin 155 Resetting the printer 155 Resetting without replacing may affect print quality. 155 Restore Held Jobs? 155 Restoring Factory Defaults 155 Restoring Held...supplies conserving 166 status of 167 storing 166 supplies, ordering charge rolls 169 fuser 169 fuser wiper 169 maintenance kit 168 pick rollers 170 print cartridges 167 staple cartridges ...
...bin 153 Reattach bin - 153 Reattach envelope feeder 154 recycled paper using 67 recycling Lexmark products 170 WEEE statement 198 Remote Management Active 154 Remove packaging material, check 154 ... printing for Windows users 75 Resetting active bin 155 Resetting the printer 155 Resetting without replacing may affect print quality. 155 Restore Held Jobs? 155 Restoring Factory Defaults 155 Restoring Held...supplies conserving 166 status of 167 storing 166 supplies, ordering charge rolls 169 fuser 169 fuser wiper 169 maintenance kit 168 pick rollers 170 print cartridges 167 staple cartridges ...
Help Menu Pages
Page 39
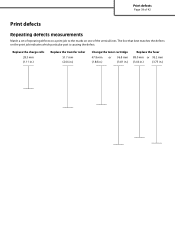
Print defects Page 39 of 42 Print defects Repeating defects measurements Match a set of repeating defects on a print job to the marks on the print job indicates which particular part is causing the defect. Replace the charge rolls 28.3 mm (1.11 in.) Replace the transfer roller 51.7 mm (2.04 in.) Change the toner cartridge 47.8 mm or 96.8 mm (1.88 in.) (3.81 in.) Replace the fuser 88.0 mm or 95.2 mm (3.46 in.) (3.75 in.) The line that best matches the defects on one of the vertical lines.
Print defects Page 39 of 42 Print defects Repeating defects measurements Match a set of repeating defects on a print job to the marks on the print job indicates which particular part is causing the defect. Replace the charge rolls 28.3 mm (1.11 in.) Replace the transfer roller 51.7 mm (2.04 in.) Change the toner cartridge 47.8 mm or 96.8 mm (1.88 in.) (3.81 in.) Replace the fuser 88.0 mm or 95.2 mm (3.46 in.) (3.75 in.) The line that best matches the defects on one of the vertical lines.
Help Menu Pages
Page 41
...replace the pick rollers, the charge roll, the transfer roller, and the fuser. Part name Maintenance kit Part number 40X4723 (100 V non-contact fuser) 40X4724 (110 V non-contact fuser) 40X4765 (220 V non-contact fuser) 40X4766 (100 V contact fuser) 40X4767 (110 V contact fuser) 40X4768 (220 V contact fuser... maintenance needed appears, order a maintenance kit. Note: Using certain types of paper may require more frequent replacement of 42 Part name Lexmark Return Program Cartridge High Yield Print Cartridge for Label Applications T650H04E Extra High Yield Print Cartridge for Label T652X04E...
...replace the pick rollers, the charge roll, the transfer roller, and the fuser. Part name Maintenance kit Part number 40X4723 (100 V non-contact fuser) 40X4724 (110 V non-contact fuser) 40X4765 (220 V non-contact fuser) 40X4766 (100 V contact fuser) 40X4767 (110 V contact fuser) 40X4768 (220 V contact fuser... maintenance needed appears, order a maintenance kit. Note: Using certain types of paper may require more frequent replacement of 42 Part name Lexmark Return Program Cartridge High Yield Print Cartridge for Label Applications T650H04E Extra High Yield Print Cartridge for Label T652X04E...
Service Manual
Page 9
... registration adjustment 4-2 Oscillating printhead assembly electronic adjustment 4-3 Alignment assembly adjustment 4-4 Fuser solenoid adjustment 4-6 Gap adjustment 4-6 Removals 4-7 Replacement note: To replace a removed part, reverse the order of removal unless noted otherwise 4-7 Access door removal (T650, T652, T654 4-8 Alignment assembly removal (T650, T652, T654 4-8 Connection access cover, rear removal (T650, T652, T654 4-11 Connection bezel assembly, rear removal...
... registration adjustment 4-2 Oscillating printhead assembly electronic adjustment 4-3 Alignment assembly adjustment 4-4 Fuser solenoid adjustment 4-6 Gap adjustment 4-6 Removals 4-7 Replacement note: To replace a removed part, reverse the order of removal unless noted otherwise 4-7 Access door removal (T650, T652, T654 4-8 Alignment assembly removal (T650, T652, T654 4-8 Connection access cover, rear removal (T650, T652, T654 4-11 Connection bezel assembly, rear removal...

Service Manual
Page 36
...is installed on a level and stable surface. • Media meets specifications and is installed properly. • Customer maintenance parts have been replaced at the specified intervals. • Check all attached options for proper attachment and electrical connection. • Refer to check the following is ... sure to the User's Guide for proper installation. Power-on . The fuser unit assembly lamps turn on . 4. Operator panel LED becomes solid. 7. Turn the printer off. 2. Press and hold and . 3. The Lexmark splash screen appears with a progress bar in the center until the code is...
...is installed on a level and stable surface. • Media meets specifications and is installed properly. • Customer maintenance parts have been replaced at the specified intervals. • Check all attached options for proper attachment and electrical connection. • Refer to check the following is ... sure to the User's Guide for proper installation. Power-on . The fuser unit assembly lamps turn on . 4. Operator panel LED becomes solid. 7. Turn the printer off. 2. Press and hold and . 3. The Lexmark splash screen appears with a progress bar in the center until the code is...

Service Manual
Page 46
... more information, go to "Scheduled maintenance" on or during disk format and write operations. Remove the incompatible output option. 3. An incompatible tray is necessary to replace the fuser assembly, transfer roller, charge roll, and pick rolls at power on page 6-2. 1. This error code displays when the printer detects a defective disk.
... more information, go to "Scheduled maintenance" on or during disk format and write operations. Remove the incompatible output option. 3. An incompatible tray is necessary to replace the fuser assembly, transfer roller, charge roll, and pick rolls at power on page 6-2. 1. This error code displays when the printer detects a defective disk.
Service Manual
Page 53
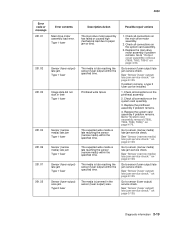
...media) late jam Type 1 fuser 201.07 Sensor (fuser output) late jam Type 1 fuser 201.25 Sensor (fuser output) area jam. Replace the system card assembly if problem remains. Go to sensor (narrow media) late jam service check. Go to "System card assembly removal (T650, T652, T654, T656)"... on page 2-139. on the system card assembly. 3. on page 4-76. If problem remains, a type 2 fuser can be installed. 1. Replace the main drive motor assembly if problem remains. See "Sensor (fuser output) late jam service check." ...
...media) late jam Type 1 fuser 201.07 Sensor (fuser output) late jam Type 1 fuser 201.25 Sensor (fuser output) area jam. Replace the system card assembly if problem remains. Go to sensor (narrow media) late jam service check. Go to "System card assembly removal (T650, T652, T654, T656)"... on page 2-139. on the system card assembly. 3. on page 4-76. If problem remains, a type 2 fuser can be installed. 1. Replace the main drive motor assembly if problem remains. See "Sensor (fuser output) late jam service check." ...

Service Manual
Page 54
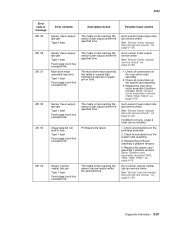
... present in left operator panel hinge) for damage. 4. Check operator panel door assembly for damage. 5. Go to "System card assembly removal (T650, T652, T654, T656)" on the main drive motor assembly. 2. 4062 Error code or message 201.26 Error contents Main drive motor assembly... load error. Printhead write failure The expected wide media is late reaching the sensor (fuser output) within the specified time. Replace the printhead assembly if problem remains. 4. The expected wide media is fully open then fully closed. 3. on the system...
... present in left operator panel hinge) for damage. 4. Check operator panel door assembly for damage. 5. Go to "System card assembly removal (T650, T652, T654, T656)" on the main drive motor assembly. 2. 4062 Error code or message 201.26 Error contents Main drive motor assembly... load error. Printhead write failure The expected wide media is late reaching the sensor (fuser output) within the specified time. Replace the printhead assembly if problem remains. 4. The expected wide media is fully open then fully closed. 3. on the system...
Service Manual
Page 55
...reaching the sensor (narrow media) within the specified time. Printhead write failure The media is late reaching the sensor (fuser output) within the specified time. Replace the main drive motor assembly if problem remains. See "Sensor (narrow media) late jam service check." Go to sensor... (narrow media) late jam service check. Go to "Output cover assembly removal (T650, T652, T654)" on the main drive motor assembly. 2. Go to sensor (fuser ...
...reaching the sensor (narrow media) within the specified time. Printhead write failure The media is late reaching the sensor (fuser output) within the specified time. Replace the main drive motor assembly if problem remains. See "Sensor (narrow media) late jam service check." Go to sensor... (narrow media) late jam service check. Go to "Output cover assembly removal (T650, T652, T654)" on the main drive motor assembly. 2. Go to sensor (fuser ...
Service Manual
Page 56
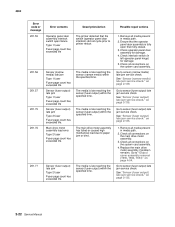
...count has exceeded life. Possible repair actions 1. See "Sensor (narrow media) late jam service check." See "Sensor (fuser output) late jam service check." Replace the main drive motor assembly if problem remains. 4062 Error code or message 201.55 201.56 201.57 201.75 ... Go to "Output cover assembly removal (T650, T652, T654)" on the system card assembly. The media is fully open failure Type 1 fuser Fuser page count has exceeded life Sensor (narrow media) late jam Type 1 fuser Fuser page count has exceeded life. Go to sensor (fuser output) late jam service check. The media...
...count has exceeded life. Possible repair actions 1. See "Sensor (narrow media) late jam service check." See "Sensor (fuser output) late jam service check." Replace the main drive motor assembly if problem remains. 4062 Error code or message 201.55 201.56 201.57 201.75 ... Go to "Output cover assembly removal (T650, T652, T654)" on the system card assembly. The media is fully open failure Type 1 fuser Fuser page count has exceeded life Sensor (narrow media) late jam Type 1 fuser Fuser page count has exceeded life. Go to sensor (fuser output) late jam service check. The media...
Service Manual
Page 585
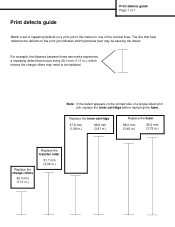
...print job indicates which means the charge rollers may be replaced. Replace the toner cartridge 47.8 mm (1.88 in.) 96.8 mm (3.81 in.) Replace the fuser 88.0 mm (3.46 in.) 95.2 mm (3.75 in.) Replace the charge rollers 28.3 mm (1.11 in.) Replace the transfer roller 51.7 mm (2.04 in .), which... marks on the printed side of the vertical lines. Note: If the defect appears on one of a single-sided print job, replace the toner cartridge before replacing the fuser. Print defects guide Print defects guide Page 1 of 1 Match a set of repeating defects on a print job to be causing ...
...print job indicates which means the charge rollers may be replaced. Replace the toner cartridge 47.8 mm (1.88 in.) 96.8 mm (3.81 in.) Replace the fuser 88.0 mm (3.46 in.) 95.2 mm (3.75 in.) Replace the charge rollers 28.3 mm (1.11 in.) Replace the transfer roller 51.7 mm (2.04 in .), which... marks on the printed side of the vertical lines. Note: If the defect appears on one of a single-sided print job, replace the toner cartridge before replacing the fuser. Print defects guide Print defects guide Page 1 of 1 Match a set of repeating defects on a print job to be causing ...


