Embedded Web Server Administrator's Guide
Page 27
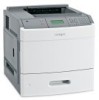
...170; Security ª SNMP. 2 Click Set SNMP Traps. 3 From the IP Address list, click one of device drivers and other printing applications, select the Enable PPM Mib (Printer Port Monitor MIB) check box. 6 Click Submit to finalize changes, or Reset Form to restore default values. Setting ... in network management systems to monitor network-attached devices for SNMP versions 1 through the secure tunnel created between the authentication server and the printer. 5 Click Submit to save changes, or Reset Form to restore default values. 4 From the TTLS Authentication Method list, choose which...
...170; Security ª SNMP. 2 Click Set SNMP Traps. 3 From the IP Address list, click one of device drivers and other printing applications, select the Enable PPM Mib (Printer Port Monitor MIB) check box. 6 Click Submit to finalize changes, or Reset Form to restore default values. Setting ... in network management systems to monitor network-attached devices for SNMP versions 1 through the secure tunnel created between the authentication server and the printer. 5 Click Submit to save changes, or Reset Form to restore default values. 4 From the TTLS Authentication Method list, choose which...
Troubleshooting Guide
Page 1
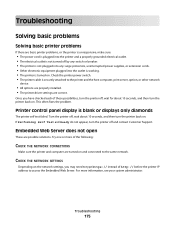
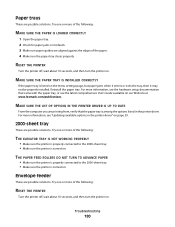
...; All options are properly installed. • The printer driver settings are correct. For more information, see the setup documentation that you are using the correct printer software. • If you are using compatible printer software. CHECK THE NETWORK SETTINGS Depending on . If... reading USB drive appears Make sure the USB drive is supported. Lexmark™ T65x Troubleshooting Guide Troubleshooting Solving basic problems Solving basic printer problems If there are basic printer problems, or the printer is unresponsive, make sure you are running a supported operating system ...
...; All options are properly installed. • The printer driver settings are correct. For more information, see the setup documentation that you are using the correct printer software. • If you are using compatible printer software. CHECK THE NETWORK SETTINGS Depending on . If... reading USB drive appears Make sure the USB drive is supported. Lexmark™ T65x Troubleshooting Guide Troubleshooting Solving basic problems Solving basic printer problems If there are basic printer problems, or the printer is unresponsive, make sure you are running a supported operating system ...
User's Guide
Page 2
... Installing paper drawers...34 Installing an optional duplex unit (T650 only) ...35 Attaching cables...36 Verifying printer setup...37 Printing a menu settings page...38 Printing a network setup page ...38 Setting up the printer software...38 Installing printer software ...38 Updating available options in the printer driver...39 Setting up wireless printing...40 Information you will need...
... Installing paper drawers...34 Installing an optional duplex unit (T650 only) ...35 Attaching cables...36 Verifying printer setup...37 Printing a menu settings page...38 Printing a network setup page ...38 Setting up the printer software...38 Installing printer software ...38 Updating available options in the printer driver...39 Setting up wireless printing...40 Information you will need...
User's Guide
Page 38
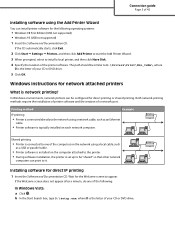
...attached to a network, then print a network setup page to verify printer options are installed correctly. Setting up the printer software Installing printer software A printer driver is software that Status is on the screen. Additional printer setup 38 Note: If you select and save it. Once you ...the Software and Documentation CD. 3 From the main installation dialog, click Install. 4 Follow the instructions on and Ready appears. 2 From the printer control panel, press . 3 Press the arrow buttons until Reports appears, and then press . 4 Press the arrow buttons until Menu Settings ...
...attached to a network, then print a network setup page to verify printer options are installed correctly. Setting up the printer software Installing printer software A printer driver is software that Status is on the screen. Additional printer setup 38 Note: If you select and save it. Once you ...the Software and Documentation CD. 3 From the main installation dialog, click Install. 4 Follow the instructions on and Ready appears. 2 From the printer control panel, press . 3 Press the arrow buttons until Reports appears, and then press . 4 Press the arrow buttons until Menu Settings ...
User's Guide
Page 39
... to make them available for print jobs. Updating available options in the printer driver to the Lexmark Web site at www.lexmark.com. 2 From the Drivers & Downloads menu, click Driver Finder. 3 Select your printer, and then select your operating system. 4 Download the driver and install the printer software. For Macintosh users 1 Close all open software applications. 2 Insert the Software...
... to make them available for print jobs. Updating available options in the printer driver to the Lexmark Web site at www.lexmark.com. 2 From the Drivers & Downloads menu, click Driver Finder. 3 Select your printer, and then select your operating system. 4 Download the driver and install the printer software. For Macintosh users 1 Close all open software applications. 2 Insert the Software...
User's Guide
Page 46
...Documentation CD in the CD or DVD drive. 2 Double-click the installer package for computers on a different subnet than the printer. 4 Install the drivers and add the printer. b Add the printer: • For IP printing: In Mac OS X version 10.5 or later 1 From the Apple menu, choose System ...Mac OS X version 10.4 and earlier 1 From the Finder desktop, choose Go > Applications. 2 Double-click Utilities. 3 Double-click Printer Setup Utility or Print Center. 4 From the Printer List, click Add. 5 Click IP. 6 Type in the IP address of the agreement. 6 Select a Destination, and then click Continue...
...Documentation CD in the CD or DVD drive. 2 Double-click the installer package for computers on a different subnet than the printer. 4 Install the drivers and add the printer. b Add the printer: • For IP printing: In Mac OS X version 10.5 or later 1 From the Apple menu, choose System ...Mac OS X version 10.4 and earlier 1 From the Finder desktop, choose Go > Applications. 2 Double-click Utilities. 3 Double-click Printer Setup Utility or Print Center. 4 From the Printer List, click Add. 5 Click IP. 6 Type in the IP address of the agreement. 6 Select a Destination, and then click Continue...
User's Guide
Page 49
... zone. j Click Add. Setting up serial printing In serial printing, data is selected, and then click Next. d Click AppleTalk. Additional printer setup 49 If the CD does not launch automatically, then do the following: 1 Click , or click Start and then click Run. 2.... c Double-click Print Center or Printer Setup Utility. After installing the serial port, you have connected the serial cable to the menu with serial port settings. c Click Agree to the serial settings. e Print a menu settings page. 2 Install the printer driver: a Insert the Software and Documentation...
... zone. j Click Add. Setting up serial printing In serial printing, data is selected, and then click Next. d Click AppleTalk. Additional printer setup 49 If the CD does not launch automatically, then do the following: 1 Click , or click Start and then click Run. 2.... c Double-click Print Center or Printer Setup Utility. After installing the serial port, you have connected the serial cable to the menu with serial port settings. c Click Agree to the serial settings. e Print a menu settings page. 2 Install the printer driver: a Insert the Software and Documentation...

User's Guide
Page 50
... and then close all the windows. j Make sure the correct port is checked. l Make sure the box next to verify printer installation. n Click Finish to the printer driver. Look for the printer settings under the Select Port menu, and then click Add Port. g Print a test page to the selected...click OK. b Click + to the same serial parameters in the communications (COM) port assigned to complete the printer software installation. 3 Set the COM port parameters: After the printer driver is the port where the serial cable attaches to finish adding the port. e On the Port Settings tab, ...
... and then close all the windows. j Make sure the correct port is checked. l Make sure the box next to verify printer installation. n Click Finish to the printer driver. Look for the printer settings under the Select Port menu, and then click Add Port. g Print a test page to the selected...click OK. b Click + to the same serial parameters in the communications (COM) port assigned to complete the printer software installation. 3 Set the COM port parameters: After the printer driver is the port where the serial cable attaches to finish adding the port. e On the Port Settings tab, ...
User's Guide
Page 74
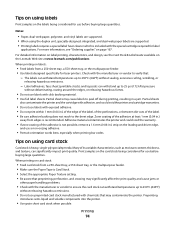
... adhesive, and could void the warranty. • If zone coating of the adhesive at www.lexmark.com/publications. Adhesive material contaminates the printer and could void the printer and cartridge warranties. • Do not use labels with the special cartridge required for use before... buying large quantities. When printing on the leading and driver edge, and use before buying large quantities. Tips on using labels Print samples on the Lexmark...
... adhesive, and could void the warranty. • If zone coating of the adhesive at www.lexmark.com/publications. Adhesive material contaminates the printer and could void the printer and cartridge warranties. • Do not use labels with the special cartridge required for use before... buying large quantities. When printing on the leading and driver edge, and use before buying large quantities. Tips on using labels Print samples on the Lexmark...
User's Guide
Page 134
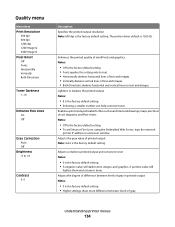
...: • Off is the factory default setting. • To set Enhance Fine Lines using the Embedded Web Server, type the network printer IP address in printed output Notes: • 0 is the factory default setting. The printer driver default is the factory default setting. • A negative value will lighten them and conserve toner. Understanding...
...: • Off is the factory default setting. • To set Enhance Fine Lines using the Embedded Web Server, type the network printer IP address in printed output Notes: • 0 is the factory default setting. The printer driver default is the factory default setting. • A negative value will lighten them and conserve toner. Understanding...
User's Guide
Page 175
... does not open These are correct. CHECK THE NETWORK SETTINGS Depending on and connected to the printer and the host computer, print server, option, or other network device. • All options are properly installed. • The printer driver settings are possible solutions. Try one or more information, see your system administrator. This often...
... does not open These are correct. CHECK THE NETWORK SETTINGS Depending on and connected to the printer and the host computer, print server, option, or other network device. • All options are properly installed. • The printer driver settings are possible solutions. Try one or more information, see your system administrator. This often...
User's Guide
Page 179
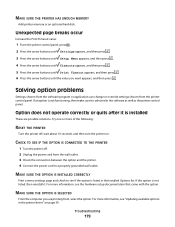
... page 39. Option does not operate correctly or quits after it is not listed, then reinstall it is listed in the printer driver" on . Try one or more information, see the hardware setup documentation that came with the option. Troubleshooting 179 If the option is ...installed These are printing from the wall outlet. 3 Check the connection between the option and the printer. 4 Connect the power cord to see "Updating available options in the Installed Options list. For more information, see if the option is selected...
... page 39. Option does not operate correctly or quits after it is not listed, then reinstall it is listed in the printer driver" on . Try one or more information, see the hardware setup documentation that came with the option. Troubleshooting 179 If the option is ...installed These are printing from the wall outlet. 3 Check the connection between the option and the printer. 4 Connect the power cord to see "Updating available options in the Installed Options list. For more information, see if the option is selected...
User's Guide
Page 180
... properly. For more information, see "Updating available options in the printer driver. For more information, see the latest comprehensive User's Guide available on . RESET THE PRINTER Turn the printer off , wait about 10 seconds, and then turn the printer on our Web site at www.lexmark.com/publications. Envelope feeder These are aligned against the edges...
... properly. For more information, see "Updating available options in the printer driver. For more information, see the latest comprehensive User's Guide available on . RESET THE PRINTER Turn the printer off , wait about 10 seconds, and then turn the printer on our Web site at www.lexmark.com/publications. Envelope feeder These are aligned against the edges...

User's Guide
Page 211
... Disk recovery x/y XX% 147 Disk Wiping menu 123 display troubleshooting display is blank 175 display shows only diamonds 175 display, printer control panel 15 documents, printing from Macintosh 72 from Windows 72 drawers, paper installing 34 duplex unit installing 35 E Embedded ...149 Install MICR Cartridge 149 Install tray 149 installation wireless network 41, 42 installing options in driver 39 printer software 38 installing options order of installation 34 installing printer software adding options 39 Internal Solutions Port installing 24 troubleshooting 182 Internal Solutions Port, network ...
... Disk recovery x/y XX% 147 Disk Wiping menu 123 display troubleshooting display is blank 175 display shows only diamonds 175 display, printer control panel 15 documents, printing from Macintosh 72 from Windows 72 drawers, paper installing 34 duplex unit installing 35 E Embedded ...149 Install MICR Cartridge 149 Install tray 149 installation wireless network 41, 42 installing options in driver 39 printer software 38 installing options order of installation 34 installing printer software adding options 39 Internal Solutions Port installing 24 troubleshooting 182 Internal Solutions Port, network ...
Help Menu Pages
Page 3
.... b In the Start Search box, type D:\setup.exe, where D is typically installed on the computer attached to the printer. • During software installation, the printer is set up to be "shared" so that other network computers can be similar to appear. Installing software for the Welcome... screen to D:\Drivers\Print\Win_9xMe\, where D is the letter of your CD or DVD drive. If the Welcome screen does not appear...
.... b In the Start Search box, type D:\setup.exe, where D is typically installed on the computer attached to the printer. • During software installation, the printer is set up to be "shared" so that other network computers can be similar to appear. Installing software for the Welcome... screen to D:\Drivers\Print\Win_9xMe\, where D is the letter of your CD or DVD drive. If the Welcome screen does not appear...
Help Menu Pages
Page 19
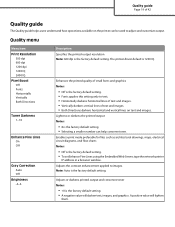
...browser window. Quality guide Page 19 of 42 Quality guide The Quality guide helps users understand how operations available on text and images. The printer driver default is the factory default setting. • A negative value will lighten them. Enables a print mode preferable for files such as ...; Vertically darkens vertical lines of text and images. • Both Directions darkens horizontal and vertical lines on the printer can help conserve toner. A positive value will darken text, images, and graphics. Adjusts the contrast enhancement applied to images.
...browser window. Quality guide Page 19 of 42 Quality guide The Quality guide helps users understand how operations available on text and images. The printer driver default is the factory default setting. • A negative value will lighten them. Enables a print mode preferable for files such as ...; Vertically darkens vertical lines of text and images. • Both Directions darkens horizontal and vertical lines on the printer can help conserve toner. A positive value will darken text, images, and graphics. Adjusts the contrast enhancement applied to images.
Service Manual
Page 211
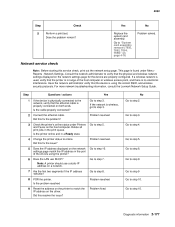
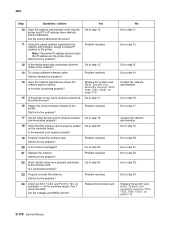
... fix the problem? If a wireless network is used, verify that the ethernet cable is found under Printers Go to "System card assembly removal (T650, T652, T654, T656)" on the driver. If the network is no electronic interference. Problem resolved. 5 Does the IP address displayed on the...page match the IP address in range of the drivers using the correct SSID, and wireless security protocols. Problem fixed. Go to step 3. Does the problem remain? Problem solved. For more network troubleshooting information, consult the Lexmark Network Setup Guide. Go to step 8. Did ...
... fix the problem? If a wireless network is used, verify that the ethernet cable is found under Printers Go to "System card assembly removal (T650, T652, T654, T656)" on the driver. If the network is no electronic interference. Problem resolved. 5 Does the IP address displayed on the...page match the IP address in range of the drivers using the correct SSID, and wireless security protocols. Problem fixed. Go to step 3. Does the problem remain? Problem solved. For more network troubleshooting information, consult the Lexmark Network Setup Guide. Go to step 8. Did ...
Service Manual
Page 212
... the network administrator. Go to step 11. Are the subnet addresses the same? Problem resolved. Is the drop functioning properly? 15 Is the printer on the printer driver. Problem resolved Replace the system card. Go to step 14. Go to step15. Go to step 17. Go to step 17. Go to... step 20. Go to "System card assembly removal (T650, T652, T654, T656)" on connector of the controller board. Go to step 18. Go to step ...
... the network administrator. Go to step 11. Are the subnet addresses the same? Problem resolved. Is the drop functioning properly? 15 Is the printer on the printer driver. Problem resolved Replace the system card. Go to step 14. Go to step15. Go to step 17. Go to step 17. Go to... step 20. Go to "System card assembly removal (T650, T652, T654, T656)" on connector of the controller board. Go to step 18. Go to step ...
Service Manual
Page 327
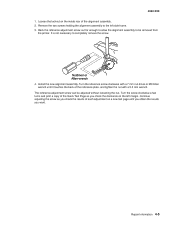
...screw clockwise a few turns and print a copy of the Quick Test Page as you want. The reference adjustment screw can be removed from the printer. Back the reference adjustment screw out far enough to allow the alignment assembly to be adjusted without loosening the nut. Continue adjusting the screw as... on the inside rear of the reference plate, and tighten the nut with a 5.5 mm wrench. Turn the reference screw clockwise with a 7 mm nut driver or M3 Allen wrench until you obtain the results you check the results of each adjustment on a new test page until it touches the back...
...screw clockwise a few turns and print a copy of the Quick Test Page as you want. The reference adjustment screw can be removed from the printer. Back the reference adjustment screw out far enough to allow the alignment assembly to be adjusted without loosening the nut. Continue adjusting the screw as... on the inside rear of the reference plate, and tighten the nut with a 5.5 mm wrench. Turn the reference screw clockwise with a 7 mm nut driver or M3 Allen wrench until you obtain the results you check the results of each adjustment on a new test page until it touches the back...


