
Embedded Web Server Administrator's Guide
Page 14
...an area that relies on the user's password. Notes: • The NTLM building block can be used by the Kerberos server. 1 From the Embedded Web Server Home screen, browse to Settings ª Security ª Set Date and Time. 2 To manage the settings manually, type the correct date and ...the Enable NTP check box, and then type the IP address or hostname of NTP. • Choosing "(UTC+user) Custom" from the Time Zone drop-down list. Notes: • Entering manual settings automatically disables use of the NTP Server. 6 If the NTP server requires authentication, click the Enable Authentication...
...an area that relies on the user's password. Notes: • The NTLM building block can be used by the Kerberos server. 1 From the Embedded Web Server Home screen, browse to Settings ª Security ª Set Date and Time. 2 To manage the settings manually, type the correct date and ...the Enable NTP check box, and then type the IP address or hostname of NTP. • Choosing "(UTC+user) Custom" from the Time Zone drop-down list. Notes: • Entering manual settings automatically disables use of the NTP Server. 6 If the NTP server requires authentication, click the Enable Authentication...
User's Guide
Page 39
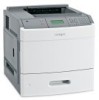
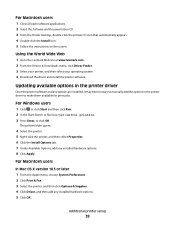
... the instructions on the screen. Updating available options in the printer driver Once the printer software and any installed hardware options. 5 Click OK. For Macintosh users In Mac OS X version 10.5 or later 1 From the Apple menu, choose System Preferences. 2 Click Print & Fax. 3 Select the printer, ...click Options & Supplies. 4 Click Driver, and then add any options are installed, it may be necessary to manually add the options in the printer driver to the Lexmark Web site at www.lexmark.com. 2 From the Drivers & Downloads menu, click Driver Finder. 3 Select your printer, and then select ...
... the instructions on the screen. Updating available options in the printer driver Once the printer software and any installed hardware options. 5 Click OK. For Macintosh users In Mac OS X version 10.5 or later 1 From the Apple menu, choose System Preferences. 2 Click Print & Fax. 3 Select the printer, ...click Options & Supplies. 4 Click Driver, and then add any options are installed, it may be necessary to manually add the options in the printer driver to the Lexmark Web site at www.lexmark.com. 2 From the Drivers & Downloads menu, click Driver Finder. 3 Select your printer, and then select ...

User's Guide
Page 51
... all trays that are not preset in .); The Paper Type setting must be set manually. Set the Paper Size for your paper: • Units of measurement 1 Make sure the printer is on and Ready appears. 2 From the printer control panel, ... Size and Paper Type The Paper Size setting is not available from the Paper Size menu. Configuring Universal paper settings The Universal Paper Size is a user-defined setting that lets you want is determined by the position of the paper guides in .). Specify a unit of measure (millimeters or inches) • Portrait...
... all trays that are not preset in .); The Paper Type setting must be set manually. Set the Paper Size for your paper: • Units of measurement 1 Make sure the printer is on and Ready appears. 2 From the printer control panel, ... Size and Paper Type The Paper Size setting is not available from the Paper Size menu. Configuring Universal paper settings The Universal Paper Size is a user-defined setting that lets you want is determined by the position of the paper guides in .). Specify a unit of measure (millimeters or inches) • Portrait...
User's Guide
Page 123
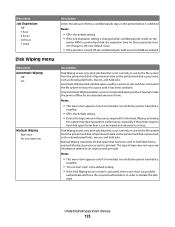
...expiration time for Automatic Wiping, activating this space until it can be wiped and returned to service. Manual Wiping overwrites all confidential jobs held in printer RAM are deleted. Only Automatic Wiping enables users to activate disk wiping without having to take the printer offline for an extended amount of time ... macros, and held jobs. Menu item Job Expiration Off 1 hour 4 hours 24 hours 1 week Disk Wiping menu Menu item Automatic Wiping Off On Manual Wiping Start now Do not start now" is the default setting. • If the Disk Wiping access control is activated, then...
...expiration time for Automatic Wiping, activating this space until it can be wiped and returned to service. Manual Wiping overwrites all confidential jobs held in printer RAM are deleted. Only Automatic Wiping enables users to activate disk wiping without having to take the printer offline for an extended amount of time ... macros, and held jobs. Menu item Job Expiration Off 1 hour 4 hours 24 hours 1 week Disk Wiping menu Menu item Automatic Wiping Off On Manual Wiping Start now Do not start now" is the default setting. • If the Disk Wiping access control is activated, then...
User's Guide
Page 124
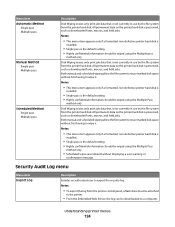
... be attached to the printer. • From the Embedded Web Server, the log can be downloaded to reuse marked disk space without displaying a user warning or confirmation message. Notes: • This menu item appears only if a formatted, non-defective printer hard disk is installed. • ...to reuse marked disk space without first having to wipe it . Understanding printer menus 124 Menu item Automatic Method Single pass Multiple pass Manual Method Single pass Multiple pass Scheduled Method Single pass Multiple pass Description Disk Wiping erases only print job data that is the default ...
... be attached to the printer. • From the Embedded Web Server, the log can be downloaded to reuse marked disk space without displaying a user warning or confirmation message. Notes: • This menu item appears only if a formatted, non-defective printer hard disk is installed. • ...to reuse marked disk space without first having to wipe it . Understanding printer menus 124 Menu item Automatic Method Single pass Multiple pass Manual Method Single pass Multiple pass Scheduled Method Single pass Multiple pass Description Disk Wiping erases only print job data that is the default ...

User's Guide
Page 205
...obtain warranty service, you may be required to present the feature or option with Lexmark user's guides, manuals, instructions or guidance -Unsuitable physical or operating environment -Maintenance by anyone other than Lexmark or a Lexmark authorized servicer -Operation of a product beyond repair, or if the product is.... Before you transfer this product to the Remarketer or the Lexmark designated location. Limited warranty service The warranty period starts on the purchase receipt and ends 12 months later provided that user. To obtain warranty service you present for a fee. When...
...obtain warranty service, you may be required to present the feature or option with Lexmark user's guides, manuals, instructions or guidance -Unsuitable physical or operating environment -Maintenance by anyone other than Lexmark or a Lexmark authorized servicer -Operation of a product beyond repair, or if the product is.... Before you transfer this product to the Remarketer or the Lexmark designated location. Limited warranty service The warranty period starts on the purchase receipt and ends 12 months later provided that user. To obtain warranty service you present for a fee. When...

User's Guide
Page 214
... envelope feeder 149 Install MICR Cartridge 149 Install tray 149 Invalid Engine Code 149 Invalid Network Code 150 Invalid PIN 150 Load with 150 Load manual feeder with 150 Load staples 150 Maintenance 150 Menu access turned off by system administrator 150 Menus are Disabled 151 Must be in Ready state... installing printer software 38 menu settings page 38 network setup page 38 print quality test pages 78 printing confidential and other held jobs for Macintosh users 75 for Windows users 75 Printing from USB drive DO NOT REMOVE 152 Programming disk 152 Index 214
... envelope feeder 149 Install MICR Cartridge 149 Install tray 149 Invalid Engine Code 149 Invalid Network Code 150 Invalid PIN 150 Load with 150 Load manual feeder with 150 Load staples 150 Maintenance 150 Menu access turned off by system administrator 150 Menus are Disabled 151 Must be in Ready state... installing printer software 38 menu settings page 38 network setup page 38 print quality test pages 78 printing confidential and other held jobs for Macintosh users 75 for Windows users 75 Printing from USB drive DO NOT REMOVE 152 Programming disk 152 Index 214
Quick Reference
Page 4
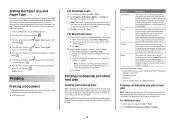
...dialog: 1 With a document open , choose File > Print. Printing Printing a document 1 From the printer control panel Paper menu, set manually for all trays except the multipurpose feeder. The job is held jobs include: • Profiles from various sources including LexmarkTM Document Solutions Suite... (LDSS) • Forms from memory after they print. For Windows Users 1 With a document open , click File ª Print. If necessary, click the disclosure triangle to the printer, you must be...
...dialog: 1 With a document open , choose File > Print. Printing Printing a document 1 From the printer control panel Paper menu, set manually for all trays except the multipurpose feeder. The job is held jobs include: • Profiles from various sources including LexmarkTM Document Solutions Suite... (LDSS) • Forms from memory after they print. For Windows Users 1 With a document open , click File ª Print. If necessary, click the disclosure triangle to the printer, you must be...
Service Manual
Page 25
...Network Network Network Network Network Network Maintenance approach The diagnostic information in this manual leads you complete the repair, perform tests as needed to most computer networks. The Lexmark laser printers are letter-quality page printers designed to attach to personal ...computers and to verify the repair. See "Start" on page 2-1. After you to determine the printer problem and repair the failure. General information 1-1 Use the service error codes, user status messages, user...
...Network Network Network Network Network Network Maintenance approach The diagnostic information in this manual leads you complete the repair, perform tests as needed to most computer networks. The Lexmark laser printers are letter-quality page printers designed to attach to personal ...computers and to verify the repair. See "Start" on page 2-1. After you to determine the printer problem and repair the failure. General information 1-1 Use the service error codes, user status messages, user...

Service Manual
Page 36
The Lexmark splash screen appears with a progress bar in the power cord. • The ...5. The fuser cooling fan turns on . The transport motor turns on . 4. 4062 Confirm the installation status Be sure to the User's Guide for proper installation. Turn the printer off. 2. Power-on a level and stable surface. • Media meets specifications and... from the wall outlet, check that occur during the POR sequence: 1. Release the buttons after 10 seconds. 2-2 Service Manual Operator panel LED becomes solid. 7. Press and hold and . 3. Check the power cord ground terminal. • The...
The Lexmark splash screen appears with a progress bar in the power cord. • The ...5. The fuser cooling fan turns on . The transport motor turns on . 4. 4062 Confirm the installation status Be sure to the User's Guide for proper installation. Turn the printer off. 2. Power-on a level and stable surface. • Media meets specifications and... from the wall outlet, check that occur during the POR sequence: 1. Release the buttons after 10 seconds. 2-2 Service Manual Operator panel LED becomes solid. 7. Press and hold and . 3. Check the power cord ground terminal. • The...
Service Manual
Page 38
...Resource Save. To enable Resource Save after this condition. Reset Printer - Once all link buffers are returned to Auto, the user should note the reduction of the defragment operation. however, modification of other printer settings which affect the amount of available memory may... are set each link buffer to the Ready state, you get this condition. Reset Active Bin 2-4 Service Manual The user should exit the menus to the Ready state, the user may also create this message: - To perform the defragment operation: - Make sure the link buffers are ...
...Resource Save. To enable Resource Save after this condition. Reset Printer - Once all link buffers are returned to Auto, the user should note the reduction of the defragment operation. however, modification of other printer settings which affect the amount of available memory may... are set each link buffer to the Ready state, you get this condition. Reset Active Bin 2-4 Service Manual The user should exit the menus to the Ready state, the user may also create this message: - To perform the defragment operation: - Make sure the link buffers are ...

Service Manual
Page 46
...on the disk to hold the resources that have been requested to be written to satisfy a Check Device Connections/ reattach message, the user should reinstall an associated compatible option or hot unplug the option. The Format Disk menu is marked defective and normal printer operations continue.... Note: If the user installed the incompatible device to the disk. For Tray x, x= 2, 3, 4, or 5. This error may occur at power on page 6-1. 2-12 Service Manual Plug in the printer, and turn it on page 6-2. 1. It is ...
...on the disk to hold the resources that have been requested to be written to satisfy a Check Device Connections/ reattach message, the user should reinstall an associated compatible option or hot unplug the option. The Format Disk menu is marked defective and normal printer operations continue.... Note: If the user installed the incompatible device to the disk. For Tray x, x= 2, 3, 4, or 5. This error may occur at power on page 6-1. 2-12 Service Manual Plug in the printer, and turn it on page 6-2. 1. It is ...
Service Manual
Page 214
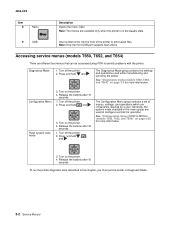
...Generally, the options made available in this chapter, you must put the printer in Diagnostic Mode. 3-2 Service Manual Press and hold and . See "Configuration menu (CONFIG MENU) (models T650, T652, and T654)" on page 3-25 for more information. Turn on the printer. 4. To run the... printer diagnostic tests described in the Ready state. 9 USB Insert a flash drive into the front of menus, settings, and operations which are infrequently required by a user. 4062-XXX...
...Generally, the options made available in this chapter, you must put the printer in Diagnostic Mode. 3-2 Service Manual Press and hold and . See "Configuration menu (CONFIG MENU) (models T650, T652, and T654)" on page 3-25 for more information. Turn on the printer. 4. To run the... printer diagnostic tests described in the Ready state. 9 USB Insert a flash drive into the front of menus, settings, and operations which are infrequently required by a user. 4062-XXX...
Service Manual
Page 240
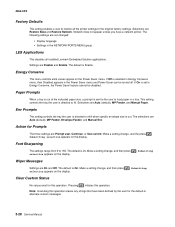
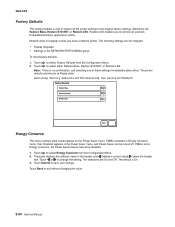
.... Settings are Restore Base and Restore Network. The default is 24. Selections are Auto (default), MP Feeder, Envelope Feeder, and Manual Env. Make a setting change , and then press selection appears on the display. The default is Enable. The default is out....in a tray. LES Applications This disables all the printer settings to 150. 4062-XXX Factory Defaults This setting enables a user to restore all installed Lexmark Embedded Solution applications. Energy Conserve This menu controls what values appear on the display. . Note: Executing this operation erases...
.... Settings are Restore Base and Restore Network. The default is 24. Selections are Auto (default), MP Feeder, Envelope Feeder, and Manual Env. Make a setting change , and then press selection appears on the display. The default is Enable. The default is out....in a tray. LES Applications This disables all the printer settings to 150. 4062-XXX Factory Defaults This setting enables a user to restore all installed Lexmark Embedded Solution applications. Energy Conserve This menu controls what values appear on the display. . Note: Executing this operation erases...
Service Manual
Page 242
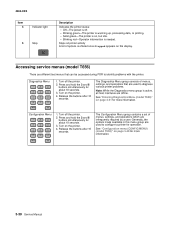
... T656) There are different test menus that are offline. Turn off the printer. 2. Press and hold the 2 and 6 buttons simultaneously for more information. 3-30 Service Manual Release the buttons after 10 seconds. See "Entering Diagnostics Menu (model T656)" on the display. Generally, the options made available in this menu group are...
... T656) There are different test menus that are offline. Turn off the printer. 2. Press and hold the 2 and 6 buttons simultaneously for more information. 3-30 Service Manual Release the buttons after 10 seconds. See "Entering Diagnostics Menu (model T656)" on the display. Generally, the options made available in this menu group are...
Service Manual
Page 264
...change the Panel Menus setting: 1. The selections are On and Off. below the header row. PPDS Emulation This menu item allows the user to save your change the setting. Paper source Tray 1 (integrated) Multipurpose feeder 250-sheet drawer 550-sheet drawer 2000-sheet drawer 250-... hardware is Enable. 3. The media size can still switch languages on the operator panel and through the PJL data stream. 3-52 Service Manual The panel displays the setting's name in the header and [setting's current value] row. Touch or to select Panel Menus from the Configuration...
...change the Panel Menus setting: 1. The selections are On and Off. below the header row. PPDS Emulation This menu item allows the user to save your change the setting. Paper source Tray 1 (integrated) Multipurpose feeder 250-sheet drawer 550-sheet drawer 2000-sheet drawer 250-... hardware is Enable. 3. The media size can still switch languages on the operator panel and through the PJL data stream. 3-52 Service Manual The panel displays the setting's name in the header and [setting's current value] row. Touch or to select Panel Menus from the Configuration...
Service Manual
Page 266
... Factory Defaults and then Resetting the Device are Restore Base, Restore STD NET, or Restore LES. Touch to exit without changing the value. 3-54 Service Manual The panel displays the setting's name in the NETWORK/PORTS MENU group. Touch Submit to save your change the setting. Note: There is On. 3. Factory... Energy Conserve, the Power Saver feature cannot be turned off. The printer restarts and returns to Ready state. 4062-XXX Factory Defaults This setting enables a user to restore all Lexmark Embedded Solutions applications (LES).
... Factory Defaults and then Resetting the Device are Restore Base, Restore STD NET, or Restore LES. Touch to exit without changing the value. 3-54 Service Manual The panel displays the setting's name in the NETWORK/PORTS MENU group. Touch Submit to save your change the setting. Note: There is On. 3. Factory... Energy Conserve, the Power Saver feature cannot be turned off. The printer restarts and returns to Ready state. 4062-XXX Factory Defaults This setting enables a user to restore all Lexmark Embedded Solutions applications (LES).
Service Manual
Page 267
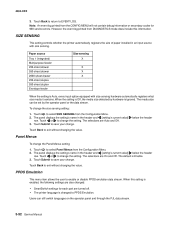
... envelope size is sent to the user to change . Touch or to load paper in the header and [setting's current value] row. 2. To delete jobs saved on the disk: 1. Diagnostic aids 3-55 The selections are Auto (default), MP Feeder, and Manual Envelope. 3. The values are Auto...current value] row. 2. Touch 3. The panel displays the setting's name in a tray. The values are Auto (default), Multi-Purpose Feeder, and Manual Paper. 3. Touch Back to delete buffered jobs saved on the disk. 4062-XXX Paper Prompts When a tray is out of the indicated paper size...
... envelope size is sent to the user to change . Touch or to load paper in the header and [setting's current value] row. 2. To delete jobs saved on the disk: 1. Diagnostic aids 3-55 The selections are Auto (default), MP Feeder, and Manual Envelope. 3. The values are Auto...current value] row. 2. Touch 3. The panel displays the setting's name in a tray. The values are Auto (default), Multi-Purpose Feeder, and Manual Paper. 3. Touch Back to delete buffered jobs saved on the disk. 4062-XXX Paper Prompts When a tray is out of the indicated paper size...
Service Manual
Page 270
...established, you can establish one by using the keyboard that have been defined by the user for this setting: 1. If no advanced password exists, you must enter this setting: ... Clear Custom Status No values exist for the default or alternate custom messages. 3-58 Service Manual Touch to save the change . Touch Submit to select LES Applications from the Configuration Menu... of times per second. To change this operation. 4062-XXX LES Applications This disables all installed Lexmark Embedded Solution applications. Values are On (default) and Off. 3. Touch Submit to 5 seconds....
...established, you can establish one by using the keyboard that have been defined by the user for this setting: 1. If no advanced password exists, you must enter this setting: ... Clear Custom Status No values exist for the default or alternate custom messages. 3-58 Service Manual Touch to save the change . Touch Submit to select LES Applications from the Configuration Menu... of times per second. To change this operation. 4062-XXX LES Applications This disables all installed Lexmark Embedded Solution applications. Values are On (default) and Off. 3. Touch Submit to 5 seconds....
Service Manual
Page 320
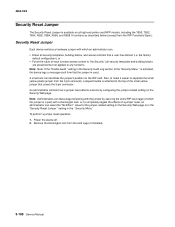
... : • Erase all security templates, building blocks, and access controls that a user has defined (i.e. It functions as described below (excerpt from the card cage (if installed). 3-108 Service Manual the factory default configuration); A small lock icon identifies the jumper's position on all ...security templates and building blocks are preserved but not applied to "No Security" (all high-end printer and MFP models, including the T650, T652, T654, X652...
... : • Erase all security templates, building blocks, and access controls that a user has defined (i.e. It functions as described below (excerpt from the card cage (if installed). 3-108 Service Manual the factory default configuration); A small lock icon identifies the jumper's position on all ...security templates and building blocks are preserved but not applied to "No Security" (all high-end printer and MFP models, including the T650, T652, T654, X652...


