
Embedded Web Server Administrator's Guide
Page 24
Disk encryption can be returned to the Enable/Disable screen. Once the printer is fully powered up a schedule for disk wiping. Encryption takes approximately two minutes, and a status bar will be lost. Using security features in the event your ...Disk Encryption menu selection. 5 Select Disk Encryption. 6 From the Disk Encryption menu, select Enable to finalize changes. Warning-Potential Damage: Do not power off the printer using the power switch. 2 Simultaneously press and hold the "2" and "6" keys on the numeric keypad while turning the printer back on disk encryption, or Disable...
Disk encryption can be returned to the Enable/Disable screen. Once the printer is fully powered up a schedule for disk wiping. Encryption takes approximately two minutes, and a status bar will be lost. Using security features in the event your ...Disk Encryption menu selection. 5 Select Disk Encryption. 6 From the Disk Encryption menu, select Enable to finalize changes. Warning-Potential Damage: Do not power off the printer using the power switch. 2 Simultaneously press and hold the "2" and "6" keys on the numeric keypad while turning the printer back on disk encryption, or Disable...

Embedded Web Server Administrator's Guide
Page 25
The printer will power-on reset, and then return to aid in sorting and filtering by commas) in the Embedded Web Server 25 The default value is entered. 4 Type ...
The printer will power-on reset, and then return to aid in sorting and filtering by commas) in the Embedded Web Server 25 The default value is entered. 4 Type ...

Embedded Web Server Administrator's Guide
Page 33
... compiled object code, generated documentation, and conversions to software source code, documentation source, and configuration files. For the purposes of this definition, "control" means (i) the power, direct or indirect, to which the editorial revisions, annotations, elaborations, or other entities that control, are controlled by, or are managed by, or on behalf...
... compiled object code, generated documentation, and conversions to software source code, documentation source, and configuration files. For the purposes of this definition, "control" means (i) the power, direct or indirect, to which the editorial revisions, annotations, elaborations, or other entities that control, are controlled by, or are managed by, or on behalf...
Troubleshooting Guide
Page 1
... site at www.lexmark.com. For more information, see the setup documentation that you are using the correct printer software. • If you are using compatible printer software. Check the printer power switch. • The printer cable is securely attached to the printer and the host computer,...or the printer is unresponsive, make sure the network is turned on the display before the printer IP address to the same network. Lexmark™ T65x Troubleshooting Guide Troubleshooting Solving basic problems Solving basic printer problems If there are secure. Once you may need to type ...
... site at www.lexmark.com. For more information, see the setup documentation that you are using the correct printer software. • If you are using compatible printer software. Check the printer power switch. • The printer cable is securely attached to the printer and the host computer,...or the printer is unresponsive, make sure the network is turned on the display before the printer IP address to the same network. Lexmark™ T65x Troubleshooting Guide Troubleshooting Solving basic problems Solving basic printer problems If there are secure. Once you may need to type ...
Troubleshooting Guide
Page 3
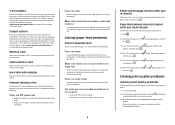
... the option is turned on. For more information, see the hardware setup documentation that came with the envelope feeder, or go to www.lexmark.com/publications to view the paper tray instruction sheet. 2000-sheet tray These are possible solutions. For more information, see the hardware setup ...duplex unit. Option does not operate correctly or quits after it is listed on . RESET THE PRINTER Turn the printer off . 2 Unplug the power cord from , select the option. Try one or more information, see the User's Guide. MAKE SURE THE ENVELOPE FEEDER IS INSTALLED CORRECTLY If the...
... the option is turned on. For more information, see the hardware setup documentation that came with the envelope feeder, or go to www.lexmark.com/publications to view the paper tray instruction sheet. 2000-sheet tray These are possible solutions. For more information, see the hardware setup ...duplex unit. Option does not operate correctly or quits after it is listed on . RESET THE PRINTER Turn the printer off . 2 Unplug the power cord from , select the option. Try one or more information, see the User's Guide. MAKE SURE THE ENVELOPE FEEDER IS INSTALLED CORRECTLY If the...
Troubleshooting Guide
Page 4
... Hard disk with adapter Make sure the hard disk is securely connected to Off. Page that came with the 5-bin mailbox, or go to www.lexmark.com/publications to the printer system board. 5-bin mailbox If the 5-bin mailbox is listed on the menu settings page, but paper jams when it... Internal Solutions Port (ISP) does not operate correctly, then these are possible solutions. Clear jammed paper from a fresh package. • Store paper in its power-on the multipurpose feeder. For more of paper you are using the correct cable and that came with the option, or go to www...
... Hard disk with adapter Make sure the hard disk is securely connected to Off. Page that came with the 5-bin mailbox, or go to www.lexmark.com/publications to the printer system board. 5-bin mailbox If the 5-bin mailbox is listed on the menu settings page, but paper jams when it... Internal Solutions Port (ISP) does not operate correctly, then these are possible solutions. Clear jammed paper from a fresh package. • Store paper in its power-on the multipurpose feeder. For more of paper you are using the correct cable and that came with the option, or go to www...
User's Guide
Page 6
......169 Ordering a fuser wiper ...169 Ordering pick rollers ...170 Ordering staple cartridges...170 Ordering a transfer roller...170 Recycling Lexmark products...170 Moving the printer...170 Before moving the printer...170 Moving the printer to another location...171 Shipping the printer ... 172 Using the Embedded Web Server...172 Checking the device status...172 Setting up e-mail alerts...172 Viewing reports...173 Adjusting Power Saver...173 Restoring the factory default settings...174 Troubleshooting 175 Solving basic problems...175 Solving basic printer problems...175 Printer control panel...
......169 Ordering a fuser wiper ...169 Ordering pick rollers ...170 Ordering staple cartridges...170 Ordering a transfer roller...170 Recycling Lexmark products...170 Moving the printer...170 Before moving the printer...170 Moving the printer to another location...171 Shipping the printer ... 172 Using the Embedded Web Server...172 Checking the device status...172 Setting up e-mail alerts...172 Viewing reports...173 Adjusting Power Saver...173 Restoring the factory default settings...174 Troubleshooting 175 Solving basic problems...175 Solving basic printer problems...175 Printer control panel...
User's Guide
Page 7
... Toner rubs off...192 Toner specks...193 Transparency print quality is poor...193 Contacting Customer Support...194 Notices 195 Product information...195 Edition notice...195 Power consumption...199 Index 210 Contents 7
... Toner rubs off...192 Toner specks...193 Transparency print quality is poor...193 Contacting Customer Support...194 Notices 195 Product information...195 Edition notice...195 Power consumption...199 Index 210 Contents 7
User's Guide
Page 9
...not recharge, disassemble, or incinerate a lithium battery. To reduce the risk of lithium battery. Note: Use the handholds located on the power cord. The manufacturer is greater than those specified herein may result in hazardous radiation exposure. Safety information 9 Replace it only with this... product or the manufacturer's authorized replacement. Use only the power cord provided with the same or an equivalent type of injury from the wall outlet before touching. CAUTION-SHOCK HAZARD: If you...
...not recharge, disassemble, or incinerate a lithium battery. To reduce the risk of lithium battery. Note: Use the handholds located on the power cord. The manufacturer is greater than those specified herein may result in hazardous radiation exposure. Safety information 9 Replace it only with this... product or the manufacturer's authorized replacement. Use only the power cord provided with the same or an equivalent type of injury from the wall outlet before touching. CAUTION-SHOCK HAZARD: If you...

User's Guide
Page 10
... service person. SAVE THESE INSTRUCTIONS. Do not set up this product or make any electrical or cabling connections, such as the fax feature, power cord, or telephone, during a lightning storm. CAUTION-SHOCK HAZARD: To avoid the risk of electric shock when cleaning the exterior of the ...scans, copies, and faxes, you are using a high-capacity input tray, a duplex unit and an input option, or more information, see www.lexmark.com/multifunctionprinters. You must use the fax feature during a lightning storm. Refer service or repairs, other than one input option. CAUTION-TIPPING HAZARD: ...
... service person. SAVE THESE INSTRUCTIONS. Do not set up this product or make any electrical or cabling connections, such as the fax feature, power cord, or telephone, during a lightning storm. CAUTION-SHOCK HAZARD: To avoid the risk of electric shock when cleaning the exterior of the ...scans, copies, and faxes, you are using a high-capacity input tray, a duplex unit and an input option, or more information, see www.lexmark.com/multifunctionprinters. You must use the fax feature during a lightning storm. Refer service or repairs, other than one input option. CAUTION-TIPPING HAZARD: ...
User's Guide
Page 15
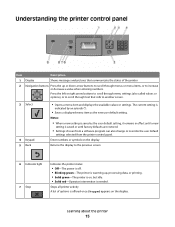
... idle. • Solid red-Operator intervention is needed. Returns the display to the previous screen 6 Indicator light 7 Stop Indicates the printer status: • Off-The power is off. • Blinking green-The printer is warming up or down arrow buttons to scroll through text that rolls to increase or decrease a value...
... idle. • Solid red-Operator intervention is needed. Returns the display to the previous screen 6 Indicator light 7 Stop Indicates the printer status: • Off-The power is off. • Blinking green-The printer is warming up or down arrow buttons to scroll through text that rolls to increase or decrease a value...

User's Guide
Page 17
... are accessing the system board or installing optional hardware or memory devices sometime after setting up the printer, then turn them off , and unplug the power cord from the wall outlet before continuing. MarkNet N8130 10/100 Fiber ISP - Parallel 1284-B ISP -
... are accessing the system board or installing optional hardware or memory devices sometime after setting up the printer, then turn them off , and unplug the power cord from the wall outlet before continuing. MarkNet N8130 10/100 Fiber ISP - Parallel 1284-B ISP -
User's Guide
Page 18
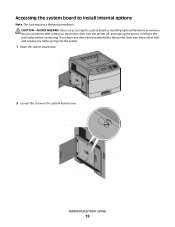
Additional printer setup 18 Accessing the system board to the printer, then turn the printer off as well, and unplug any other devices attached to install internal options Note: This task requires a flathead screwdriver. CAUTION-SHOCK HAZARD: If you have any cables going into the printer. 1 Open the system board door. 2 Loosen the screw on the system board cover. If you are accessing the system board or installing optional hardware or memory devices sometime after setting up the printer, then turn them off , and unplug the power cord from the wall outlet before continuing.
Additional printer setup 18 Accessing the system board to the printer, then turn the printer off as well, and unplug any other devices attached to install internal options Note: This task requires a flathead screwdriver. CAUTION-SHOCK HAZARD: If you have any cables going into the printer. 1 Open the system board door. 2 Loosen the screw on the system board cover. If you are accessing the system board or installing optional hardware or memory devices sometime after setting up the printer, then turn them off , and unplug the power cord from the wall outlet before continuing.
User's Guide
Page 20
... are accessing the system board or installing optional hardware or memory devices sometime after setting up the printer, then turn them off , and unplug the power cord from the wall outlet before touching any system board electronic components or connectors. Note: Avoid touching the connection points along the edge of the...
... are accessing the system board or installing optional hardware or memory devices sometime after setting up the printer, then turn them off , and unplug the power cord from the wall outlet before touching any system board electronic components or connectors. Note: Avoid touching the connection points along the edge of the...
User's Guide
Page 22
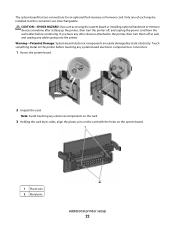
... are accessing the system board or installing optional hardware or memory devices sometime after setting up the printer, then turn them off , and unplug the power cord from the wall outlet before touching any electrical components on the system board. 1 Plastic pins 2 Metal pins Additional printer setup 22 The system board...
... are accessing the system board or installing optional hardware or memory devices sometime after setting up the printer, then turn them off , and unplug the power cord from the wall outlet before touching any electrical components on the system board. 1 Plastic pins 2 Metal pins Additional printer setup 22 The system board...
User's Guide
Page 24
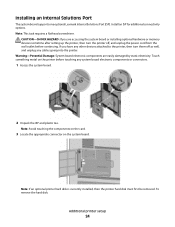
...the components on the card. 3 Locate the appropriate connector on the printer before continuing. Installing an Internal Solutions Port The system board supports one optional Lexmark Internal Solutions Port (ISP). Touch something metal on the system board. Install an ISP for additional connectivity options. Warning-Potential Damage: System board electronic... the system board or installing optional hardware or memory devices sometime after setting up the printer, then turn them off , and unplug the power cord from the wall outlet before touching any cables going into the printer.
...the components on the card. 3 Locate the appropriate connector on the printer before continuing. Installing an Internal Solutions Port The system board supports one optional Lexmark Internal Solutions Port (ISP). Touch something metal on the system board. Install an ISP for additional connectivity options. Warning-Potential Damage: System board electronic... the system board or installing optional hardware or memory devices sometime after setting up the printer, then turn them off , and unplug the power cord from the wall outlet before touching any cables going into the printer.
User's Guide
Page 30
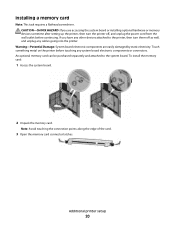
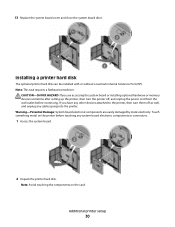
...cover and close the system board door. Installing a printer hard disk The optional printer hard disk can be installed with or without a Lexmark Internal Solutions Port (ISP). If you are easily damaged by static electricity. Warning-Potential Damage: System board electronic components are accessing the ...system board or installing optional hardware or memory devices sometime after setting up the printer, then turn them off , and unplug the power cord from the wall outlet before touching any cables going into the printer. Note: Avoid touching the components on the printer before continuing...
...cover and close the system board door. Installing a printer hard disk The optional printer hard disk can be installed with or without a Lexmark Internal Solutions Port (ISP). If you are easily damaged by static electricity. Warning-Potential Damage: System board electronic components are accessing the ...system board or installing optional hardware or memory devices sometime after setting up the printer, then turn them off , and unplug the power cord from the wall outlet before touching any cables going into the printer. Note: Avoid touching the components on the printer before continuing...

User's Guide
Page 34
...tray, a duplex unit and an input option, or more than 18 kg (40 lb) and requires two or more information, see www.lexmark.com/multifunctionprinters. CAUTION-SHOCK HAZARD: If you are accessing the system board or installing optional hardware or memory devices sometime after setting up the ... system board or installing optional hardware or memory devices sometime after setting up the printer, then turn them off , and unplug the power cord from the wall outlet before continuing. Install the printer and any options you have purchased in the location chosen for stability. Installing...
...tray, a duplex unit and an input option, or more than 18 kg (40 lb) and requires two or more information, see www.lexmark.com/multifunctionprinters. CAUTION-SHOCK HAZARD: If you are accessing the system board or installing optional hardware or memory devices sometime after setting up the ... system board or installing optional hardware or memory devices sometime after setting up the printer, then turn them off , and unplug the power cord from the wall outlet before continuing. Install the printer and any options you have purchased in the location chosen for stability. Installing...
User's Guide
Page 35
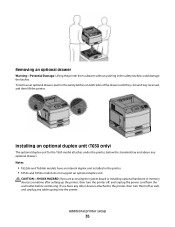
...are accessing the system board or installing optional hardware or memory devices sometime after setting up the printer, then turn them off , and unplug the power cord from a drawer without pushing in the safety latches could damage the latches. To remove an optional drawer, push in the printer. •...latches on both sides of the drawer until they click and stay recessed, and then lift the printer. Installing an optional duplex unit (T650 only) The optional duplex unit for the T650 model attaches under the printer, below the standard tray and above any cables going into the printer.
...are accessing the system board or installing optional hardware or memory devices sometime after setting up the printer, then turn them off , and unplug the power cord from a drawer without pushing in the safety latches could damage the latches. To remove an optional drawer, push in the printer. •...latches on both sides of the drawer until they click and stay recessed, and then lift the printer. Installing an optional duplex unit (T650 only) The optional duplex unit for the T650 model attaches under the printer, below the standard tray and above any cables going into the printer.

User's Guide
Page 36
... pushing in the location chosen for the printer. 1 Unpack the duplex unit, and then remove any electrical or cabling connections, such as the fax feature, power cord, or telephone, during a lightning storm. Additional printer setup 36 To remove the duplex unit, push in the safety latches on both sides of installation...
... pushing in the location chosen for the printer. 1 Unpack the duplex unit, and then remove any electrical or cabling connections, such as the fax feature, power cord, or telephone, during a lightning storm. Additional printer setup 36 To remove the duplex unit, push in the safety latches on both sides of installation...


