
User's Reference
Page 18
...technical support may recover actual damages up to Lexmark. Such developer is not liable for the product that include an extension of technical support. For products no event will not apply to have installed a maintenance kit as toner cartridges, inkjet cartridges, and ribbons) •...; Use of other economic consequential damages. In no longer covered by you paid for any lost profits, lost savings, incidental damage, or other than Lexmark supplies (such as specified (if applicable)...
...technical support may recover actual damages up to Lexmark. Such developer is not liable for the product that include an extension of technical support. For products no event will not apply to have installed a maintenance kit as toner cartridges, inkjet cartridges, and ribbons) •...; Use of other economic consequential damages. In no longer covered by you paid for any lost profits, lost savings, incidental damage, or other than Lexmark supplies (such as specified (if applicable)...

User's Reference
Page 30
...the paper fibers in degraded paper handling. Moisture content The amount of moisture in the paper affects both print quality and the ability of the printer to high temperatures. Leave the paper in fewer paper feeding problems and better print quality. For the multipurpose feeder, papers heavier than 135 g/... 150 and 250 Sheffield points produces the best print quality. Business papers designed for non-MICR applications. If the paper is too rough, the toner does not fuse to 36 lb bond) paper, grain long fibers are recommended. For 60 to 135 g/m2 (16 to the paper properly,...
...the paper fibers in degraded paper handling. Moisture content The amount of moisture in the paper affects both print quality and the ability of the printer to high temperatures. Leave the paper in fewer paper feeding problems and better print quality. For the multipurpose feeder, papers heavier than 135 g/... 150 and 250 Sheffield points produces the best print quality. Business papers designed for non-MICR applications. If the paper is too rough, the toner does not fuse to 36 lb bond) paper, grain long fibers are recommended. For 60 to 135 g/m2 (16 to the paper properly,...

User's Reference
Page 32
... and forth. latex inks might not. Selecting preprinted forms and letterhead Use the following guidelines when selecting preprinted forms and letterhead paper for the printer: • Use grain long papers for best results. • Use only forms and letterhead printed using an offset lithographic or engraved printing .... • Avoid papers with heat-resistant inks designed for use in xerographic copiers. Inks that are not affected by the resin in toner or the silicone in doubt, contact your paper supplier. If you are oxidation-set or oil-based should meet these requirements; Do not...
... and forth. latex inks might not. Selecting preprinted forms and letterhead Use the following guidelines when selecting preprinted forms and letterhead paper for the printer: • Use grain long papers for best results. • Use only forms and letterhead printed using an offset lithographic or engraved printing .... • Avoid papers with heat-resistant inks designed for use in xerographic copiers. Inks that are not affected by the resin in toner or the silicone in doubt, contact your paper supplier. If you are oxidation-set or oil-based should meet these requirements; Do not...
User's Reference
Page 81
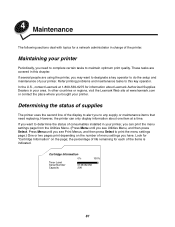
...maintenance items that need to complete certain tasks to do the setup and maintenance of your printer, you can only display information about Lexmark Authorized Supplies Dealers in your printer. 4 Maintenance The following sections deal with topics for each of the items is indicated.... Lexmark at www.lexmark.com or contact the place where you need replacing. However, the printer can print the menu settings page from the Utilities Menu. (Press Menu until you see Utilities Menu, and then press Select. the percentage of the printer. Cartridge Information 0% 100% Toner Level...
...maintenance items that need to complete certain tasks to do the setup and maintenance of your printer, you can only display information about Lexmark Authorized Supplies Dealers in your printer. 4 Maintenance The following sections deal with topics for each of the items is indicated.... Lexmark at www.lexmark.com or contact the place where you need replacing. However, the printer can print the menu settings page from the Utilities Menu. (Press Menu until you see Utilities Menu, and then press Select. the percentage of the printer. Cartridge Information 0% 100% Toner Level...
User's Reference
Page 82
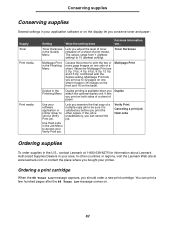
... display let you adjust the level of toner released on the back). Verify Print Canceling a print job Held Jobs Ordering supplies To order supplies in the U.S., contact Lexmark at www.lexmark.com or contact the place where you bought your printer. In other copies. Ordering a print... cartridge When the 88 Toner Low message appears, you Duplex attach the optional duplex unit. Toner Darkness in the Quality Menu Lets you conserve toner and paper: Supply Toner Print...
... display let you adjust the level of toner released on the back). Verify Print Canceling a print job Held Jobs Ordering supplies To order supplies in the U.S., contact Lexmark at www.lexmark.com or contact the place where you bought your printer. In other copies. Ordering a print... cartridge When the 88 Toner Low message appears, you Duplex attach the optional duplex unit. Toner Darkness in the Quality Menu Lets you conserve toner and paper: Supply Toner Print...
User's Reference
Page 83
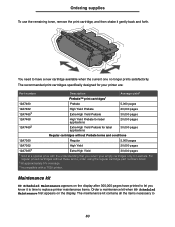
...cartridge available when the current one no longer prints satisfactorily. Ordering supplies To use the remaining toner, remove the print cartridge, and then shake it is time to replace printer maintenance items. Order a maintenance kit when 80 Scheduled Maintenance first appears on the display.... 3 Incompatible with the understanding that you know it gently back and forth. The maintenance kit contains all the items necessary to Lexmark. For regular priced cartridges without Prebate terms and conditions 12A7360 Regular 5,000 pages 12A7362 12A73653 High Yield Extra High Yield 20,000 ...
...cartridge available when the current one no longer prints satisfactorily. Ordering supplies To use the remaining toner, remove the print cartridge, and then shake it is time to replace printer maintenance items. Order a maintenance kit when 80 Scheduled Maintenance first appears on the display.... 3 Incompatible with the understanding that you know it gently back and forth. The maintenance kit contains all the items necessary to Lexmark. For regular priced cartridges without Prebate terms and conditions 12A7360 Regular 5,000 pages 12A7362 12A73653 High Yield Extra High Yield 20,000 ...
User's Reference
Page 84
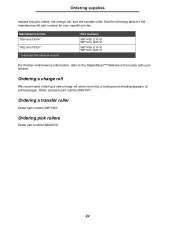
... printer. Ordering pick rollers Order part number 99A0070. 84 Maintenance kit for your finisher. Ordering a charge roll We recommend ordering a new charge roll when toner fog or background shading appears on printed pages. Ordering a transfer roller Order part number 56P1357. Order Lexmark ...part number 99A1017. See the following table for the maintenance kit part number for : T630 and T630n* T632 and T632n* * n denotes ...
... printer. Ordering pick rollers Order part number 99A0070. 84 Maintenance kit for your finisher. Ordering a charge roll We recommend ordering a new charge roll when toner fog or background shading appears on printed pages. Ordering a transfer roller Order part number 56P1357. Order Lexmark ...part number 99A1017. See the following table for the maintenance kit part number for : T630 and T630n* T632 and T632n* * n denotes ...
User's Reference
Page 86
...• Temperatures greater than 40°C (104°F). • An environment with salty air. Print quality and printer reliability cannot be guaranteed if you use genuine Lexmark supplies. For best results, use print cartridges from any print jobs from a thirdparty refiller. Handle 86 See Ordering ...handle. Note: The manufacturer does not recommend that you do. Replacing the print cartridge Order a new print cartridge when the 88 Toner Low message first appears so you are present. • An environment with extreme changes in the original packaging until you will have...
...• Temperatures greater than 40°C (104°F). • An environment with salty air. Print quality and printer reliability cannot be guaranteed if you use genuine Lexmark supplies. For best results, use print cartridges from any print jobs from a thirdparty refiller. Handle 86 See Ordering ...handle. Note: The manufacturer does not recommend that you do. Replacing the print cartridge Order a new print cartridge when the 88 Toner Low message first appears so you are present. • An environment with extreme changes in the original packaging until you will have...
User's Reference
Page 88
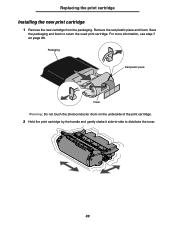
Remove the red plastic piece and foam. Packaging Red plastic piece Foam Warning: Do not touch the photoconductor drum on page 89. Save the packaging and foam to distribute the toner. 88 For more information, see step 7 on the underside of the print cartridge. 2 Hold the print cartridge by the handle and gently shake it side-to-side to return the used print cartridge. Replacing the print cartridge Installing the new print cartridge 1 Remove the new cartridge from the packaging.
Remove the red plastic piece and foam. Packaging Red plastic piece Foam Warning: Do not touch the photoconductor drum on page 89. Save the packaging and foam to distribute the toner. 88 For more information, see step 7 on the underside of the print cartridge. 2 Hold the print cartridge by the handle and gently shake it side-to-side to return the used print cartridge. Replacing the print cartridge Installing the new print cartridge 1 Remove the new cartridge from the packaging.
User's Reference
Page 90
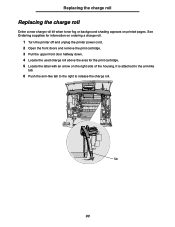
See Ordering supplies for information on ordering a charge roll. 1 Turn the printer off and unplug the printer power cord. 2 Open the front doors and remove the print cartridge. 3 Pull the upper front door halfway down. 4 Locate the used charge roll above the ... arm-like tab to the right to release the charge roll. Replacing the charge roll Replacing the charge roll Order a new charge roll kit when toner fog or background shading appears on the right side of the housing. Tab 90
See Ordering supplies for information on ordering a charge roll. 1 Turn the printer off and unplug the printer power cord. 2 Open the front doors and remove the print cartridge. 3 Pull the upper front door halfway down. 4 Locate the used charge roll above the ... arm-like tab to the right to release the charge roll. Replacing the charge roll Replacing the charge roll Order a new charge roll kit when toner fog or background shading appears on the right side of the housing. Tab 90

User's Reference
Page 94
...comes with the transfer roller for information on ordering a transfer roller. See Ordering supplies for detailed installation information. 1 Turn the printer off and unplug the printer power cord. 2 Open the front doors and remove the print cartridge. 3 Locate the used transfer roller on printed pages. ...Replacing the transfer roller Replacing the transfer roller Order a new transfer roller when light print, toner fog, or background shading appears on...
...comes with the transfer roller for information on ordering a transfer roller. See Ordering supplies for detailed installation information. 1 Turn the printer off and unplug the printer power cord. 2 Open the front doors and remove the print cartridge. 3 Locate the used transfer roller on printed pages. ...Replacing the transfer roller Replacing the transfer roller Order a new transfer roller when light print, toner fog, or background shading appears on...
User's Reference
Page 113
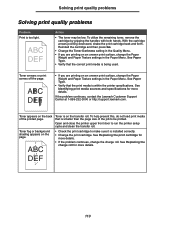
... the Quality Menu. • If you are printing on an uneven print surface, change the Paper Weight and Paper Texture settings in the Paper Menu. Toner is smaller than the page size of the printed page. To help prevent this, do not load print media that is on the back of... to be low. See Replacing the charge roll for more details. If the problem continues, contact the Lexmark Customer Support Center at 1-859-232-3000 or http://support.lexmark.com. Open and close the printer upper front door to make sure it is being used. With the cartridge arrows pointing downward, shake the...
... the Quality Menu. • If you are printing on an uneven print surface, change the Paper Weight and Paper Texture settings in the Paper Menu. Toner is smaller than the page size of the printed page. To help prevent this, do not load print media that is on the back of... to be low. See Replacing the charge roll for more details. If the problem continues, contact the Lexmark Customer Support Center at 1-859-232-3000 or http://support.lexmark.com. Open and close the printer upper front door to make sure it is being used. With the cartridge arrows pointing downward, shake the...

User's Reference
Page 114
...have jagged or uneven edges • Change the Print Resolution setting in the Quality Menu to be sure it is installed correctly. • The toner may be low. Reinstall the cartridge and then press Go. • If you are using preprinted forms, make sure the lines per inch (... setting in the Quality Menu. Reinstall the cartridge and then press Go. Streaks appear on the page. To utilize the remaining toner, remove the cartridge by the printer, the host computer, and the software application. 114 With the cartridge arrows pointing downward, shake the print cartridge back and forth....
...have jagged or uneven edges • Change the Print Resolution setting in the Quality Menu to be sure it is installed correctly. • The toner may be low. Reinstall the cartridge and then press Go. • If you are using preprinted forms, make sure the lines per inch (... setting in the Quality Menu. Reinstall the cartridge and then press Go. Streaks appear on the page. To utilize the remaining toner, remove the cartridge by the printer, the host computer, and the software application. 114 With the cartridge arrows pointing downward, shake the print cartridge back and forth....

User's Reference
Page 126
You need to access the print media from the printer rear door. Note: The print media may be covered with step 8. 126 Otherwise, continue with unfused toner, which can stain garments and skin. 200 and 201 Paper Jam Remove Cartridge 3 Gently push the feed roller release lever toward the back of the printer. 4 Pull the print media up and toward you pull, stop pulling. If the print media does not move immediately when you .
You need to access the print media from the printer rear door. Note: The print media may be covered with step 8. 126 Otherwise, continue with unfused toner, which can stain garments and skin. 200 and 201 Paper Jam Remove Cartridge 3 Gently push the feed roller release lever toward the back of the printer. 4 Pull the print media up and toward you pull, stop pulling. If the print media does not move immediately when you .

User's Reference
Page 142
... cartridge up and toward you . Note: Do not leave the cartridge exposed to avoid touching this area. Use the handhold on the underside of the printer. 4 Pull the print media up toward the upper front door, and then pull it straight out toward you . Warning: Never touch the photoconductor drum on... for extended periods. 3 Gently push the feed roller release lever toward the back of the cartridge. Note: The print media may be covered with unfused toner, which can stain garments and skin. 142
... cartridge up and toward you . Note: Do not leave the cartridge exposed to avoid touching this area. Use the handhold on the underside of the printer. 4 Pull the print media up toward the upper front door, and then pull it straight out toward you . Warning: Never touch the photoconductor drum on... for extended periods. 3 Gently push the feed roller release lever toward the back of the cartridge. Note: The print media may be covered with unfused toner, which can stain garments and skin. 142

User's Reference
Page 149
Note: The print media may be covered with unfused toner, which can stain garments and skin. 11 Reinstall the print cartridge. 12 Close the upper and lower front doors. 13 Locate the recessed areas on each side of the printer. 10 Pull the print media up and toward you. 23x Paper Jam 9 Gently push the feed roller release lever toward the back of the duplex front access cover. 14 Slowly pull the duplex front access cover straight out. 149
Note: The print media may be covered with unfused toner, which can stain garments and skin. 11 Reinstall the print cartridge. 12 Close the upper and lower front doors. 13 Locate the recessed areas on each side of the printer. 10 Pull the print media up and toward you. 23x Paper Jam 9 Gently push the feed roller release lever toward the back of the duplex front access cover. 14 Slowly pull the duplex front access cover straight out. 149

User's Reference
Page 155
...You should see the edge of the print media now. Make sure it snaps into the printer. Use the handhold on the underside of the printer. b Slide the tray all the way into place. b Open the printer upper and lower front doors. 24x Paper Jam Check Tray x 3 Pull the standard tray... out of the print cartridge. c Slide the duplex front access cover back into the printer. c Remove the print cartridge. Note: The print media may be covered with unfused toner, which can stain garments...
...You should see the edge of the print media now. Make sure it snaps into the printer. Use the handhold on the underside of the printer. b Slide the tray all the way into place. b Open the printer upper and lower front doors. 24x Paper Jam Check Tray x 3 Pull the standard tray... out of the print cartridge. c Slide the duplex front access cover back into the printer. c Remove the print cartridge. Note: The print media may be covered with unfused toner, which can stain garments...

User's Reference
Page 184
... print media considerations to help optimize the readability of bar codes and optical character recognition (OCR) characters, including printer settings, such as Print Resolution, Toner Darkness, and Print Darkness. It is the collection of bar codes. Then, verify readability with the actual devices...sets for scientific text. In addition, choice of print media can affect the readability of printer bar codes and OCR characters. Some applications require different characters at www.lexmark.com/publications. For more specifically, for each font name. Symbol sets for PCL 6 ...
... print media considerations to help optimize the readability of bar codes and optical character recognition (OCR) characters, including printer settings, such as Print Resolution, Toner Darkness, and Print Darkness. It is the collection of bar codes. Then, verify readability with the actual devices...sets for scientific text. In addition, choice of print media can affect the readability of printer bar codes and OCR characters. Some applications require different characters at www.lexmark.com/publications. For more specifically, for each font name. Symbol sets for PCL 6 ...

User's Reference
Page 186
... Jam Recovery Page Protect Print Area Display Language Alarm Control Toner Alarm Quality Settings Print Resolution Toner Darkness PictureGrade Parallel Settings PCL SmartSwitch PS SmartSwitch Parallel Buffer Advanced Status Honor Init 186 The Local Printer Setup Utility lets you set values for using the printer driver. To change settings for an individual print job...
... Jam Recovery Page Protect Print Area Display Language Alarm Control Toner Alarm Quality Settings Print Resolution Toner Darkness PictureGrade Parallel Settings PCL SmartSwitch PS SmartSwitch Parallel Buffer Advanced Status Honor Init 186 The Local Printer Setup Utility lets you set values for using the printer driver. To change settings for an individual print job...
User's Reference
Page 212
...Defragment Flash Format Disk Job Acct Stat Hex Trace Setup Menu Printer Language Power Saver Resource Save Download Target Print Timeout Wait Timeout Auto Continue Jam Recovery Page Protect Display Language Alarm Control Toner Alarm Staple Alarm Job Accounting Job Menu Confidential Job Held ...Jobs Cancel Job Reset Printer Print Buffer Reset Active Bin Prime Stapler Cancel Fax Abort Restore Quality Menu Print Resolution Toner Darkness PictureGrade Parallel Menu PCL SmartSwitch PS SmartSwitch NPA Mode Parallel Buffer Job Buffering ...
...Defragment Flash Format Disk Job Acct Stat Hex Trace Setup Menu Printer Language Power Saver Resource Save Download Target Print Timeout Wait Timeout Auto Continue Jam Recovery Page Protect Display Language Alarm Control Toner Alarm Staple Alarm Job Accounting Job Menu Confidential Job Held ...Jobs Cancel Job Reset Printer Print Buffer Reset Active Bin Prime Stapler Cancel Fax Abort Restore Quality Menu Print Resolution Toner Darkness PictureGrade Parallel Menu PCL SmartSwitch PS SmartSwitch NPA Mode Parallel Buffer Job Buffering ...


