Quick Reference
Page 9
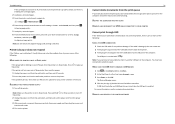
... or region. Set Date 18 / 01 / 2011 Press OK when complete. 19 Open the printer. 17 Set the time, and then press OK . Note: The printhead moves to scroll between the month, day, and year. Note: The date format varies, depending on the display. Time Zone (UTC-05:00) Eastern Time...
... or region. Set Date 18 / 01 / 2011 Press OK when complete. 19 Open the printer. 17 Set the time, and then press OK . Note: The printhead moves to scroll between the month, day, and year. Note: The date format varies, depending on the display. Time Zone (UTC-05:00) Eastern Time...
Quick Reference
Page 12
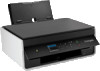
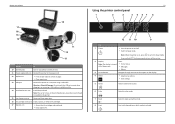
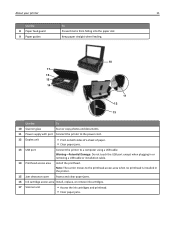
... Access and clear paper jams. 16 Ink cartridge access area Install, replace, or remove ink cartridges. 17 Scanner unit • Access the ink cartridges and printhead. • Clear paper jams. 12 Using the printer control panel 1 2 3 4 5 67 8 12 11 10 9 Use 1 Power To • Turn ...the printer on which mode is selected. Start a job, depending on and off in or removing a USB cable or installation cable. 14 Printhead access area Install the printhead. Press and hold for three seconds to turn off the printer. 2 Display View: Note: The display is on the display. 4 ...
... Access and clear paper jams. 16 Ink cartridge access area Install, replace, or remove ink cartridges. 17 Scanner unit • Access the ink cartridges and printhead. • Clear paper jams. 12 Using the printer control panel 1 2 3 4 5 67 8 12 11 10 9 Use 1 Power To • Turn ...the printer on which mode is selected. Start a job, depending on and off in or removing a USB cable or installation cable. 14 Printhead access area Install the printhead. Press and hold for three seconds to turn off the printer. 2 Display View: Note: The display is on the display. 4 ...
Quick Reference
Page 14
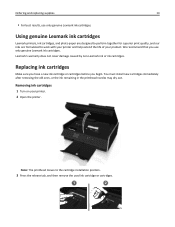
...Removing ink cartridges 1 Turn on your country or region, you begin. Note: The printhead moves to Lexmark for remanufacturing, refilling, or recycling. 2 Available only on the Lexmark Web site at www.lexmark.com. You must install new cartridges immediately after removing the old ones, or the... ink remaining in the printhead nozzles may get more ink, order high‑yield ink cartridges. • Depending...
...Removing ink cartridges 1 Turn on your country or region, you begin. Note: The printhead moves to Lexmark for remanufacturing, refilling, or recycling. 2 Available only on the Lexmark Web site at www.lexmark.com. You must install new cartridges immediately after removing the old ones, or the... ink remaining in the printhead nozzles may get more ink, order high‑yield ink cartridges. • Depending...

Quick Reference
Page 15
... you can perform, your printed image appear jagged or wavy, then you may need to align the printhead. 1 Load plain paper. 2 From the printer control panel, navigate to air. 3 Close the printer. Aligning the printhead If the characters or lines on if it is turned off. It will briefly come out of...
... you can perform, your printed image appear jagged or wavy, then you may need to align the printhead. 1 Load plain paper. 2 From the printer control panel, navigate to air. 3 Close the printer. Aligning the printhead If the characters or lines on if it is turned off. It will briefly come out of...

Quick Reference
Page 16
... and replacing ink cartridges 16 If you aligned the cartridges to perform automatic maintenance cycles. If print quality has not improved, then clean the printhead nozzles. Keep your printer plugged to a properly grounded, working electrical outlet to allow it to improve print quality, then print your prints....levels are too low, you must replace the ink cartridges before you may need to clean the printhead nozzles to Clean Printhead or Deep Clean Printhead, and then press OK . Cleaning the printhead nozzles If you have not been using the printer for a long period, then you can clean ...
... and replacing ink cartridges 16 If you aligned the cartridges to perform automatic maintenance cycles. If print quality has not improved, then clean the printhead nozzles. Keep your printer plugged to a properly grounded, working electrical outlet to allow it to improve print quality, then print your prints....levels are too low, you must replace the ink cartridges before you may need to clean the printhead nozzles to Clean Printhead or Deep Clean Printhead, and then press OK . Cleaning the printhead nozzles If you have not been using the printer for a long period, then you can clean ...

Quick Reference
Page 30
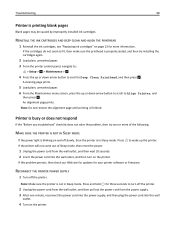
...TO YOUR PRINTER CHECK THE USB CONNECTION 1 Check the USB cable for any obvious damage. REINSTALL THE INK CARTRIDGES AND DEEP CLEAN AND ALIGN THE PRINTHEAD 1 Reinstall the ink cartridges, see the Wireless troubleshooting section. If the cable is printing blank pages Blank pages may have connected to Macintosh users... use a new one minute, reconnect the power cord into the power supply, and then plug the power cord into the USB port of the printhead. 3 Close the printer. MAKE SURE THE PRINT JOB IS NOT PAUSED MAKE SURE YOUR PRINTER IS SET AS THE DEFAULT PRINTER RECONNECT THE PRINTER ...
...TO YOUR PRINTER CHECK THE USB CONNECTION 1 Check the USB cable for any obvious damage. REINSTALL THE INK CARTRIDGES AND DEEP CLEAN AND ALIGN THE PRINTHEAD 1 Reinstall the ink cartridges, see the Wireless troubleshooting section. If the cable is printing blank pages Blank pages may have connected to Macintosh users... use a new one minute, reconnect the power cord into the power supply, and then plug the power cord into the USB port of the printhead. 3 Close the printer. MAKE SURE THE PRINT JOB IS NOT PAUSED MAKE SURE YOUR PRINTER IS SET AS THE DEFAULT PRINTER RECONNECT THE PRINTER ...
Quick Reference
Page 31
... Hub are listed, then the USB port is not in Sleep mode. Press to wake up or down arrow button to scroll to Deep Clean Printhead, and then press OK . The Device Manager opens. 4 Click the plus sign (+) beside Universal Serial Bus controllers. Troubleshooting If the cartridges do not... seem to fit, then make sure the printhead is properly seated, and then try one . 2 Firmly plug the square end of the USB cable into the back of the printer. 3 Firmly plug...
... Hub are listed, then the USB port is not in Sleep mode. Press to wake up or down arrow button to scroll to Deep Clean Printhead, and then press OK . The Device Manager opens. 4 Click the plus sign (+) beside Universal Serial Bus controllers. Troubleshooting If the cartridges do not... seem to fit, then make sure the printhead is properly seated, and then try one . 2 Firmly plug the square end of the USB cable into the back of the printer. 3 Firmly plug...
Quick Reference
Page 37
... 32 cannot print through USB 31 cartridges, ink ordering 14 checking an unresponsive printer 29 checklist before you troubleshoot 29 cleaning printhead nozzles 16 Communication not available message 34 configuring Wi‑Fi Protected Setup PBC, Push Button Configuration method 28 PIN, Personal... models 5 printer printing blank pages 30 printer problems, basic solutions 29 printer software installing 17 printers supported 21 printhead aligning 15 printhead access area 12 printhead nozzles cleaning 16 printing documents 20 network setup page 32 on both sides of the paper 20 two‑sided...
... 32 cannot print through USB 31 cartridges, ink ordering 14 checking an unresponsive printer 29 checklist before you troubleshoot 29 cleaning printhead nozzles 16 Communication not available message 34 configuring Wi‑Fi Protected Setup PBC, Push Button Configuration method 28 PIN, Personal... models 5 printer printing blank pages 30 printer problems, basic solutions 29 printer software installing 17 printers supported 21 printhead aligning 15 printhead access area 12 printhead nozzles cleaning 16 printing documents 20 network setup page 32 on both sides of the paper 20 two‑sided...
User's Guide
Page 11
... Access and clear paper jams. 16 Ink cartridge access area Install, replace, or remove ink cartridges. 17 Scanner unit • Access the ink cartridges and printhead. • Clear paper jams. About your printer 11 Use the 8 Paper feed guard 9 Paper guides To Prevent items from falling into the paper slot. Keep... cord. 12 Duplex unit • Print on both sides of a sheet of paper. • Clear paper jams. 13 USB port Connect the printer to the printhead access area when no printhead is installed in or removing a USB cable or installation cable. 14...
... Access and clear paper jams. 16 Ink cartridge access area Install, replace, or remove ink cartridges. 17 Scanner unit • Access the ink cartridges and printhead. • Clear paper jams. About your printer 11 Use the 8 Paper feed guard 9 Paper guides To Prevent items from falling into the paper slot. Keep... cord. 12 Duplex unit • Print on both sides of a sheet of paper. • Clear paper jams. 13 USB port Connect the printer to the printhead access area when no printhead is installed in or removing a USB cable or installation cable. 14...
User's Guide
Page 13
...have a new ink cartridge or cartridges before you use only genuine Lexmark ink cartridges. Lexmark's warranty does not cover damage caused by non-Lexmark ink or ink cartridges. We recommend that you begin. Note: The printhead moves to work with your printer and help extend the life of...ones, or the ink remaining in the printhead nozzles may dry out. Ordering and replacing supplies 13 • For best results, use only genuine Lexmark ink cartridges. Removing ink cartridges 1 Turn on your product. Using genuine Lexmark ink cartridges Lexmark printers, ink cartridges, and photo paper ...
...have a new ink cartridge or cartridges before you use only genuine Lexmark ink cartridges. Lexmark's warranty does not cover damage caused by non-Lexmark ink or ink cartridges. We recommend that you begin. Note: The printhead moves to work with your printer and help extend the life of...ones, or the ink remaining in the printhead nozzles may dry out. Ordering and replacing supplies 13 • For best results, use only genuine Lexmark ink cartridges. Removing ink cartridges 1 Turn on your product. Using genuine Lexmark ink cartridges Lexmark printers, ink cartridges, and photo paper ...
User's Guide
Page 91
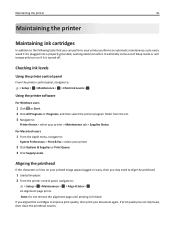
If print quality has not improved, then clean the printhead nozzles. Note: Do not remove the alignment page until printing is plugged into a properly grounded, working electrical outlet. Maintaining the printer 91 Maintaining the printer ... perform, your printer performs an automatic maintenance cycle every week if it is turned off. Aligning the printhead If the characters or lines on if it is finished. If you may need to align the printhead. 1 Load plain paper. 2 From the printer control panel, navigate to : System Preferences > Print & Fax > select your...
If print quality has not improved, then clean the printhead nozzles. Note: Do not remove the alignment page until printing is plugged into a properly grounded, working electrical outlet. Maintaining the printer 91 Maintaining the printer ... perform, your printer performs an automatic maintenance cycle every week if it is turned off. Aligning the printhead If the characters or lines on if it is finished. If you may need to align the printhead. 1 Load plain paper. 2 From the printer control panel, navigate to : System Preferences > Print & Fax > select your...
User's Guide
Page 92
...-Potential Damage: Do not use household cleaners or detergents, as they may cause damage to Clean Printhead or Deep Clean Printhead, and then press . OK A cleaning page prints. Notes: • Cleaning the printhead nozzles uses ink, so clean them only when necessary. • Deep cleaning uses more ink,... so try the Clean Printhead option first to save ink. • If the ink levels are too low, you can clean the printhead nozzles. 1 Load paper. 2 From the printer control panel, navigate to: > Setup > OK > ...
...-Potential Damage: Do not use household cleaners or detergents, as they may cause damage to Clean Printhead or Deep Clean Printhead, and then press . OK A cleaning page prints. Notes: • Cleaning the printhead nozzles uses ink, so clean them only when necessary. • Deep cleaning uses more ink,... so try the Clean Printhead option first to save ink. • If the ink levels are too low, you can clean the printhead nozzles. 1 Load paper. 2 From the printer control panel, navigate to: > Setup > OK > ...

User's Guide
Page 96
... or right arrow button to scroll to a defective port. Print job does not print or is damaged, then use a new one or more of the printhead. 3 Close the printer. OK Software did not install If you troubleshoot" checklist does not solve the problem, then try another USB port on the computer...
... or right arrow button to scroll to a defective port. Print job does not print or is damaged, then use a new one or more of the printhead. 3 Close the printer. OK Software did not install If you troubleshoot" checklist does not solve the problem, then try another USB port on the computer...
User's Guide
Page 98
...scroll to Align Printer, and then press . Press and hold for three seconds to wake up or down arrow button to scroll to Deep Clean Printhead, and then press . OK An alignment page prints. Note: Do not remove the alignment page until printing is printing blank pages Blank pages ...printer control panel, navigate to: > Setup > OK > Maintenance > OK 4 Press the up the printer. REINSTALL THE INK CARTRIDGES AND DEEP CLEAN AND ALIGN THE PRINTHEAD 1 Reinstall the ink cartridges, see "Replacing ink cartridges" on and off the printer. If the cartridges do not seem to fit, then make sure the...
...scroll to Align Printer, and then press . Press and hold for three seconds to wake up or down arrow button to scroll to Deep Clean Printhead, and then press . OK An alignment page prints. Note: Do not remove the alignment page until printing is printing blank pages Blank pages ...printer control panel, navigate to: > Setup > OK > Maintenance > OK 4 Press the up the printer. REINSTALL THE INK CARTRIDGES AND DEEP CLEAN AND ALIGN THE PRINTHEAD 1 Reinstall the ink cartridges, see "Replacing ink cartridges" on and off the printer. If the cartridges do not seem to fit, then make sure the...
User's Guide
Page 103
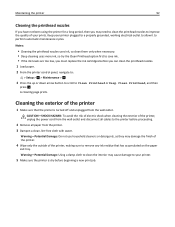
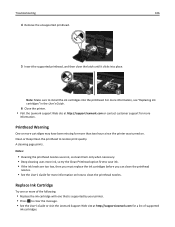
...printer to remove any obstructions to the printhead, and then close the printer. • Press OK to avoid damage and print quality problems. 1 Open the printer, and then lift the latch. 2 Remove the printhead. 1 2 Printhead Error Remove and reinsert the printhead Warning-Potential Damage: Do not touch... the cartridge contacts with bare hands to clear the message. Printhead Cannot Move Try one or more of the print job, and ...
...printer to remove any obstructions to the printhead, and then close the printer. • Press OK to avoid damage and print quality problems. 1 Open the printer, and then lift the latch. 2 Remove the printhead. 1 2 Printhead Error Remove and reinsert the printhead Warning-Potential Damage: Do not touch... the cartridge contacts with bare hands to clear the message. Printhead Cannot Move Try one or more of the print job, and ...
User's Guide
Page 104
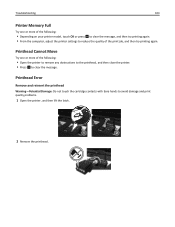
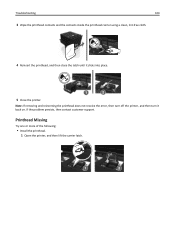
Troubleshooting 104 3 Wipe the printhead contacts and the contacts inside the printhead carrier using a clean, lint‑free cloth. 4 Reinsert the printhead, and then close the latch until it back on. Note: If removing and reinserting the printhead does not resolve the error, then turn off the printer, and then turn it clicks into place. 1 2 5 Close the printer. If the problem persists, then contact customer support. Printhead Missing Try one or more of the following: • Install the printhead. 1 Open the printer, and then lift the carrier latch. 1 2
Troubleshooting 104 3 Wipe the printhead contacts and the contacts inside the printhead carrier using a clean, lint‑free cloth. 4 Reinsert the printhead, and then close the latch until it back on. Note: If removing and reinserting the printhead does not resolve the error, then turn off the printer, and then turn it clicks into place. 1 2 5 Close the printer. If the problem persists, then contact customer support. Printhead Missing Try one or more of the following: • Install the printhead. 1 Open the printer, and then lift the carrier latch. 1 2
User's Guide
Page 105
.... • If your printer did not come with a printhead, then visit the Lexmark support Web site at http://support.lexmark.com, or contact customer support for more of the following: • Turn the printer off, and then turn it clicks into the printhead. For more information, see "Printhead Error" in the User's Guide. Troubleshooting 105...
.... • If your printer did not come with a printhead, then visit the Lexmark support Web site at http://support.lexmark.com, or contact customer support for more of the following: • Turn the printer off, and then turn it clicks into the printhead. For more information, see "Printhead Error" in the User's Guide. Troubleshooting 105...
User's Guide
Page 106
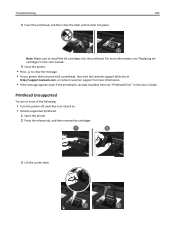
... the message. • See the User's Guide or visit the Lexmark Support Web site at http://support.lexmark.com or contact customer support for more of supported ink cartridges. Notes: • Cleaning the printhead nozzles uses ink, so clean them only when necessary. • Deep..., see "Replacing ink cartridges" in the User's Guide. 6 Close the printer. • Visit the Lexmark support Web site at http://support.lexmark.com for more information. Printhead Warning One or more cartridges may have been missing for more information on . Troubleshooting 106 4 Remove the unsupported...
... the message. • See the User's Guide or visit the Lexmark Support Web site at http://support.lexmark.com or contact customer support for more of supported ink cartridges. Notes: • Cleaning the printhead nozzles uses ink, so clean them only when necessary. • Deep..., see "Replacing ink cartridges" in the User's Guide. 6 Close the printer. • Visit the Lexmark support Web site at http://support.lexmark.com for more information. Printhead Warning One or more cartridges may have been missing for more information on . Troubleshooting 106 4 Remove the unsupported...

User's Guide
Page 108
Avoid unnecessarily touching these parts while clearing jams. Check the jam clearance area 1 Lift the scanner unit. 2 Remove the jam clearance cover. 1 2 3 Notes: • Squeeze the snap to lift the jam clearance cover. • Make sure that the printhead is moved to the side and away from the jammed paper. Troubleshooting 108 • "Paper jam in the duplex unit" on page 110 • "Paper or specialty media misfeeds" on page 111 Paper jam in the printer Note: The parts inside the printer are sensitive.
Avoid unnecessarily touching these parts while clearing jams. Check the jam clearance area 1 Lift the scanner unit. 2 Remove the jam clearance cover. 1 2 3 Notes: • Squeeze the snap to lift the jam clearance cover. • Make sure that the printhead is moved to the side and away from the jammed paper. Troubleshooting 108 • "Paper jam in the duplex unit" on page 110 • "Paper or specialty media misfeeds" on page 111 Paper jam in the printer Note: The parts inside the printer are sensitive.
User's Guide
Page 113
... COMPUTER Consider upgrading the RAM. SELECT A HIGHER PRINT QUALITY FROM THE PRINTER SOFTWARE MAKE SURE THE INK CARTRIDGES ARE PROPERLY INSTALLED ALIGN THE PRINTHEAD CLEAN OR DEEP CLEAN THE PRINTHEAD NOZZLES Note: If these solutions do not remove the streaks or lines on printed image If the "Before you troubleshoot" checklist does...
... COMPUTER Consider upgrading the RAM. SELECT A HIGHER PRINT QUALITY FROM THE PRINTER SOFTWARE MAKE SURE THE INK CARTRIDGES ARE PROPERLY INSTALLED ALIGN THE PRINTHEAD CLEAN OR DEEP CLEAN THE PRINTHEAD NOZZLES Note: If these solutions do not remove the streaks or lines on printed image If the "Before you troubleshoot" checklist does...


