User Guide
Page 2
... information 5 About your printer 6 Thank you for choosing this printer!...6 Minimizing your printer's environmental impact...6 Finding information about the printer...7 Understanding the parts of the printer...9 Ordering and replacing supplies 11 Ordering ink cartridges...11 Using genuine Lexmark ink cartridges...11 Replacing ink cartridges...12 Ordering paper and other supplies...13 Recycling Lexmark products...13 Using the printer control panel buttons and...
... information 5 About your printer 6 Thank you for choosing this printer!...6 Minimizing your printer's environmental impact...6 Finding information about the printer...7 Understanding the parts of the printer...9 Ordering and replacing supplies 11 Ordering ink cartridges...11 Using genuine Lexmark ink cartridges...11 Replacing ink cartridges...12 Ordering paper and other supplies...13 Recycling Lexmark products...13 Using the printer control panel buttons and...

User Guide
Page 4
Networking FAQ...73 Maintaining the printer 84 Maintaining ink cartridges...84 Cleaning the exterior of the printer...86 Cleaning the scanner glass...86 Troubleshooting 87 Before you troubleshoot...87 Using the Service Center to solve printer problems 87 If Troubleshooting does not solve your problem...87 Setup troubleshooting...87 Jams and misfeeds troubleshooting...93 Print...
Networking FAQ...73 Maintaining the printer 84 Maintaining ink cartridges...84 Cleaning the exterior of the printer...86 Cleaning the scanner glass...86 Troubleshooting 87 Before you troubleshoot...87 Using the Service Center to solve printer problems 87 If Troubleshooting does not solve your problem...87 Setup troubleshooting...87 Jams and misfeeds troubleshooting...93 Print...

User Guide
Page 6
... the paper manually or automatically (depending on both sides of the paper. Conserving ink • Use Quick Print or Draft Mode. The Power Saver feature puts the printer in your new printer right away, use the setup materials that are ideal for presentation. • ... You can be used to share a single printer among multiple computers, thus conserving energy and other resources. Inks in Toolbars, the Print or Print Preview dialog, or the printer display (depending on your printer 6 Minimizing your printer's environmental impact We are committed to print more than normal and...
... the paper manually or automatically (depending on both sides of the paper. Conserving ink • Use Quick Print or Draft Mode. The Power Saver feature puts the printer in your new printer right away, use the setup materials that are ideal for presentation. • ... You can be used to share a single printer among multiple computers, thus conserving energy and other resources. Inks in Toolbars, the Print or Print Preview dialog, or the printer display (depending on your printer 6 Minimizing your printer's environmental impact We are committed to print more than normal and...
User Guide
Page 7
.... • Clean the printhead. To read the Lexmark Environmental Sustainability Report, see www.lexmark.com/environment. To return an ink cartridge, go to www.lexmark.com/recycle. Recycling • Return ink cartridges for ? For updates, check our Web site at www.lexmark.com/publications/. About your ink cartridges, try using printer software • Setting up and configuring the...
.... • Clean the printhead. To read the Lexmark Environmental Sustainability Report, see www.lexmark.com/environment. To return an ink cartridge, go to www.lexmark.com/recycle. Recycling • Return ink cartridges for ? For updates, check our Web site at www.lexmark.com/publications/. About your ink cartridges, try using printer software • Setting up and configuring the...
User Guide
Page 10
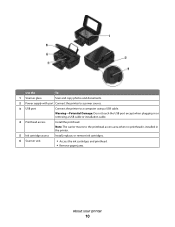
Use the To 1 Scanner glass Scan and copy photos and documents. 2 Power supply with port Connect the printer to a power source. 3 USB port Connect the printer to the printhead access area when no printhead is installed in or removing a USB cable or installation cable. 4 Printhead access ... moves to a computer using a USB cable. Warning-Potential Damage: Do not touch the USB port except when plugging in the printer. 5 Ink cartridge access Install, replace, or remove ink cartridges. 6 Scanner unit • Access the ink cartridges and printhead. • Remove paper jams. About your...
Use the To 1 Scanner glass Scan and copy photos and documents. 2 Power supply with port Connect the printer to a power source. 3 USB port Connect the printer to the printhead access area when no printhead is installed in or removing a USB cable or installation cable. 4 Printhead access ... moves to a computer using a USB cable. Warning-Potential Damage: Do not touch the USB port except when plugging in the printer. 5 Ink cartridge access Install, replace, or remove ink cartridges. 6 Scanner unit • Access the ink cartridges and printhead. • Remove paper jams. About your...
User Guide
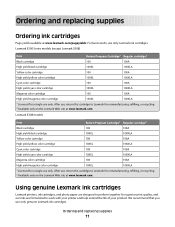
Page 11
... 100 100A 100XL 100XLA Cyan color cartridge High yield cyan color cartridge 100 100XL 100A 100XLA Magenta color cartridge 100 100A High yield magenta color cartridge 100XL 100XLA 1 Licensed for remanufacturing, refilling, or recycling. 2 Available only on the Lexmark Web site at www.lexmark.com. After use only Lexmark ink cartridges. Using genuine Lexmark ink cartridges Lexmark printers, ink cartridges, and photo paper...
... 100 100A 100XL 100XLA Cyan color cartridge High yield cyan color cartridge 100 100XL 100A 100XLA Magenta color cartridge 100 100A High yield magenta color cartridge 100XL 100XLA 1 Licensed for remanufacturing, refilling, or recycling. 2 Available only on the Lexmark Web site at www.lexmark.com. After use only Lexmark ink cartridges. Using genuine Lexmark ink cartridges Lexmark printers, ink cartridges, and photo paper...

User Guide
Page 12
... in the printhead nozzles may dry out. 1 Turn on your printer. 2 Open the printer. Replacing ink cartridges Make sure you have a new ink cartridge or cartridges before you begin. Lexmark's warranty does not cover damage caused by non-Lexmark ink or ink cartridges. Ordering and replacing supplies 12 Use two hands to the cartridge installation position. 3 Press the...
... in the printhead nozzles may dry out. 1 Turn on your printer. 2 Open the printer. Replacing ink cartridges Make sure you have a new ink cartridge or cartridges before you begin. Lexmark's warranty does not cover damage caused by non-Lexmark ink or ink cartridges. Ordering and replacing supplies 12 Use two hands to the cartridge installation position. 3 Press the...

User Guide
Page 20
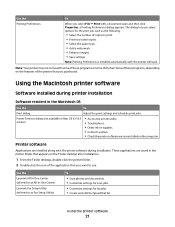
.... • Access the Lexmark Fax Setup Utility in four-in-one printers. Using the printer software 20 Printer software Use the LexmarkTM Printer Home (referred to as Printer Home) Lexmark Fast Pics (referred to as Fast Pics) Lexmark Toolbar (referred to as Toolbar) Lexmark Tools for Office (referred ... Answering, and print fax history and status reports. Notes: • This program is installed automatically with the printer software. • You may be prompted to save ink. • Schedule automatic printing of Web pages. • Access Picnik and edit photos online. • Print...
.... • Access the Lexmark Fax Setup Utility in four-in-one printers. Using the printer software 20 Printer software Use the LexmarkTM Printer Home (referred to as Printer Home) Lexmark Fast Pics (referred to as Fast Pics) Lexmark Toolbar (referred to as Toolbar) Lexmark Tools for Office (referred ... Answering, and print fax history and status reports. Notes: • This program is installed automatically with the printer software. • You may be prompted to save ink. • Schedule automatic printing of Web pages. • Access Picnik and edit photos online. • Print...
User Guide
Page 21
...; Create and edit the Speed Dial list. Note: Your printer may not come with the printer software during printer installation Software resident in Mac OS X v10.5 or later) • Access the printer utility. • Troubleshoot. • Order ink or supplies. • Contact Lexmark. • Check the printer software version installed on the features of copies to print...
...; Create and edit the Speed Dial list. Note: Your printer may not come with the printer software during printer installation Software resident in Mac OS X v10.5 or later) • Access the printer utility. • Troubleshoot. • Order ink or supplies. • Contact Lexmark. • Check the printer software version installed on the features of copies to print...
User Guide
Page 22
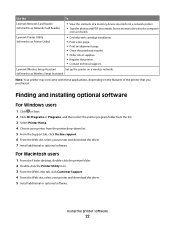
... alignment page. • Clean the printhead nozzles. • Order ink or supplies. • Register the printer. • Contact technical support. Lexmark Wireless Setup Assistant Set up the printer on the features of a memory device inserted into a network printer. • Transfer photos and PDF documents from the printer drop-down list. 5 From the Support tab, click On...
... alignment page. • Clean the printhead nozzles. • Order ink or supplies. • Register the printer. • Contact technical support. Lexmark Wireless Setup Assistant Set up the printer on the features of a memory device inserted into a network printer. • Transfer photos and PDF documents from the printer drop-down list. 5 From the Support tab, click On...

User Guide
Page 29
... Load the paper in the ink cartridges. • Remove each sheet as it is enough ink in the printer. 2 Send the print job: For Windows users a With a document open , choose File > Print. For Macintosh users a With a document open , click File Print. b From the Printer pop-up menu, choose the ... to print, the type of paper to use , and how the pages should print. d From the print options pop-up menu, choose the printer. c If necessary, click the disclosure triangle. Printing Tips for printing • Use the appropriate paper for your print job. • Select a...
... Load the paper in the ink cartridges. • Remove each sheet as it is enough ink in the printer. 2 Send the print job: For Windows users a With a document open , choose File > Print. For Macintosh users a With a document open , click File Print. b From the Printer pop-up menu, choose the ... to print, the type of paper to use , and how the pages should print. d From the print options pop-up menu, choose the printer. c If necessary, click the disclosure triangle. Printing Tips for printing • Use the appropriate paper for your print job. • Select a...
User Guide
Page 45
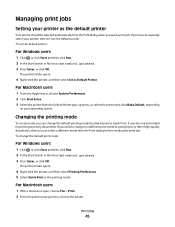
... Run. 2 In the Start Search or Run box, type control printers. 3 Press Enter, or click OK. Changing the printing mode To conserve ink, you send a print job. The printer folder opens. 4 Right-click the printer, and then select Printing Preferences. 5 Select Quick Print as Default Printer. For Macintosh users 1 With a document open, choose File > Print...
... Run. 2 In the Start Search or Run box, type control printers. 3 Press Enter, or click OK. Changing the printing mode To conserve ink, you send a print job. The printer folder opens. 4 Right-click the printer, and then select Printing Preferences. 5 Select Quick Print as Default Printer. For Macintosh users 1 With a document open, choose File > Print...

User Guide
Page 46
... OK. Printing 46 Changing the printing mode for each print job. Note: Printing using Quick Print uses less ink and is ideal for printing text documents. The printer folder opens. 4 Right-click the printer, and then select Pause Printing. The print queue dialog appears. 2 Pause the print job: • If...• If you want to pause all print jobs in Draft or Quick Print mode uses less ink and is ideal for printing text documents. Note: Printing in the queue, then click Pause Printer or Stop Jobs, depending on your operating system. 4 From the Print Quality pop-up menu, ...
... OK. Printing 46 Changing the printing mode for each print job. Note: Printing using Quick Print uses less ink and is ideal for printing text documents. The printer folder opens. 4 Right-click the printer, and then select Pause Printing. The print queue dialog appears. 2 Pause the print job: • If...• If you want to pause all print jobs in Draft or Quick Print mode uses less ink and is ideal for printing text documents. Note: Printing in the queue, then click Pause Printer or Stop Jobs, depending on your operating system. 4 From the Print Quality pop-up menu, ...

User Guide
Page 84
... Macintosh users 1 From the Finder desktop, double-click the printer program folder. 2 Select Printer Utility from the list. 3 Check the ink levels from the printer drop-down list. 5 From the Maintenance tab, click Check ink levels. Using the printer software For Windows users 1 Click or Start. 2 Click ... briefly come out of Power Saver mode or will temporarily power on your printer image appear jagged or wavy, then you can perform, your printer from the Maintenance tab. Maintaining the printer Maintaining ink cartridges In addition to the following tasks that you may need to Maintenance,...
... Macintosh users 1 From the Finder desktop, double-click the printer program folder. 2 Select Printer Utility from the list. 3 Check the ink levels from the printer drop-down list. 5 From the Maintenance tab, click Check ink levels. Using the printer software For Windows users 1 Click or Start. 2 Click ... briefly come out of Power Saver mode or will temporarily power on your printer image appear jagged or wavy, then you can perform, your printer from the Maintenance tab. Maintaining the printer Maintaining ink cartridges In addition to the following tasks that you may need to Maintenance,...

User Guide
Page 85
...buttons to scroll to Align Printer, and then press . 5 Press again. Clean the printhead nozzles to improve the quality of the Printer Utility dialog, click Print Alignment Page. 5 Follow the instructions on the computer screen. Notes: • Cleaning the printhead nozzles uses ink, so clean them only when... necessary. • Deep cleaning uses more ink, so try the Clean Printhead ...
...buttons to scroll to Align Printer, and then press . 5 Press again. Clean the printhead nozzles to improve the quality of the Printer Utility dialog, click Print Alignment Page. 5 Follow the instructions on the computer screen. Notes: • Cleaning the printhead nozzles uses ink, so clean them only when... necessary. • Deep cleaning uses more ink, so try the Clean Printhead ...

User Guide
Page 86
A cleaning page prints. Cleaning the exterior of the printer, making sure to remove any ink residue that the printer is dry before placing the document on the paper exit tray. Warning-Potential Damage: Do not use household cleaners or detergents, as they may cause ... from the wall outlet. CAUTION-SHOCK HAZARD: To avoid the risk of electric shock when cleaning the exterior of the printer, unplug the power cord from the wall outlet and disconnect all ink or corrective fluid on a document is turned off and unplugged from the paper support and paper exit tray. 3 Dampen...
A cleaning page prints. Cleaning the exterior of the printer, making sure to remove any ink residue that the printer is dry before placing the document on the paper exit tray. Warning-Potential Damage: Do not use household cleaners or detergents, as they may cause ... from the wall outlet. CAUTION-SHOCK HAZARD: To avoid the risk of electric shock when cleaning the exterior of the printer, unplug the power cord from the wall outlet and disconnect all ink or corrective fluid on a document is turned off and unplugged from the paper support and paper exit tray. 3 Dampen...

User Guide
Page 87
...ink cartridges, and install new cartridges if necessary. • Use the Service Center to find the following: • Knowledgebase articles with the latest information and troubleshooting for your problem Visit our Web site at support.lexmark.com to locate and solve the problem (Windows only). • Turn the printer... off, wait about 10 seconds, and then turn the printer back on. Using the Service Center to solve printer problems The Service Center provides step-by-...
...ink cartridges, and install new cartridges if necessary. • Use the Service Center to find the following: • Knowledgebase articles with the latest information and troubleshooting for your problem Visit our Web site at support.lexmark.com to locate and solve the problem (Windows only). • Turn the printer... off, wait about 10 seconds, and then turn the printer back on. Using the Service Center to solve printer problems The Service Center provides step-by-...
User Guide
Page 90
...the power cord from the wall outlet. 2 Gently remove the power supply from the printer, and then reinsert it. 3 Plug the power cord into the matching color slot of the printhead. 3 Close the printer. Print job does not print or is missing pages If the "Before you reinstall ...the software, do the following : MAKE SURE THE INK CARTRIDGES ARE INSERTED CORRECTLY 1 Turn the printer on the printer. SELECT YOUR PRINTER FROM THE PRINT ...
...the power cord from the wall outlet. 2 Gently remove the power supply from the printer, and then reinsert it. 3 Plug the power cord into the matching color slot of the printhead. 3 Close the printer. Print job does not print or is missing pages If the "Before you reinstall ...the software, do the following : MAKE SURE THE INK CARTRIDGES ARE INSERTED CORRECTLY 1 Turn the printer on the printer. SELECT YOUR PRINTER FROM THE PRINT ...
User Guide
Page 91
... on page 12 for any obvious damage. The USB port is finished. REINSTALL THE INK CARTRIDGES AND DEEP CLEAN AND ALIGN THE PRINTHEAD 1 Reinstall the ink cartridges, see "Replacing ink cartridges" on the printer. An alignment page prints. Troubleshooting 91 Printer is busy or does not respond If the "Before you troubleshoot" checklist does not...
... on page 12 for any obvious damage. The USB port is finished. REINSTALL THE INK CARTRIDGES AND DEEP CLEAN AND ALIGN THE PRINTHEAD 1 Reinstall the ink cartridges, see "Replacing ink cartridges" on the printer. An alignment page prints. Troubleshooting 91 Printer is busy or does not respond If the "Before you troubleshoot" checklist does not...

User Guide
Page 95
...in the document. • Remove as many unused fonts as possible from your system. SELECT A HIGHER PRINT QUALITY FROM THE PRINTER SOFTWARE MAKE SURE THE INK CARTRIDGES ARE PROPERLY INSTALLED ALIGN THE PRINTHEAD CLEAN OR DEEP CLEAN THE PRINTHEAD NOZZLES Note: If these solutions do not remove the ...streaks or lines on the printed image, then contact technical support. SELECT A LOWER PRINT QUALITY FROM THE PRINTER SOFTWARE MANUALLY SELECT A...
...in the document. • Remove as many unused fonts as possible from your system. SELECT A HIGHER PRINT QUALITY FROM THE PRINTER SOFTWARE MAKE SURE THE INK CARTRIDGES ARE PROPERLY INSTALLED ALIGN THE PRINTHEAD CLEAN OR DEEP CLEAN THE PRINTHEAD NOZZLES Note: If these solutions do not remove the ...streaks or lines on the printed image, then contact technical support. SELECT A LOWER PRINT QUALITY FROM THE PRINTER SOFTWARE MANUALLY SELECT A...


