Quick Reference
Page 3
... home screen 13 Navigating menus using the touch screen 14 Using memory cards and flash drives 15 Ordering and replacing supplies 17 Ordering ink cartridges...17 Replacing ink cartridges...17 Maintaining ink cartridges 18 Using the printer software 20 Minimum system requirements 20 Installing the printer software 20 Using the Windows printer software 20 Using the...
... home screen 13 Navigating menus using the touch screen 14 Using memory cards and flash drives 15 Ordering and replacing supplies 17 Ordering ink cartridges...17 Replacing ink cartridges...17 Maintaining ink cartridges 18 Using the printer software 20 Minimum system requirements 20 Installing the printer software 20 Using the Windows printer software 20 Using the...
Quick Reference
Page 5
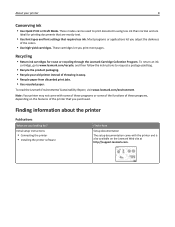
... our printers to Sleep mode after the printer has been idle for 10 minutes. • Select the lowest Sleep timeout. To return an ink cartridge, go to www.lexmark.com/recycle, and then follow the instructions to reduce your printer's environmental impact We are committed to protecting the environment and are available only...
... our printers to Sleep mode after the printer has been idle for 10 minutes. • Select the lowest Sleep timeout. To return an ink cartridge, go to www.lexmark.com/recycle, and then follow the instructions to reduce your printer's environmental impact We are committed to protecting the environment and are available only...
Quick Reference
Page 10
Lexmark Pro910 Series Installation Configure Advanced Features You can I don't do this printer, you want to send and receive faxes What will I be missing if I do ... identifies you as the sender in all your sent faxes. 23 Unpack the ink cartridges. 21 Configure other advanced fax settings later in all your sent faxes. Get my printer ready to scan directly to my computer Configure Lexmark SmartSolutions and standalone email Get my printer ready to set up fax now? Otherwise...
Lexmark Pro910 Series Installation Configure Advanced Features You can I don't do this printer, you want to send and receive faxes What will I be missing if I do ... identifies you as the sender in all your sent faxes. 23 Unpack the ink cartridges. 21 Configure other advanced fax settings later in all your sent faxes. Get my printer ready to scan directly to my computer Configure Lexmark SmartSolutions and standalone email Get my printer ready to set up fax now? Otherwise...
Quick Reference
Page 11
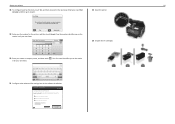
...from the one shown. • Recycle the alignment page. Slide your printer 11 24 Insert each ink cartridge. SD/MS-Duo/MMC The customer support label that prints may take a while to print. •.../MS-Duo/MMC Notes: • The alignment page prints. • Do not remove the page until the cartridge clicks into place. 26 Extend the paper exit tray and flip out the paper stop. 2 1 27 From ...alignment page that is finished. Then, use two hands to install the black cartridge. • Install the new ink cartridges immediately after removing the protective cap to avoid exposing the...
...from the one shown. • Recycle the alignment page. Slide your printer 11 24 Insert each ink cartridge. SD/MS-Duo/MMC The customer support label that prints may take a while to print. •.../MS-Duo/MMC Notes: • The alignment page prints. • Do not remove the page until the cartridge clicks into place. 26 Extend the paper exit tray and flip out the paper stop. 2 1 27 From ...alignment page that is finished. Then, use two hands to install the black cartridge. • Install the new ink cartridges immediately after removing the protective cap to avoid exposing the...
Quick Reference
Page 12
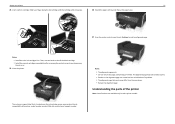
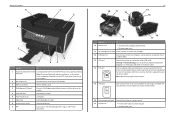
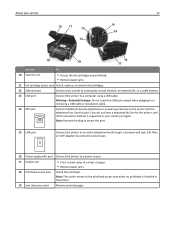
... 12 15 EXT LINE EXT LINE 19 18 16 17 Use the To 10 Scanner unit • Access the ink cartridges and printhead. • Remove paper jams. 11 Ink cartridge access area Install, replace, or remove ink cartridges. 12 Ethernet port Connect your printer to a computer, a local network, an external DSL, or a cable modem. 13 USB...
... 12 15 EXT LINE EXT LINE 19 18 16 17 Use the To 10 Scanner unit • Access the ink cartridges and printhead. • Remove paper jams. 11 Ink cartridge access area Install, replace, or remove ink cartridges. 12 Ethernet port Connect your printer to a computer, a local network, an external DSL, or a cable modem. 13 USB...
Quick Reference
Page 17
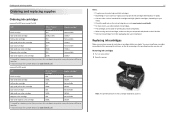
... after removing the old ones, or the ink remaining in packs. • You can order a mix of standard ink cartridges and high‑yield ink cartridges, depending on their flat side. • Remove ink cartridges from their packaging only upon installation. Ordering and replacing supplies Ordering and replacing supplies Ordering ink cartridges Lexmark Pro910 Series except Pro919 Item Return Program...
... after removing the old ones, or the ink remaining in packs. • You can order a mix of standard ink cartridges and high‑yield ink cartridges, depending on their flat side. • Remove ink cartridges from their packaging only upon installation. Ordering and replacing supplies Ordering and replacing supplies Ordering ink cartridges Lexmark Pro910 Series except Pro919 Item Return Program...
Quick Reference
Page 18
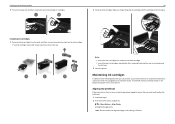
...every week if it is turned off. Notes: • Insert the color cartridges first, and then the black cartridge. • Insert the new ink cartridges immediately after removing the protective cap to avoid exposing the ink to : > More Options > Align Printer An alignment page prints. Ordering ...and replacing supplies 3 Press the release tab, and then remove the used ink cartridge or cartridges. 18 2 Insert each ink cartridge. It will briefly come out of Sleep mode or will temporarily power on your printed image appear jagged or wavy, ...
...every week if it is turned off. Notes: • Insert the color cartridges first, and then the black cartridge. • Insert the new ink cartridges immediately after removing the protective cap to avoid exposing the ink to : > More Options > Align Printer An alignment page prints. Ordering ...and replacing supplies 3 Press the release tab, and then remove the used ink cartridge or cartridges. 18 2 Insert each ink cartridge. It will briefly come out of Sleep mode or will temporarily power on your printed image appear jagged or wavy, ...

Quick Reference
Page 19
... your prints. Notes: • Cleaning the printhead nozzles uses ink, so clean them only when necessary. • Deep cleaning uses more ink, so try the Clean Printhead option first to save ink. • If the ink levels are too low, then you must replace the ink cartridges before you may need to clean the printhead nozzles...
... your prints. Notes: • Cleaning the printhead nozzles uses ink, so clean them only when necessary. • Deep cleaning uses more ink, so try the Clean Printhead option first to save ink. • If the ink levels are too low, then you must replace the ink cartridges before you may need to clean the printhead nozzles...
Quick Reference
Page 21
... software Launching the Print dialog Use the Print dialog to PDF. • Adjust settings for the printer. • Order supplies. • Maintain ink cartridges. • Register the printer. • Contact technical support. • Access the User's Guide. Speed up the wireless printer on a wireless ...Printer software Use the LexmarkTM Printer Home (referred to as Printer Home) Lexmark Phone Book (referred to as Phone Book) Abbyy Sprint OCR Lexmark Wireless Setup Utility (referred to as Wireless Setup Utility) Lexmark Tools for Office (referred to as the following: • Select the...
... software Launching the Print dialog Use the Print dialog to PDF. • Adjust settings for the printer. • Order supplies. • Maintain ink cartridges. • Register the printer. • Contact technical support. • Access the User's Guide. Speed up the wireless printer on a wireless ...Printer software Use the LexmarkTM Printer Home (referred to as Printer Home) Lexmark Phone Book (referred to as Phone Book) Abbyy Sprint OCR Lexmark Wireless Setup Utility (referred to as Wireless Setup Utility) Lexmark Tools for Office (referred to as the following: • Select the...

Quick Reference
Page 45
If Troubleshooting does not solve your problem Visit our Web site at http://support.lexmark.com to find the following: • Knowledgebase articles with the latest information and troubleshooting for your printer • Live online customer support • Contact ... Check the printer for error messages, and resolve any errors. • Check for paper jam messages, and clear any jams. • Check the ink cartridges, and install new cartridges if necessary. • Turn the printer off the printer. Note: Make sure the printer is not in the printers folder or as a printer option...
If Troubleshooting does not solve your problem Visit our Web site at http://support.lexmark.com to find the following: • Knowledgebase articles with the latest information and troubleshooting for your printer • Live online customer support • Contact ... Check the printer for error messages, and resolve any errors. • Check for paper jam messages, and clear any jams. • Check the ink cartridges, and install new cartridges if necessary. • Turn the printer off the printer. Note: Make sure the printer is not in the printers folder or as a printer option...
Quick Reference
Page 46
...in the list, then try one or more of the printhead. 3 Close the printer. From the list of the following : MAKE SURE THE INK CARTRIDGES ARE INSERTED CORRECTLY 1 Turn the printer on the computer. RECONNECT THE PRINTER POWER SUPPLY 1 Turn off the printer. Note: If you continue ...to Macintosh users only. 1 With a document open the printer. 2 Make sure the cartridges are inserted correctly. If the cable is wirelessly connected, see the Wireless troubleshooting section. The USB port is marked with . If your printer, and ...
...in the list, then try one or more of the printhead. 3 Close the printer. From the list of the following : MAKE SURE THE INK CARTRIDGES ARE INSERTED CORRECTLY 1 Turn the printer on the computer. RECONNECT THE PRINTER POWER SUPPLY 1 Turn off the printer. Note: If you continue ...to Macintosh users only. 1 With a document open the printer. 2 Make sure the cartridges are inserted correctly. If the cable is wirelessly connected, see the Wireless troubleshooting section. The USB port is marked with . If your printer, and ...
Quick Reference
Page 47
...checklist does not solve the problem, then try one or more of the following: REPLACE THE INK CARTRIDGES For more information, see "Replacing ink cartridges" on the printer. Note: Make sure that the cartridges click firmly into the wall outlet. 4 Turn on the computer. Printer is busy or ...Unplug the power cord from the print queue If you continue to print, then the computer and printer may not be caused by improperly installed ink cartridges. Troubleshooting Printer is marked with . CLEAN THE PRINTHEAD NOZZLES 1 Load plain, unmarked paper. 2 From the home screen, navigate to turn...
...checklist does not solve the problem, then try one or more of the following: REPLACE THE INK CARTRIDGES For more information, see "Replacing ink cartridges" on the printer. Note: Make sure that the cartridges click firmly into the wall outlet. 4 Turn on the computer. Printer is busy or ...Unplug the power cord from the print queue If you continue to print, then the computer and printer may not be caused by improperly installed ink cartridges. Troubleshooting Printer is marked with . CLEAN THE PRINTHEAD NOZZLES 1 Load plain, unmarked paper. 2 From the home screen, navigate to turn...
Quick Reference
Page 55
... wireless network 50 cannot print through USB 47 cannot receive faxes 49 cannot run fax software 49 cannot send faxes 48 cartridges, ink ordering 17 checking an unresponsive printer 45 checking the dial tone 37 checklist before you troubleshoot 45 fax troubleshooting 48 cleaning...13 incorrect language appears on display 45 information finding 5 information needed for setting up printer on wireless network 42 ink conserving 5 ink cartridge access area location 12 ink cartridges installing 17 ordering 17 removing 17 replacing 17 inserting a memory card or flash drive 15 installation screen did not...
... wireless network 50 cannot print through USB 47 cannot receive faxes 49 cannot run fax software 49 cannot send faxes 48 cartridges, ink ordering 17 checking an unresponsive printer 45 checking the dial tone 37 checklist before you troubleshoot 45 fax troubleshooting 48 cleaning...13 incorrect language appears on display 45 information finding 5 information needed for setting up printer on wireless network 42 ink conserving 5 ink cartridge access area location 12 ink cartridges installing 17 ordering 17 removing 17 replacing 17 inserting a memory card or flash drive 15 installation screen did not...

Quick Reference
Page 56
...address of computer 50 finding IP address of computer (Mac) 50 finding IP address of printer 50 IP addresses 50 notices 2, 54 O ordering ink cartridges 17 P page does not print 46 paper conserving 5 paper exit tray location 12 paper stop location 12 paper tray (Tray 1) location 12 ... finding 5 Push Button Configuration method using 43 R receiving faxes Auto Answer setting 38, 41 automatically 41 manually 41 tips 41 recycling 5 replacing ink cartridges 17 RJ‑11 adapter 35 S safety information 2, 30 scan job canceling 28 scanner unit location 12 scanning creating a PDF from scan 28...
...address of computer 50 finding IP address of computer (Mac) 50 finding IP address of printer 50 IP addresses 50 notices 2, 54 O ordering ink cartridges 17 P page does not print 46 paper conserving 5 paper exit tray location 12 paper stop location 12 paper tray (Tray 1) location 12 ... finding 5 Push Button Configuration method using 43 R receiving faxes Auto Answer setting 38, 41 automatically 41 manually 41 tips 41 recycling 5 replacing ink cartridges 17 RJ‑11 adapter 35 S safety information 2, 30 scan job canceling 28 scanner unit location 12 scanning creating a PDF from scan 28...
User's Guide
Page 2
... 7 Finding information about the printer...8 Understanding the parts of the printer 10 Ordering and replacing supplies 13 Ordering ink cartridges...13 Using genuine Lexmark ink cartridges...14 Replacing ink cartridges...14 Ordering paper and other supplies...15 Recycling Lexmark products...16 Using the printer control panel buttons and menus 17 Using the printer control panel...17 Understanding the...
... 7 Finding information about the printer...8 Understanding the parts of the printer 10 Ordering and replacing supplies 13 Ordering ink cartridges...13 Using genuine Lexmark ink cartridges...14 Replacing ink cartridges...14 Ordering paper and other supplies...15 Recycling Lexmark products...16 Using the printer control panel buttons and menus 17 Using the printer control panel...17 Understanding the...
User's Guide
Page 4
... network management tasks 106 Networking FAQ...112 Using SmartSolutions 125 What are SmartSolutions?...125 Creating and customizing printer solutions 125 Maintaining the printer 127 Maintaining ink cartridges...127 Cleaning the exterior of the printer...128 Cleaning the scanner glass...129 Cleaning the touch screen...129 Moving the printer to another location 130
... network management tasks 106 Networking FAQ...112 Using SmartSolutions 125 What are SmartSolutions?...125 Creating and customizing printer solutions 125 Maintaining the printer 127 Maintaining ink cartridges...127 Cleaning the exterior of the printer...128 Cleaning the scanner glass...129 Cleaning the touch screen...129 Moving the printer to another location 130
User's Guide
Page 8
...;paid bag. • Recycle the product packaging. • Recycle your printer 8 Conserving ink • Use Quick Print or Draft Mode. To return an ink cartridge, go to www.lexmark.com/recycle, and then follow the instructions to print documents using less ink than normal and are ideal for printing documents that are you print more...
...;paid bag. • Recycle the product packaging. • Recycle your printer 8 Conserving ink • Use Quick Print or Draft Mode. To return an ink cartridge, go to www.lexmark.com/recycle, and then follow the instructions to print documents using less ink than normal and are ideal for printing documents that are you print more...
User's Guide
Page 12
... your printer 12 10 11 13 12 15 EXT LINE EXT LINE 19 18 16 17 Use the To 10 Scanner unit • Access the ink cartridges and printhead. • Remove paper jams. 11 Ink cartridge access area Install, replace, or remove ink cartridges. 12 Ethernet port Connect your country or region.
... your printer 12 10 11 13 12 15 EXT LINE EXT LINE 19 18 16 17 Use the To 10 Scanner unit • Access the ink cartridges and printhead. • Remove paper jams. 11 Ink cartridge access area Install, replace, or remove ink cartridges. 12 Ethernet port Connect your country or region.
User's Guide
Page 13
... of standard ink cartridges and high‑yield ink cartridges, depending on your needs. • Check the yield rate on the ink cartridge box, or visit www.lexmark.com/yields. • For best results, use only Lexmark ink cartridges. • The cartridges can be used for a single use only. Ordering and replacing supplies 13 Ordering and replacing supplies Ordering ink cartridges Lexmark Pro910 Series...
... of standard ink cartridges and high‑yield ink cartridges, depending on your needs. • Check the yield rate on the ink cartridge box, or visit www.lexmark.com/yields. • For best results, use only Lexmark ink cartridges. • The cartridges can be used for a single use only. Ordering and replacing supplies 13 Ordering and replacing supplies Ordering ink cartridges Lexmark Pro910 Series...
User's Guide
Page 14
... a new ink cartridge or cartridges before you use only genuine Lexmark ink cartridges. Note: The printhead moves to the cartridge installation position. 3 Press the release tab, and then remove the used ink cartridge or cartridges. Installing ink cartridges 1 Remove the ink cartridge from the pack, and then remove the protective cap from their flat side. • Remove ink cartridges from the ink cartridge. Using genuine Lexmark ink cartridges Lexmark printers, ink cartridges, and photo...
... a new ink cartridge or cartridges before you use only genuine Lexmark ink cartridges. Note: The printhead moves to the cartridge installation position. 3 Press the release tab, and then remove the used ink cartridge or cartridges. Installing ink cartridges 1 Remove the ink cartridge from the pack, and then remove the protective cap from their flat side. • Remove ink cartridges from the ink cartridge. Using genuine Lexmark ink cartridges Lexmark printers, ink cartridges, and photo...


