Quick Reference
Page 2
..., and you agree to return them only to Lexmark for signs of such problems. Remove the power cord from the electrical outlet before inspecting it. Do not pinch the power cord between objects such as the fax feature, power cord, or telephone, during a lightning...or cabling connections, such as furniture and walls. This patented printer is preaddressed. Do not place or use the fax feature during a lightning storm. Lexmark-branded cartridges are properly handled with this product near the product and easily accessible. CAUTION-POTENTIAL INJURY: To reduce risk...
..., and you agree to return them only to Lexmark for signs of such problems. Remove the power cord from the electrical outlet before inspecting it. Do not pinch the power cord between objects such as the fax feature, power cord, or telephone, during a lightning...or cabling connections, such as furniture and walls. This patented printer is preaddressed. Do not place or use the fax feature during a lightning storm. Lexmark-branded cartridges are properly handled with this product near the product and easily accessible. CAUTION-POTENTIAL INJURY: To reduce risk...
Quick Reference
Page 3
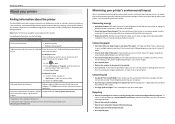
... software 28 Scanning to a PDF...28 Canceling scan jobs...28 E-mailing 29 Sending e-mail...29 Canceling an e‑mail...29 Setting up the printer to fax 30 Step 1: Connect the printer to the telephone line 30 Step 2: Check the dial tone 37 Step 3: Set your... fax name and fax number 38 Step 4: Set the printer to receive faxes automatically or manually 38 Step 5: Set the number of rings 38 Step 6: Create a contact list 38 Faxing 40 Sending faxes...40 Receiving faxes...41 Wireless networking 42 Information you will need to set...
... software 28 Scanning to a PDF...28 Canceling scan jobs...28 E-mailing 29 Sending e-mail...29 Canceling an e‑mail...29 Setting up the printer to fax 30 Step 1: Connect the printer to the telephone line 30 Step 2: Check the dial tone 37 Step 3: Set your... fax name and fax number 38 Step 4: Set the printer to receive faxes automatically or manually 38 Step 5: Set the number of rings 38 Step 6: Create a contact list 38 Faxing 40 Sending faxes...40 Receiving faxes...41 Wireless networking 42 Information you will need to set...
Quick Reference
Page 5
... on both sides of the paper manually or automatically (depending on troubleshooting printer setup issues as well as solving basic networking and faxing problems. Note: Some functions are continually improving our printers to reduce their environmental impact. For Macintosh users 1 From the Finder,... Pages per Sheet feature allows you to Sleep mode after the printer has been idle for reuse or recycling through the Lexmark Cartridge Collection Program. Duplexing lets you looking for presentation. It also includes information on your printer's environmental impact even further...
... on both sides of the paper manually or automatically (depending on troubleshooting printer setup issues as well as solving basic networking and faxing problems. Note: Some functions are continually improving our printers to reduce their environmental impact. For Macintosh users 1 From the Finder,... Pages per Sheet feature allows you to Sleep mode after the printer has been idle for reuse or recycling through the Lexmark Cartridge Collection Program. Duplexing lets you looking for presentation. It also includes information on your printer's environmental impact even further...
Quick Reference
Page 6
... inactivity. 6 Setting up to 1200 dpi optical resolution. • Fax-Do standalone black and color faxing at 33.6Kbps modem speed. Printer models The installation software CD that came with your printer works for the following printer models: • Lexmark Pro912 • Lexmark Pro915 • Lexmark Pro919 Printer features Depending on the model, your printer comes...
... inactivity. 6 Setting up to 1200 dpi optical resolution. • Fax-Do standalone black and color faxing at 33.6Kbps modem speed. Printer models The installation software CD that came with your printer works for the following printer models: • Lexmark Pro912 • Lexmark Pro915 • Lexmark Pro919 Printer features Depending on the model, your printer comes...
Quick Reference
Page 10
... software installation. Otherwise, touch Set Up Later, and then go to access all your fax number for the printer, and then touch Accept. Yes Setup Later 19 Enter your sent faxes. Lexmark Pro910 Series Installation Configure Advanced Features You can I don't do this now? Get my... printer ready to scan directly to my computer Configure Lexmark SmartSolutions and standalone email Get my printer ready to the next...
... software installation. Otherwise, touch Set Up Later, and then go to access all your fax number for the printer, and then touch Accept. Yes Setup Later 19 Enter your sent faxes. Lexmark Pro910 Series Installation Configure Advanced Features You can I don't do this now? Get my... printer ready to scan directly to my computer Configure Lexmark SmartSolutions and standalone email Get my printer ready to the next...
Quick Reference
Page 12
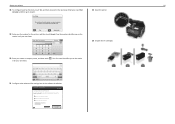
... port. 15 LINE port Connect the printer to an active telephone line (through a standard wall jack, DSL filter, or VoIP adapter) to send and receive faxes. 16 Power supply with port Connect the printer to a power source. 17 Duplex unit • Print on the scanner glass. 2 ADF output tray Hold ...camera or a flash drive to the printer. 5 Paper exit tray Hold paper as it exits. 8 Printer control panel Operate the printer. 9 ADF Scan, copy, or fax multiple‑page letter‑, legal‑, and A4‑size documents. 12 10 11 13 12 15 EXT LINE EXT LINE 19 18 16...
... port. 15 LINE port Connect the printer to an active telephone line (through a standard wall jack, DSL filter, or VoIP adapter) to send and receive faxes. 16 Power supply with port Connect the printer to a power source. 17 Duplex unit • Print on the scanner glass. 2 ADF output tray Hold ...camera or a flash drive to the printer. 5 Paper exit tray Hold paper as it exits. 8 Printer control panel Operate the printer. 9 ADF Scan, copy, or fax multiple‑page letter‑, legal‑, and A4‑size documents. 12 10 11 13 12 15 EXT LINE EXT LINE 19 18 16...
Quick Reference
Page 13
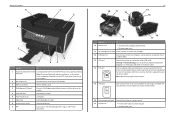
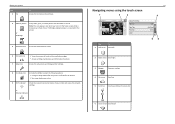
...to switch to a higher one menu level to Sleep mode. Return to change the printer settings. in select printer models. 1 2 3 4 5 A Copy Scan Fax Memory Smart Device Solutions Use 1 Copy A 2 Scan 9 87 6 To Access the copy menu and make copies. About your printer Use the 18 Printhead access area... 19 Jam clearance cover To Install the printhead. Use the home screen selections to initiate an action, such as copying or faxing, or to the home screen. Note: When the printer is selected. Using the printer control panel Note: The icons appear when they...
...to switch to a higher one menu level to Sleep mode. Return to change the printer settings. in select printer models. 1 2 3 4 5 A Copy Scan Fax Memory Smart Device Solutions Use 1 Copy A 2 Scan 9 87 6 To Access the copy menu and make copies. About your printer Use the 18 Printhead access area... 19 Jam clearance cover To Install the printhead. Use the home screen selections to initiate an action, such as copying or faxing, or to the home screen. Note: When the printer is selected. Using the printer control panel Note: The icons appear when they...
Quick Reference
Page 14
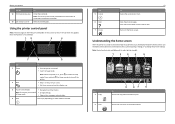
...: • Change to low. 9 Wi‑Fi indicator Check the network connection status of your printer and access the network settings. About your printer Use 3 Fax To Access the fax menu and send faxes. 4 Memory Device View, select, print, or attach photos and documents to the printer.
...: • Change to low. 9 Wi‑Fi indicator Check the network connection status of your printer and access the network settings. About your printer Use 3 Fax To Access the fax menu and send faxes. 4 Memory Device View, select, print, or attach photos and documents to the printer.
Quick Reference
Page 21
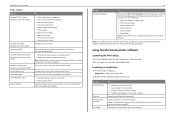
... software Use the LexmarkTM Printer Home (referred to as Printer Home) Lexmark Phone Book (referred to as Phone Book) Abbyy Sprint OCR Lexmark Wireless Setup Utility (referred to as Wireless Setup Utility) Lexmark Tools for Office (referred to as Tools for Office) Printer Setup ... not come with a document open , choose File > Print. Use the Printer Settings Shortcuts Wireless Setup Assistant Uninstaller To • Customize settings for fax jobs. • Create and edit the Contacts list. • Configure e‑mail connectivity settings. • Configure the language, country, date, and...
... software Use the LexmarkTM Printer Home (referred to as Printer Home) Lexmark Phone Book (referred to as Phone Book) Abbyy Sprint OCR Lexmark Wireless Setup Utility (referred to as Wireless Setup Utility) Lexmark Tools for Office (referred to as Tools for Office) Printer Setup ... not come with a document open , choose File > Print. Use the Printer Settings Shortcuts Wireless Setup Assistant Uninstaller To • Customize settings for fax jobs. • Create and edit the Contacts list. • Configure e‑mail connectivity settings. • Configure the language, country, date, and...

Quick Reference
Page 30
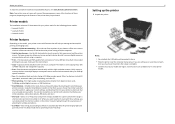
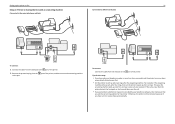
...any number of rings that is applicable to the port of the printer. Scenario 1: Standard telephone line Setup 1: Printer is connected to a dedicated fax line EXT LINE To connect: Connect the cable from the wall jack to your telephone service. CAUTION-POTENTIAL INJURY: To reduce risk of fire, ...use the fax feature during a lightning storm. 30 Step 1: Connect the printer to the telephone line Check the scenarios below and follow the setup that you ...
...any number of rings that is applicable to the port of the printer. Scenario 1: Standard telephone line Setup 1: Printer is connected to a dedicated fax line EXT LINE To connect: Connect the cable from the wall jack to your telephone service. CAUTION-POTENTIAL INJURY: To reduce risk of fire, ...use the fax feature during a lightning storm. 30 Step 1: Connect the printer to the telephone line Check the scenarios below and follow the setup that you ...
Quick Reference
Page 31
...four rings, then set the correct ring pattern for this setup: • If you have set the printer to receive faxes automatically (Auto Answer On). • Set the printer to receive faxes automatically. If the call . • If you set the printer to the port of the printer. Tips for ..., then make sure that you subscribe to a distinctive ring service provided by your voice calls are received. Otherwise, the printer will not receive faxes even if you have only one telephone number on the line and takes over the call is sharing the line with an answering machine Connected...
...four rings, then set the correct ring pattern for this setup: • If you have set the printer to receive faxes automatically (Auto Answer On). • Set the printer to receive faxes automatically. If the call . • If you set the printer to the port of the printer. Tips for ..., then make sure that you subscribe to a distinctive ring service provided by your voice calls are received. Otherwise, the printer will not receive faxes even if you have only one telephone number on the line and takes over the call is sharing the line with an answering machine Connected...
Quick Reference
Page 32
... the telephone to the Tips for the printer, and slow Internet connection on your regular telephone line into two channels: voice and Internet. Telephone and fax signals travel through the voice channel, and Internet signals pass through the other channel. Setting up the printer to... a quality connection, you subscribe to install a DSL filter for the printer. If you have only one telephone number on the telephone, failed and poor quality faxes for this setup: • This setup works best if you need to a distinctive ring service. Otherwise, the printer will not receive...
... the telephone to the Tips for the printer, and slow Internet connection on your regular telephone line into two channels: voice and Internet. Telephone and fax signals travel through the voice channel, and Internet signals pass through the other channel. Setting up the printer to... a quality connection, you subscribe to install a DSL filter for the printer. If you have only one telephone number on the telephone, failed and poor quality faxes for this setup: • This setup works best if you need to a distinctive ring service. Otherwise, the printer will not receive...
Quick Reference
Page 33
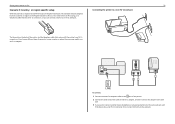
Setting up the printer to fax To install a filter for the printer: 1 Connect the line port of the DSL filter to the wall jack. 2 Connect a telephone cable from the port. port ... printer into the splitter and then listen for your VoIP provider if you are using a computer for a dial tone. The port labeled Phone Line 2 or Fax Port is active. • If you use a phone splitter. You may need two phone ports for a dial tone. To connect: 1 Connect one end of a telephone...
Setting up the printer to fax To install a filter for the printer: 1 Connect the line port of the DSL filter to the wall jack. 2 Connect a telephone cable from the port. port ... printer into the splitter and then listen for your VoIP provider if you are using a computer for a dial tone. The port labeled Phone Line 2 or Fax Port is active. • If you use a phone splitter. You may need two phone ports for a dial tone. To connect: 1 Connect one end of a telephone...
Quick Reference
Page 34
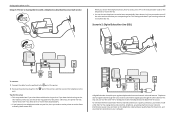
... the wall jack to the port of the printer, and then connect the telephone to the Tips for a dial tone. Setting up the printer to fax Scenario 4: Digital telephone service through a cable provider Setup 1: Printer is connected directly to a cable modem Follow this setup if your cable provider activated the wall... you do not have to plug your devices into the second phone port. cable modem is not always active. The port labeled Phone Line 2 or Fax Port is installed elsewhere in your house so that the phone port on the cable modem. You may need two phone ports for a dial tone...
... the wall jack to the port of the printer, and then connect the telephone to the Tips for a dial tone. Setting up the printer to fax Scenario 4: Digital telephone service through a cable provider Setup 1: Printer is connected directly to a cable modem Follow this setup if your cable provider activated the wall... you do not have to plug your devices into the second phone port. cable modem is not always active. The port labeled Phone Line 2 or Fax Port is installed elsewhere in your house so that the phone port on the cable modem. You may need two phone ports for a dial tone...
Quick Reference
Page 35
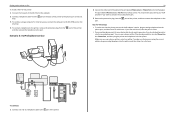
Setting up the printer to fax 35 Scenario 5: Country‑ or region‑specific setup Different countries or regions have different types of the printer and the telephone cable that has ... of the cable to the RJ‑11 adapter, and then connect the adapter to a non‑RJ‑11 wall jack EXT LINE The fax ports on the back of telephone wall jacks. If you want to connect another device (telephone or answering machine) to the same wall jack, and...
Setting up the printer to fax 35 Scenario 5: Country‑ or region‑specific setup Different countries or regions have different types of the printer and the telephone cable that has ... of the cable to the RJ‑11 adapter, and then connect the adapter to a non‑RJ‑11 wall jack EXT LINE The fax ports on the back of telephone wall jacks. If you want to connect another device (telephone or answering machine) to the same wall jack, and...

Quick Reference
Page 36
Austria Belgium Denmark Germany Ireland Italy Portugal Spain Sweden To connect: Connect the cable from the port of the printer. Setting up the printer to fax Notes: • Do not remove the wrap plug from the port of the printer. • The printer may not come with an RJ-11 adapter ...
Austria Belgium Denmark Germany Ireland Italy Portugal Spain Sweden To connect: Connect the cable from the port of the printer. Setting up the printer to fax Notes: • Do not remove the wrap plug from the port of the printer. • The printer may not come with an RJ-11 adapter ...
Quick Reference
Page 37
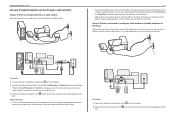
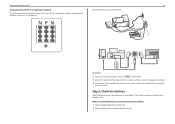
... jack are for telephones. The F port is properly connected to the same wall jack, then connect the devices as shown. Setting up the printer to fax 37 Connecting the printer to any of the N ports. The N ports are working or if the printer is for...
... jack are for telephones. The F port is properly connected to the same wall jack, then connect the devices as shown. Setting up the printer to fax 37 Connecting the printer to any of the N ports. The N ports are working or if the printer is for...

Quick Reference
Page 38
...incorrectly, then the printer rings, but it . 38 Step 5: Set the number of the contact. Enter the entry number before entering the contact name and fax number of rings If you want . 1 From the printer control panel, navigate to a telephone line through the port on page 48. Make sure the printer... patterns let you know which telephone number was dialed and which device you enter this information. Note: In some countries, you to have a dedicated fax telephone line), and the time and date on the 2 Select the number of rings that you should use to answer the call. Setting up the...
...incorrectly, then the printer rings, but it . 38 Step 5: Set the number of the contact. Enter the entry number before entering the contact name and fax number of rings If you want . 1 From the printer control panel, navigate to a telephone line through the port on page 48. Make sure the printer... patterns let you know which telephone number was dialed and which device you enter this information. Note: In some countries, you to have a dedicated fax telephone line), and the time and date on the 2 Select the number of rings that you should use to answer the call. Setting up the...

Quick Reference
Page 39
... contact list The Contacts tab of the Printer Setup Utility opens. For more information on the fax software, click Help or . Setting up the printer to fax 39 Using the fax software If you are connecting the printer to : Printer Home > select your printer folder 2 Double‑click Printer... Settings. 3 Click the Contacts tab. • To add contacts, click the Individuals tab. • To add fax groups, click the Groups tab. For Windows users 1 Click or Start. 2 Click All Programs or Programs, and then select the printer program folder from...
... contact list The Contacts tab of the Printer Setup Utility opens. For more information on the fax software, click Help or . Setting up the printer to fax 39 Using the fax software If you are connecting the printer to : Printer Home > select your printer folder 2 Double‑click Printer... Settings. 3 Click the Contacts tab. • To add contacts, click the Individuals tab. • To add fax groups, click the Groups tab. For Windows users 1 Click or Start. 2 Click All Programs or Programs, and then select the printer program folder from...
Quick Reference
Page 40
... and then touch Add a Number. Faxing Faxing Note: The fax function is available only in the "Fax number(s)" field. Sending faxes using the printer control panel 1 Load an original document. 2 Touch Fax. 3 Send the fax: To send a fax to a single recipient: a Enter a fax number, or touch Address Book or ... document open , choose File > Print. 2 From the Printer pop‑up this step until you add a recipient. b Touch . b Enter a fax number, or touch Address Book or History to import a contact. For Macintosh users 1 With a document open , click File > Print. 2 Make sure ...
... and then touch Add a Number. Faxing Faxing Note: The fax function is available only in the "Fax number(s)" field. Sending faxes using the printer control panel 1 Load an original document. 2 Touch Fax. 3 Send the fax: To send a fax to a single recipient: a Enter a fax number, or touch Address Book or ... document open , choose File > Print. 2 From the Printer pop‑up this step until you add a recipient. b Touch . b Enter a fax number, or touch Address Book or History to import a contact. For Macintosh users 1 With a document open , click File > Print. 2 Make sure ...


