
OptraImage 443/433 Setup Guide (1.8 MB)
Page 2
... Optra are periodically made at DFARS 252.227-7013 and in applicable FAR provisions: Lexmark International, Inc., Lexington, KY 40550. Other trademarks are trademarks of printer commands (language) and functions included in its software products. In the United Kingdom ... purchase additional copies of their respective owners. © Copyright 1999, 2000 Lexmark International, Inc. This means the printer recognizes PostScript Level 2 or PostScript 3 commands used instead. OptraImage and MarkTrack are the property of publications related to be incorporated in later ...
... Optra are periodically made at DFARS 252.227-7013 and in applicable FAR provisions: Lexmark International, Inc., Lexington, KY 40550. Other trademarks are trademarks of printer commands (language) and functions included in its software products. In the United Kingdom ... purchase additional copies of their respective owners. © Copyright 1999, 2000 Lexmark International, Inc. This means the printer recognizes PostScript Level 2 or PostScript 3 commands used instead. OptraImage and MarkTrack are the property of publications related to be incorporated in later ...
OptraImage 443/433 Setup Guide (1.8 MB)
Page 3
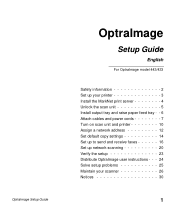
OptraImage Setup Guide OptraImage Setup Guide English For OptraImage model 443/433 Safety information 2 Set up your printer 3 Install the MarkNet print server 4 Unlock the scan unit 5 Install output tray and raise paper feed tray - - 6 Attach cables and power cords 7 Turn on scan unit and printer 10 Assign a network address 12 Set default copy settings 14 Set up to send and receive faxes 16 Set up network scanning 20 Verify the setup 23 Distribute OptraImage user instructions - - - 24 Solve setup problems 25 Maintain your scanner 26 Notices 30 1
OptraImage Setup Guide OptraImage Setup Guide English For OptraImage model 443/433 Safety information 2 Set up your printer 3 Install the MarkNet print server 4 Unlock the scan unit 5 Install output tray and raise paper feed tray - - 6 Attach cables and power cords 7 Turn on scan unit and printer 10 Assign a network address 12 Set default copy settings 14 Set up to send and receive faxes 16 Set up network scanning 20 Verify the setup 23 Distribute OptraImage user instructions - - - 24 Solve setup problems 25 Maintain your scanner 26 Notices 30 1

OptraImage 443/433 Setup Guide (1.8 MB)
Page 4
...including the following: • If your product is NOT marked with the use of specific Lexmark components. Lexmark is not responsible for damages resulting from the use of some parts may not always be ...connected to a professional service person. • This product is installed, you must be obvious. The safety features of other than those described in wet locations. • Before attempting to access the printer...port of the MarkNet print server. 2 OptraImage Setup Guide
...including the following: • If your product is NOT marked with the use of specific Lexmark components. Lexmark is not responsible for damages resulting from the use of some parts may not always be ...connected to a professional service person. • This product is installed, you must be obvious. The safety features of other than those described in wet locations. • Before attempting to access the printer...port of the MarkNet print server. 2 OptraImage Setup Guide

OptraImage 443/433 Setup Guide (1.8 MB)
Page 5
...grounded or fax/phone outlets and turned on it during OptraImage setup, unplug all power cords, fax/phone cables, and network cables from an outlet. If you use the latest version. 1 Set up the printer according to use the information contained on . Step 1:... purchased. When installing printer drivers, make sure you attach the printer to a workstation, printer, MarkNet print server, scan unit, and any other peripherals powered from their electrical outlets. CAUTION: Turn All Power Off Before and during the OptraImage setup. 2 Verify the printer hardware setup by printing...
...grounded or fax/phone outlets and turned on it during OptraImage setup, unplug all power cords, fax/phone cables, and network cables from an outlet. If you use the latest version. 1 Set up the printer according to use the information contained on . Step 1:... purchased. When installing printer drivers, make sure you attach the printer to a workstation, printer, MarkNet print server, scan unit, and any other peripherals powered from their electrical outlets. CAUTION: Turn All Power Off Before and during the OptraImage setup. 2 Verify the printer hardware setup by printing...

OptraImage 443/433 Setup Guide (1.8 MB)
Page 6
... Install the MarkNet N2501e or N2401e print server in your printer setup documentation. cable) 11 cable) MarkNet N2401e print server ports SCSI port (OptraImage scan unit attaches here) Ethernet 10/100 port (uses RJ-45 cable) 4 OptraImage Setup Guide See "Safety information" on page 2 for ... the wall outlet. Make sure your printer shipped with the MarkNet N2501e or N2401e print server already installed, skip to your printer, make sure the fax/phone cable is unplugged. MarkNet N2501e print server ports SCSI port (OptraImage scan unit attaches here) Ethernet 10/...
... Install the MarkNet N2501e or N2401e print server in your printer setup documentation. cable) 11 cable) MarkNet N2401e print server ports SCSI port (OptraImage scan unit attaches here) Ethernet 10/100 port (uses RJ-45 cable) 4 OptraImage Setup Guide See "Safety information" on page 2 for ... the wall outlet. Make sure your printer shipped with the MarkNet N2501e or N2401e print server already installed, skip to your printer, make sure the fax/phone cable is unplugged. MarkNet N2501e print server ports SCSI port (OptraImage scan unit attaches here) Ethernet 10/...

OptraImage 443/433 Setup Guide (1.8 MB)
Page 9
It is important to the OptraImage hardware, but do not plug the power cords into electrical outlets. Step 5: Attach cables and power cords Attach all the cables and power cords to turn the power on page 10 for detailed information. See "Turn on scan unit and printer" on in the correct sequence. Printer power cord OptraImage power adapter On/off switch OptraImage Y line cord SCSI cable OptraImage Setup Guide 7
It is important to the OptraImage hardware, but do not plug the power cords into electrical outlets. Step 5: Attach cables and power cords Attach all the cables and power cords to turn the power on page 10 for detailed information. See "Turn on scan unit and printer" on in the correct sequence. Printer power cord OptraImage power adapter On/off switch OptraImage Y line cord SCSI cable OptraImage Setup Guide 7

OptraImage 443/433 Setup Guide (1.8 MB)
Page 10
Correct SCSI switch settings SCSI cable You received one SCSI cable with your OptraImage purchase.The SCSI cable connects your scan unit and printer to work. Make sure the SCSI switch settings on the back of the scan unit are in this step, but do not turn the power on yet. SCSI switch settings Your scan unit contains dip switches that must be in the correct position in order for the scan unit to each other. Connect the SCSI cable in the correct position 8 OptraImage Setup Guide
Correct SCSI switch settings SCSI cable You received one SCSI cable with your OptraImage purchase.The SCSI cable connects your scan unit and printer to work. Make sure the SCSI switch settings on the back of the scan unit are in this step, but do not turn the power on yet. SCSI switch settings Your scan unit contains dip switches that must be in the correct position in order for the scan unit to each other. Connect the SCSI cable in the correct position 8 OptraImage Setup Guide

OptraImage 443/433 Setup Guide (1.8 MB)
Page 11
... back of the German wall outlet. If you must be able to send network print jobs to your OptraImage printer, plug the Ethernet cable into the outlet yet. Back of printer SCSI cable Network cable If you want to be the only device attached to the telephone fax line cable...telephone cable into the Ethernet network port on the MarkNet N2501e print server installed in your printer. Telephone fax line cable (RJ-11) Ethernet network cable Back of scanner Power adapter cable SCSI cable OptraImage Setup Guide 9 The adapter is designed only for use in your country, attach the...
... back of the German wall outlet. If you must be able to send network print jobs to your OptraImage printer, plug the Ethernet cable into the outlet yet. Back of printer SCSI cable Network cable If you want to be the only device attached to the telephone fax line cable...telephone cable into the Ethernet network port on the MarkNet N2501e print server installed in your printer. Telephone fax line cable (RJ-11) Ethernet network cable Back of scanner Power adapter cable SCSI cable OptraImage Setup Guide 9 The adapter is designed only for use in your country, attach the...

OptraImage 443/433 Setup Guide (1.8 MB)
Page 12
... grounded outlet and turn off switch 1 If you are ready to your printer, you disconnected the Ethernet network cable from the control panel. Do not turn on the left. The Please Set Date/Time prompt indicates that you restart OptraImage, a Please Wait message displays on , there is a short wait cycle while the...
... grounded outlet and turn off switch 1 If you are ready to your printer, you disconnected the Ethernet network cable from the control panel. Do not turn on the left. The Please Set Date/Time prompt indicates that you restart OptraImage, a Please Wait message displays on , there is a short wait cycle while the...

OptraImage 443/433 Setup Guide (1.8 MB)
Page 14
...gateway to find the address, go to change the address. If the network setup page doesn't contain the information you must browse to use the printer operator panel. Step 7: Assign a network address Print a network setup page You cannot manually configure network scanning using DHCP, the proper address values ...information on the network. Click View Documentation and look on the Drivers, MarkVision, and Utilities CD. Press Menu> repeatedly until you find the OptraImage, you think it is using the OptraImage control panel. Use the printer operator panel to do so.
...gateway to find the address, go to change the address. If the network setup page doesn't contain the information you must browse to use the printer operator panel. Step 7: Assign a network address Print a network setup page You cannot manually configure network scanning using DHCP, the proper address values ...information on the network. Click View Documentation and look on the Drivers, MarkVision, and Utilities CD. Press Menu> repeatedly until you find the OptraImage, you think it is using the OptraImage control panel. Use the printer operator panel to do so.
OptraImage 443/433 Setup Guide (1.8 MB)
Page 16
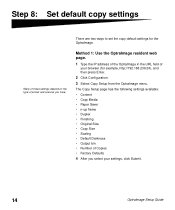
Step 8: Set default copy settings Many of these settings depend on the type of your settings, click Submit. 14 OptraImage Setup Guide The Copy Setup page has the following settings available: • Content • Copy Media • Paper Saver • n-up frame •...copy default settings for example, http://192.168.236.24), and then press Enter. 2 Click Configuration. 3 Select Copy Setup from the OptraImage menu. Method 1: Use the OptraImage resident web page. 1 Type the IP address of the OptraImage in the URL field of printer and scanner you select your browser (for the...
Step 8: Set default copy settings Many of these settings depend on the type of your settings, click Submit. 14 OptraImage Setup Guide The Copy Setup page has the following settings available: • Content • Copy Media • Paper Saver • n-up frame •...copy default settings for example, http://192.168.236.24), and then press Enter. 2 Click Configuration. 3 Select Copy Setup from the OptraImage menu. Method 1: Use the OptraImage resident web page. 1 Type the IP address of the OptraImage in the URL field of printer and scanner you select your browser (for the...
OptraImage 443/433 Setup Guide (1.8 MB)
Page 18
... Protocol (NTP) time, the current date and time are prompted for More Fax Configuration. If you must use the OptraImage control panel to use your browser to get the correct time. During printer power up, if the MarkNet print server is sent) • Station Name (identification of the business, other entity, or...
... Protocol (NTP) time, the current date and time are prompted for More Fax Configuration. If you must use the OptraImage control panel to use your browser to get the correct time. During printer power up, if the MarkNet print server is sent) • Station Name (identification of the business, other entity, or...

OptraImage 443/433 Setup Guide (1.8 MB)
Page 19
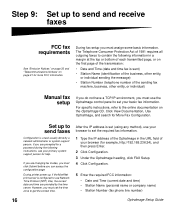
... browser, and then press Enter. 2 Click Configuration. 3 Under the OptraImage heading, click FAX Setup. 4 Click Configuration. 5 Set your printer. After installing MarkVision, you can do an IP search to find the OptraImage printer containing the MarkNet N2501e or N2401e print server and go to the Fax...can access the configuration page. Use MarkVision to an output bin on your options for installing MarkVision is a printer management utility on . 6 When you can configure OptraImage to route faxes received through the fax modem port on the MarkNet N2501e to set the fax receive options: ...
... browser, and then press Enter. 2 Click Configuration. 3 Under the OptraImage heading, click FAX Setup. 4 Click Configuration. 5 Set your printer. After installing MarkVision, you can do an IP search to find the OptraImage printer containing the MarkNet N2501e or N2401e print server and go to the Fax...can access the configuration page. Use MarkVision to an output bin on your options for installing MarkVision is a printer management utility on . 6 When you can configure OptraImage to route faxes received through the fax modem port on the MarkNet N2501e to set the fax receive options: ...

OptraImage 443/433 Setup Guide (1.8 MB)
Page 20
... can create permanent fax destinations that it be printed automatically. Click View Documentation, Use OptraImage, and search for Solve Fax Problems. If Analog is recorded in the URL field of fax log options, refer to activate your printer documentation for example, John_Acct 555-1212). 6 Assign a shortcut number (1- 245). You can print this...
... can create permanent fax destinations that it be printed automatically. Click View Documentation, Use OptraImage, and search for Solve Fax Problems. If Analog is recorded in the URL field of fax log options, refer to activate your printer documentation for example, John_Acct 555-1212). 6 Assign a shortcut number (1- 245). You can print this...
OptraImage 443/433 Setup Guide (1.8 MB)
Page 25
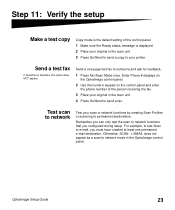
... your original in the scan unit. 3 Press Go/Send to send a copy to your printer. Remember you can only test the scan to e-mail, you configured during setup. OptraImage Setup Guide 23 Enter Phone # displays on the OptraImage control panel. 2 Use the numeric keypad on the control panel and enter the phone number... page test fax to network mode in the scan unit. 4 Press Go/Send to permanent destinations. Test scan to network Test your original in the OptraImage control panel.
... your original in the scan unit. 3 Press Go/Send to send a copy to your printer. Remember you can only test the scan to e-mail, you configured during setup. OptraImage Setup Guide 23 Enter Phone # displays on the OptraImage control panel. 2 Use the numeric keypad on the control panel and enter the phone number... page test fax to network mode in the scan unit. 4 Press Go/Send to permanent destinations. Test scan to network Test your original in the OptraImage control panel.

OptraImage 443/433 Setup Guide (1.8 MB)
Page 27
... to the online documentation on the OptraImage CD. See "Set up network scanning" on page 20 for bent pins. If you need more information, see "Turn on scan unit and printer" on page 10. 1 Verify each other, or the printer or scanner may be turned off. 1 Turn printer off, and then back on. ... fax setup. See "Turn on scan unit and printer" on page 10. Make sure all cables and cords are connected, and then power up in the correct order. OptraImage Setup Guide 25 For more help Launch the OptraImage CD, and then click Contact Lexmark for a complete list of the SCSI cables for ...
... to the online documentation on the OptraImage CD. See "Set up network scanning" on page 20 for bent pins. If you need more information, see "Turn on scan unit and printer" on page 10. 1 Verify each other, or the printer or scanner may be turned off. 1 Turn printer off, and then back on. ... fax setup. See "Turn on scan unit and printer" on page 10. Make sure all cables and cords are connected, and then power up in the correct order. OptraImage Setup Guide 25 For more help Launch the OptraImage CD, and then click Contact Lexmark for a complete list of the SCSI cables for ...


