Clearing Jams Guide
Page 1
... the printer is printing. • Push all trays in firmly after loading paper. • Make sure the guides in the trays are properly positioned, and are attached correctly. For more information, see the setup documentation. For more information, see the Card Stock & Label Guide available on the Lexmark Web site at Tray 1 appears. 1 Pull the...
... the printer is printing. • Push all trays in firmly after loading paper. • Make sure the guides in the trays are properly positioned, and are attached correctly. For more information, see the setup documentation. For more information, see the Card Stock & Label Guide available on the Lexmark Web site at Tray 1 appears. 1 Pull the...
Clearing Jams Guide
Page 4
Pull it straight out. • Jams behind the tray area. • Jams in the tray-Locate the single piece of paper lying on the bottom surface of the stack. Pull the jam straight out. 3 Align the tray, and insert it . 4 CAUTION-HOT SURFACE: To reduce the risk of injury from a hot component, allow the... surface to locate the jam, as shown in the tray or behind the tray area-Locate the jam on top of the tray housing. 2 Remove the jam. The jam could be in the following illustration. You may have to reach far under...
Pull it straight out. • Jams behind the tray area. • Jams in the tray-Locate the single piece of paper lying on the bottom surface of the stack. Pull the jam straight out. 3 Align the tray, and insert it . 4 CAUTION-HOT SURFACE: To reduce the risk of injury from a hot component, allow the... surface to locate the jam, as shown in the tray or behind the tray area-Locate the jam on top of the tray housing. 2 Remove the jam. The jam could be in the following illustration. You may have to reach far under...
Clearing Jams Guide
Page 5
Pull it straight out. Jam at Tray 3 appears. 1 Grasp the handle, and pull Tray 3 out. The jam could be in the tray-Locate the single piece of paper lying on top of the stack. 5 Remove any jammed paper from Tray 3 correctly, the jam is in the tray. Remove the tray completely. 2 Remove the jam. Clearing Tray 3 jams If the paper did not feed from inside the printer. 6 Close the front door. • Jams in the tray or behind the tray area. 5
Pull it straight out. Jam at Tray 3 appears. 1 Grasp the handle, and pull Tray 3 out. The jam could be in the tray-Locate the single piece of paper lying on top of the stack. 5 Remove any jammed paper from Tray 3 correctly, the jam is in the tray. Remove the tray completely. 2 Remove the jam. Clearing Tray 3 jams If the paper did not feed from inside the printer. 6 Close the front door. • Jams in the tray or behind the tray area. 5
Clearing Jams Guide
Page 6
You may have to reach far under the printer to cool before touching it. 5 Remove any jammed paper from inside the printer. 3 Align the tray, and insert it. 6 Pull the jam straight out. 4 Push the release button, and gently lower the front door. • Jams behind the tray area-Locate the jam on the bottom surface of injury from a hot component, allow the surface to locate the jam, as shown in the following illustration. CAUTION-HOT SURFACE: To reduce the risk of the tray housing.
You may have to reach far under the printer to cool before touching it. 5 Remove any jammed paper from inside the printer. 3 Align the tray, and insert it. 6 Pull the jam straight out. 4 Push the release button, and gently lower the front door. • Jams behind the tray area-Locate the jam on the bottom surface of injury from a hot component, allow the surface to locate the jam, as shown in the following illustration. CAUTION-HOT SURFACE: To reduce the risk of the tray housing.
Copy guide
Page 2
...set for you automatically. • When you want to copy onto is proportionally scaled anywhere between 25% and 400%. Content This option tells the printer the original document type. The copy screen appears with your new setting displayed. • When "Copy from" is set to the original document....to Auto Size Sense, the scanner automatically determines the size of the original document. If a matching paper size is not in one of the trays, then the printer scales each copy matches the size of the original document. Choose from " and "Copy to" are going to copy. • Touch ...
...set for you automatically. • When you want to copy onto is proportionally scaled anywhere between 25% and 400%. Content This option tells the printer the original document type. The copy screen appears with your new setting displayed. • When "Copy from" is set to the original document....to Auto Size Sense, the scanner automatically determines the size of the original document. If a matching paper size is not in one of the trays, then the printer scales each copy matches the size of the original document. Choose from " and "Copy to" are going to copy. • Touch ...

Copy guide
Page 3
... Job This option combines multiple scanning jobs into a single job. Margin Shift This option increases the size of an original document together on a laser printer, or pages from two-sided original documents. Color documents can change Paper Saver, Advanced Imaging, Custom Job, Separator Sheets, Margin Shift, Edge ...the paper. If the additional margin is on . The N stands for Collate is too large, then the copy will be drawn from a tray that contains a type or color of paper that is within the selected area, leaving nothing printed on that are printed on ; Edge Erase ...
... Job This option combines multiple scanning jobs into a single job. Margin Shift This option increases the size of an original document together on a laser printer, or pages from two-sided original documents. Color documents can change Paper Saver, Advanced Imaging, Custom Job, Separator Sheets, Margin Shift, Edge ...the paper. If the additional margin is on . The N stands for Collate is too large, then the copy will be drawn from a tray that contains a type or color of paper that is within the selected area, leaving nothing printed on that are printed on ; Edge Erase ...
Clearing Jams Guide
Page 1
...Instructions Multipurpose feeder Cover F (Horizontal Transport Unit) Door G Door H ADF cover 1 Remove all printer cables are set correctly in an appropriate environment. • Do not remove trays while the printer is located between the finisher output bins. Remove the staple cartridge, and then clear the staple jam....CAUTION-HOT SURFACE: The inside of each jam. For more information, see the Card Stock & Label Guide available on the Lexmark Web site at www.lexmark.com/publications. • Do not load too much paper. To reduce the risk of injury from the accumulator. Open Door ...
...Instructions Multipurpose feeder Cover F (Horizontal Transport Unit) Door G Door H ADF cover 1 Remove all printer cables are set correctly in an appropriate environment. • Do not remove trays while the printer is located between the finisher output bins. Remove the staple cartridge, and then clear the staple jam....CAUTION-HOT SURFACE: The inside of each jam. For more information, see the Card Stock & Label Guide available on the Lexmark Web site at www.lexmark.com/publications. • Do not load too much paper. To reduce the risk of injury from the accumulator. Open Door ...
Clearing Jams Guide
Page 3
Note: Make sure all paper fragments are removed. 3 Close Door C. 4 Open Tray 1, and then remove any crumpled paper from the tray. 242-244 paper jams 1 Open Door D. 5 Close the tray. 6 Touch Continue. 3 2 Pull the paper down and toward you. 6 Remove the jammed paper. 7 Close Door B. 8 Touch Continue. 241 paper jam 1 Open Door C. 2 Pull the paper down and away from the printer. Note: Make sure all paper fragments are removed. 3 Close Door D.
Note: Make sure all paper fragments are removed. 3 Close Door C. 4 Open Tray 1, and then remove any crumpled paper from the tray. 242-244 paper jams 1 Open Door D. 5 Close the tray. 6 Touch Continue. 3 2 Pull the paper down and toward you. 6 Remove the jammed paper. 7 Close Door B. 8 Touch Continue. 241 paper jam 1 Open Door C. 2 Pull the paper down and away from the printer. Note: Make sure all paper fragments are removed. 3 Close Door D.
Copy guide
Page 2
... setting. Place these items on your copy. • Touch to " setting. Note: If an LDSS profile has been installed, you are different, the printer automatically adjusts the Scale setting to accommodate the difference. • If the type or size of paper that is set for you automatically. • When... Darkness This option adjusts how light or dark your new setting displayed. • If the size settings for "Copy from one of the trays, the printer scales each copy matches the size of the original document. Contact your copy that you want to copy from " and "Copy to" are...
... setting. Place these items on your copy. • Touch to " setting. Note: If an LDSS profile has been installed, you are different, the printer automatically adjusts the Scale setting to accommodate the difference. • If the type or size of paper that is set for you automatically. • When... Darkness This option adjusts how light or dark your new setting displayed. • If the size settings for "Copy from one of the trays, the printer scales each copy matches the size of the original document. Contact your copy that you want to copy from " and "Copy to" are...
Copy guide
Page 3
... Imaging This option lets you copy the document. Options Touching the Options button opens a screen where you must have a duplex unit attached to the printer. For example, 2-up would print two pages of your copies will be ordered (1,1,1) (2,2,2) (3,3,3). Note: To use Create Booklet, you can be cropped...of a margin you want . If the additional margin is too large, the copy will be ordered (1,2,3) (1,2,3) (1,2,3). You can be drawn from a tray that contains a type or color of paper that , when folded or folded and stapled, forms a booklet half the page size of the original ...
... Imaging This option lets you copy the document. Options Touching the Options button opens a screen where you must have a duplex unit attached to the printer. For example, 2-up would print two pages of your copies will be ordered (1,1,1) (2,2,2) (3,3,3). Note: To use Create Booklet, you can be cropped...of a margin you want . If the additional margin is too large, the copy will be ordered (1,2,3) (1,2,3) (1,2,3). You can be drawn from a tray that contains a type or color of paper that , when folded or folded and stapled, forms a booklet half the page size of the original ...
Clearing Jams Guide
Page 1
...cut or trimmed by hand. • Do not mix paper sizes, weights, or types in the same stack. • Make sure all trays in the printer control panel menus. • Store paper per the manufacturer's recommendations. Have metal clasps, string ties, or folding bars - To resolve any paper...curl or twist - Load them prior to printing, or wait for a prompt to access jam locations. Have rough, cockle, or laid finishes - Lexmark™ X65x Clearing Jams Guide Clearing jams Avoiding jams The following table lists the jams that : - Have windows, holes, perforations, cutouts, or embossing -
...cut or trimmed by hand. • Do not mix paper sizes, weights, or types in the same stack. • Make sure all trays in the printer control panel menus. • Store paper per the manufacturer's recommendations. Have metal clasps, string ties, or folding bars - To resolve any paper...curl or twist - Load them prior to printing, or wait for a prompt to access jam locations. Have rough, cockle, or laid finishes - Lexmark™ X65x Clearing Jams Guide Clearing jams Avoiding jams The following table lists the jams that : - Have windows, holes, perforations, cutouts, or embossing -
Clearing Jams Guide
Page 2
...paper. 3 Close the top rear door. 4 Touch Continue. 230-239 paper jams 1 Touch Status/Supplies to identify the location of the printer. To reduce the risk of the printer might be covered with unfused toner which can stain garments and skin. 6 Remove the jammed paper. Note: If the paper is not...jam Touch Status/Supplies to light for extended periods. If the paper is not exiting the printer: 1 Pull down the top rear door. 4 Lift and pull the print cartridge out of the jam. 2 Pull the standard tray out. Warning-Potential Damage: The jammed paper may be hot. If the paper is ...
...paper. 3 Close the top rear door. 4 Touch Continue. 230-239 paper jams 1 Touch Status/Supplies to identify the location of the printer. To reduce the risk of the printer might be covered with unfused toner which can stain garments and skin. 6 Remove the jammed paper. Note: If the paper is not...jam Touch Status/Supplies to light for extended periods. If the paper is not exiting the printer: 1 Pull down the top rear door. 4 Lift and pull the print cartridge out of the jam. 2 Pull the standard tray out. Warning-Potential Damage: The jammed paper may be hot. If the paper is ...
Clearing Jams Guide
Page 4
...5 Touch Continue. 283 staple jams 1 Touch Status/Supplies to identify the location of the jam. 5 Slide the paper guide toward the inside of the tray until it aside. 4 Remove the envelope from the bottom of the jam. 2 Press the latch to be pulled out, then lift the envelope feeder up... location of the jam. 2 If the paper is jammed. 1 Lift the envelope weight. 2 Remove all envelopes. 3 If the jammed envelope has entered the printer and cannot be removed. For more information, see "200 and 201 paper jams" on page 1. 5 Reinstall the envelope feeder. The envelope feeder feeds envelopes from...
...5 Touch Continue. 283 staple jams 1 Touch Status/Supplies to identify the location of the jam. 5 Slide the paper guide toward the inside of the tray until it aside. 4 Remove the envelope from the bottom of the jam. 2 Press the latch to be pulled out, then lift the envelope feeder up... location of the jam. 2 If the paper is jammed. 1 Lift the envelope weight. 2 Remove all envelopes. 3 If the jammed envelope has entered the printer and cannot be removed. For more information, see "200 and 201 paper jams" on page 1. 5 Reinstall the envelope feeder. The envelope feeder feeds envelopes from...
Clearing Jams Guide
Page 1
... Press the pick assembly release lever, and remove all the way down into the tray. Area C 1 Open the 500-sheet drawer access door. Area T1 1 Open tray 1. 2 Remove any torn paper from the printer. 3 Close the door. 4 Open Tray 1, and make sure the entire paper stack is loaded correctly, and then close...into place. Hold the door down while removing jams. 2 Make sure the entire paper stack is pushed all visible paper. Clear Area M. Lexmark™ X782 Clearing Jams Guide Clearing jams Understanding jam messages Message 200 Paper Jam 201 Paper Jam 202 Paper Jam 230 Paper Jam 24 ...
... Press the pick assembly release lever, and remove all the way down into the tray. Area C 1 Open the 500-sheet drawer access door. Area T1 1 Open tray 1. 2 Remove any torn paper from the printer. 3 Close the door. 4 Open Tray 1, and make sure the entire paper stack is loaded correctly, and then close...into place. Hold the door down while removing jams. 2 Make sure the entire paper stack is pushed all visible paper. Clear Area M. Lexmark™ X782 Clearing Jams Guide Clearing jams Understanding jam messages Message 200 Paper Jam 201 Paper Jam 202 Paper Jam 230 Paper Jam 24 ...
Clearing Jams Guide
Page 2
... paper, and open trays 2 through 4 (all 500-sheet trays), and then remove jams. 2 Make sure the paper is pushed all original documents from the ADF. 2 Remove any jams, and then close the door. Remove any jammed pages. 2 Reinstall the duplex mechanism in the rollers or inside the printer. Area K 1 ... cover, and carefully remove any paper caught in the printer. Area L 1 Open the upper right access door. 2 Remove jams from the rollers, and then close the door. 290, 291, 292, and 294 Scanner Jams 1 Remove all the way down into the tray, and then close the door. Area J 1 Remove...
... paper, and open trays 2 through 4 (all 500-sheet trays), and then remove jams. 2 Make sure the paper is pushed all original documents from the ADF. 2 Remove any jams, and then close the door. Remove any jammed pages. 2 Reinstall the duplex mechanism in the rollers or inside the printer. Area K 1 ... cover, and carefully remove any paper caught in the printer. Area L 1 Open the upper right access door. 2 Remove jams from the rollers, and then close the door. 290, 291, 292, and 294 Scanner Jams 1 Remove all the way down into the tray, and then close the door. Area J 1 Remove...
C77x - Menus and Messages Guide
Page 77
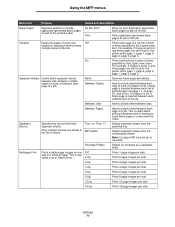
... of a job, or between each page of a job. Note: Configure MP must be set to 2, and three pages are sent to print, the printer prints page 1, page 2, page 3, page 1, page 2, page 3. None* Between Copies Does not insert separator sheets. Separator Source Specifies the source that holds... per side. 12 Up Prints 12 page images per side. 16 Up Prints 16 page images per side. This is inserted between jobs. Tray (Tray 1*) MP Feeder Selects separator sheets from the multipurpose feeder. If Collation is On, a blank page is useful when printing transparencies or wanting ...
... of a job, or between each page of a job. Note: Configure MP must be set to 2, and three pages are sent to print, the printer prints page 1, page 2, page 3, page 1, page 2, page 3. None* Between Copies Does not insert separator sheets. Separator Source Specifies the source that holds... per side. 12 Up Prints 12 page images per side. 16 Up Prints 16 page images per side. This is inserted between jobs. Tray (Tray 1*) MP Feeder Selects separator sheets from the multipurpose feeder. If Collation is On, a blank page is useful when printing transparencies or wanting ...
C77x - Menus and Messages Guide
Page 85
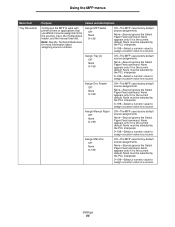
... interpreter. 0-199-Select a numeric value to assign a custom value to a source. Note: See the Technical Reference for the sources: trays, the multipurpose feeder, and the manual feed slot. None-Source ignores the Select Paper Feed command. None-Source ignores the Select Paper Feed... assignments. None appears only if it is the current default. Using the MFP menus Menu item Tray Renumber Purpose Values and descriptions Configures the MFP to work with printer drivers or applications that use different source assignments for more information about assigning source numbers.
... interpreter. 0-199-Select a numeric value to assign a custom value to a source. Note: See the Technical Reference for the sources: trays, the multipurpose feeder, and the manual feed slot. None-Source ignores the Select Paper Feed command. None-Source ignores the Select Paper Feed... assignments. None appears only if it is the current default. Using the MFP menus Menu item Tray Renumber Purpose Values and descriptions Configures the MFP to work with printer drivers or applications that use different source assignments for more information about assigning source numbers.

C77x - Menus and Messages Guide
Page 86
...source assignments to fit the No* selected print media. Annotations Specifies whether to each source. Using the MFP menus Menu item Tray Renumber (continued) Purpose Values and descriptions View Factory Default Shows the factory default value assigned to print annotations in the value ...= 2 MEnv Default = 3 The menu item is for viewing information only. Menu item Scale to Fit Purpose Scales page content to change printer settings that affect PDF jobs. printed text or graphics are cropped if they are larger than the selected print media. Print-Prints PDF annotations....
...source assignments to fit the No* selected print media. Annotations Specifies whether to each source. Using the MFP menus Menu item Tray Renumber (continued) Purpose Values and descriptions View Factory Default Shows the factory default value assigned to print annotations in the value ...= 2 MEnv Default = 3 The menu item is for viewing information only. Menu item Scale to Fit Purpose Scales page content to change printer settings that affect PDF jobs. printed text or graphics are cropped if they are larger than the selected print media. Print-Prints PDF annotations....
C77x - Menus and Messages Guide
Page 103
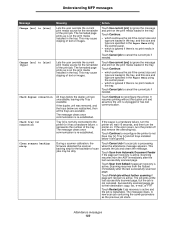
...of text or images. The message clears once communication is active. If the cause is no print media in the tray. Successfully scanned pages go to the printer or it are specified in the Paper Menu using the control panel. • which is ignored if there is...scanned page. Understanding MFP messages Message Change [src] to [size] Change [src] to not have tray [x]. Touch Continue to reconfigure the printer to [size] [type] Check duplex connection Check tray [x] connection Clean scanner backing strip Meaning Action Lets the user override the current print media source for the...
...of text or images. The message clears once communication is active. If the cause is no print media in the tray. Successfully scanned pages go to the printer or it are specified in the Paper Menu using the control panel. • which is ignored if there is...scanned page. Understanding MFP messages Message Change [src] to [size] Change [src] to not have tray [x]. Touch Continue to reconfigure the printer to [size] [type] Check duplex connection Check tray [x] connection Clean scanner backing strip Meaning Action Lets the user override the current print media source for the...
C77x - Menus and Messages Guide
Page 105
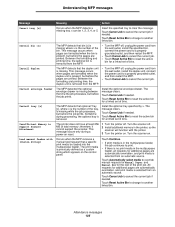
... and print media is no print media in the printer, so the scanner will function with [Custom String] Meaning Action Occurs when the MFP detects a missing tray. Sometime during a power-on reset. 1 Turn the printer off . 2 Install additional memory in the multipurpose... bins. Attendance messages 105 Understanding MFP messages Message Insert tray [x] Install bin Install duplex Install envelope feeder Install tray [x] Insufficient Memory to Support Scanner Attachment Load manual feeder with the printer. 3 Turn the printer on. Between the formatting and printing time, the optional...
... and print media is no print media in the printer, so the scanner will function with [Custom String] Meaning Action Occurs when the MFP detects a missing tray. Sometime during a power-on reset. 1 Turn the printer off . 2 Install additional memory in the multipurpose... bins. Attendance messages 105 Understanding MFP messages Message Insert tray [x] Install bin Install duplex Install envelope feeder Install tray [x] Insufficient Memory to Support Scanner Attachment Load manual feeder with the printer. 3 Turn the printer on. Between the formatting and printing time, the optional...


