Print Drivers for UNIX and LINUX Systems
Page 48
Index A Add Print Queue Wizard 19 administrative group adding a user 17 changing the group name 16 removing user 17 administrator mode 34 B banner program using 29 writing 29 C collating copies 26 command line 33 creating print queues 19 creating virtual devices 18 printing from 24 CUPS 39 Customer Support, contacting 40 D default settings 34 Device Manager 17 duplex printing 26 H holding print jobs 28 hostname troubleshooting 38 I installing printer drivers before installing 8 finding space 13 on Debian Linux 11...
Index A Add Print Queue Wizard 19 administrative group adding a user 17 changing the group name 16 removing user 17 administrator mode 34 B banner program using 29 writing 29 C collating copies 26 command line 33 creating print queues 19 creating virtual devices 18 printing from 24 CUPS 39 Customer Support, contacting 40 D default settings 34 Device Manager 17 duplex printing 26 H holding print jobs 28 hostname troubleshooting 38 I installing printer drivers before installing 8 finding space 13 on Debian Linux 11...
Universal Print Driver Version 2.0 White Paper
Page 4
... user interface matches the language of the Universal Print Driver provides a more languages. Connecting the driver to a specific printer automatically updates the driver settings to show only the paper sizes, trays, types, finishing options, and other data that best suits their environment. Introduction 4 New Features New user interface The new user interface of your operating system. By associating print jobs with Driver Configuration Files (DCFs) lets administrators create a deployment package that is stored in select printer models with a printer hard disk installed...
... user interface matches the language of the Universal Print Driver provides a more languages. Connecting the driver to a specific printer automatically updates the driver settings to show only the paper sizes, trays, types, finishing options, and other data that best suits their environment. Introduction 4 New Features New user interface The new user interface of your operating system. By associating print jobs with Driver Configuration Files (DCFs) lets administrators create a deployment package that is stored in select printer models with a printer hard disk installed...
Universal Print Driver Version 2.0 White Paper
Page 13
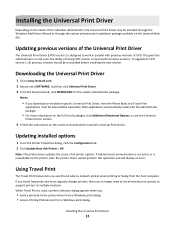
... dialog, click the Configuration tab. 2 Click Update Now‑Ask Printer > OK. If you travel frequently and must regularly change printers, then you download an emulation‑specific Universal Print Driver, then the Phone Book and Travel Print applications must be downloaded separately. To upgrade to UPD version 2, all printer options. Notes: • If you no longer need to install several print queues to support printers at multiple locations. If bidirectional...
... dialog, click the Configuration tab. 2 Click Update Now‑Ask Printer > OK. If you travel frequently and must regularly change printers, then you download an emulation‑specific Universal Print Driver, then the Phone Book and Travel Print applications must be downloaded separately. To upgrade to UPD version 2, all printer options. Notes: • If you no longer need to install several print queues to support printers at multiple locations. If bidirectional...
Universal Print Driver Version 2.0 White Paper
Page 17
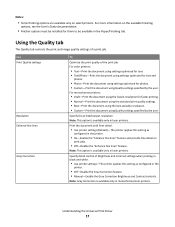
... option is available only in monochrome laser printers. Understanding the Universal Print Driver 17 Specify the printed output resolution. Using the Quality tab The Quality tab controls the print and image quality settings of a print job. For monochrome printers: • Draft-Print the document using the lowest resolution for photos. • Custom-Print the document using Quality settings specified by the user. Note: Gray Correction is available only in the printer. • Off-Disable the Gray Correction feature. • Manual-Enable...
... option is available only in monochrome laser printers. Understanding the Universal Print Driver 17 Specify the printed output resolution. Using the Quality tab The Quality tab controls the print and image quality settings of a print job. For monochrome printers: • Draft-Print the document using the lowest resolution for photos. • Custom-Print the document using Quality settings specified by the user. Note: Gray Correction is available only in the printer. • Off-Disable the Gray Correction feature. • Manual-Enable...
Card Stock & Label Guide
Page 54
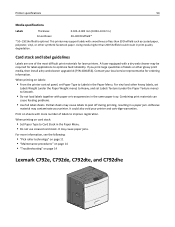
...; Do not load labels together with a dry web cleaner may be required for label applications to optimize feed reliability. Printer specifications 54 Media specifications Labels Thickness: 0.102-0.305 mm (0.004-0.012 in a paper jam. When printing on card stock: • Set Paper Type to peel off during printing, resulting in .) Smoothness: 50-300 Sheffield* * 50-150 Sheffield is optimal. Combining print materials can cause feeding problems. • Use full label sheets. Print on page 14 Lexmark C792e...
...; Do not load labels together with a dry web cleaner may be required for label applications to optimize feed reliability. Printer specifications 54 Media specifications Labels Thickness: 0.102-0.305 mm (0.004-0.012 in a paper jam. When printing on card stock: • Set Paper Type to peel off during printing, resulting in .) Smoothness: 50-300 Sheffield* * 50-150 Sheffield is optimal. Combining print materials can cause feeding problems. • Use full label sheets. Print on page 14 Lexmark C792e...
Card Stock & Label Guide
Page 55
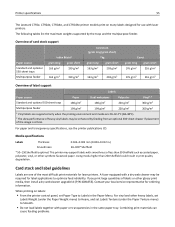
... print media, then install a dry web cleaner upgrade kit (P/N 40X1856). A fuser equipped with a dry web cleaner may be enhanced by the trays and the multipurpose feeder. Contact your local service representative for label applications to optimize feed reliability. When printing on many labels designed for laser printers. Combining print materials can cause feeding problems. For paper and transparency specifications, see the printer publications CD. For vinyl and other heavy labels, set Labels Weight (under the Paper Texture menu...
... print media, then install a dry web cleaner upgrade kit (P/N 40X1856). A fuser equipped with a dry web cleaner may be enhanced by the trays and the multipurpose feeder. Contact your local service representative for label applications to optimize feed reliability. When printing on many labels designed for laser printers. Combining print materials can cause feeding problems. For paper and transparency specifications, see the printer publications CD. For vinyl and other heavy labels, set Labels Weight (under the Paper Texture menu...
Card Stock & Label Guide
Page 140
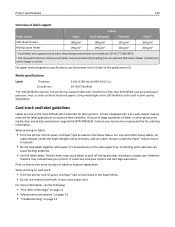
... Paper Menu. • Do not use creased card stock. When printing on the publications CD. A fuser equipped with more information, see the printer User's Guide on labels: • From the printer control panel, set Paper Type to Labels in .) Smoothness: 50-300* Sheffield * 50-150 Sheffield is critical. When printing on page 14 Media specifications Labels Thickness: 0.102-0.305 mm (0.004-0.012 in the Paper Menu. For paper and transparency specifications, see the following: • "Pick roller...
... Paper Menu. • Do not use creased card stock. When printing on the publications CD. A fuser equipped with more information, see the printer User's Guide on labels: • From the printer control panel, set Paper Type to Labels in .) Smoothness: 50-300* Sheffield * 50-150 Sheffield is critical. When printing on page 14 Media specifications Labels Thickness: 0.102-0.305 mm (0.004-0.012 in the Paper Menu. For paper and transparency specifications, see the following: • "Pick roller...

Card Stock & Label Guide
Page 171
... printer operator panel, set the Labels Texture (under the Paper Texture menu) to the guidelines specified under a 250‑sheet integral tray. It is recommended that enhances feeding reliability. A special fuser cleaner should be sure to ‑print sizes, such as 3 x 5‑inch index cards, Lexmark offers a variety of 7 inches. The wax wiper that is P/N 99A1082. Optional 500‑sheet Universally Adjustable Trays support forms with the Optra T is used for laser printers...
... printer operator panel, set the Labels Texture (under the Paper Texture menu) to the guidelines specified under a 250‑sheet integral tray. It is recommended that enhances feeding reliability. A special fuser cleaner should be sure to ‑print sizes, such as 3 x 5‑inch index cards, Lexmark offers a variety of 7 inches. The wax wiper that is P/N 99A1082. Optional 500‑sheet Universally Adjustable Trays support forms with the Optra T is used for laser printers...

Forms and Bar Code Card Technical Reference Guide
Page 98
... 29). • For modes 2 and 3, the postal code, country code, and class of -labels field. Optional Sets the ECC level to /L, /M, /Q, /H Optional Sets the QR encoding mode to /Numeric, /Alphanumeric, /ECI, /Byte, /Kanji, /Mixed Optional Sets the size of QR symbology used. Valid values are /Model1, /Model2 (default). Arguments for QR bar code symbology Key /Symbology Type name /Units name /Model name /ECC /Mode name name /ModuleSize integer...
... 29). • For modes 2 and 3, the postal code, country code, and class of -labels field. Optional Sets the ECC level to /L, /M, /Q, /H Optional Sets the QR encoding mode to /Numeric, /Alphanumeric, /ECI, /Byte, /Kanji, /Mixed Optional Sets the size of QR symbology used. Valid values are /Model1, /Model2 (default). Arguments for QR bar code symbology Key /Symbology Type name /Units name /Model name /ECC /Mode name name /ModuleSize integer...
PRESCRIBE Emulation Technical Reference Guide
Page 3
... to factory default settings. For more information on page 12. Flash memory and hard disk support PRESCRIBE downloaded fonts (LDFC) and PRESCRIBE macros can be an effective replacement for the PRESCRIBE emulation option (example: "P-Scribe = P41G"). After installing the option, set of engineering commandlevel tests. Many accounts use the Kyocera factory default settings and may restore your printer to match the Kyocera default setup on the applications. To verify installation, print a Print Menus page from the printer control panel. Supported devices • Lexmark MS812...
... to factory default settings. For more information on page 12. Flash memory and hard disk support PRESCRIBE downloaded fonts (LDFC) and PRESCRIBE macros can be an effective replacement for the PRESCRIBE emulation option (example: "P-Scribe = P41G"). After installing the option, set of engineering commandlevel tests. Many accounts use the Kyocera factory default settings and may restore your printer to match the Kyocera default setup on the applications. To verify installation, print a Print Menus page from the printer control panel. Supported devices • Lexmark MS812...

Print Quality Guide
Page 15
... use it. The problem is solved. Step 4 Go to light may cause print quality problems. 2 Install the imaging unit, and then the cartridge. a Reinstall the imaging unit. 1 Remove the toner cartridge, and then the imaging unit. Do streaked vertical lines appear on prints support at http://support.lexmark. Warning-Potential Damage: Do not expose the imaging unit to match the paper loaded in the tray settings. Extended exposure to step 5. From the printer control panel, set the paper texture, type, and weight in the Paper menu to direct light...
... use it. The problem is solved. Step 4 Go to light may cause print quality problems. 2 Install the imaging unit, and then the cartridge. a Reinstall the imaging unit. 1 Remove the toner cartridge, and then the imaging unit. Do streaked vertical lines appear on prints support at http://support.lexmark. Warning-Potential Damage: Do not expose the imaging unit to match the paper loaded in the tray settings. Extended exposure to step 5. From the printer control panel, set the paper texture, type, and weight in the Paper menu to direct light...

Quick Reference
Page 1
... (4.13 x 5.83 inches) for two‑sided (duplex) printing. • The largest supported Universal size is a user‑defined setting that are using a proxy server, then temporarily disable it to : > Settings > > Paper Menu > > Universal Setup > > Units of Measure > > select unit of measure > Adjusting toner darkness Using the Embedded Web Server 1 Open a Web browser, and then type the IP address of the printer. 10 USB port Connect a flash drive to : > Settings > > Print Settings > Menu > > Toner Darkness > Quality 2 Adjust the toner darkness, and then press . 1 Notes...
... (4.13 x 5.83 inches) for two‑sided (duplex) printing. • The largest supported Universal size is a user‑defined setting that are using a proxy server, then temporarily disable it to : > Settings > > Paper Menu > > Universal Setup > > Units of Measure > > select unit of measure > Adjusting toner darkness Using the Embedded Web Server 1 Open a Web browser, and then type the IP address of the printer. 10 USB port Connect a flash drive to : > Settings > > Print Settings > Menu > > Toner Darkness > Quality 2 Adjust the toner darkness, and then press . 1 Notes...

User's Guide
Page 9
... cover page. Initial setup instructions: • Connecting the printer • Installing the printer software Additional setup and instructions for using the printer: • Selecting and storing paper and specialty media • Loading paper • Configuring printer settings • Viewing and printing documents and photos • Setting up and using the printer models that are listed on the Software and Documentation CD. Networking Guide-Open the Software and Documentation CD, and then look for : • Connecting the printer to search for ? For updates, visit our Web...
... cover page. Initial setup instructions: • Connecting the printer • Installing the printer software Additional setup and instructions for using the printer: • Selecting and storing paper and specialty media • Loading paper • Configuring printer settings • Viewing and printing documents and photos • Setting up and using the printer models that are listed on the Software and Documentation CD. Networking Guide-Open the Software and Documentation CD, and then look for : • Connecting the printer to search for ? For updates, visit our Web...

User's Guide
Page 43
... printer models • Network setup page-Use this page to a network. f Print a test page to expand the list of the CD or DVD drive. 3 Press Enter, or click OK. After installing the printer driver, set in the COM port assigned to verify the network connection. If an option you set the serial parameters to : Add port > select a port type > enter the necessary information > OK g Click Continue > Finish. 3 Set the COM port parameters. Check the serial heading of the page. "Printing a menu settings page" on page 122 or "Printing a menu settings page...
... printer models • Network setup page-Use this page to a network. f Print a test page to expand the list of the CD or DVD drive. 3 Press Enter, or click OK. After installing the printer driver, set in the COM port assigned to verify the network connection. If an option you set the serial parameters to : Add port > select a port type > enter the necessary information > OK g Click Continue > Finish. 3 Set the COM port parameters. Check the serial heading of the page. "Printing a menu settings page" on page 122 or "Printing a menu settings page...

User's Guide
Page 314
... to the internal print server. Use the correct cable, and then check if it is securely connected to step 2. The problem is listed in the Installed Options list. Is the internal print server listed in the menu settings page? For more information, see "Installing an Internal Solutions Port" on . For more information, see the setup documentation that the paper guides rest against the edges of the paper. • Make sure the paper is installed. Go to...
... to the internal print server. Use the correct cable, and then check if it is securely connected to step 2. The problem is listed in the Installed Options list. Is the internal print server listed in the menu settings page? For more information, see "Installing an Internal Solutions Port" on . For more information, see the setup documentation that the paper guides rest against the edges of the paper. • Make sure the paper is installed. Go to...

User's Guide
Page 332
... the print job. Go to light may cause print quality problems. 2 Install the imaging unit, and then the cartridge. Warning-Potential Damage: Do not expose the imaging unit to direct light for more of the following: • Specify the paper texture, type, and weight from a fresh package. The problem is solved. Do streaked vertical lines appear on prints? From the printer control panel, set the paper texture, type, and weight in the Paper menu to match the paper texture, type...
... the print job. Go to light may cause print quality problems. 2 Install the imaging unit, and then the cartridge. Warning-Potential Damage: Do not expose the imaging unit to direct light for more of the following: • Specify the paper texture, type, and weight from a fresh package. The problem is solved. Do streaked vertical lines appear on prints? From the printer control panel, set the paper texture, type, and weight in the Paper menu to match the paper texture, type...
User's Guide
Page 355
... standard bin jam. [203] 271 [x]‑page jam, remove tray 1 to clear duplex. [235-239] 271 A accessing the Embedded Web Server 92, 139 Active NIC menu 201 adjusting brightness Embedded Web Server 126, 173 printer control panel 126 printer display 173 adjusting display brightness 126, 173 adjusting printer display brightness 80 adjusting Sleep mode 79, 125, 172 adjusting toner darkness 69, 115, 163 administrator settings Embedded Web Server 74 AppleTalk menu 206 attaching cables 33 available internal options 13 avoiding jams 183 avoiding paper jams 261 B Background and Idle Screen using...
... standard bin jam. [203] 271 [x]‑page jam, remove tray 1 to clear duplex. [235-239] 271 A accessing the Embedded Web Server 92, 139 Active NIC menu 201 adjusting brightness Embedded Web Server 126, 173 printer control panel 126 printer display 173 adjusting display brightness 126, 173 adjusting printer display brightness 80 adjusting Sleep mode 79, 125, 172 adjusting toner darkness 69, 115, 163 administrator settings Embedded Web Server 74 AppleTalk menu 206 attaching cables 33 available internal options 13 avoiding jams 183 avoiding paper jams 261 B Background and Idle Screen using...

User's Guide
Page 359
... checking, from printer control panel 123 checking, on the printer control panel 170 checking, using the Embedded Web Server 77, 123, 171 using genuine Lexmark 248 parts and supplies, status of checking, on printer control panel 77 PCL Emul menu 239 PDF menu 238 Personal Identification Number method using 39 port settings configuring 41 PostScript menu 239 PPDS font error [50] 294 preparing to set up the printer on an Ethernet network 37 print irregularities 323 print job canceling from the printer control panel 73 canceling, from computer 74, 120, 167 print quality troubleshooting blank pages...
... checking, from printer control panel 123 checking, on the printer control panel 170 checking, using the Embedded Web Server 77, 123, 171 using genuine Lexmark 248 parts and supplies, status of checking, on printer control panel 77 PCL Emul menu 239 PDF menu 238 Personal Identification Number method using 39 port settings configuring 41 PostScript menu 239 PPDS font error [50] 294 preparing to set up the printer on an Ethernet network 37 print irregularities 323 print job canceling from the printer control panel 73 canceling, from computer 74, 120, 167 print quality troubleshooting blank pages...
User's Guide
Page 360
... parts 47, 88, 134 Sleep button light 48, 88, 134 using 47, 88, 134 printer control panel, virtual display using the Embedded Web Server 74, 120 printer hard disk disposing of life [81.xx] 287 Imaging unit low [84.xy] 287 Imaging unit nearly low [84.xy] 288 Imaging unit very low [84.xy] 288 Incompatible output bin [x] [59] 288 Incompatible tray [x] [59] 288 Incorrect paper size, open [paper source] [34] 288 Insert hole punch box 289 Insert staple cartridge 289 Insert Tray [x] 289 Install bin...
... parts 47, 88, 134 Sleep button light 48, 88, 134 using 47, 88, 134 printer control panel, virtual display using the Embedded Web Server 74, 120 printer hard disk disposing of life [81.xx] 287 Imaging unit low [84.xy] 287 Imaging unit nearly low [84.xy] 288 Imaging unit very low [84.xy] 288 Incompatible output bin [x] [59] 288 Incompatible tray [x] [59] 288 Incorrect paper size, open [paper source] [34] 288 Insert hole punch box 289 Insert staple cartridge 289 Insert Tray [x] 289 Install bin...
User's Guide
Page 363
... Web Server 337 checking an unresponsive printer 302 contacting customer support 337 solving basic printer problems 302 troubleshooting, display printer display is blank 304 troubleshooting, paper feed message remains after jam is cleared 317 troubleshooting, print envelope seals when printing 305 error reading flash drive 305 held jobs do not print 304 incorrect characters print 306 incorrect margins on prints 321 jammed pages are not reprinted 316 job prints from wrong tray 306 job prints on wrong paper 306 jobs do not print 309 Large jobs do not collate 307 multiple‑language PDF files...
... Web Server 337 checking an unresponsive printer 302 contacting customer support 337 solving basic printer problems 302 troubleshooting, display printer display is blank 304 troubleshooting, paper feed message remains after jam is cleared 317 troubleshooting, print envelope seals when printing 305 error reading flash drive 305 held jobs do not print 304 incorrect characters print 306 incorrect margins on prints 321 jammed pages are not reprinted 316 job prints from wrong tray 306 job prints on wrong paper 306 jobs do not print 309 Large jobs do not collate 307 multiple‑language PDF files...


