
User's Guide
Page 3
... Information x Online Documents x Trademarks xi 1 Setting Up Your Printer 1 Unpacking Your Printer 1 Removing Print Cartridge Packaging 2 Installing the Print Cartridge 5 Loading the Standard Input Tray 6 Installing the Paper Bail 11 Connecting Your Printer to a Computer 12 Using a Parallel Cable 12 Using a ...USB Cable 14 Plugging the Printer In 20 Turning the Printer Power On 20 Printing the Menu Settings Page 21 Installing the Operator ...
... Information x Online Documents x Trademarks xi 1 Setting Up Your Printer 1 Unpacking Your Printer 1 Removing Print Cartridge Packaging 2 Installing the Print Cartridge 5 Loading the Standard Input Tray 6 Installing the Paper Bail 11 Connecting Your Printer to a Computer 12 Using a Parallel Cable 12 Using a ...USB Cable 14 Plugging the Printer In 20 Turning the Printer Power On 20 Printing the Menu Settings Page 21 Installing the Operator ...
User's Guide
Page 10
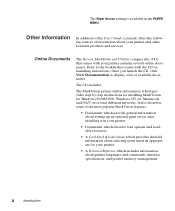
... booklet that comes with the CD for Windows 95/98/2000, Windows NT 4.0, Macintosh, and OS/2 on several online documents. Refer to this User's Guide, Lexmark offers the following sources of available documents. Online Documents The Drivers, MarkVision and Utilities compact disc (CD) that comes with your printer and other Lexmark products and services.
... booklet that comes with the CD for Windows 95/98/2000, Windows NT 4.0, Macintosh, and OS/2 on several online documents. Refer to this User's Guide, Lexmark offers the following sources of available documents. Online Documents The Drivers, MarkVision and Utilities compact disc (CD) that comes with your printer and other Lexmark products and services.
User's Guide
Page 26
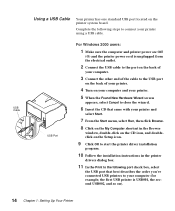
... port on the back of your computer. 3 Connect the other end of the cable to the USB port on the back of your printer. 4 Turn on your computer and your printer. 5 When the Found New Hardware Wizard screen appears, select Cancel to close the wizard. 6 Insert the CD that came with your... the My Computer shortcut in the Browse window, double-click on the CD icon, and doubleclick on the Setup icon. 9 Click OK to start the printer driver installation program. 10 Follow the installation instructions in the printer drivers dialog box. 11 In the Print to the following steps to your...
... port on the back of your computer. 3 Connect the other end of the cable to the USB port on the back of your printer. 4 Turn on your computer and your printer. 5 When the Found New Hardware Wizard screen appears, select Cancel to close the wizard. 6 Insert the CD that came with your... the My Computer shortcut in the Browse window, double-click on the CD icon, and doubleclick on the Setup icon. 9 Click OK to start the printer driver installation program. 10 Follow the installation instructions in the printer drivers dialog box. 11 In the Print to the following steps to your...
User's Guide
Page 27
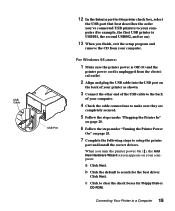
... the USB cable into the USB port on page 20. 7 Complete the following steps to search for the best driver. a Click Next. For Windows 98 users: 1 Make sure the printer power is Off (O) and the printer power cord is USB001, the second USB002, and so on). 13 When you turn the... printer power On (|), the Add New Hardware Wizard screen appears on your computer. b Click the default to setup the printer port and install the correct drivers.
... the USB cable into the USB port on page 20. 7 Complete the following steps to search for the best driver. a Click Next. For Windows 98 users: 1 Make sure the printer power is Off (O) and the printer power cord is USB001, the second USB002, and so on). 13 When you turn the... printer power On (|), the Add New Hardware Wizard screen appears on your computer. b Click the default to setup the printer port and install the correct drivers.

User's Guide
Page 28
... installed, click Finish. m Select Install from this laser printer to select Optra M410 or Optra M412. g Scroll down until you have read the agreement. i Click Next. The Choose your CD-ROM drive. q Scroll through the list of the screen and click the check box to verify the driver for WIN98USB and click OK. e Click Specify a location...
... installed, click Finish. m Select Install from this laser printer to select Optra M410 or Optra M412. g Scroll down until you have read the agreement. i Click Next. The Choose your CD-ROM drive. q Scroll through the list of the screen and click the check box to verify the driver for WIN98USB and click OK. e Click Specify a location...
User's Guide
Page 29
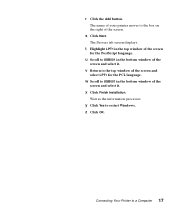
s Click Next. The Drivers tab screen displays. v Return to a Computer 17 Connecting Your Printer to the top window of the screen and select LPT1 for the PostScript language. x Click Finish Installation. w Scroll to restart Windows. Wait as the information ...processes. y Click Yes to USB001 in the bottom window of the screen for the PCL language. The name of your printer moves to USB001 in the top window of the screen and select it . u Scroll to the box on the right of the screen and select...
s Click Next. The Drivers tab screen displays. v Return to a Computer 17 Connecting Your Printer to the top window of the screen and select LPT1 for the PostScript language. x Click Finish Installation. w Scroll to restart Windows. Wait as the information ...processes. y Click Yes to USB001 in the bottom window of the screen for the PCL language. The name of your printer moves to USB001 in the top window of the screen and select it . u Scroll to the box on the right of the screen and select...
User's Guide
Page 34
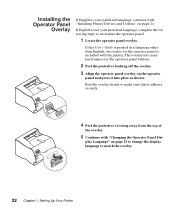
.... 5 Continue with "Changing the Operator Panel Dis- play Language" on page 24. The overlay has translated names for the operator panel is included with "Installing Printer Drivers and Utilities" on page 23 to change the display language to match the overlay. 22 Chapter 1: Setting Up Your... Printer Installing the Operator Panel Overlay If English is your preferred language, complete the following steps to customize the operator panel. 1 Locate the operator panel overlay. ...
.... 5 Continue with "Changing the Operator Panel Dis- play Language" on page 24. The overlay has translated names for the operator panel is included with "Installing Printer Drivers and Utilities" on page 23 to change the display language to match the overlay. 22 Chapter 1: Setting Up Your... Printer Installing the Operator Panel Overlay If English is your preferred language, complete the following steps to customize the operator panel. 1 Locate the operator panel overlay. ...
User's Guide
Page 36
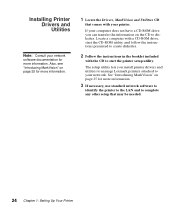
... LAN and to complete any other setup that comes with the CD to start the printer setup utility. If your computer does not have a CD-ROM drive, you install printer drivers and utilities to manage Lexmark printers attached to your network. Installing Printer Drivers and Utilities Note: Consult your network software documentation for more information. 1 Locate the...
... LAN and to complete any other setup that comes with the CD to start the printer setup utility. If your computer does not have a CD-ROM drive, you install printer drivers and utilities to manage Lexmark printers attached to your network. Installing Printer Drivers and Utilities Note: Consult your network software documentation for more information. 1 Locate the...
User's Guide
Page 37
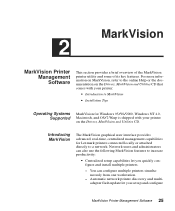
... Windows 95/98/2000, Windows NT 4.0, Macintosh, and OS/2 Warp is shipped with your printer on the Drivers, MarkVision and Utilities CD that comes with your printer: • Introduction to MarkVision • Installation Tips Operating Systems Supported MarkVision for Lexmark printers connected locally or attached directly to increase productivity: • Centralized setup capabilities let you...
... Windows 95/98/2000, Windows NT 4.0, Macintosh, and OS/2 Warp is shipped with your printer on the Drivers, MarkVision and Utilities CD that comes with your printer: • Introduction to MarkVision • Installation Tips Operating Systems Supported MarkVision for Lexmark printers connected locally or attached directly to increase productivity: • Centralized setup capabilities let you...
User's Guide
Page 38
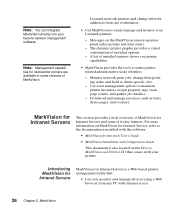
...MarkVision for Intranets User's Guide. • MarkVision Installation and Configuration Guide. Messages on the Drivers, MarkVision and Utilities CD that : • Lets you printer capabilities. • MarkVision provides the tools to the documentation installed with the software: &#...installed options. - Note: You can integrate MarkVision directly into your Lexmark printers. - Lexmark network printers and change their printing order, and hold or delete specific jobs. - This document is a Web-based printer management utility that comes with intranet access. 26 Chapter 2: MarkVision ...
...MarkVision for Intranets User's Guide. • MarkVision Installation and Configuration Guide. Messages on the Drivers, MarkVision and Utilities CD that : • Lets you printer capabilities. • MarkVision provides the tools to the documentation installed with the software: &#...installed options. - Note: You can integrate MarkVision directly into your Lexmark printers. - Lexmark network printers and change their printing order, and hold or delete specific jobs. - This document is a Web-based printer management utility that comes with intranet access. 26 Chapter 2: MarkVision ...
User's Guide
Page 41
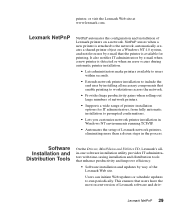
... more than a dozen steps in Windows NT environments running TCP/IP. • Automates the setup of printer installation options for printing. Lexmark NetPnP 29 Software Installation and Distribution Tools On the Drivers, MarkVision and Utilities CD, Lexmark's allin-one software installation utility provides IT administrators with time-saving installation and distribution tools that users...
... more than a dozen steps in Windows NT environments running TCP/IP. • Automates the setup of printer installation options for printing. Lexmark NetPnP 29 Software Installation and Distribution Tools On the Drivers, MarkVision and Utilities CD, Lexmark's allin-one software installation utility provides IT administrators with time-saving installation and distribution tools that users...
User's Guide
Page 42
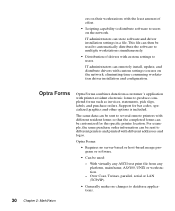
... to users on the network, eliminating time-consuming workstation driver installation and configuration. ers on their workstations with custom settings to users. IT administrators can be sent to several remote printers with printer-resident electronic forms to produce completed forms such as invoices...text print file from a customer's application with different resident forms so that the completed forms can store software and driver installation settings in a file. Optra Forms: • Requires no changes to users on the network. With virtually any platform, mainframe, AS/400,...
... to users on the network, eliminating time-consuming workstation driver installation and configuration. ers on their workstations with custom settings to users. IT administrators can be sent to several remote printers with printer-resident electronic forms to produce completed forms such as invoices...text print file from a customer's application with different resident forms so that the completed forms can store software and driver installation settings in a file. Optra Forms: • Requires no changes to users on the network. With virtually any platform, mainframe, AS/400,...
User's Guide
Page 45
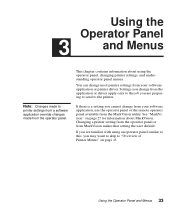
...33 This chapter contains information about MarkVision. Settings you change from the application or driver apply only to the job you are familiar with using an operator panel similar to this, you cannot change most printer settings from the operator panel. See "MarkVision" on page 43. If there..., use the operator panel or the remote operator panel available from MarkVision makes that setting the user default. Changing a printer setting from the operator panel or from the MarkVision utility. Using the Operator Panel 3 and Menus Note: Changes made to "Overview of...
...33 This chapter contains information about MarkVision. Settings you change from the application or driver apply only to the job you are familiar with using an operator panel similar to this, you cannot change most printer settings from the operator panel. See "MarkVision" on page 43. If there..., use the operator panel or the remote operator panel available from MarkVision makes that setting the user default. Changing a printer setting from the operator panel or from the MarkVision utility. Using the Operator Panel 3 and Menus Note: Changes made to "Overview of...

User's Guide
Page 50
...can select are described in more detail in the tables indicates the factory default setting. Note: Changes made from a software application or driver override the user default settings made from the operator panel, the asterisk moves next to the selected setting to identify it easy for... next to a value in the tables beginning on page 43 shows the menus and all of menus are available to change printer settings. These settings are the original printer settings. (Factory defaults may only be effective for more information. The diagram on page 44. Some menus appear only if ...
...can select are described in more detail in the tables indicates the factory default setting. Note: Changes made from a software application or driver override the user default settings made from the operator panel, the asterisk moves next to the selected setting to identify it easy for... next to a value in the tables beginning on page 43 shows the menus and all of menus are available to change printer settings. These settings are the original printer settings. (Factory defaults may only be effective for more information. The diagram on page 44. Some menus appear only if ...
User's Guide
Page 65
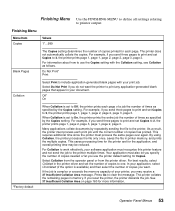
... Panel Menus 53 Select Do Not Print if you may be reduced. Select Collation from the operator panel or from the printer driver. In your application, select Uncollated (if the option is complex or exceeds the memory capacity of times as follows. The... copies. For information about how to print any application-generated blank pages that appear in the printer driver and set Copies to 2, the printer prints page 1, page 2, page 3, page 1, page 2, page 3. When Collation is set Copies to 2, the printer prints page 1, page 1, page 2, page 2, page 3, page 3. For best results, ...
... Panel Menus 53 Select Do Not Print if you may be reduced. Select Collation from the operator panel or from the printer driver. In your application, select Uncollated (if the option is complex or exceeds the memory capacity of times as follows. The... copies. For information about how to print any application-generated blank pages that appear in the printer driver and set Copies to 2, the printer prints page 1, page 2, page 3, page 1, page 2, page 3. When Collation is set Copies to 2, the printer prints page 1, page 1, page 2, page 2, page 3, page 3. For best results, ...
User's Guide
Page 72
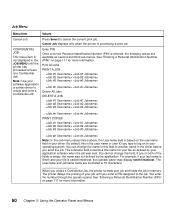
... smith timesheet. You cannot change the name in this field to another name in your software application or printer driver to cancel the current print job. Cancel Job displays only when the printer is empty, the name was sent. See "Entering a Personal Identification Number (PIN)" on page 111 for...one or both of your job until you type to log on the username field in the driver before you create a Confidential Job, the printer formats your file is based on to the job. The printer delays the printing of the fields is processing a print job. See "Entering a Personal ...
... smith timesheet. You cannot change the name in this field to another name in your software application or printer driver to cancel the current print job. Cancel Job displays only when the printer is empty, the name was sent. See "Entering a Personal Identification Number (PIN)" on page 111 for...one or both of your job until you type to log on the username field in the driver before you create a Confidential Job, the printer formats your file is based on to the job. The printer delays the printing of the fields is processing a print job. See "Entering a Personal ...
User's Guide
Page 77
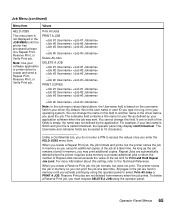
... do not enter a PIN to select Print All Jobs or PRINT A JOB. Reserve Print jobs are automatically deleted when the printer requires extra memory to your software application or printer driver to 16 characters. Unlike a Confidential Job, you may display smith timesheet. Operator Panel Menus 65 Print All Jobs PRINT A JOB... request DELETE A JOB using the operator panel to access the values once you create a Reserve Print job, the job formats, but the printer stores the job in memory so you can change this is the user name or user ID you type in to log on the username...
... do not enter a PIN to select Print All Jobs or PRINT A JOB. Reserve Print jobs are automatically deleted when the printer requires extra memory to your software application or printer driver to 16 characters. Unlike a Confidential Job, you may display smith timesheet. Operator Panel Menus 65 Print All Jobs PRINT A JOB... request DELETE A JOB using the operator panel to access the values once you create a Reserve Print job, the job formats, but the printer stores the job in memory so you can change this is the user name or user ID you type in to log on the username...
User's Guide
Page 78
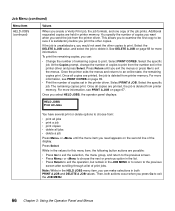
... number of copies you want the other copies. Press Return until you exit the menus or press Go to delete it is deleted from the printer driver. Select PRINT A JOB. Select the specific job. Select the DELETE A JOB value, and select the job to exit the menus. Once all copies.... Select the specific job. You specify the number of remaining copies to choose from the number set in the printer driver and press Select. Once the printer exits the menus and returns to print from : • print all jobs • print a job • print copies • delete all copies are ...
... number of copies you want the other copies. Press Return until you exit the menus or press Go to delete it is deleted from the printer driver. Select PRINT A JOB. Select the specific job. Select the DELETE A JOB value, and select the job to exit the menus. Once all copies.... Select the specific job. You specify the number of remaining copies to choose from the number set in the printer driver and press Select. Once the printer exits the menus and returns to print from : • print all jobs • print a job • print copies • delete all copies are ...
User's Guide
Page 94
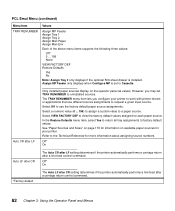
... source assignments to request a given input source. Off* On Auto LF after CR The Auto CR after LF setting determines if the printer automatically performs a carriage return after a carriage return control command. 82 Chapter 3: Using the Operator Panel and Menus Auto CR after LF...a paper source. The TRAY RENUMBER menu item lets you may set to Cassette. Refer to the Technical Reference for your printer to work with printer drivers or applications that use the factory default paper source assignments. PCL Emul Menu (continued) Menu Item TRAY RENUMBER Values Assign MP...
... source assignments to request a given input source. Off* On Auto LF after CR The Auto CR after LF setting determines if the printer automatically performs a carriage return after a carriage return control command. 82 Chapter 3: Using the Operator Panel and Menus Auto CR after LF...a paper source. The TRAY RENUMBER menu item lets you may set to Cassette. Refer to the Technical Reference for your printer to work with printer drivers or applications that use the factory default paper source assignments. PCL Emul Menu (continued) Menu Item TRAY RENUMBER Values Assign MP...
User's Guide
Page 120
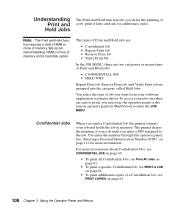
... Number (PIN)" on page 111 for more of a job, print it later, and ask for additional copies. To access your software application or printer driver. tion requires a total of 8MB or more information about Confidential Jobs, see CONFIDENTIAL JOB on page 60. • To print all Confidential Jobs,...additional copies of your job and holds the job in MarkVision to print, you send a Confidential Job, the printer formats your job until you enter a PIN assigned to the job. The printer delays the printing of a Confidential Job, see PRINT A JOB on page 64. 108 Chapter 3: Using ...
... Number (PIN)" on page 111 for more of a job, print it later, and ask for additional copies. To access your software application or printer driver. tion requires a total of 8MB or more information about Confidential Jobs, see CONFIDENTIAL JOB on page 60. • To print all Confidential Jobs,...additional copies of your job and holds the job in MarkVision to print, you send a Confidential Job, the printer formats your job until you enter a PIN assigned to the job. The printer delays the printing of a Confidential Job, see PRINT A JOB on page 64. 108 Chapter 3: Using ...

