
User's Guide
Page 3
... x Online Documents x Trademarks xi 1 Setting Up Your Printer 1 Unpacking Your Printer 1 Removing Print Cartridge Packaging 2 Installing the Print Cartridge 5 Loading the Standard Input Tray 6 Installing the Paper Bail 11 Connecting Your Printer to a Computer 12 Using a Parallel Cable 12 Using ...a USB Cable 14 Plugging the Printer In 20 Turning the Printer Power On 20 Printing the Menu Settings Page 21 Installing the Operator Panel Overlay 22 Changing the Operator Panel Display Language 23 Installing Printer Drivers...
... x Online Documents x Trademarks xi 1 Setting Up Your Printer 1 Unpacking Your Printer 1 Removing Print Cartridge Packaging 2 Installing the Print Cartridge 5 Loading the Standard Input Tray 6 Installing the Paper Bail 11 Connecting Your Printer to a Computer 12 Using a Parallel Cable 12 Using ...a USB Cable 14 Plugging the Printer In 20 Turning the Printer Power On 20 Printing the Menu Settings Page 21 Installing the Operator Panel Overlay 22 Changing the Operator Panel Display Language 23 Installing Printer Drivers...
User's Guide
Page 10
Online Documents The Drivers, MarkVision and Utilities compact disc (CD) that comes with your printer contains several different networks. It also describes some of the most popular MarkVision features. • Documents which provide general ... PAPER MENU. Refer to the booklet that comes with the CD for your printer. • A Technical Reference which includes information about your printer and other Lexmark products and services. The CD includes: The MarkVision printer utility information, which provides step-by-step instructions for installing MarkVision for Windows ...
Online Documents The Drivers, MarkVision and Utilities compact disc (CD) that comes with your printer contains several different networks. It also describes some of the most popular MarkVision features. • Documents which provide general ... PAPER MENU. Refer to the booklet that comes with the CD for your printer. • A Technical Reference which includes information about your printer and other Lexmark products and services. The CD includes: The MarkVision printer utility information, which provides step-by-step instructions for installing MarkVision for Windows ...
User's Guide
Page 26
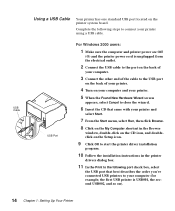
...icon, and doubleclick on the Setup icon. 9 Click OK to start the printer driver installation program. 10 Follow the installation instructions in the printer drivers dialog box. 11 In the Print to the following steps to your printer using a USB cable. USB Port For Windows 2000 users: 1 Make ...sure the computer and printer power are Off (O) and the printer power cord is unplugged from the electrical...
...icon, and doubleclick on the Setup icon. 9 Click OK to start the printer driver installation program. 10 Follow the installation instructions in the printer drivers dialog box. 11 In the Print to the following steps to your printer using a USB cable. USB Port For Windows 2000 users: 1 Make ...sure the computer and printer power are Off (O) and the printer power cord is unplugged from the electrical...
User's Guide
Page 27
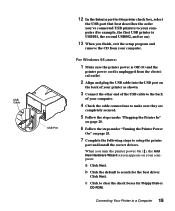
... On (|), the Add New Hardware Wizard screen appears on page 20. 7 Complete the following steps to setup the printer port and install the correct drivers. When you finish, exit the setup program and remove the CD from the electrical outlet. 2 Align and plug the USB cable into the USB port ...on the back of your printer as shown. 3 Connect the other end of the USB cable to the back of your computer...
... On (|), the Add New Hardware Wizard screen appears on page 20. 7 Complete the following steps to setup the printer port and install the correct drivers. When you finish, exit the setup program and remove the CD from the electrical outlet. 2 Align and plug the USB cable into the USB port ...on the back of your printer as shown. 3 Connect the other end of the USB cable to the back of your computer...

User's Guide
Page 28
Double-click to install the printer driver. When the next screen appears that came with your printer. l Click Printer Software. m Select Install from this laser printer to select Optra M410 or Optra M412. o Select Custom Install and click Next. p Click Next. Complete the following to select it. The Choose your CD-ROM drive. q Scroll through the list ...
Double-click to install the printer driver. When the next screen appears that came with your printer. l Click Printer Software. m Select Install from this laser printer to select Optra M410 or Optra M412. o Select Custom Install and click Next. p Click Next. Complete the following to select it. The Choose your CD-ROM drive. q Scroll through the list ...
User's Guide
Page 29
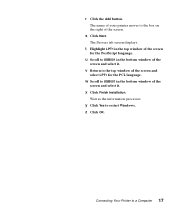
... top window of the screen and select LPT1 for the PostScript language. v Return to restart Windows. s Click Next. The name of the screen. Connecting Your Printer to the box on the right of your printer moves to a Computer 17 The Drivers tab screen displays. Wait as the information processes.
... top window of the screen and select LPT1 for the PostScript language. v Return to restart Windows. s Click Next. The name of the screen. Connecting Your Printer to the box on the right of your printer moves to a Computer 17 The Drivers tab screen displays. Wait as the information processes.
User's Guide
Page 34
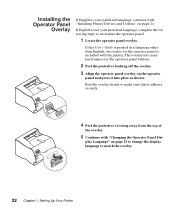
Rub the overlay firmly to make sure that it into place as shown. If English is not your preferred language, continue with "Installing Printer Drivers and Utilities" on page 24. play Language" on the operator panel and press it adheres securely. 4 Peel the protective covering away from ...the top of the overlay. 5 Continue with the printer. If this User's Guide is printed in a language other than English, an overlay for the operator panel buttons. 2 Peel the protective backing off ...
Rub the overlay firmly to make sure that it into place as shown. If English is not your preferred language, continue with "Installing Printer Drivers and Utilities" on page 24. play Language" on the operator panel and press it adheres securely. 4 Peel the protective covering away from ...the top of the overlay. 5 Continue with the printer. If this User's Guide is printed in a language other than English, an overlay for the operator panel buttons. 2 Peel the protective backing off ...
User's Guide
Page 36
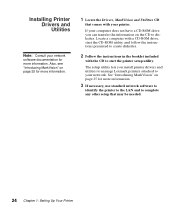
... utility. If your computer does not have a CD-ROM drive, you install printer drivers and utilities to manage Lexmark printers attached to complete any other setup that comes with the CD to diskettes. The setup utility lets you can transfer the... for more information. 3 If necessary, use standard network software to identify the printer to the LAN and to your network. Installing Printer Drivers and Utilities Note: Consult your network software documentation for more information. 1 Locate the Drivers, MarkVision and Utilities CD that may be needed. 24 Chapter 1: Setting Up ...
... utility. If your computer does not have a CD-ROM drive, you install printer drivers and utilities to manage Lexmark printers attached to complete any other setup that comes with the CD to diskettes. The setup utility lets you can transfer the... for more information. 3 If necessary, use standard network software to identify the printer to the LAN and to your network. Installing Printer Drivers and Utilities Note: Consult your network software documentation for more information. 1 Locate the Drivers, MarkVision and Utilities CD that may be needed. 24 Chapter 1: Setting Up ...
User's Guide
Page 37
... Windows 95/98/2000, Windows NT 4.0, Macintosh, and OS/2 Warp is shipped with your printer on the Drivers, MarkVision and Utilities CD that comes with your printer: • Introduction to MarkVision • Installation Tips Operating Systems Supported MarkVision for Lexmark printers connected locally or attached directly to increase productivity: • Centralized setup capabilities let you...
... Windows 95/98/2000, Windows NT 4.0, Macintosh, and OS/2 Warp is shipped with your printer on the Drivers, MarkVision and Utilities CD that comes with your printer: • Introduction to MarkVision • Installation Tips Operating Systems Supported MarkVision for Lexmark printers connected locally or attached directly to increase productivity: • Centralized setup capabilities let you...
User's Guide
Page 38
...Drivers, MarkVision and Utilities CD that : • Lets you printer capabilities. • MarkVision provides the tools to the documentation installed with your favorite network management software. MarkVision for Intranet Servers This section provides a brief overview of MarkVision for multivendor printers...Intranet Servers, refer to make printerrelated administrative tasks effortless. - Lexmark network printers and change their printing order, and hold or delete specific jobs. - The dynamic printer graphic provides a visual confirmation of installed features shows you monitor ...
...Drivers, MarkVision and Utilities CD that : • Lets you printer capabilities. • MarkVision provides the tools to the documentation installed with your favorite network management software. MarkVision for Intranet Servers This section provides a brief overview of MarkVision for multivendor printers...Intranet Servers, refer to make printerrelated administrative tasks effortless. - Lexmark network printers and change their printing order, and hold or delete specific jobs. - The dynamic printer graphic provides a visual confirmation of installed features shows you monitor ...
User's Guide
Page 41
... to the network, automatically creates a shared printer object on a network. Software Installation and Distribution Tools On the Drivers, MarkVision and Utilities CD, Lexmark's allin-one software installation utility provides IT administrators with time-saving installation and distribution tools that users have the most recent version of the Lexmark Web site. This ensures that enhance...
... to the network, automatically creates a shared printer object on a network. Software Installation and Distribution Tools On the Drivers, MarkVision and Utilities CD, Lexmark's allin-one software installation utility provides IT administrators with time-saving installation and distribution tools that users have the most recent version of the Lexmark Web site. This ensures that enhance...
User's Guide
Page 42
... custom settings to users. This file can remotely install, update, and distribute drivers with custom settings to several remote printers with printer-resident electronic forms to database applications. 30 Chapter 2: MarkVision IT administrators can then be used : - Optra Forms: • Requires no changes to produce completed forms such as invoices, statements, pick slips, labels...
... custom settings to users. This file can remotely install, update, and distribute drivers with custom settings to several remote printers with printer-resident electronic forms to database applications. 30 Chapter 2: MarkVision IT administrators can then be used : - Optra Forms: • Requires no changes to produce completed forms such as invoices, statements, pick slips, labels...
User's Guide
Page 45
...MarkVision makes that setting the user default. If there is a setting you cannot change from your software application or printer driver. If you may want to skip to "Overview of Printer Menus" on page 25 for information about using an operator panel similar to this, you are preparing to send to... the job you are familiar with using the operator panel, changing printer settings, and understanding operator panel menus. Using the Operator Panel and Menus 33 This chapter contains information about MarkVision. Changing...
...MarkVision makes that setting the user default. If there is a setting you cannot change from your software application or printer driver. If you may want to skip to "Overview of Printer Menus" on page 25 for information about using an operator panel similar to this, you are preparing to send to... the job you are familiar with using the operator panel, changing printer settings, and understanding operator panel menus. Using the Operator Panel and Menus 33 This chapter contains information about MarkVision. Changing...

User's Guide
Page 50
...Note: Changes made from a software application or driver override the user default settings made from the operator panel, the asterisk moves next to the selected setting to identify it easy for a particular printer language. These settings are the original printer settings. (Factory defaults may only be effective for... defaults are available to make it as the current user default setting. The items in each menu. When you use the specified printer language. You can select are described in more detail in the tables beginning on page 44. See "Changing Menu Settings" on ...
...Note: Changes made from a software application or driver override the user default settings made from the operator panel, the asterisk moves next to the selected setting to identify it easy for a particular printer language. These settings are the original printer settings. (Factory defaults may only be effective for... defaults are available to make it as the current user default setting. The items in each menu. When you use the specified printer language. You can select are described in more detail in the tables beginning on page 44. See "Changing Menu Settings" on ...
User's Guide
Page 65
... copies. If the job is set the number of copies to Off, the printer prints each page of a job the number of your printer, you do not want . The printer collates the remaining pages in the printer driver and set to one. See 37 Insufficient Collation Area on page 160 for each... print job until the correct number of times as follows. Operator Panel Menus 53 For information about how to printer output. ...
... copies. If the job is set the number of copies to Off, the printer prints each page of a job the number of your printer, you do not want . The printer collates the remaining pages in the printer driver and set to one. See 37 Insufficient Collation Area on page 160 for each... print job until the correct number of times as follows. Operator Panel Menus 53 For information about how to printer output. ...
User's Guide
Page 72
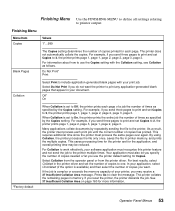
... JOB This menu item is processing a print job. PRINT COPIES ... If one Confidential Job. When you create a Confidential Job, the printer formats your application software when the job was not defined by your job and holds the job in the JOB MENU until you send the...fields is entered, the following values are truncated to the job. Note: Use your job until the printer has processed at least one or both of your software application or printer driver to your operating system. The Username and Jobname fields are available as defined by the application. Job...
... JOB This menu item is processing a print job. PRINT COPIES ... If one Confidential Job. When you create a Confidential Job, the printer formats your application software when the job was not defined by your job and holds the job in the JOB MENU until you send the...fields is entered, the following values are truncated to the job. Note: Use your job until the printer has processed at least one or both of your software application or printer driver to your operating system. The Username and Jobname fields are available as defined by the application. Job...
User's Guide
Page 77
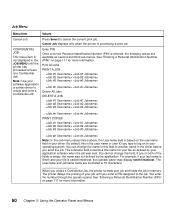
...the Username field is called timesheet, the operator panel may print additional copies. The printer stores the job in memory so you can change this setting, refer to your file as the job remains stored in the driver before you do not enter a PIN to create and send a Repeat Print, Reserve... at a later time. If one or both of the set limit for your operating system. As long as defined by your software application or printer driver to access the values once you create a Repeat Print job, the job formats and prints, but does not print. Operator Panel Menus 65 When...
...the Username field is called timesheet, the operator panel may print additional copies. The printer stores the job in memory so you can change this setting, refer to your file as the job remains stored in the driver before you do not enter a PIN to create and send a Repeat Print, Reserve... at a later time. If one or both of the set limit for your operating system. As long as defined by your software application or printer driver to access the values once you create a Repeat Print job, the job formats and prints, but does not print. Operator Panel Menus 65 When...
User's Guide
Page 78
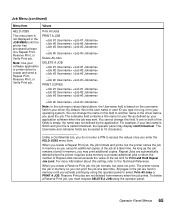
...print the other copies to print from the number set in the printer driver. To print the remaining copies, you would not want when you create a Verify Print job, the job formats, and one copy of copies set in printer memory. At the Copies prompt, change the number of remaining copies... 67. Job Menu (continued) Menu Item HELD JOBS (continued) Values When you send the job from the printer driver. You specify the number of copies you want the other copies. Once the printer exits the menus and returns to delete it is unsatisfactory, you can: • Change the number of copies...
...print the other copies to print from the number set in the printer driver. To print the remaining copies, you would not want when you create a Verify Print job, the job formats, and one copy of copies set in printer memory. At the Copies prompt, change the number of remaining copies... 67. Job Menu (continued) Menu Item HELD JOBS (continued) Values When you send the job from the printer driver. You specify the number of copies you want the other copies. Once the printer exits the menus and returns to delete it is unsatisfactory, you can: • Change the number of copies...
User's Guide
Page 94
... menu item, select Yes to return all tray assignments to use different source assignments to the Technical Reference for your printer to work with printer drivers or applications that use the factory default paper source assignments. PCL Emul Menu (continued) Menu Item TRAY RENUMBER Values ... to factory default values. Select VIEW FACTORY DEF to view the factory default values assigned to uninstalled sources. However, you configure your printer. The TRAY RENUMBER menu item lets you may set to a paper source. Refer to request a given input source. Assign MP Feeder...
... menu item, select Yes to return all tray assignments to use different source assignments to the Technical Reference for your printer to work with printer drivers or applications that use the factory default paper source assignments. PCL Emul Menu (continued) Menu Item TRAY RENUMBER Values ... to factory default values. Select VIEW FACTORY DEF to view the factory default values assigned to uninstalled sources. However, you configure your printer. The TRAY RENUMBER menu item lets you may set to a paper source. Refer to request a given input source. Assign MP Feeder...
User's Guide
Page 120
To access your job until you enter a PIN assigned to the job. The printer delays the printing of your jobs once they are grouped into the category called Held Jobs. You enter the number through the operator panel. See "... 111 for additional copies. For more information. Understanding Print and Hold Jobs The Print and Hold function lets you send a Confidential Job, the printer formats your software application or printer driver. You select the type of a Confidential Job, see PRINT COPIES on page 62. • To print additional copies of job you must...
To access your job until you enter a PIN assigned to the job. The printer delays the printing of your jobs once they are grouped into the category called Held Jobs. You enter the number through the operator panel. See "... 111 for additional copies. For more information. Understanding Print and Hold Jobs The Print and Hold function lets you send a Confidential Job, the printer formats your software application or printer driver. You select the type of a Confidential Job, see PRINT COPIES on page 62. • To print additional copies of job you must...

