User's Guide
Page 2
Contents Safety information 7 Learning about the printer 8 Printer overview...8 Applying control panel overlays...9 Understanding the printer features and functions 10 Printing a demonstration page...12 Printing a network setup page...14 Printing from Windows or DOS...14 Using IBM emulation mode...15 Using Epson ... 23 Setting the forms thickness lever...23 Paper paths...25 Using the Tear Off function...25 Loading continuous paper...26 Loading continuous forms using the push tractor...26 Front loading continuous forms using the pull tractor ...29 Bottom loading continuous forms using the pull...
Contents Safety information 7 Learning about the printer 8 Printer overview...8 Applying control panel overlays...9 Understanding the printer features and functions 10 Printing a demonstration page...12 Printing a network setup page...14 Printing from Windows or DOS...14 Using IBM emulation mode...15 Using Epson ... 23 Setting the forms thickness lever...23 Paper paths...25 Using the Tear Off function...25 Loading continuous paper...26 Loading continuous forms using the push tractor...26 Front loading continuous forms using the pull tractor ...29 Bottom loading continuous forms using the pull...
User's Guide
Page 3
... Changing menu settings (an example)...49 Setup Mode - Main menu...50 Main menu options...50 Forms Macro options...51 Data options ...52 Control options...54 Emulation options ...55 Interface options...56 Maintaining the printer 57 Ordering supplies...57 Removing the ribbon cartridge...57 Cleaning the printer...57 Recycling Lexmark products...58 Administrative support 59 Restoring...
... Changing menu settings (an example)...49 Setup Mode - Main menu...50 Main menu options...50 Forms Macro options...51 Data options ...52 Control options...54 Emulation options ...55 Interface options...56 Maintaining the printer 57 Ordering supplies...57 Removing the ribbon cartridge...57 Cleaning the printer...57 Recycling Lexmark products...58 Administrative support 59 Restoring...
User's Guide
Page 11
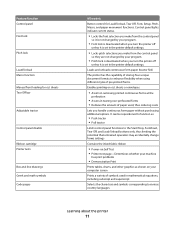
... Locks the font selection you make from the control panel so it is set in the printer default settings. Loads and unloads continuous form paper (tractor fed) The printer has the capability of storing four unique document formats to enhance flexibility when using different styles of...variety of symbols used , thus reducing costs Lets you handle continuous form paper without purchasing additional options. Feature/function Control panel Font lock Pitch lock Load/Unload Macro function Manual front loading for Load/Unload, Tear Off, Font, Setup, Pitch, Macro, and paper movement functions.
... Locks the font selection you make from the control panel so it is set in the printer default settings. Loads and unloads continuous form paper (tractor fed) The printer has the capability of storing four unique document formats to enhance flexibility when using different styles of...variety of symbols used , thus reducing costs Lets you handle continuous form paper without purchasing additional options. Feature/function Control panel Font lock Pitch lock Load/Unload Macro function Manual front loading for Load/Unload, Tear Off, Font, Setup, Pitch, Macro, and paper movement functions.
User's Guide
Page 14
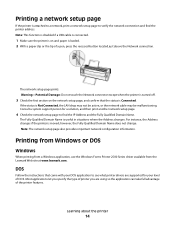
... status is moved; Printing from Windows or DOS Windows When printing from a Windows application, use the Windows Forms Printer 2500 Series driver available from the Lexmark Web site at www.lexmark.com. DOS Follow the instructions that the status is loaded. 2 With a paper clip or the tip ...drop may not be active, or the network cable may be malfunctioning. Note: The network setup page also provides important network configuration information. Printing a network setup page If the printer is useful in situations where the Address changes. however, the Fully Qualified Domain Name does ...
... status is moved; Printing from Windows or DOS Windows When printing from a Windows application, use the Windows Forms Printer 2500 Series driver available from the Lexmark Web site at www.lexmark.com. DOS Follow the instructions that the status is loaded. 2 With a paper clip or the tip ...drop may not be active, or the network cable may be malfunctioning. Note: The network setup page also provides important network configuration information. Printing a network setup page If the printer is useful in situations where the Address changes. however, the Fully Qualified Domain Name does ...
User's Guide
Page 18
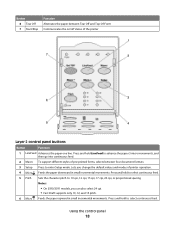
... Tear Off 7 Start/Stop Function Alternates the paper between four document formats 3 Setup Press to advance the paper 5 micro movements, and then go into continuous feed. 2 Macro To support different styles of printer operation. 4 Micro Feeds the paper downward in small incremental movements. Press and ...spacing Notes: • On 2590/2591 models, you change the default values and modes of pre-printed forms, selects between Tear Off and Top-Of-Form Communicates the on/off status of the printer Layer 2 control panel buttons Button Function 1 LineFeed Advances the paper one line.
... Tear Off 7 Start/Stop Function Alternates the paper between four document formats 3 Setup Press to advance the paper 5 micro movements, and then go into continuous feed. 2 Macro To support different styles of printer operation. 4 Micro Feeds the paper downward in small incremental movements. Press and ...spacing Notes: • On 2590/2591 models, you change the default values and modes of pre-printed forms, selects between Tear Off and Top-Of-Form Communicates the on/off status of the printer Layer 2 control panel buttons Button Function 1 LineFeed Advances the paper one line.
User's Guide
Page 19
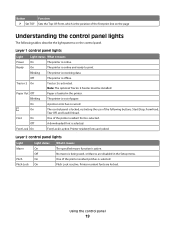
...On The control panel is locked, restricting the use of paper. Pitch Lock is loaded in the Setup menu. Note: The optional Tractor 2 Feeder must be installed. On A printer error has occurred. Layer 2 control panel lights Light Macro Pitch Pitch Lock Light status On Off On... Button Function 7 Set TOF Sets the Top-Of-Form, which is the position of the printer resident fonts is selected. Layer 1 control panel lights Light Light status What it means The specified macro function is active. Blinking The printer is selected. Off A downloaded font is receiving data...
...On The control panel is locked, restricting the use of paper. Pitch Lock is loaded in the Setup menu. Note: The optional Tractor 2 Feeder must be installed. On A printer error has occurred. Layer 2 control panel lights Light Macro Pitch Pitch Lock Light status On Off On... Button Function 7 Set TOF Sets the Top-Of-Form, which is the position of the printer resident fonts is selected. Layer 1 control panel lights Light Light status What it means The specified macro function is active. Blinking The printer is selected. Off A downloaded font is receiving data...

User's Guide
Page 25
...; Off-Lets you move a continuous form manually to the tear off position. Front loading paper Rear loading paper Paper paths for the push tractor In these examples, the tractor pulls the paper from the front or the bottom of the printer. For more information, see "Using Setup mode" on page 48. Note: ...The Tear Off function works only when the tractor unit is in the Setup menu or from your program. Paper paths Paper paths for the pull tractor...
...; Off-Lets you move a continuous form manually to the tear off position. Front loading paper Rear loading paper Paper paths for the push tractor In these examples, the tractor pulls the paper from the front or the bottom of the printer. For more information, see "Using Setup mode" on page 48. Note: ...The Tear Off function works only when the tractor unit is in the Setup menu or from your program. Paper paths Paper paths for the pull tractor...

User's Guide
Page 48
... called factory default settings. This chapter describes how to set form length. These are loaded in the printer when using Setup mode. 1 Open the control panel to access layer 2. 2 Press Setup to put the printer in Setup mode and print the Main menu. 3 Press LineFeed to print a list of available options you can change the factory...
... called factory default settings. This chapter describes how to set form length. These are loaded in the printer when using Setup mode. 1 Open the control panel to access layer 2. 2 Press Setup to put the printer in Setup mode and print the Main menu. 3 Press LineFeed to print a list of available options you can change the factory...

User's Guide
Page 49
... are saved only when the printer exits Setup mode. Note: If the printer runs out of how to change the Menu Language setting. 1 With the printer in the printer when using Setup mode, load more Control Options. Printer Setup mode-Main menu To Select Press Exit and Save Setup Set TOF Print All LineFeed Forms Macro Options Macro Data Options...
... are saved only when the printer exits Setup mode. Note: If the printer runs out of how to change the Menu Language setting. 1 With the printer in the printer when using Setup mode, load more Control Options. Printer Setup mode-Main menu To Select Press Exit and Save Setup Set TOF Print All LineFeed Forms Macro Options Macro Data Options...

User's Guide
Page 50
...that corresponds to the language you return to the Main menu, press Set TOF to exit Setup mode and save the new setting. Main menu Main menu options Note: Use Setup mode to configure the printer according to your needs. Menu Language To Select Press No Change Set TOF English LineFeed French... Macro German Micro Italian Micro (More) Setup Return to Main menu Pitch Printer menus now print in French. 6 Press Pitch to return to the Main menu or press Set TOF (No Change) to go back ...
...that corresponds to the language you return to the Main menu, press Set TOF to exit Setup mode and save the new setting. Main menu Main menu options Note: Use Setup mode to configure the printer according to your needs. Menu Language To Select Press No Change Set TOF English LineFeed French... Macro German Micro Italian Micro (More) Setup Return to Main menu Pitch Printer menus now print in French. 6 Press Pitch to return to the Main menu or press Set TOF (No Change) to go back ...
User's Guide
Page 51
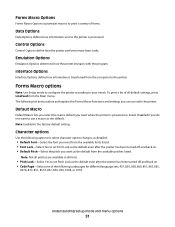
... powered on. Forms Macro options Note: Use Setup mode to configure the printer according to set Pitch Lock as the default even after the printer has been turned off and back on. • Code Page-Select one of all fonts. • Pitch Lock-Select Yes to the printer is processed. ...a macro as the default. Understanding Setup mode and menu options 51 Forms Macro Options Forms Macro Options customizes macros to print a variety of forms. Data Options Data Options defines how information sent to set Font Lock as the default even after the printer has been turned off and back on...
... powered on. Forms Macro options Note: Use Setup mode to configure the printer according to set Pitch Lock as the default even after the printer has been turned off and back on. • Code Page-Select one of all fonts. • Pitch Lock-Select Yes to the printer is processed. ...a macro as the default. Understanding Setup mode and menu options 51 Forms Macro Options Forms Macro Options customizes macros to print a variety of forms. Data Options Data Options defines how information sent to set Font Lock as the default even after the printer has been turned off and back on...
User's Guide
Page 52
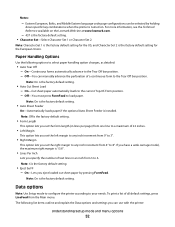
...you can manually advance the perforation of all default settings, press LineFeed from 3 to the current Top-Of-Form position. - Data options Note: Use Setup mode to configure the printer according to the Tear Off bar position. - Note: On is the factory default setting. For more ...information, see the Technical Reference available on the Lexmark Web site at www.lexmark.com. - 437 is the factory default setting. • Form Length This ...
...you can manually advance the perforation of all default settings, press LineFeed from 3 to the current Top-Of-Form position. - Data options Note: Use Setup mode to configure the printer according to the Tear Off bar position. - Note: On is the factory default setting. For more ...information, see the Technical Reference available on the Lexmark Web site at www.lexmark.com. - 437 is the factory default setting. • Form Length This ...
User's Guide
Page 53
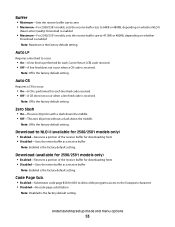
... code page 858 for each line feed code received. • Off-A CR does not occur when a line feed code is the factory default setting. Understanding Setup mode and menu options 53 Buffer • Minimum-Sets the receive buffer size to zero • Maximum-For 2580/2581 models, sets the receive buffer...
... code page 858 for each line feed code received. • Off-A CR does not occur when a line feed code is the factory default setting. Understanding Setup mode and menu options 53 Buffer • Minimum-Sets the receive buffer size to zero • Maximum-For 2580/2581 models, sets the receive buffer...

User's Guide
Page 54
...setting. TOF Read • Enabled-Verifies the Top-Of-Form before printing begins on continuous forms • Disabled-Does not verify the Top-Of-Form before printing on continuous forms Note: Enabled is selected, the printer still prints unidirectionally. Note: Off is the factory default ...Spacing is the factory default setting. Menu Language Select the language you can use with the printer: Uni-Dir Printing • On-The printer prints unidirectionally by line (in . Understanding Setup mode and menu options 54 Demo Print • Enabled-Prints a Demo page • Disabled...
...setting. TOF Read • Enabled-Verifies the Top-Of-Form before printing begins on continuous forms • Disabled-Does not verify the Top-Of-Form before printing on continuous forms Note: Enabled is selected, the printer still prints unidirectionally. Note: Off is the factory default ...Spacing is the factory default setting. Menu Language Select the language you can use with the printer: Uni-Dir Printing • On-The printer prints unidirectionally by line (in . Understanding Setup mode and menu options 54 Demo Print • Enabled-Prints a Demo page • Disabled...

User's Guide
Page 55
... select the character set associated with added capabilities. Note: Disabled is the factory default setting. Emulation options Note: Enter Setup mode to configure the printer according to those used by Epson FX850/FX 1050: Japan, Norway, Denmark II, Korea (2580/2581 models only), ... lets you select Italic Character Table or Epson Extended Graphic Character Table. Quiet • Enabled-The printer prints at a quieter noise level. • Disabled-The printer prints at www.lexmark.com/publications. Note: Printing speed slows in . Note: Graphics is the factory default setting. Note...
... select the character set associated with added capabilities. Note: Disabled is the factory default setting. Emulation options Note: Enter Setup mode to configure the printer according to those used by Epson FX850/FX 1050: Japan, Norway, Denmark II, Korea (2580/2581 models only), ... lets you select Italic Character Table or Epson Extended Graphic Character Table. Quiet • Enabled-The printer prints at a quieter noise level. • Disabled-The printer prints at www.lexmark.com/publications. Note: Printing speed slows in . Note: Graphics is the factory default setting. Note...
User's Guide
Page 56
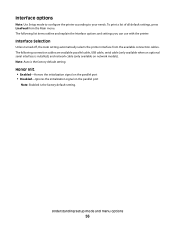
... outline and explain the Interface options and settings you can use with the printer: Interface Selection Unless turned off, the Auto setting automatically selects the printer interface from the Main menu. Interface options Note: Use Setup mode to configure the printer according to your needs. Honor Init. • Enabled-Honors the initialization signal on...
... outline and explain the Interface options and settings you can use with the printer: Interface Selection Unless turned off, the Auto setting automatically selects the printer interface from the Main menu. Interface options Note: Use Setup mode to configure the printer according to your needs. Honor Init. • Enabled-Honors the initialization signal on...

User's Guide
Page 71
...paper guide to the left. • Remove the Auto Sheet Feeder, move the continuous forms to the park position using isopropyl alcohol and a clean cloth. Try one or more of sheet you are possible solutions. Printer does not feed from the optional Tractor 2 Feeder These are trying to On. Rotate ...: • Set the Auto Sheet Feeder locking lever to the back position. • Set the paper select lever to the position. • Enter Setup mode and set the option to print. Troubleshooting 71 • Make sure the right paper guide is set correctly for the type of the following...
...paper guide to the left. • Remove the Auto Sheet Feeder, move the continuous forms to the park position using isopropyl alcohol and a clean cloth. Try one or more of sheet you are possible solutions. Printer does not feed from the optional Tractor 2 Feeder These are trying to On. Rotate ...: • Set the Auto Sheet Feeder locking lever to the back position. • Set the paper select lever to the position. • Enter Setup mode and set the option to print. Troubleshooting 71 • Make sure the right paper guide is set correctly for the type of the following...
User's Guide
Page 74
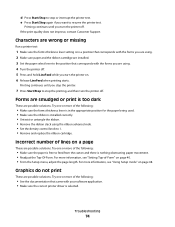
.... For more information, see "Setting Top-of-Form" on page 48. For more information, see "Using Setup mode" on page 40. • From the Setup menu, adjust the page length. If the print quality does not improve, contact Customer Support. Printing continues until you turn the printer off . Incorrect number of the following: •...
.... For more information, see "Setting Top-of-Form" on page 48. For more information, see "Using Setup mode" on page 40. • From the Setup menu, adjust the page length. If the print quality does not improve, contact Customer Support. Printing continues until you turn the printer off . Incorrect number of the following: •...

User's Guide
Page 83
...support Code page substitution 52 F factory default settings restoring 59 FCC notices 77 features and functions printer 10 font locking 21 selecting 21 font lock disabling 21 Forms Macro options Setup mode 51 forms thickness lever setting 23 H Hex Trace mode using 62 I IBM emulation mode using 15 ...Load/Unload function using 20 loading continuous forms 26 cut form or envelope 37 locking control panel 20 M Main menu options 50 menu settings changing 49 N network setup page 14 noise emission levels 79 notices 77, 78, 79, 80 O offline setting printer 20 Okidata MICROLINE emulation mode using ...
...support Code page substitution 52 F factory default settings restoring 59 FCC notices 77 features and functions printer 10 font locking 21 selecting 21 font lock disabling 21 Forms Macro options Setup mode 51 forms thickness lever setting 23 H Hex Trace mode using 62 I IBM emulation mode using 15 ...Load/Unload function using 20 loading continuous forms 26 cut form or envelope 37 locking control panel 20 M Main menu options 50 menu settings changing 49 N network setup page 14 noise emission levels 79 notices 77, 78, 79, 80 O offline setting printer 20 Okidata MICROLINE emulation mode using ...
User's Guide
Page 84
... continues beyond edges of continuous forms 69 printer cleaning 57 features and functions 10 overview 8 parts 8 test 62 printer status checking 63 printer test page interrupting or stopping 62 running 62 printing demonstration page 12 from DOS 14 from Windows 14 network setup page 14 pull position tractor... converting 45 paper paths 25 R recycling Lexmark products 58 WEEE statement 79 ribbon cartridge removing 57 S safety information 7 security supporting IPSec 60 supporting SNMPv3 60 using 802.1x authentication 61 setting Top-Of-Form 40, 41, 42 Setup mode Control options 54 Data options 52 ...
... continues beyond edges of continuous forms 69 printer cleaning 57 features and functions 10 overview 8 parts 8 test 62 printer status checking 63 printer test page interrupting or stopping 62 running 62 printing demonstration page 12 from DOS 14 from Windows 14 network setup page 14 pull position tractor... converting 45 paper paths 25 R recycling Lexmark products 58 WEEE statement 79 ribbon cartridge removing 57 S safety information 7 security supporting IPSec 60 supporting SNMPv3 60 using 802.1x authentication 61 setting Top-Of-Form 40, 41, 42 Setup mode Control options 54 Data options 52 ...


