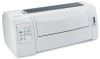
User's Guide
Page 3
... factory default settings...59 Supporting IPSec...60 Supporting SNMPv3...60 Using 802.1x authentication...61 Contents 3 Loading a cut form or envelope manually ...37 Aligning the left margin ...39 Setting Top-of-Form...40 Setting Top-Of-Form for continuous forms in push mode 40 Setting Top-Of-Form for continuous forms in pull mode 41 Setting Top-Of-Form for a cut form or an envelope ...41 Setting Top-Of-Form in a macro ...42 Paper and specialty media guide 43 Paper types and sizes supported...
... factory default settings...59 Supporting IPSec...60 Supporting SNMPv3...60 Using 802.1x authentication...61 Contents 3 Loading a cut form or envelope manually ...37 Aligning the left margin ...39 Setting Top-of-Form...40 Setting Top-Of-Form for continuous forms in push mode 40 Setting Top-Of-Form for continuous forms in pull mode 41 Setting Top-Of-Form for a cut form or an envelope ...41 Setting Top-Of-Form in a macro ...42 Paper and specialty media guide 43 Paper types and sizes supported...
User's Guide
Page 4
... Customer Support 75 Contents 4 Troubleshooting 62 Checking an unresponsive printer...62 Testing the printer...62 Checking the printer status...63 Adjusting character (bidirectional) alignment...65 Solving printing problems...66 Printer test works, but the printer does not print when attached to the computer 66 Printer is noisy...67 Printer sounds like it is printing, but the power light is on a page...74 Graphics do not work, except for Start/Stop, FormFeed, Tear Off and Load/Unload 68 Printer power switch...
... Customer Support 75 Contents 4 Troubleshooting 62 Checking an unresponsive printer...62 Testing the printer...62 Checking the printer status...63 Adjusting character (bidirectional) alignment...65 Solving printing problems...66 Printer test works, but the printer does not print when attached to the computer 66 Printer is noisy...67 Printer sounds like it is printing, but the power light is on a page...74 Graphics do not work, except for Start/Stop, FormFeed, Tear Off and Load/Unload 68 Printer power switch...
User's Guide
Page 11
... symbols corresponding to enhance flexibility when using different styles of pre-printed forms. Enables printing on your machine has print problems • Demonstration Print Prints tables, charts, and other graphics as shown on cut sheets Tear Off bar Adjustable tractor Control panel disable Ribbon cartridge Printer tests Box and line drawings Greek and math symbols Code pages All models Button control for Load/Unload, Tear Off, Font, Setup, Pitch, Macro, and paper movement functions. It can be...
... symbols corresponding to enhance flexibility when using different styles of pre-printed forms. Enables printing on your machine has print problems • Demonstration Print Prints tables, charts, and other graphics as shown on cut sheets Tear Off bar Adjustable tractor Control panel disable Ribbon cartridge Printer tests Box and line drawings Greek and math symbols Code pages All models Button control for Load/Unload, Tear Off, Font, Setup, Pitch, Macro, and paper movement functions. It can be...

User's Guide
Page 20
... printing on . To lock the control panel: 1 Turn the printer off . 2 Press and hold Load/Unload and Tractor while turning the printer on the next page or to the Start/Stop, FormFeed, Tear Off, and Load/Unload buttons, lock the control panel. Setting the printer online or offline The printer must be online to the Top-Of-Form. When the panel is not loaded, the Paper Out light blinks. The Ready light comes on . To change one type of printer...
... printing on . To lock the control panel: 1 Turn the printer off . 2 Press and hold Load/Unload and Tractor while turning the printer on the next page or to the Start/Stop, FormFeed, Tear Off, and Load/Unload buttons, lock the control panel. Setting the printer online or offline The printer must be online to the Top-Of-Form. When the panel is not loaded, the Paper Out light blinks. The Ready light comes on . To change one type of printer...

User's Guide
Page 26
... received data for paper loading instructions. 1 Turn the printer on the next page. • No data, printer control codes, or escape codes have already set to On, it moves the top perforation of a continuous form to the Tear Off position when all of the following are true: • The printer has finished printing. • The paper has advanced to the Top-Of-Form and begins printing. The light blinks. 3 Open the control panel cover to access...
... received data for paper loading instructions. 1 Turn the printer on the next page. • No data, printer control codes, or escape codes have already set to On, it moves the top perforation of a continuous form to the Tear Off position when all of the following are true: • The printer has finished printing. • The paper has advanced to the Top-Of-Form and begins printing. The light blinks. 3 Open the control panel cover to access...

User's Guide
Page 50
... of all default settings, press LineFeed from the Main menu. To print a list of the Main menu page: Understanding Setup mode and menu options 50 3 To change another setting. 7 If you return to the Main menu, press Set TOF to exit Setup mode and save the new setting. Notes: • New settings are saved only when the printer exits Setup mode. • If the printer runs out of paper while you are using Setup mode, load more Menu Language options. 5 For...
... of all default settings, press LineFeed from the Main menu. To print a list of the Main menu page: Understanding Setup mode and menu options 50 3 To change another setting. 7 If you return to the Main menu, press Set TOF to exit Setup mode and save the new setting. Notes: • New settings are saved only when the printer exits Setup mode. • If the printer runs out of paper while you are using Setup mode, load more Menu Language options. 5 For...

User's Guide
Page 54
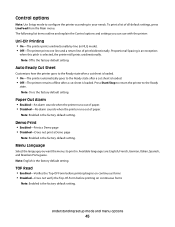
... a cut sheet is loaded. Note: English is the factory default setting. Control options Note: Use Setup mode to configure the printer according to print in NLQ mode). • Off-The printer prints one line and a return line of all default settings, press LineFeed from the Main menu. Note: On is the factory default setting. Demo Print • Enabled-Prints a Demo page • Disabled-Does not print a Demo page Note: Enabled is the factory default setting. TOF Read • Enabled-Verifies the Top-Of-Form before printing begins...
... a cut sheet is loaded. Note: English is the factory default setting. Control options Note: Use Setup mode to configure the printer according to print in NLQ mode). • Off-The printer prints one line and a return line of all default settings, press LineFeed from the Main menu. Note: On is the factory default setting. Demo Print • Enabled-Prints a Demo page • Disabled-Does not print a Demo page Note: Enabled is the factory default setting. TOF Read • Enabled-Verifies the Top-Of-Form before printing begins...

User's Guide
Page 59
... control panel lights blink on and off several times. The factory default settings have been restored once the carrier moves. Administrative support Restoring the factory default settings Restoring the US factory default settings The factory default settings for Europe are : • Code pages: 437 • Character Set: 1 • Form length: 11 inches To restore the factory default settings: 1 Make sure the ribbon cartridge is installed and paper is loaded. 2 Turn the printer off. 3 Open the ribbon access cover. 4 Move the printhead over toward the control panel side of the printer...
... control panel lights blink on and off several times. The factory default settings have been restored once the carrier moves. Administrative support Restoring the factory default settings Restoring the US factory default settings The factory default settings for Europe are : • Code pages: 437 • Character Set: 1 • Form length: 11 inches To restore the factory default settings: 1 Make sure the ribbon cartridge is installed and paper is loaded. 2 Turn the printer off. 3 Open the ribbon access cover. 4 Move the printhead over toward the control panel side of the printer...

User's Guide
Page 63
... condition. Printer status Control panel lights Power Ready Paper Out Power Ready Paper Out Power Ready Paper Out Ready Status On On Off On Off Off On Off Blinking Blinking Action required Normal operating conditions. No action required. Troubleshooting 63 Normal offline condition 1 Load paper. 2 Press Start/Stop. Note: If you installed the optional Tractor 2 Feeder and you with the table information. Use this mode to help diagnose software/driver problems. 1 Make sure the paper is loaded, and the ribbon cartridge is...
... condition. Printer status Control panel lights Power Ready Paper Out Power Ready Paper Out Power Ready Paper Out Ready Status On On Off On Off Off On Off Blinking Blinking Action required Normal operating conditions. No action required. Troubleshooting 63 Normal offline condition 1 Load paper. 2 Press Start/Stop. Note: If you installed the optional Tractor 2 Feeder and you with the table information. Use this mode to help diagnose software/driver problems. 1 Make sure the paper is loaded, and the ribbon cartridge is...
User's Guide
Page 67
... with your DOS application. The paper remains at www.lexmark.com. • If you are using Windows, use the Windows Forms Printer 2500 Series driver available from the Lexmark Web site at the new Top-Of-Form position until the printer beeps and the light blinks. 3 Open the control panel to access layer 2. 4 Press Micro or Micro to move the paper to the new Top-Of-Form position. 6 Press Start/Stop. Troubleshooting 67 Try one or more...
... with your DOS application. The paper remains at www.lexmark.com. • If you are using Windows, use the Windows Forms Printer 2500 Series driver available from the Lexmark Web site at the new Top-Of-Form position until the printer beeps and the light blinks. 3 Open the control panel to access layer 2. 4 Press Micro or Micro to move the paper to the new Top-Of-Form position. 6 Press Start/Stop. Troubleshooting 67 Try one or more...
User's Guide
Page 69
... this problem, your software is overriding your DOS application. Incorrect characters print, left and right tractor doors, and then remove the paper. 7 Remove the ribbon access cover to clear any continuous forms that have already printed. 3 Set the forms thickness lever to align with your control panel font and/or pitch selection, or using DOS, follow the instructions that the selected paper size is the same as the actual paper size. • Adjust...
... this problem, your software is overriding your DOS application. Incorrect characters print, left and right tractor doors, and then remove the paper. 7 Remove the ribbon access cover to clear any continuous forms that have already printed. 3 Set the forms thickness lever to align with your control panel font and/or pitch selection, or using DOS, follow the instructions that the selected paper size is the same as the actual paper size. • Adjust...

User's Guide
Page 73
... print. 3 Replace the ribbon cartridge. 4 Run a printer test. a Make sure the paper and the ribbon cartridge are using. b Turn the printer off. When the print becomes too light, turn the printer on the carrier. 2 Adjust the density control knob from 1 to 2 to increase print darkness. c Press and hold LineFeed while you solve print quality problems. If these suggestions do not correct the problem, contact Customer Support. Print is preset to the wrong number. CHECK THE FORMS...
... print. 3 Replace the ribbon cartridge. 4 Run a printer test. a Make sure the paper and the ribbon cartridge are using. b Turn the printer off. When the print becomes too light, turn the printer on the carrier. 2 Adjust the density control knob from 1 to 2 to increase print darkness. c Press and hold LineFeed while you solve print quality problems. If these suggestions do not correct the problem, contact Customer Support. Print is preset to the wrong number. CHECK THE FORMS...

User's Guide
Page 81
..., in need of the warranty period. You are substantially used parts, which it was originally purchased for your use , free from Lexmark or a Lexmark Remarketer, referred to in this statement as shown on the World Wide Web at Lexmark's option). Limited warranty service The warranty period starts on the date of all print cartridges, programs, data, and removable storage media (unless directed otherwise by any maintenance items...
..., in need of the warranty period. You are substantially used parts, which it was originally purchased for your use , free from Lexmark or a Lexmark Remarketer, referred to in this statement as shown on the World Wide Web at Lexmark's option). Limited warranty service The warranty period starts on the date of all print cartridges, programs, data, and removable storage media (unless directed otherwise by any maintenance items...

User's Guide
Page 83
... and misfeeds troubleshooting paper is jammed in the printer 69 L left margin aligning 39 lights control panel 19 Load/Unload function using 20 loading continuous forms 26 cut form or envelope 37 locking control panel 20 M Main menu options 50 menu settings changing 49 N network setup page 14 noise emission levels 79 notices 77, 78, 79, 80 O offline setting printer 20 Okidata MICROLINE emulation mode using 16 online setting printer 20 ordering supplies 57 P paper advancing 20 paper feed troubleshooting Auto Sheet Feeder feeds multiple sheets 72 Auto Sheet Feeder positions paper incorrectly 72...
... and misfeeds troubleshooting paper is jammed in the printer 69 L left margin aligning 39 lights control panel 19 Load/Unload function using 20 loading continuous forms 26 cut form or envelope 37 locking control panel 20 M Main menu options 50 menu settings changing 49 N network setup page 14 noise emission levels 79 notices 77, 78, 79, 80 O offline setting printer 20 Okidata MICROLINE emulation mode using 16 online setting printer 20 ordering supplies 57 P paper advancing 20 paper feed troubleshooting Auto Sheet Feeder feeds multiple sheets 72 Auto Sheet Feeder positions paper incorrectly 72...
User's Guide
Page 84
... menu options 50 using 48 SNMPv3 60 supplies ordering 57 T Tear Off function using 25 Tear Off position setting 25 Top-Of-Form setting 40, 41, 42 tractor pull position 44 push position 44 Tractor mode selecting 21 troubleshooting checking an unresponsive printer 62 contacting Customer Support 75 restoring factory default settings 59 troubleshooting, jams and misfeeds paper is jammed in the printer 69 troubleshooting, paper feed Auto Sheet Feeder feeds at incorrect rate 71 Auto Sheet Feeder feeds multiple sheets 72 Auto Sheet Feeder...
... menu options 50 using 48 SNMPv3 60 supplies ordering 57 T Tear Off function using 25 Tear Off position setting 25 Top-Of-Form setting 40, 41, 42 tractor pull position 44 push position 44 Tractor mode selecting 21 troubleshooting checking an unresponsive printer 62 contacting Customer Support 75 restoring factory default settings 59 troubleshooting, jams and misfeeds paper is jammed in the printer 69 troubleshooting, paper feed Auto Sheet Feeder feeds at incorrect rate 71 Auto Sheet Feeder feeds multiple sheets 72 Auto Sheet Feeder...
User's Guide
Page 85
... 72 paper fed in Auto Sheet Feeder jams at printer entrance 70 paper jammed in Auto Sheet Feeder 70 printer does not feed from Auto Sheet Feeder 71 printer does not feed paper 70 troubleshooting, print buttons do not work 68 incorrect characters print, left margin changes, or printing stops 69 left margin moves right during printing 68 Print test works, but printer does not print when attached to the computer 66 printer alarm sounds 67 printer is noisy 67 printer power switch is on, but the power light is...
... 72 paper fed in Auto Sheet Feeder jams at printer entrance 70 paper jammed in Auto Sheet Feeder 70 printer does not feed from Auto Sheet Feeder 71 printer does not feed paper 70 troubleshooting, print buttons do not work 68 incorrect characters print, left margin changes, or printing stops 69 left margin moves right during printing 68 Print test works, but printer does not print when attached to the computer 66 printer alarm sounds 67 printer is noisy 67 printer power switch is on, but the power light is...
Quick Reference
Page 12
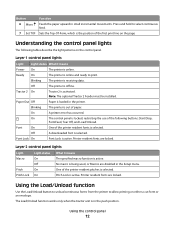
... hold to select continuous feed. 7 Set TOF Sets the Top-Of-Form, which is the position of paper. Paper is out of the first print line on the page Understanding the control panel lights The following buttons: Start/Stop, FormFeed, Tear Off, and Load/Unload. Off A downloaded font is online. Using the Load/Unload function Use the Load/Unload button to unload continuous forms from the printer to print. Blinking The printer is loaded in the push position...
... hold to select continuous feed. 7 Set TOF Sets the Top-Of-Form, which is the position of paper. Paper is out of the first print line on the page Understanding the control panel lights The following buttons: Start/Stop, FormFeed, Tear Off, and Load/Unload. Off A downloaded font is online. Using the Load/Unload function Use the Load/Unload button to unload continuous forms from the printer to print. Blinking The printer is loaded in the push position...
Quick Reference
Page 17
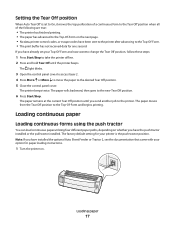
... Start/Stop. Setting the Tear Off position When Auto Tear Off is the push tractor position. The light blinks. 3 Open the control panel cover to access layer 2. 4 Press Micro or Micro to move the paper to the Top-Of-Form. • The print buffer has not received data for paper loading instructions. 1 Turn the printer on whether you have the push tractor installed or the pull tractor installed. The printer beeps twice. Loading paper...
... Start/Stop. Setting the Tear Off position When Auto Tear Off is the push tractor position. The light blinks. 3 Open the control panel cover to access layer 2. 4 Press Micro or Micro to move the paper to the Top-Of-Form. • The print buffer has not received data for paper loading instructions. 1 Turn the printer on whether you have the push tractor installed or the pull tractor installed. The printer beeps twice. Loading paper...

Quick Reference
Page 41
... new setting. Notes: • New settings are using Setup mode, load more Menu Language options. 5 For this example, press Macro to your needs. Control Options Return to Main menu Current Press English Set TOF Return to previous page Enabled LineFeed Menu Language Macro TOF Read Micro Quiet Micro 4 Press the button that corresponds to the language you are saved only when the printer exits Setup mode. • If the printer runs out of all default settings...
... new setting. Notes: • New settings are using Setup mode, load more Menu Language options. 5 For this example, press Macro to your needs. Control Options Return to Main menu Current Press English Set TOF Return to previous page Enabled LineFeed Menu Language Macro TOF Read Micro Quiet Micro 4 Press the button that corresponds to the language you are saved only when the printer exits Setup mode. • If the printer runs out of all default settings...
Quick Reference
Page 45
... page • Disabled-Does not print a Demo page Note: Enabled is the factory default setting. Control options Note: Use Setup mode to configure the printer according to the Ready state. Note: Off is the factory default setting. Note: On is the factory default setting. To print a list of paper. TOF Read • Enabled-Verifies the Top-Of-Form before printing begins on continuous forms • Disabled-Does not verify the Top-Of-Form before printing on continuous forms Note: Enabled is the factory default setting. Menu Language...
... page • Disabled-Does not print a Demo page Note: Enabled is the factory default setting. Control options Note: Use Setup mode to configure the printer according to the Ready state. Note: Off is the factory default setting. Note: On is the factory default setting. To print a list of paper. TOF Read • Enabled-Verifies the Top-Of-Form before printing begins on continuous forms • Disabled-Does not verify the Top-Of-Form before printing on continuous forms Note: Enabled is the factory default setting. Menu Language...


