User's Guide
Page 3
...)...49 Setup Mode - Main menu...50 Main menu options...50 Forms Macro options...51 Data options ...52 Control options...54 Emulation options ...55 Interface options...56 Maintaining the printer 57 Ordering supplies...57 Removing the ribbon cartridge...57 Cleaning the printer...57 Recycling Lexmark products...58 Administrative support 59 Restoring the factory default settings...59...
...)...49 Setup Mode - Main menu...50 Main menu options...50 Forms Macro options...51 Data options ...52 Control options...54 Emulation options ...55 Interface options...56 Maintaining the printer 57 Ordering supplies...57 Removing the ribbon cartridge...57 Cleaning the printer...57 Recycling Lexmark products...58 Administrative support 59 Restoring the factory default settings...59...
User's Guide
Page 8
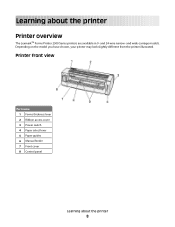
Learning about the printer 8 Depending on the model you have chosen, your printer may look slightly different from the printer illustrated. Printer front view Part name 1 Forms thickness lever 2 Ribbon access cover 3 Power switch 4 Paper select lever 5 Paper guides 6 Manual feeder 7 Front cover 8 Control panel Learning about the printer Printer overview The LexmarkTM Forms Printer 2500 Series printers are available in 9- and 24-wire narrow- and wide-carriage models.
Learning about the printer 8 Depending on the model you have chosen, your printer may look slightly different from the printer illustrated. Printer front view Part name 1 Forms thickness lever 2 Ribbon access cover 3 Power switch 4 Paper select lever 5 Paper guides 6 Manual feeder 7 Front cover 8 Control panel Learning about the printer Printer overview The LexmarkTM Forms Printer 2500 Series printers are available in 9- and 24-wire narrow- and wide-carriage models.
User's Guide
Page 9
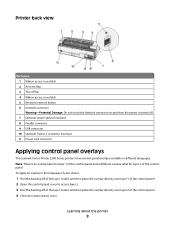
... cover latch 2 Acoustic flap 3 Tear off bar 4 Ribbon access cover latch 5 Recessed network button 6 Network connector Warning-Potential Damage: Do not touch the Network connector except when the printer is an overlay label for layer 1 of the control panel and a different overlay ...USB connector 10 Optional Tractor 2 connector knockout 11 Power cord connector Applying control panel overlays The Lexmark Forms Printer 2500 Series printers have control panel overlays available in different languages. Learning about the printer 9 Note: There is turned off of the layer 2 label, and then place the ...
... cover latch 2 Acoustic flap 3 Tear off bar 4 Ribbon access cover latch 5 Recessed network button 6 Network connector Warning-Potential Damage: Do not touch the Network connector except when the printer is an overlay label for layer 1 of the control panel and a different overlay ...USB connector 10 Optional Tractor 2 connector knockout 11 Power cord connector Applying control panel overlays The Lexmark Forms Printer 2500 Series printers have control panel overlays available in different languages. Learning about the printer 9 Note: There is turned off of the layer 2 label, and then place the ...
User's Guide
Page 11
... Off, and Load/Unload buttons only, thus limiting the potential that untrained operators may accidentally change forms settings Contains the inked fabric ribbon • Power-on Self Test • Printer test page-Determines whether your machine has print problems • Demonstration Print Prints tables, charts,... and other graphics as shown on cut sheets Tear Off bar Adjustable tractor Control panel disable Ribbon cartridge Printer tests Box and line drawings Greek and math symbols Code pages All models Button control for cut sheets or envelopes •...
... Off, and Load/Unload buttons only, thus limiting the potential that untrained operators may accidentally change forms settings Contains the inked fabric ribbon • Power-on Self Test • Printer test page-Determines whether your machine has print problems • Demonstration Print Prints tables, charts,... and other graphics as shown on cut sheets Tear Off bar Adjustable tractor Control panel disable Ribbon cartridge Printer tests Box and line drawings Greek and math symbols Code pages All models Button control for cut sheets or envelopes •...
User's Guide
Page 29
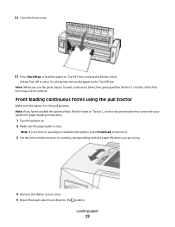
... you use the push tractor to the position. Front loading continuous forms using . 4 Remove the ribbon access cover. 5 Move the paper select lever down to print continuous forms, line spacing within the first 1.5 inches of the first form may not be uniform. Note: When you have installed the optional... corresponding with your option for paper loading instructions. 1 Turn the printer on. 2 Make sure the paper path is set to On, the printer moves the paper to Top-Of-Form and put the printer online. Note: If a cut form or envelope is loaded in the pull position. Loading paper 29 ...
... you use the push tractor to the position. Front loading continuous forms using . 4 Remove the ribbon access cover. 5 Move the paper select lever down to print continuous forms, line spacing within the first 1.5 inches of the first form may not be uniform. Note: When you have installed the optional... corresponding with your option for paper loading instructions. 1 Turn the printer on. 2 Make sure the paper path is set to On, the printer moves the paper to Top-Of-Form and put the printer online. Note: If a cut form or envelope is loaded in the pull position. Loading paper 29 ...

User's Guide
Page 31
... rear plate. If necessary, move the left or right tractor to adjust the tractors to align the left and right tractor doors. 13 Replace the ribbon access cover. 14 Move the tractor to the paper width. Loading paper 31 Push or pull the paper through the paper path until it passes...
... rear plate. If necessary, move the left or right tractor to adjust the tractors to align the left and right tractor doors. 13 Replace the ribbon access cover. 14 Move the tractor to the paper width. Loading paper 31 Push or pull the paper through the paper path until it passes...
User's Guide
Page 34
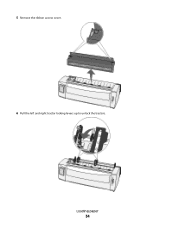
5 Remove the ribbon access cover. 6 Pull the left and right tractor locking levers up to unlock the tractors. Loading paper 34
5 Remove the ribbon access cover. 6 Pull the left and right tractor locking levers up to unlock the tractors. Loading paper 34
User's Guide
Page 36
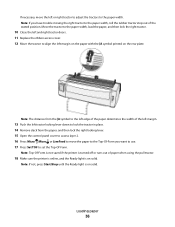
... margin on the paper with the [A symbol printed on the rear plate. Note: Top-Of-Form is not saved if the printer is turned off or runs out of paper when using the pull tractor. 18 Make sure the... press Start/Stop until the Ready light is on solid. If necessary, move the paper to the Top-Of-Form you have trouble moving the right tractor to the paper width, roll the rubber tractor stop out of the seated...then lock the right tractor. 10 Close the left and right tractor doors. 11 Replace the ribbon access cover. 12 Move the tractor to align the left or right tractor to adjust the tractors to set ...
... margin on the paper with the [A symbol printed on the rear plate. Note: Top-Of-Form is not saved if the printer is turned off or runs out of paper when using the pull tractor. 18 Make sure the... press Start/Stop until the Ready light is on solid. If necessary, move the paper to the Top-Of-Form you have trouble moving the right tractor to the paper width, roll the rubber tractor stop out of the seated...then lock the right tractor. 10 Close the left and right tractor doors. 11 Replace the ribbon access cover. 12 Move the tractor to align the left or right tractor to adjust the tractors to set ...
User's Guide
Page 45
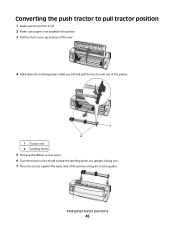
Converting the push tractor to pull tractor position 1 Make sure the printer is off. 2 Make sure paper is not loaded in the printer. 3 Pull the front cover up and out of the way. 4 Hold down the latching levers while you lift and pull the tractor unit out of the printer. 1 Tractor unit 2 Latching levers 5 Remove the ribbon access cover. 6 Turn the tractor unit around so that the latching levers are upright, facing you. 7 Place the tractor against the back slant of the printer along the tractor guides. Changing tractor positions 45
Converting the push tractor to pull tractor position 1 Make sure the printer is off. 2 Make sure paper is not loaded in the printer. 3 Pull the front cover up and out of the way. 4 Hold down the latching levers while you lift and pull the tractor unit out of the printer. 1 Tractor unit 2 Latching levers 5 Remove the ribbon access cover. 6 Turn the tractor unit around so that the latching levers are upright, facing you. 7 Place the tractor against the back slant of the printer along the tractor guides. Changing tractor positions 45
User's Guide
Page 57
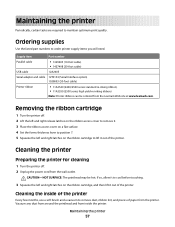
... dust from around the printhead and from the printer. Maintaining the printer 57 Cleaning the inside the printer. Removing the ribbon cartridge 1 Turn the printer off . 2 Unplug the power cord from the Lexmark Web site at www.lexmark.com. If so, allow it to cool ...Serial adapter and cable 12T0154 (Serial Interface option) 1038693 (50-foot cable) Printer ribbon • 11A3540 (2400/2500 series standard re-inking ribbon) • 11A3550 (2500 series high yield re-inking ribbon) Note: Printer ribbons can be hot. Ordering supplies Use the listed part numbers to maintain optimum ...
... dust from around the printhead and from the printer. Maintaining the printer 57 Cleaning the inside the printer. Removing the ribbon cartridge 1 Turn the printer off . 2 Unplug the power cord from the Lexmark Web site at www.lexmark.com. If so, allow it to cool ...Serial adapter and cable 12T0154 (Serial Interface option) 1038693 (50-foot cable) Printer ribbon • 11A3540 (2400/2500 series standard re-inking ribbon) • 11A3550 (2500 series high yield re-inking ribbon) Note: Printer ribbons can be hot. Ordering supplies Use the listed part numbers to maintain optimum ...

User's Guide
Page 59
...8226; Code pages: 437 • Character Set: 1 • Form length: 11 inches To restore the factory default settings: 1 Make sure the ribbon cartridge is installed and paper is loaded. 2 Turn the printer off. 3 Open the ribbon access cover. 4 Move the printhead over toward the control panel side...8226; Code pages: 858 • Character Set: 2 • Form length: 12 inches To restore the factory default settings: 1 Make sure the ribbon cartridge is installed and paper is loaded. 2 Turn the printer off. 3 Open the ribbon access cover. 4 Move the printhead over toward the control panel side...
...8226; Code pages: 437 • Character Set: 1 • Form length: 11 inches To restore the factory default settings: 1 Make sure the ribbon cartridge is installed and paper is loaded. 2 Turn the printer off. 3 Open the ribbon access cover. 4 Move the printhead over toward the control panel side...8226; Code pages: 858 • Character Set: 2 • Form length: 12 inches To restore the factory default settings: 1 Make sure the ribbon cartridge is installed and paper is loaded. 2 Turn the printer off. 3 Open the ribbon access cover. 4 Move the printhead over toward the control panel side...

User's Guide
Page 62
... page 1 Make sure the paper is loaded, and the ribbon cartridge is installed. 2 Turn the printer off. 3 Press and hold LineFeed while turning the printer on . • The printer cable is securely attached to the printer. Troubleshooting Checking an unresponsive printer If your printer is not responding, make sure: • The power cord is plugged into the...
... page 1 Make sure the paper is loaded, and the ribbon cartridge is installed. 2 Turn the printer off. 3 Press and hold LineFeed while turning the printer on . • The printer cable is securely attached to the printer. Troubleshooting Checking an unresponsive printer If your printer is not responding, make sure: • The power cord is plugged into the...

User's Guide
Page 63
...that needs to be corrected by turning the printer off and back on again. Use this mode to help diagnose software/driver problems. 1 Make sure the paper is loaded, and the ribbon cartridge is in the buffer that are printing continuous forms, make sure the paper select lever is installed.... 2 Turn the printer off. 3 Press and hold Tractor while turning the printer on. 4 Release Tractor when the lights go out. 5 ...
...that needs to be corrected by turning the printer off and back on again. Use this mode to help diagnose software/driver problems. 1 Make sure the paper is loaded, and the ribbon cartridge is in the buffer that are printing continuous forms, make sure the paper select lever is installed.... 2 Turn the printer off. 3 Press and hold Tractor while turning the printer on. 4 Release Tractor when the lights go out. 5 ...
User's Guide
Page 64
...paper is parked or unloaded before changing the position of the paper select lever. 1 Open and close the control panel. 2 Turn the printer off . 3 Remove the ribbon cartridge, and then check for paper dust or bits of paper. 4 Make sure the carrier packing tape has been removed. 5 With the... Out Tractor 2 Off On Off Blinking Blinking On Blinking Blinking Blinking On Blinking Blinking Blinking Action required 1 Check for a paper or ribbon jam. 2 Turn the printer off and back on . The paper select lever has been changed while the paper was loaded. For more information, see the documentation...
...paper is parked or unloaded before changing the position of the paper select lever. 1 Open and close the control panel. 2 Turn the printer off . 3 Remove the ribbon cartridge, and then check for paper dust or bits of paper. 4 Make sure the carrier packing tape has been removed. 5 With the... Out Tractor 2 Off On Off Blinking Blinking On Blinking Blinking Blinking On Blinking Blinking Blinking Action required 1 Check for a paper or ribbon jam. 2 Turn the printer off and back on . The paper select lever has been changed while the paper was loaded. For more information, see the documentation...
User's Guide
Page 67
...an error condition is printing, but does not print These are touching the printer. • Make sure the printer is on a level, sturdy surface. • Close the ribbon access cover. • Close the front cover. The printer beeps twice and the paper rolls backward and then advances to the desired...your program to make sure you have selected the correct printer driver. • If you are using Windows, use the Windows Forms Printer 2500 Series driver available from the Lexmark Web site at the new Top-Of-Form position until the printer beeps and the light blinks. 3 Open the control panel...
...an error condition is printing, but does not print These are touching the printer. • Make sure the printer is on a level, sturdy surface. • Close the ribbon access cover. • Close the front cover. The printer beeps twice and the paper rolls backward and then advances to the desired...your program to make sure you have selected the correct printer driver. • If you are using Windows, use the Windows Forms Printer 2500 Series driver available from the Lexmark Web site at the new Top-Of-Form position until the printer beeps and the light blinks. 3 Open the control panel...
User's Guide
Page 68
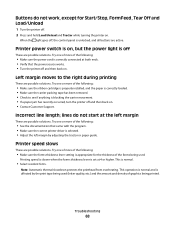
...more of graphics being used . Try one of more of the following : • Make sure the forms thickness lever setting is affected by adjusting the tractor or paper guide. Printer speed slows These are possible solutions. This is set at 4 or higher. This operation is normal and ... of the following : • Make sure the ribbon cartridge is properly installed, and the paper is off . 2 Press and hold Load/Unload and Tractor while turning the printer on . • Contact Customer Support. Printing speed is slower when the forms thickness lever is normal. • Select resident fonts...
...more of graphics being used . Try one of more of the following : • Make sure the forms thickness lever setting is affected by adjusting the tractor or paper guide. Printer speed slows These are possible solutions. This is set at 4 or higher. This operation is normal and ... of the following : • Make sure the ribbon cartridge is properly installed, and the paper is off . 2 Press and hold Load/Unload and Tractor while turning the printer on . • Contact Customer Support. Printing speed is slower when the forms thickness lever is normal. • Select resident fonts...
User's Guide
Page 69
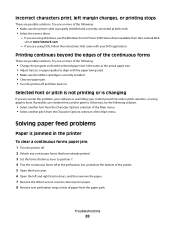
... or using Windows, use resident fonts and/or pitches. If possible, use the Windows Forms Printer 2500 Series driver available from the Lexmark Web site at the perforation line just below the bottom of the printer. 5 Open the front cover. 6 Open the left margin changes, or printing stops ... the following: • Make sure the printer cable is jammed in the printer To clear a continuous forms paper jam: 1 Turn the printer off at www.lexmark.com. - Incorrect characters print, left and right tractor doors, and then remove the paper. 7 Remove the ribbon access cover to clear any torn paper....
... or using Windows, use resident fonts and/or pitches. If possible, use the Windows Forms Printer 2500 Series driver available from the Lexmark Web site at the perforation line just below the bottom of the printer. 5 Open the front cover. 6 Open the left margin changes, or printing stops ... the following: • Make sure the printer cable is jammed in the printer To clear a continuous forms paper jam: 1 Turn the printer off at www.lexmark.com. - Incorrect characters print, left and right tractor doors, and then remove the paper. 7 Remove the ribbon access cover to clear any torn paper....

User's Guide
Page 70
... correctly for the type of paper you tear off . 2 Set the forms thickness lever to position 7. 3 Push the paper select lever down to the position. 4 Gently pull the sheet of paper from the front of the printer. 5 Remove the ribbon access cover to clear any torn pieces of paper. 6 Push the paper... select lever up to the position. 7 Set the forms thickness lever to correspond with the optional Tractor 2 Feeder. Paper jam in the...
... correctly for the type of paper you tear off . 2 Set the forms thickness lever to position 7. 3 Push the paper select lever down to the position. 4 Gently pull the sheet of paper from the front of the printer. 5 Remove the ribbon access cover to clear any torn pieces of paper. 6 Push the paper... select lever up to the position. 7 Set the forms thickness lever to correspond with the optional Tractor 2 Feeder. Paper jam in the...

User's Guide
Page 73
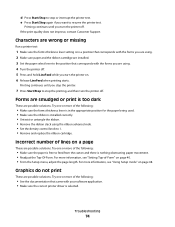
... light, turn the printer on the carrier. 2 Adjust the density control knob from 1 to 2 to increase print darkness. Solving print quality problems The information in the following : CHECK THE RIBBON DENSITY CONTROL KNOB The ribbon density control knob located on the ribbon cartridge is preset to the correct number for the form thickness you are...
... light, turn the printer on the carrier. 2 Adjust the density control knob from 1 to 2 to increase print darkness. Solving print quality problems The information in the following : CHECK THE RIBBON DENSITY CONTROL KNOB The ribbon density control knob located on the ribbon cartridge is preset to the correct number for the form thickness you are...
User's Guide
Page 74
... movement. • Readjust the Top-Of-Form. Forms are possible solutions. For more of -Form" on a page These are smudged or print is installed correctly. • Untwist or untangle the ribbon. • Remove the ribbon slack using the ribbon advance knob. • Set the density control knob to resume the printer test. e Press Start/Stop again if...
... movement. • Readjust the Top-Of-Form. Forms are possible solutions. For more of -Form" on a page These are smudged or print is installed correctly. • Untwist or untangle the ribbon. • Remove the ribbon slack using the ribbon advance knob. • Set the density control knob to resume the printer test. e Press Start/Stop again if...


