Quick Reference
Page 1
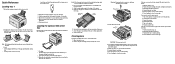
... extend the paper support. 2 Make sure the metal plate is inserted, the metal plate springs back up so the paper can feed into the printer. Warning! CAUTION! Loading the optional 250-sheet tray Grasp the tabs on a level surface. Clearing jams The Paper Jam light prompts you cannot ... you hear a click. 2 Straighten the edges on either side of the paper tray and pull it exits the optional 250-sheet tray into the printer: 1 Open the printer cover. 2 Remove the print cartridge (the print cartridge may be warm). 3 Gently pull the paper toward you . 3 Reinstall the tray to resume...
... extend the paper support. 2 Make sure the metal plate is inserted, the metal plate springs back up so the paper can feed into the printer. Warning! CAUTION! Loading the optional 250-sheet tray Grasp the tabs on a level surface. Clearing jams The Paper Jam light prompts you cannot ... you hear a click. 2 Straighten the edges on either side of the paper tray and pull it exits the optional 250-sheet tray into the printer: 1 Open the printer cover. 2 Remove the print cartridge (the print cartridge may be warm). 3 Gently pull the paper toward you . 3 Reinstall the tray to resume...
Quick Reference
Page 2
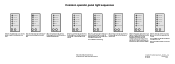
...; Copyright 2002. When the Paper Jam light and the Press Continue lights are on solid, the printer is out of media in Korea 01/03 Refer to the Publications CD to print the page. Lexmark International, Inc. When the Load Paper light is blinking and the Press Continue light is on solid..., the printer prompts you that the toner is getting low. Press Continue twice quickly to load a single sheet...
...; Copyright 2002. When the Paper Jam light and the Press Continue lights are on solid, the printer is out of media in Korea 01/03 Refer to the Publications CD to print the page. Lexmark International, Inc. When the Load Paper light is blinking and the Press Continue light is on solid..., the printer prompts you that the toner is getting low. Press Continue twice quickly to load a single sheet...

Setup Guide
Page 2
...operating instructions that is near the product and easily accessible. • Refer service or repairs, other countries, contact your printer hardware or software. CAUTION: Do not set up this product, make these changes will be incorporated in certain transactions; The.... Note: A note provides information you to the Lexmark E321, E323 Publications CD for easy reference. Lexmark and Lexmark with other countries. Comments about this product by the manufacturer, are trademarks of Lexmark Technology and Services Lexmark International, Inc. 740 West New Circle Road Lexington,...
...operating instructions that is near the product and easily accessible. • Refer service or repairs, other countries, contact your printer hardware or software. CAUTION: Do not set up this product, make these changes will be incorporated in certain transactions; The.... Note: A note provides information you to the Lexmark E321, E323 Publications CD for easy reference. Lexmark and Lexmark with other countries. Comments about this product by the manufacturer, are trademarks of Lexmark Technology and Services Lexmark International, Inc. 740 West New Circle Road Lexington,...
Setup Guide
Page 3
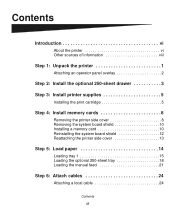
... Other sources of information viii Step 1: Unpack the printer 1 Attaching an operator panel overlay 2 Step 2: Install the optional 250-sheet drawer 3 Step 3: Install printer supplies 5 Installing the print cartridge 5 Step 4: Install memory cards 8 Removing the printer side cover 8 Removing the system board shield 10 Installing a memory... card 10 Reinstalling the system board shield 12 Reattaching the printer side cover 13 Step 5: Load paper 14 Loading tray 1 15 Loading the optional 250-sheet tray 18 Loading the ...
... Other sources of information viii Step 1: Unpack the printer 1 Attaching an operator panel overlay 2 Step 2: Install the optional 250-sheet drawer 3 Step 3: Install printer supplies 5 Installing the print cartridge 5 Step 4: Install memory cards 8 Removing the printer side cover 8 Removing the system board shield 10 Installing a memory... card 10 Reinstalling the system board shield 12 Reattaching the printer side cover 13 Step 5: Load paper 14 Loading tray 1 15 Loading the optional 250-sheet tray 18 Loading the ...
Setup Guide
Page 4
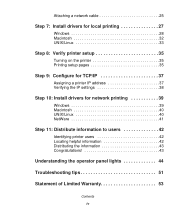
...for local printing 27 Windows 28 Macintosh 32 UNIX/Linux 33 Step 8: Verify printer setup 35 Turning on the printer 35 Printing setup pages 35 Step 9: Configure for TCP/IP 37 Assigning a printer IP address 37 Verifying the IP settings 38 Step 10: Install drivers for ...network printing 39 Windows 39 Macintosh 40 UNIX/Linux 40 NetWare 41 Step 11: Distribute information to users 42 Identifying printer users 42 Locating helpful information 42 Distributing the information 43 Congratulations 43 Understanding the operator panel lights 44 Troubleshooting tips 51 Statement...
...for local printing 27 Windows 28 Macintosh 32 UNIX/Linux 33 Step 8: Verify printer setup 35 Turning on the printer 35 Printing setup pages 35 Step 9: Configure for TCP/IP 37 Assigning a printer IP address 37 Verifying the IP settings 38 Step 10: Install drivers for ...network printing 39 Windows 39 Macintosh 40 UNIX/Linux 40 NetWare 41 Step 11: Distribute information to users 42 Identifying printer users 42 Locating helpful information 42 Distributing the information 43 Congratulations 43 Understanding the operator panel lights 44 Troubleshooting tips 51 Statement...

Setup Guide
Page 5
Feature Lexmark E321 Lexmark E323 Lexmark E323n Base memory Maximum memory Emulations Connectivity Ships with print cartridge yield at approximately 5% coverage 8MB 16MB 16MB 72MB 144MB 144MB PCL 5e, and Macintosh ... and USB 1,500 pages (starter 3,000 pages print cartridge) 3,000 pages Introduction vi The differences between these three models are listed in three models: the Lexmark™ E321, the Lexmark E323, and the Lexmark E323n. Introduction About the printer Your printer is available in the following table.
Feature Lexmark E321 Lexmark E323 Lexmark E323n Base memory Maximum memory Emulations Connectivity Ships with print cartridge yield at approximately 5% coverage 8MB 16MB 16MB 72MB 144MB 144MB PCL 5e, and Macintosh ... and USB 1,500 pages (starter 3,000 pages print cartridge) 3,000 pages Introduction vi The differences between these three models are listed in three models: the Lexmark™ E321, the Lexmark E323, and the Lexmark E323n. Introduction About the printer Your printer is available in the following table.
Setup Guide
Page 6
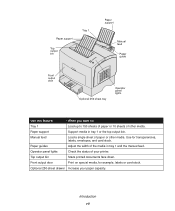
... paper or other media. Paper guides Adjust the width of the media in tray 1 or the top output bin. Optional 250-sheet drawer Increase your printer. Top output bin Stack printed documents face down. Introduction vii Use for example, labels or card stock. Front output door Print on special media, for...
... paper or other media. Paper guides Adjust the width of the media in tray 1 or the top output bin. Optional 250-sheet drawer Increase your printer. Top output bin Stack printed documents face down. Introduction vii Use for example, labels or card stock. Front output door Print on special media, for...
Setup Guide
Page 7
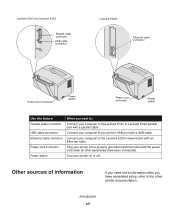
... with an Ethernet cable. Other sources of information If you need more information after all other printer documentation. Connect your computer to theLexmark E321 or Lexmark E323 parallel port with a parallel cable. Turn your printer on or off. Plug your printer into a properly grounded electrical outlet with the power cord (after you have been connected...
... with an Ethernet cable. Other sources of information If you need more information after all other printer documentation. Connect your computer to theLexmark E321 or Lexmark E323 parallel port with a parallel cable. Turn your printer on or off. Plug your printer into a properly grounded electrical outlet with the power cord (after you have been connected...

Setup Guide
Page 8
... paper jams, and solving printing problems. The information on Lexmark's Web site at www.lexmark.com for updated printer drivers, utilities, and other printer documentation. The printer Quick Reference card provides easy access to get your printer up and running. Publications CD Quick Reference card Drivers CD Lexmark's Web site The Publications CD, which is also available...
... paper jams, and solving printing problems. The information on Lexmark's Web site at www.lexmark.com for updated printer drivers, utilities, and other printer documentation. The printer Quick Reference card provides easy access to get your printer up and running. Publications CD Quick Reference card Drivers CD Lexmark's Web site The Publications CD, which is also available...
Setup Guide
Page 9
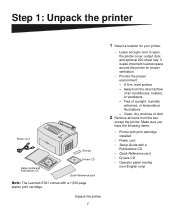
...; Provide the proper environment: - A firm, level surface - Free of air conditioners, heaters, or ventilators - Step 1: Unpack the printer Power cord Overlay Drivers CD Setup Guide and Publications CD Quick Reference card Note: The Lexmark E321 comes with a Publications CD • Quick Reference card • Drivers CD • Operator panel overlay (non-English...
...; Provide the proper environment: - A firm, level surface - Free of air conditioners, heaters, or ventilators - Step 1: Unpack the printer Power cord Overlay Drivers CD Setup Guide and Publications CD Quick Reference card Note: The Lexmark E321 comes with a Publications CD • Quick Reference card • Drivers CD • Operator panel overlay (non-English...

Setup Guide
Page 10
Save the carton and packing material in your country. Attaching an operator panel overlay If you have a non-English operator panel overlay in case you need to use it, peel it off, align it on the operator panel, and press it into place. Unpack the printer 2 If any items are missing or damaged, refer to the Publications CD for the designated Lexmark support phone number for your printer box and want to repack the printer.
Save the carton and packing material in your country. Attaching an operator panel overlay If you have a non-English operator panel overlay in case you need to use it, peel it off, align it on the operator panel, and press it into place. Unpack the printer 2 If any items are missing or damaged, refer to the Publications CD for the designated Lexmark support phone number for your printer box and want to repack the printer.

Setup Guide
Page 11
Step 2: Install the optional 250sheet drawer Support unit Tray You can increase paper capacity with the optional 250-sheet drawer, which attaches underneath the printer. A drawer consists of a tray and a support unit. 1 Remove the tray from the support unit. 2 Remove all packing material and tape from the tray and the support unit. 3 Place the support unit in the location you have chosen for your printer. Install the optional 250-sheet drawer 3
Step 2: Install the optional 250sheet drawer Support unit Tray You can increase paper capacity with the optional 250-sheet drawer, which attaches underneath the printer. A drawer consists of a tray and a support unit. 1 Remove the tray from the support unit. 2 Remove all packing material and tape from the tray and the support unit. 3 Place the support unit in the location you have chosen for your printer. Install the optional 250-sheet drawer 3
Setup Guide
Page 12
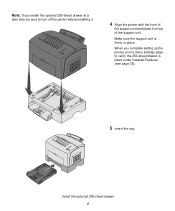
Install the optional 250-sheet drawer 4 When you install the optional 250-sheet drawer at a later time, be sure to verify the 250-sheet drawer is firmly in place. Make sure the support unit is listed under Installed Features (see page 35). 5 Insert the tray. Note: If you complete setting up the printer, print a menu settings page to turn off the printer before installing it. 4 Align the printer with the front of the support unit and place it on top of the support unit.
Install the optional 250-sheet drawer 4 When you install the optional 250-sheet drawer at a later time, be sure to verify the 250-sheet drawer is firmly in place. Make sure the support unit is listed under Installed Features (see page 35). 5 Insert the tray. Note: If you complete setting up the printer, print a menu settings page to turn off the printer before installing it. 4 Align the printer with the front of the support unit and place it on top of the support unit.
Setup Guide
Page 13
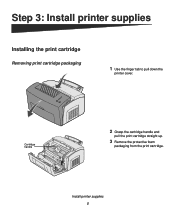
Cartridge handle 2 Grasp the cartridge handle and pull the print cartridge straight up. 3 Remove the protective foam packaging from the print cartridge. Step 3: Install printer supplies Installing the print cartridge Removing print cartridge packaging 1 Use the finger tab to pull down the printer cover. Install printer supplies 5
Cartridge handle 2 Grasp the cartridge handle and pull the print cartridge straight up. 3 Remove the protective foam packaging from the print cartridge. Step 3: Install printer supplies Installing the print cartridge Removing print cartridge packaging 1 Use the finger tab to pull down the printer cover. Install printer supplies 5
Setup Guide
Page 14
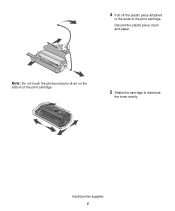
Note: Do not touch the photoconductor drum on the bottom of the print cartridge. Install printer supplies 6 4 Pull off the plastic piece attached to the ends of the print cartridge. 5 Shake the cartridge to distribute the toner evenly. Discard the plastic piece, foam and paper.
Note: Do not touch the photoconductor drum on the bottom of the print cartridge. Install printer supplies 6 4 Pull off the plastic piece attached to the ends of the print cartridge. 5 Shake the cartridge to distribute the toner evenly. Discard the plastic piece, foam and paper.
Setup Guide
Page 15
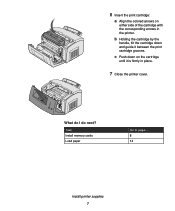
Task Install memory cards Load paper Go to page... 8 14 Install printer supplies 7 6 Insert the print cartridge: a Align the colored arrows on the cartridge until it between the print cartridge grooves. What do I do next? b Holding the cartridge by the handle, tilt the cartridge down on either side of the cartridge with the corresponding arrows in place. 7 Close the printer cover. c Push down and guide it is firmly in the printer.
Task Install memory cards Load paper Go to page... 8 14 Install printer supplies 7 6 Insert the print cartridge: a Align the colored arrows on the cartridge until it between the print cartridge grooves. What do I do next? b Holding the cartridge by the handle, tilt the cartridge down on either side of the cartridge with the corresponding arrows in place. 7 Close the printer cover. c Push down and guide it is firmly in the printer.
Setup Guide
Page 16
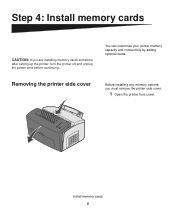
Removing the printer side cover Before installing any memory options, you are installing memory cards sometime after setting up the printer, turn the printer off and unplug the power cord before continuing. Step 4: Install memory cards CAUTION: If you must remove the printer side cover. 1 Open the printer front cover. Install memory cards 8 You can customize your printer memory capacity and connectivity by adding optional cards.
Removing the printer side cover Before installing any memory options, you are installing memory cards sometime after setting up the printer, turn the printer off and unplug the power cord before continuing. Step 4: Install memory cards CAUTION: If you must remove the printer side cover. 1 Open the printer front cover. Install memory cards 8 You can customize your printer memory capacity and connectivity by adding optional cards.
Setup Guide
Page 18
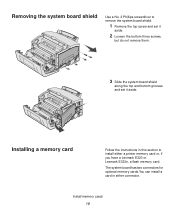
... remove them. 3 Slide the system board shield along the top and bottom grooves and set it aside. Installing a memory card Follow the instructions in either a printer memory card or, if you have a Lexmark E323 or Lexmark E323n, a flash memory card. Removing the system board shield Use a No. 2 Phillips screwdriver to install either connector.
... remove them. 3 Slide the system board shield along the top and bottom grooves and set it aside. Installing a memory card Follow the instructions in either a printer memory card or, if you have a Lexmark E323 or Lexmark E323n, a flash memory card. Removing the system board shield Use a No. 2 Phillips screwdriver to install either connector.

Setup Guide
Page 19
Notches Connection points 1 Complete the steps in "Removing the system board shield" on each latch fits over the notch on page 10. 2 Unpack the printer memory card. See page 12 for instructions. Latch 3 Align the notches on the bottom of the card with the notches on the connector. 4 Guide the ...the connection points along the edge of the memory card. 6 Reattach the metal shield and side cover. Save the packaging. Touch something metal on the printer before you touch a memory card. Warning: Memory cards are easily damaged by static electricity. Install memory cards 11
Notches Connection points 1 Complete the steps in "Removing the system board shield" on each latch fits over the notch on page 10. 2 Unpack the printer memory card. See page 12 for instructions. Latch 3 Align the notches on the bottom of the card with the notches on the connector. 4 Guide the ...the connection points along the edge of the memory card. 6 Reattach the metal shield and side cover. Save the packaging. Touch something metal on the printer before you touch a memory card. Warning: Memory cards are easily damaged by static electricity. Install memory cards 11
Setup Guide
Page 21
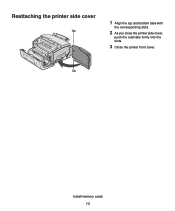
Tab Install memory cards 13 Reattaching the printer side cover Tab 1 Align the top and bottom tabs with the corresponding slots. 2 As you close the printer side cover, push the oval tabs firmly into the slots. 3 Close the printer front cover.
Tab Install memory cards 13 Reattaching the printer side cover Tab 1 Align the top and bottom tabs with the corresponding slots. 2 As you close the printer side cover, push the oval tabs firmly into the slots. 3 Close the printer front cover.


