Setup Guide
Page 4
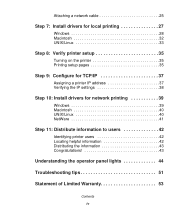
...for local printing 27 Windows 28 Macintosh 32 UNIX/Linux 33 Step 8: Verify printer setup 35 Turning on the printer 35 Printing setup pages 35 Step 9: Configure for TCP/IP 37 Assigning a printer IP address 37 Verifying the IP settings 38 Step 10: Install drivers for ... 39 Macintosh 40 UNIX/Linux 40 NetWare 41 Step 11: Distribute information to users 42 Identifying printer users 42 Locating helpful information 42 Distributing the information 43 Congratulations 43 Understanding the operator panel lights 44 Troubleshooting tips 51 Statement of Limited Warranty 53 Contents iv
...for local printing 27 Windows 28 Macintosh 32 UNIX/Linux 33 Step 8: Verify printer setup 35 Turning on the printer 35 Printing setup pages 35 Step 9: Configure for TCP/IP 37 Assigning a printer IP address 37 Verifying the IP settings 38 Step 10: Install drivers for ... 39 Macintosh 40 UNIX/Linux 40 NetWare 41 Step 11: Distribute information to users 42 Identifying printer users 42 Locating helpful information 42 Distributing the information 43 Congratulations 43 Understanding the operator panel lights 44 Troubleshooting tips 51 Statement of Limited Warranty 53 Contents iv
Setup Guide
Page 59
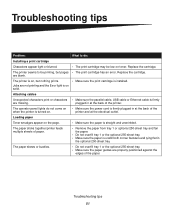
... nothing prints. • Make sure the print cartridge is installed. Replace the cartridge. Troubleshooting tips 51 Loading paper Toner smudges appear on , but pages • The print cartridge has an error. The printer seems to do not come on . The paper skews or buckles. • Do not...sheet tray. • Make sure the paper guides are blank. are properly positioned against the edges of the when the printer is turned on • Make sure the power cord is firmly plugged in the optional 250-sheet tray. Troubleshooting tips Problem: What to be low on solid.
... nothing prints. • Make sure the print cartridge is installed. Replace the cartridge. Troubleshooting tips 51 Loading paper Toner smudges appear on , but pages • The print cartridge has an error. The printer seems to do not come on . The paper skews or buckles. • Do not...sheet tray. • Make sure the paper guides are blank. are properly positioned against the edges of the when the printer is turned on • Make sure the power cord is firmly plugged in the optional 250-sheet tray. Troubleshooting tips Problem: What to be low on solid.
Setup Guide
Page 60
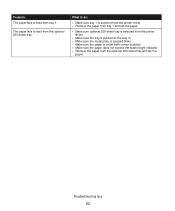
.... • Remove the paper from tray 1 and fan the paper. • Make sure optional 250-sheet tray is selected from the printer driver. • Make sure the tray is pushed all the way in. • Make sure the metal plate is pressed down. • Make sure the ...; Make sure the paper does not exceed the stack height indicator. • Remove the paper from the optional 250-sheet tray and fan the paper. Troubleshooting tips 52 The paper fails to feed from the optional 250-sheet tray.
.... • Remove the paper from tray 1 and fan the paper. • Make sure optional 250-sheet tray is selected from the printer driver. • Make sure the tray is pushed all the way in. • Make sure the metal plate is pressed down. • Make sure the ...; Make sure the paper does not exceed the stack height indicator. • Remove the paper from the optional 250-sheet tray and fan the paper. Troubleshooting tips 52 The paper fails to feed from the optional 250-sheet tray.

User's Reference
Page 4
... ...39 Manual feed 40 Clearing jams ...42 Chapter 4: Understanding the operator panel lights 47 Chapter 5: Understanding the printer configuration menus ....... 69 Printing the Printer Settings Configuration sheet 69 Configuration menus overview 69 Utilities menu 70 Setup menu 70 Parallel menu 71 USB menu 71 ...Network menu 72 Using the Local Printer Setup Utility 74 Chapter 6: Maintenance 75 Conserving supplies 75 Ordering supplies 75 Recycling the print cartridge 76 Replacing the print ...
... ...39 Manual feed 40 Clearing jams ...42 Chapter 4: Understanding the operator panel lights 47 Chapter 5: Understanding the printer configuration menus ....... 69 Printing the Printer Settings Configuration sheet 69 Configuration menus overview 69 Utilities menu 70 Setup menu 70 Parallel menu 71 USB menu 71 ...Network menu 72 Using the Local Printer Setup Utility 74 Chapter 6: Maintenance 75 Conserving supplies 75 Ordering supplies 75 Recycling the print cartridge 76 Replacing the print ...

User's Reference
Page 59
... in the Ready mode and Hex Trace is active. What you can use Hex Trace to help troubleshoot printing problems. After resolving the problem, turn off the printer to exit Hex Trace. Ready/Data Toner Low Load Paper Paper Jam Error Press Continue Continue Cancel 59 What you are using was not... designed for your printer. Ready/Data Toner Low Load Paper Paper Jam Error Press Continue Continue Cancel What this light sequence means: The print cartridge you can do : ...
... in the Ready mode and Hex Trace is active. What you can use Hex Trace to help troubleshoot printing problems. After resolving the problem, turn off the printer to exit Hex Trace. Ready/Data Toner Low Load Paper Paper Jam Error Press Continue Continue Cancel 59 What you are using was not... designed for your printer. Ready/Data Toner Low Load Paper Paper Jam Error Press Continue Continue Cancel What this light sequence means: The print cartridge you can do : ...

User's Reference
Page 60
... are canceled. What this light sequence means: • The current print job is canceled. • The printer is resetting to the user default settings. Ready/Data Toner Low Load Paper Paper Jam Error Press Continue Continue ...Cancel 60 What you can use Hex Trace to help troubleshoot printing problems. After resolving the problem, turn off the printer to exit Hex Trace. • Remove the print cartridge and shake it or.... • Replace the print cartridge. A user default setting remains in the Lexmark E321. What you change it to clear.
... are canceled. What this light sequence means: • The current print job is canceled. • The printer is resetting to the user default settings. Ready/Data Toner Low Load Paper Paper Jam Error Press Continue Continue ...Cancel 60 What you can use Hex Trace to help troubleshoot printing problems. After resolving the problem, turn off the printer to exit Hex Trace. • Remove the print cartridge and shake it or.... • Replace the print cartridge. A user default setting remains in the Lexmark E321. What you change it to clear.
User's Reference
Page 70
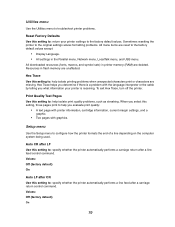
Utilities menu Use the Utilities menu to troubleshoot printer problems. Reset Factory Defaults Use this setting to: help isolate print quality problems, such as streaking. All downloaded resources (fonts, macros, and symbol sets) in ... when unexpected characters print or characters are deleted. Print Quality Test Pages Use this setting to : help you evaluate print quality: • A text page with printer information, cartridge information, current margin settings, and a graphic. • Two pages with the language interpreter or the cable by telling you determine if there is...
Utilities menu Use the Utilities menu to troubleshoot printer problems. Reset Factory Defaults Use this setting to: help isolate print quality problems, such as streaking. All downloaded resources (fonts, macros, and symbol sets) in ... when unexpected characters print or characters are deleted. Print Quality Test Pages Use this setting to : help you evaluate print quality: • A text page with printer information, cartridge information, current margin settings, and a graphic. • Two pages with the language interpreter or the cable by telling you determine if there is...

User's Reference
Page 80
... back of the page. • Replace the print cartridge. You may be sure you bought your printer. Vertical or horizontal streaks appear • Replace the print cartridge. Toner smudges appear on the page. 80 7 Troubleshooting Solving printing problems Use the following tables to find solutions for example, card stock or labels, be...
... back of the page. • Replace the print cartridge. You may be sure you bought your printer. Vertical or horizontal streaks appear • Replace the print cartridge. Toner smudges appear on the page. 80 7 Troubleshooting Solving printing problems Use the following tables to find solutions for example, card stock or labels, be...
User's Reference
Page 84
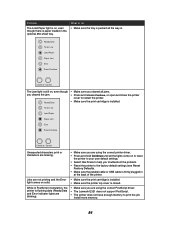
...flushing data (Ready/Data and Error indicator lights are using the correct printer driver. • Press and hold Continue until all the lights come on , even though you troubleshoot the problem. • Reset the printer to restart the printer. • Make sure the print cartridge is installed. What to...Install more memory. 84 Problem The Load Paper light is on solid. • Make sure the printer top cover is closed. Jobs are using the correct PostScript driver. • The Lexmark E321 does not support PostScript. • The printer does not have enough memory to print the job.
...flushing data (Ready/Data and Error indicator lights are using the correct printer driver. • Press and hold Continue until all the lights come on , even though you troubleshoot the problem. • Reset the printer to restart the printer. • Make sure the print cartridge is installed. What to...Install more memory. 84 Problem The Load Paper light is on solid. • Make sure the printer top cover is closed. Jobs are using the correct PostScript driver. • The Lexmark E321 does not support PostScript. • The printer does not have enough memory to print the job.
User's Reference
Page 85
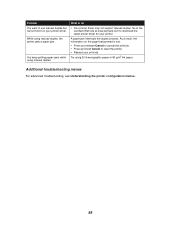
Try using manual duplex. What to download the latest printer driver for your printer. Additional troubleshooting menus For advanced troubleshooting, see Understanding the printer configuration menus. 85 Go to the Lexmark Web site at www.lexmark.com to do • Your printer driver may not support manual duplex. You keep getting paper jams while using 20 lb xerographic paper...
Try using manual duplex. What to download the latest printer driver for your printer. Additional troubleshooting menus For advanced troubleshooting, see Understanding the printer configuration menus. 85 Go to the Lexmark Web site at www.lexmark.com to do • Your printer driver may not support manual duplex. You keep getting paper jams while using 20 lb xerographic paper...

Information Update
Page 5
... Utility is already selected, try changing the texture setting to a rougher setting. From your printer driver, select Custom 6-Rough Env from the Paper Type menu. 4 Troubleshooting tip Solving print quality problems with your printer. The Utility will be installed on your computer under Program Files (unless you chose a different directory). 7 Open the Local...
... Utility is already selected, try changing the texture setting to a rougher setting. From your printer driver, select Custom 6-Rough Env from the Paper Type menu. 4 Troubleshooting tip Solving print quality problems with your printer. The Utility will be installed on your computer under Program Files (unless you chose a different directory). 7 Open the Local...


