User's Guide
Page 3
Table of contents 1 About your printer v Performance vi Print quality vi Ease of use vi Other information sources x 2 The basics 1 What's in the box 1 Installing the print cartridge 2 Connecting the printer to your computer 4 Loading paper 9 Printing a test page 11 Attaching a new operator panel overlay 12 Installing memory 13 3 Printer drivers 19 Printer drivers 19 MarkVision 21 4 Paper handling 23 Paper types and sizes 24 Loading paper, other media in the automatic feeder 28 Loading paper, other media in the manual feeder 31 Table of contents iii
Table of contents 1 About your printer v Performance vi Print quality vi Ease of use vi Other information sources x 2 The basics 1 What's in the box 1 Installing the print cartridge 2 Connecting the printer to your computer 4 Loading paper 9 Printing a test page 11 Attaching a new operator panel overlay 12 Installing memory 13 3 Printer drivers 19 Printer drivers 19 MarkVision 21 4 Paper handling 23 Paper types and sizes 24 Loading paper, other media in the automatic feeder 28 Loading paper, other media in the manual feeder 31 Table of contents iii

User's Guide
Page 4
Clearing paper jams 32 5 Troubleshooting 35 Indicator lights 37 6 Supplies 57 Print cartridge maintenance 57 Appendix A: Printer specifications 59 Printer features 59 Printer dimensions 60 Appendix B: Advanced troubleshooting 61 Appendix C: Safety information 73 Appendix D: Notices 79 Glossary X-1 Index X-5 iv Table of contents
Clearing paper jams 32 5 Troubleshooting 35 Indicator lights 37 6 Supplies 57 Print cartridge maintenance 57 Appendix A: Printer specifications 59 Printer features 59 Printer dimensions 60 Appendix B: Advanced troubleshooting 61 Appendix C: Safety information 73 Appendix D: Notices 79 Glossary X-1 Index X-5 iv Table of contents
User's Guide
Page 11
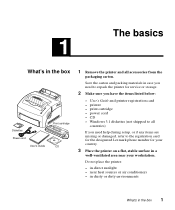
...ventilated area near heat sources or air conditioners - Do not place the printer: - User's Guide and printer registration card - print cartridge - Windows 3.1 diskettes (not shipped to all accessories from the packaging ...carton. in the box 1 in dusty or dirty environments What's in direct sunlight - CD - printer - near your country. 3 Place the printer on a flat, stable surface in case you need to the registration card for the designated Lexmark...
...ventilated area near heat sources or air conditioners - Do not place the printer: - User's Guide and printer registration card - print cartridge - Windows 3.1 diskettes (not shipped to all accessories from the packaging ...carton. in the box 1 in dusty or dirty environments What's in direct sunlight - CD - printer - near your country. 3 Place the printer on a flat, stable surface in case you need to the registration card for the designated Lexmark...

User's Guide
Page 12
Installing the print cartridge 1 Use the finger tab to pull down the printer cover. 2 Unpack the print cartridge. 3 Holding the cartridge level, pull out the sealing tape. 2 Chapter 1: The basics
Installing the print cartridge 1 Use the finger tab to pull down the printer cover. 2 Unpack the print cartridge. 3 Holding the cartridge level, pull out the sealing tape. 2 Chapter 1: The basics

User's Guide
Page 13
b Gently push down between the print cartridge slots. Installing the print cartridge 3 4 Gently shake the cartridge to distribute the toner evenly. 5 Insert the print cartridge: a Slide the print cartridge down on the cartridge until it drops into place.
b Gently push down between the print cartridge slots. Installing the print cartridge 3 4 Gently shake the cartridge to distribute the toner evenly. 5 Insert the print cartridge: a Slide the print cartridge down on the cartridge until it drops into place.
User's Guide
Page 14
... Replace the cartridge. • The print cartridge may be printing, but nothing prints. Printer seems to be defective. Connecting the printer to your computer To print from the print cartridge. • Make sure the print cartridge is on your computer, your printer needs to your printer's functions. ...toner. We recommend Lexmark part number 1329605 (10 ft) or 1427498 (20 ft). Jobs are blank. Replace the cartridge. • Make sure you removed the sealing tape from the print cartridge. • Replace the print cartridge. • The print cartridge may not be ...
... Replace the cartridge. • The print cartridge may be printing, but nothing prints. Printer seems to be defective. Connecting the printer to your computer To print from the print cartridge. • Make sure the print cartridge is on your computer, your printer needs to your printer's functions. ...toner. We recommend Lexmark part number 1329605 (10 ft) or 1427498 (20 ft). Jobs are blank. Replace the cartridge. • Make sure you removed the sealing tape from the print cartridge. • Replace the print cartridge. • The print cartridge may not be ...

User's Guide
Page 21
... the edges of paper. • Remove the paper from the paper feeder and fan the paper. Printing a test page 11 Paper sticks together/printer feeds multiple sheets of the paper. Troubleshooting Tips Problem: What to do: Toner smudges appear on the front or • Make sure the paper...paper feeder. The automatic paper feeder holds up to 150 sheets, depending on the thickness of the page. To print a test page, the print cartridge must be installed (see page 2). Paper fails to feed from the automatic • Remove the paper from the paper feeder and fan the paper. ...
... the edges of paper. • Remove the paper from the paper feeder and fan the paper. Printing a test page 11 Paper sticks together/printer feeds multiple sheets of the paper. Troubleshooting Tips Problem: What to do: Toner smudges appear on the front or • Make sure the paper...paper feeder. The automatic paper feeder holds up to 150 sheets, depending on the thickness of the page. To print a test page, the print cartridge must be installed (see page 2). Paper fails to feed from the automatic • Remove the paper from the paper feeder and fan the paper. ...

User's Guide
Page 23
... are ready to the booklet that came with 2MB of printer memory. Turn to remove the metal shield covering the printer system board. 1 Turn off the printer and unplug the power cord from the printer. 2 Disconnect the printer cable (if attached) from the printer. 3 Remove the print cartridge and cover it. You can also install a 1MB, 2MB...
... are ready to the booklet that came with 2MB of printer memory. Turn to remove the metal shield covering the printer system board. 1 Turn off the printer and unplug the power cord from the printer. 2 Disconnect the printer cable (if attached) from the printer. 3 Remove the print cartridge and cover it. You can also install a 1MB, 2MB...

User's Guide
Page 24
Note: Exposing the photoconductor to light may damage the print cartridge. After you remove the cartridge from the printer, cover it or store it in a clean, dark place. 4 With the printer facing you, place it on its left side. 5 Turn the printer around so the bottom of the printer is facing you. 6 Locate and remove the 3 screws on the metal shield. 14 Chapter 1: The basics
Note: Exposing the photoconductor to light may damage the print cartridge. After you remove the cartridge from the printer, cover it or store it in a clean, dark place. 4 With the printer facing you, place it on its left side. 5 Turn the printer around so the bottom of the printer is facing you. 6 Locate and remove the 3 screws on the metal shield. 14 Chapter 1: The basics
User's Guide
Page 29
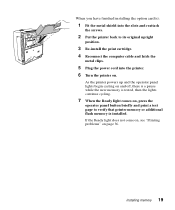
...1 Fit the metal shield into the printer. 6 Turn the printer on. If the Ready light does not come on, see "Printing problems" on , press the operator panel button briefly and print a test page to its original upright position. 3 Re-install the print cartridge. 4 Reconnect the computer cable and ...latch the metal clips. 5 Plug the power cord into the slots and reattach the screws. 2 Put the printer back to verify that printer memory or additional flash memory is installed. As the printer powers up and the operator panel...
...1 Fit the metal shield into the printer. 6 Turn the printer on. If the Ready light does not come on, see "Printing problems" on , press the operator panel button briefly and print a test page to its original upright position. 3 Re-install the print cartridge. 4 Reconnect the computer cable and ...latch the metal clips. 5 Plug the power cord into the slots and reattach the screws. 2 Put the printer back to verify that printer memory or additional flash memory is installed. As the printer powers up and the operator panel...

User's Guide
Page 44
... get a paper jam, the Paper Jam indicator light prompts you remove the cartridge from the paper feeder when the jam occurs: 1 Pull the paper straight up out of the paper feeder. 2 Open and close the printer cover to feed from the printer, cover it or store it . After you to light may damage... the print cartridge. If the paper jam occurs inside the printer: 1 Remove the paper from the output bin. 2 Turn the...
... get a paper jam, the Paper Jam indicator light prompts you remove the cartridge from the paper feeder when the jam occurs: 1 Pull the paper straight up out of the paper feeder. 2 Open and close the printer cover to feed from the printer, cover it or store it . After you to light may damage... the print cartridge. If the paper jam occurs inside the printer: 1 Remove the paper from the output bin. 2 Turn the...

User's Guide
Page 45
... adhesive labels remain in the fuser, try opening and closing the cover. The plain paper will remove any remaining adhesive in the printer. 7 Re-insert the print cartridge. 8 Close the printer cover to the backing sheet after clearing the paper jam. 2 Feed 10 or more paper in or on both sides and pull...
... adhesive labels remain in the fuser, try opening and closing the cover. The plain paper will remove any remaining adhesive in the printer. 7 Re-insert the print cartridge. 8 Close the printer cover to the backing sheet after clearing the paper jam. 2 Feed 10 or more paper in or on both sides and pull...
User's Guide
Page 47
... next darker print setting. • If Toner Saver is straight and unwrinkled. • Replace the print cartridge. If you cannot fix the problem, contact your printer driver. • Remove the print cartridge, shake it from the print cartridge. • Hot/humid or cold/dry weather conditions may have accumulated (see "Paper types and sizes...
... next darker print setting. • If Toner Saver is straight and unwrinkled. • Replace the print cartridge. If you cannot fix the problem, contact your printer driver. • Remove the print cartridge, shake it from the print cartridge. • Hot/humid or cold/dry weather conditions may have accumulated (see "Paper types and sizes...

User's Guide
Page 48
...connector on your printer registration card. • Outside the U.S., contact your Lexmark printer driver. • Try a different kind of xerographic bond paper. • Replace the print cartridge. Printer does not print even though a • Open and close the printer cover to reset the printer. 36 Chapter 4:...the best quality. • Replace the print cartridge. • Select a different Media Type or Form Type setting from your Lexmark printer driver. • Try a different kind of paper. Paper designed for 3 seconds to restart the printer. If you cannot print a test page, ...
...connector on your printer registration card. • Outside the U.S., contact your Lexmark printer driver. • Try a different kind of xerographic bond paper. • Replace the print cartridge. Printer does not print even though a • Open and close the printer cover to reset the printer. 36 Chapter 4:...the best quality. • Replace the print cartridge. • Select a different Media Type or Form Type setting from your Lexmark printer driver. • Try a different kind of paper. Paper designed for 3 seconds to restart the printer. If you cannot print a test page, ...

User's Guide
Page 57
If your printer lights look like this : Then your printer: top cover is open or the print cartridge is full (Memory Full) • Print data without saving it in flash memory by pushing the operator panel button with a brief button press or • reset the front panel by pushing the operator panel button with a long button press. Indicator lights 45 If your printer lights look like this : Then your printer: flash memory is not installed. • Close the cover to display the light sequence that appeared before the cover was opened. • Install the print cartridge.
If your printer lights look like this : Then your printer: top cover is open or the print cartridge is full (Memory Full) • Print data without saving it in flash memory by pushing the operator panel button with a brief button press or • reset the front panel by pushing the operator panel button with a long button press. Indicator lights 45 If your printer lights look like this : Then your printer: flash memory is not installed. • Close the cover to display the light sequence that appeared before the cover was opened. • Install the print cartridge.
User's Guide
Page 72
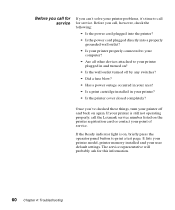
... blow? • Has a power outage occurred in your area? • Is a print cartridge installed in and turned on? • Is the wall outlet turned off and back on the printer registration card or contact your user default settings. If the Ready indicator light is still not operating... properly, call the Lexmark service number listed on again. It lists your printer model, printer memory installed and your point of service. Before you call for service If you can't solve your printer problems, it's time to call for this information. 60...
... blow? • Has a power outage occurred in your area? • Is a print cartridge installed in and turned on? • Is the wall outlet turned off and back on the printer registration card or contact your user default settings. If the Ready indicator light is still not operating... properly, call the Lexmark service number listed on again. It lists your printer model, printer memory installed and your point of service. Before you call for service If you can't solve your printer problems, it's time to call for this information. 60...

User's Guide
Page 73
... are ready to clear a paper jam. Print cartridge maintenance 57 Print cartridge maintenance To get the maximum benefit from its packaging until you bought your print cartridge: • Do not remove the print cartridge from your printer. To locate the dealer nearest you can order Lexmark supplies from the printer except to replace it or to install...
... are ready to clear a paper jam. Print cartridge maintenance 57 Print cartridge maintenance To get the maximum benefit from its packaging until you bought your print cartridge: • Do not remove the print cartridge from your printer. To locate the dealer nearest you can order Lexmark supplies from the printer except to replace it or to install...

User's Guide
Page 75
...• Make sure you may use in the specified country. Recycling used Lexmark's Operation ReSourceSM program lets you . Printer seems to you supplies participate in Operation ReSource. Printer is not appropriate for participating in worldwide recycling at no cost to be printing...on solid. Replace the cartridge. • The print cartridge may be defective. Some shipping cartons have printed instructions for your printer. Jobs are blank. Troubleshooting Tips Problem Characters appear light or blurred. Print cartridge maintenance 59 Replace the cartridge. • Make sure...
...• Make sure you may use in the specified country. Recycling used Lexmark's Operation ReSourceSM program lets you . Printer seems to you supplies participate in Operation ReSource. Printer is not appropriate for participating in worldwide recycling at no cost to be printing...on solid. Replace the cartridge. • The print cartridge may be defective. Some shipping cartons have printed instructions for your printer. Jobs are blank. Troubleshooting Tips Problem Characters appear light or blurred. Print cartridge maintenance 59 Replace the cartridge. • Make sure...
User's Guide
Page 77
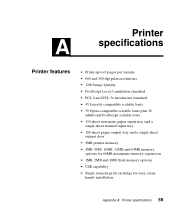
... scalable fonts • 39 Optra-compatible scalable fonts plus 36 additional PostScript scalable fonts • 150-sheet automatic paper input tray and a single-sheet manual input tray • 100-sheet paper output tray and a single-sheet output door • 2MB printer memory • 4MB, 8MB..., 16MB, 32MB and 64MB memory options for 66MB maximum memory expansion • 1MB, 2MB and 4MB flash memory options • USB capability • Single element print cartridge for easy, cleanhands installation Appendix...
... scalable fonts • 39 Optra-compatible scalable fonts plus 36 additional PostScript scalable fonts • 150-sheet automatic paper input tray and a single-sheet manual input tray • 100-sheet paper output tray and a single-sheet output door • 2MB printer memory • 4MB, 8MB..., 16MB, 32MB and 64MB memory options for 66MB maximum memory expansion • 1MB, 2MB and 4MB flash memory options • USB capability • Single element print cartridge for easy, cleanhands installation Appendix...

User's Guide
Page 78
Printer dimensions Height: Width: Depth: Weight: 8.8" (224mm) 13.6" (345mm) 14.4" (365mm) 16.5 lbs (7.5kg) with print cartridge 60 Appendix A: Printer specifications
Printer dimensions Height: Width: Depth: Weight: 8.8" (224mm) 13.6" (345mm) 14.4" (365mm) 16.5 lbs (7.5kg) with print cartridge 60 Appendix A: Printer specifications


