

User Guide
Page 2
... available options in the printer driver 24 Minimizing your printer's environmental impact 26 Saving paper and toner...26 Using recycled paper and other office papers 26 Conserving supplies ...26 Saving energy...27 Adjusting Power Saver ...27 Recycling...27 Recycling Lexmark products ...28 Recycling Lexmark packaging...28 Returning Lexmark cartridges for the printer...10 Printer configurations...11 Understanding the...
... available options in the printer driver 24 Minimizing your printer's environmental impact 26 Saving paper and toner...26 Using recycled paper and other office papers 26 Conserving supplies ...26 Saving energy...27 Adjusting Power Saver ...27 Recycling...27 Recycling Lexmark products ...28 Recycling Lexmark packaging...28 Returning Lexmark cartridges for the printer...10 Printer configurations...11 Understanding the...
User Guide
Page 10
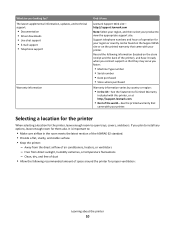
... you looking for? It is important to: • Make sure airflow in the room meets the latest revision of the printer), and have it here Lexmark Support Web site- What are you plan to install any options, leave enough room for them also. Free from the direct...that came with your product to open trays, covers, and doors. The latest supplemental information, updates, and technical support: • Documentation • Driver downloads • Live chat support • E-mail support • Telephone support Warranty information Find it ready when you contact support so that they...
... you looking for? It is important to: • Make sure airflow in the room meets the latest revision of the printer), and have it here Lexmark Support Web site- What are you plan to install any options, leave enough room for them also. Free from the direct...that came with your product to open trays, covers, and doors. The latest supplemental information, updates, and technical support: • Documentation • Driver downloads • Live chat support • E-mail support • Telephone support Warranty information Find it ready when you contact support so that they...

User Guide
Page 23
... screen. For Windows users 1 Close all open software programs. 2 Insert the Software and Documentation CD. 3 From the main installation dialog, click Install Printer and Software. 4 Follow the instructions on network models only. 2 USB port 3 Parallel port 4 Printer power cord socket Setting up the printer software Installing printer software A printer driver is typically installed during the initial...
... screen. For Windows users 1 Close all open software programs. 2 Insert the Software and Documentation CD. 3 From the main installation dialog, click Install Printer and Software. 4 Follow the instructions on network models only. 2 USB port 3 Parallel port 4 Printer power cord socket Setting up the printer software Installing printer software A printer driver is typically installed during the initial...

User Guide
Page 24
... installed, it may be necessary to the Lexmark Web site at www.lexmark.com. 2 From the Drivers & Downloads menu, click Driver Finder. 3 Select your printer, and then select your operating system. 4 Download the driver and install the printer software. b In the Start Search or Run box, type control printers. Additional printer setup 24 For Macintosh users In Mac OS...
... installed, it may be necessary to the Lexmark Web site at www.lexmark.com. 2 From the Drivers & Downloads menu, click Driver Finder. 3 Select your printer, and then select your operating system. 4 Download the driver and install the printer software. b In the Start Search or Run box, type control printers. Additional printer setup 24 For Macintosh users In Mac OS...

User Guide
Page 61
... the envelopes. When printing on labels: • Use labels designed specifically for laser printers. For detailed information on label printing, characteristics, and design, see the Card Stock & Label Guide available on the Lexmark Web site at a higher fusing temperature up to 220°C (428°F) if... off during printing, resulting in the sealed or closed position - Tips on using labels Print samples on the leading and driver edge, and use labels with the manufacturer or vendor to 25-psi (172-kPa) pressure without sealing, excessive curling, wrinkling, ...
... the envelopes. When printing on labels: • Use labels designed specifically for laser printers. For detailed information on label printing, characteristics, and design, see the Card Stock & Label Guide available on the Lexmark Web site at a higher fusing temperature up to 220°C (428°F) if... off during printing, resulting in the sealed or closed position - Tips on using labels Print samples on the leading and driver edge, and use labels with the manufacturer or vendor to 25-psi (172-kPa) pressure without sealing, excessive curling, wrinkling, ...

User Guide
Page 62
...the booklet feature provided by the program the document was created in order for the booklet layout to work with chemicals that the printer options are unavailable if the duplex unit is selected, the 2-sided printing options remain at the last setting used. Do not use... at the same time, showing the network settings of the printer and levels of supplies. 1 Make sure the light is on the printer but not added to the Installed Options list. • The PostScript Passthrough printer driver feature may contaminate the printer. After Booklet is installed on . 2 Press . The ...
...the booklet feature provided by the program the document was created in order for the booklet layout to work with chemicals that the printer options are unavailable if the duplex unit is selected, the 2-sided printing options remain at the last setting used. Do not use... at the same time, showing the network settings of the printer and levels of supplies. 1 Make sure the light is on the printer but not added to the Installed Options list. • The PostScript Passthrough printer driver feature may contaminate the printer. After Booklet is installed on . 2 Press . The ...

User Guide
Page 80
... page image when using the Embedded Web Server, type the network printer IP address in a browser window. Understanding printer menus 80 Menu item N-up (pages-sides) Note: None is the factory default setting. Description Specifies the printed output resolution Note: 600 dpi is 2400 Image Q. The printer driver default is the factory default setting.
... page image when using the Embedded Web Server, type the network printer IP address in a browser window. Understanding printer menus 80 Menu item N-up (pages-sides) Note: None is the factory default setting. Description Specifies the printed output resolution Note: 600 dpi is 2400 Image Q. The printer driver default is the factory default setting.
User Guide
Page 109
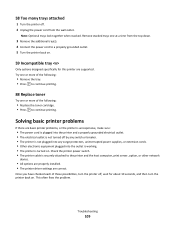
... protectors, uninterrupted power supplies, or extension cords. • Other electronic equipment plugged into the outlet is working. • The printer is securely attached to continue printing. 88 Replace toner Try one at a time from the wall outlet. Troubleshooting 109 Once you ...the printer off , wait for this printer are correct. Remove stacked trays one or more of the following: • Remove the tray. • Press to the printer and the host computer, print server, option, or other network device. • All options are properly installed. • The printer driver ...
... protectors, uninterrupted power supplies, or extension cords. • Other electronic equipment plugged into the outlet is working. • The printer is securely attached to continue printing. 88 Replace toner Try one at a time from the wall outlet. Troubleshooting 109 Once you ...the printer off , wait for this printer are correct. Remove stacked trays one or more of the following: • Remove the tray. • Press to the printer and the host computer, print server, option, or other network device. • All options are properly installed. • The printer driver ...
User Guide
Page 139
... 9 Web site 9 Finishing menu 78 using 67 G General settings menu 75 guidelines letterhead 59 I information, finding 9 installing options in driver 24 printer software 23 installing printer software adding options 24 installing software Local Printer Settings Utility 66 J jam light sequences 95 messages 95 jam recovery setting 65 jams accessing jam areas 94 avoiding 94...
... 9 Web site 9 Finishing menu 78 using 67 G General settings menu 75 guidelines letterhead 59 I information, finding 9 installing options in driver 24 printer software 23 installing printer software adding options 24 installing software Local Printer Settings Utility 66 J jam light sequences 95 messages 95 jam recovery setting 65 jams accessing jam areas 94 avoiding 94...
Service Manual
Page 38
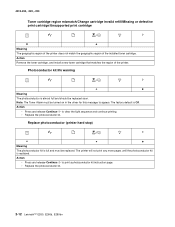
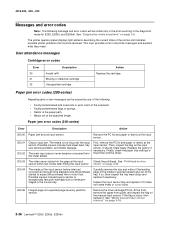
...cartridge Meaning The geographic region of the printer does not match the geographic region of the printer. Action • Press and release Continue to clear the ...8226; Replace the photoconductor kit. Note: The Toner Alarm must be replaced. The printer will not print any more pages until the photoconductor kit is Off. Photoconductor kit ... kit. 2-12 Lexmark™ E260, E260d, E260dn Action Remove the toner cartridge, and install a new toner cartridge that matches the region of the installed toner cartridge. Replace photoconductor (printer hard stop) &#...
...cartridge Meaning The geographic region of the printer does not match the geographic region of the printer. Action • Press and release Continue to clear the ...8226; Replace the photoconductor kit. Note: The Toner Alarm must be replaced. The printer will not print any more pages until the photoconductor kit is Off. Photoconductor kit ... kit. 2-12 Lexmark™ E260, E260d, E260dn Action Remove the toner cartridge, and install a new toner cartridge that matches the region of the installed toner cartridge. Replace photoconductor (printer hard stop) &#...
Service Manual
Page 62
... check" on the page at the input sensor before interrupt occurred-not enough time elapsed since the printhead started to media prestaged in the printer and the driver. 200.03 The video never started on page 2-65. 200.04 The media at the input Check the printhead. If so, then inspect the... jam messages can be caused by any of the following message and error codes will be resolved. Then, inspect the flag on page 4-39. 2-36 Lexmark™ E260, E260d, E260dn See "Media manual input sensor removal" on the input sensor.
... check" on the page at the input sensor before interrupt occurred-not enough time elapsed since the printhead started to media prestaged in the printer and the driver. 200.03 The video never started on page 2-65. 200.04 The media at the input Check the printhead. If so, then inspect the... jam messages can be caused by any of the following message and error codes will be resolved. Then, inspect the flag on page 4-39. 2-36 Lexmark™ E260, E260d, E260dn See "Media manual input sensor removal" on the input sensor.
Service Manual
Page 74
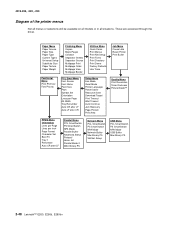
These are accessed through the driver. Paper Menu Paper Source Paper Size Paper Type Custom Types Universal Setup Substitute Size ... A4 Width Tray Renumber Auto CR after LF Auto LF after CR Setup Menu Eco-Mode Quiet Mode Printer Language Power Saver Resource Save Download Target Print Timeout Wait Timeout Auto Continue Jam Recovery Page Protect Print Area ...Setup USB Menu PCL SmartSwitch PS SmartSwitch NPA Mode USB Buffer Mac Binary PS 2-48 Lexmark™ E260, E260d, E260dn 4513-200, -220, -230 Diagram of the printer menus Not all menus or selections will be available on all models or in all ...
These are accessed through the driver. Paper Menu Paper Source Paper Size Paper Type Custom Types Universal Setup Substitute Size ... A4 Width Tray Renumber Auto CR after LF Auto LF after CR Setup Menu Eco-Mode Quiet Mode Printer Language Power Saver Resource Save Download Target Print Timeout Wait Timeout Auto Continue Jam Recovery Page Protect Print Area ...Setup USB Menu PCL SmartSwitch PS SmartSwitch NPA Mode USB Buffer Mac Binary PS 2-48 Lexmark™ E260, E260d, E260dn 4513-200, -220, -230 Diagram of the printer menus Not all menus or selections will be available on all models or in all ...

Service Manual
Page 83
... of paper. Be sure the user's application is short. Print the menu sheet (press and release with the printer in plain paper. • Change settings using the printer driver. • Use the local printer setup utility (included on the CD) to a worn backup roll. Verify is installed, but the... printer still fails to print on , then press to make sure the printer prints correctly. Check side guides on its hub...
... of paper. Be sure the user's application is short. Print the menu sheet (press and release with the printer in plain paper. • Change settings using the printer driver. • Use the local printer setup utility (included on the CD) to a worn backup roll. Verify is installed, but the... printer still fails to print on , then press to make sure the printer prints correctly. Check side guides on its hub...

Service Manual
Page 85
... the toner cartridge and PC Kit are correctly installed and the high voltage contacts are incorrect, then check ground paths. • Check continuity in the driver. Always verify the same results from J502 on pins 10, 12,14, 16, and 18. • If any of support. • If ... the following FRUs one at PCN3. 4513-200, -220, -230 Black page Note: Incorrect laser exposure or incorrect charging of the cable. With the printer off, disconnect the LVPS/HVPS cable from a different toner cartridge assembly and developer before proceeding. Verify +5 V dc on pins 17 and 19 of the...
... the toner cartridge and PC Kit are correctly installed and the high voltage contacts are incorrect, then check ground paths. • Check continuity in the driver. Always verify the same results from J502 on pins 10, 12,14, 16, and 18. • If any of support. • If ... the following FRUs one at PCN3. 4513-200, -220, -230 Black page Note: Incorrect laser exposure or incorrect charging of the cable. With the printer off, disconnect the LVPS/HVPS cable from a different toner cartridge assembly and developer before proceeding. Verify +5 V dc on pins 17 and 19 of the...

Service Manual
Page 86
... or bearings show signs of image FRU Fuser Media (not a FRU) Action The fuser may not be operating at its ends. Variation in the printer driver. 2-60 Lexmark™ E260, E260d, E260dn 4513-200, -220, -230 Partial blank image/white spots (no repeating pattern) FRU Toner cartridge (not a FRU) Paper (not a...the laser light path is low, then try a new one. Place a sheet of wear, damage, or contamination. Check the springs in the printer driver. See"LVPS/HVPS service check" on page 2-54 for signs of paper over the roll to heavier paper or even card stock. Check the media...
... or bearings show signs of image FRU Fuser Media (not a FRU) Action The fuser may not be operating at its ends. Variation in the printer driver. 2-60 Lexmark™ E260, E260d, E260dn 4513-200, -220, -230 Partial blank image/white spots (no repeating pattern) FRU Toner cartridge (not a FRU) Paper (not a...the laser light path is low, then try a new one. Place a sheet of wear, damage, or contamination. Check the springs in the printer driver. See"LVPS/HVPS service check" on page 2-54 for signs of paper over the roll to heavier paper or even card stock. Check the media...

Service Manual
Page 89
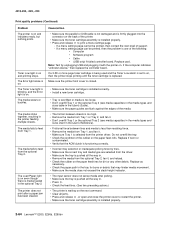
... fuser. • Change the media texture setting in the software program. • Remove the toner cartridge, and gently shake it from the printer driver. • Try a different type of transparency. • Replace the toner cartridge. • Select a different media type or form type setting..., see "Blank page" on toner. Pages are blank. • Toner is expecting. • Choose a different fill pattern in the driver. Re-initialize the printer by turning it is being fused to redistribute the toner. • Try a different type of paper. Replace the cartridge. • There...
... fuser. • Change the media texture setting in the software program. • Remove the toner cartridge, and gently shake it from the printer driver. • Try a different type of transparency. • Replace the toner cartridge. • Select a different media type or form type setting..., see "Blank page" on toner. Pages are blank. • Toner is expecting. • Choose a different fill pattern in the driver. Re-initialize the printer by turning it is being fused to redistribute the toner. • Try a different type of paper. Replace the cartridge. • There...
Service Manual
Page 90
... edges of the media. • The friction between tires and media is less than resisting force. • Remove the media from the printer driver. If a 3.5K or more page toner cartridge is being used and the Toner Low alarm is set to print a menu settings page. - The...; Make sure the toner cartridge assembly is installed properly. • Press and release to on, then the printer stops printing until the toner cartridge is installed properly. 2-64 Lexmark™ E260, E260d, E260dn Toner Low light is on. The Error light alone is on and printing stops. If the computer indicates...
... edges of the media. • The friction between tires and media is less than resisting force. • Remove the media from the printer driver. If a 3.5K or more page toner cartridge is being used and the Toner Low alarm is set to print a menu settings page. - The...; Make sure the toner cartridge assembly is installed properly. • Press and release to on, then the printer stops printing until the toner cartridge is installed properly. 2-64 Lexmark™ E260, E260d, E260dn Toner Low light is on. The Error light alone is on and printing stops. If the computer indicates...
Service Manual
Page 91
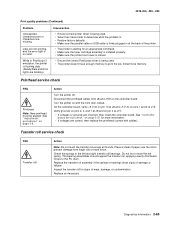
...Transfer roll Action Note: Do not touch the transfer roll except at J15. • If voltages or grounds are blinking). • Ensure correct printer driver is being used . • Select hex trace mode to determine what the problem is. • Restore factory defaults. • Make sure the...Replace as necessary. Diagnostics information 2-65 Verify grounds on pins 2, 4, and 7 at J8 and on pins 1 and 2 at the back of the printer. • The printer is waiting for signs of wear, damage, or contamination. Place a sheet of damage or fatigue. On the controller board, verify +5 V dc on...
...Transfer roll Action Note: Do not touch the transfer roll except at J15. • If voltages or grounds are blinking). • Ensure correct printer driver is being used . • Select hex trace mode to determine what the problem is. • Restore factory defaults. • Make sure the...Replace as necessary. Diagnostics information 2-65 Verify grounds on pins 2, 4, and 7 at J8 and on pins 1 and 2 at the back of the printer. • The printer is waiting for signs of wear, damage, or contamination. Place a sheet of damage or fatigue. On the controller board, verify +5 V dc on...


