Service Manual
Page 32
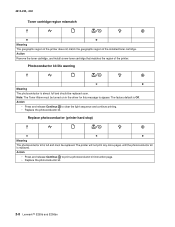
...printer does not match the geographic region of the printer. The printer will not print any more pages until the photoconductor kit is Off. Action • Press and release Continue to print a photoconductor kit instruction page. • Replace the photoconductor kit. 2-8 Lexmark™ E250d and E250dn...continue printing. • Replace the photoconductor kit. Replace photoconductor (printer hard stop) ✷ ✷ z Meaning The photoconductor kit is almost full and should be turned on in the driver for this message to appear. Action Remove the toner cartridge,...
...printer does not match the geographic region of the printer. The printer will not print any more pages until the photoconductor kit is Off. Action • Press and release Continue to print a photoconductor kit instruction page. • Replace the photoconductor kit. 2-8 Lexmark™ E250d and E250dn...continue printing. • Replace the photoconductor kit. Replace photoconductor (printer hard stop) ✷ ✷ z Meaning The photoconductor kit is almost full and should be turned on in the driver for this message to appear. Action Remove the toner cartridge,...

Service Manual
Page 54
...no gap at the manual feeder sensor, opened the gap by stopping the feed rolls, but laser servo cleanup is delayed at the alignment gate. The measured gap at the input sensor. ... jitter-stable specification. Possible cause is that the page stalled at the alignment gate. Printhead Driver: Mirror motor fell out of lock condition after multiple attempts. First writing line of the ... never became uncovered from tray 1 to reach the input sensor after two tries. 2-30 Lexmark™ E250d and E250dn Possible causes include multi-sheet feed or pre-staged media in the tray. 4512-220, ...
...no gap at the manual feeder sensor, opened the gap by stopping the feed rolls, but laser servo cleanup is delayed at the alignment gate. The measured gap at the input sensor. ... jitter-stable specification. Possible cause is that the page stalled at the alignment gate. Printhead Driver: Mirror motor fell out of lock condition after multiple attempts. First writing line of the ... never became uncovered from tray 1 to reach the input sensor after two tries. 2-30 Lexmark™ E250d and E250dn Possible causes include multi-sheet feed or pre-staged media in the tray. 4512-220, ...
Service Manual
Page 60
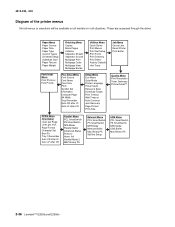
4512-220, -230 Diagram of the printer menus Not all menus or selections will be available on all models or in all situations. These are accessed through the driver. Paper Menu Paper Source Paper Size Paper Type Custom Types Universal Setup Substitute... A4 Width Tray Renumber Auto CR after LF Auto LF after CR Setup Menu Eco-Mode Quiet Mode Printer Language Power Saver Resource Save Download Target Print Timeout Wait Timeout Auto Continue Jam Recovery Page Protect Print Area ... USB Menu PCL SmartSwitch PS SmartSwitch NPA Mode USB Buffer Mac Binary PS 2-36 Lexmark™ E250d and E250dn
4512-220, -230 Diagram of the printer menus Not all menus or selections will be available on all models or in all situations. These are accessed through the driver. Paper Menu Paper Source Paper Size Paper Type Custom Types Universal Setup Substitute... A4 Width Tray Renumber Auto CR after LF Auto LF after CR Setup Menu Eco-Mode Quiet Mode Printer Language Power Saver Resource Save Download Target Print Timeout Wait Timeout Auto Continue Jam Recovery Page Protect Print Area ... USB Menu PCL SmartSwitch PS SmartSwitch NPA Mode USB Buffer Mac Binary PS 2-36 Lexmark™ E250d and E250dn

Service Manual
Page 72
Check the media settings in the printer driver. 2-48 Lexmark™ E250d and E250dn The bearing assemblies should support the transfer roll, applying ...not a FRU) Action Remove the toner cartridge assembly and gently shake the assembly to make sure that the laser light path is not blocked. Variation in the left and right transfer roll bearings. Try changing the setting to...or even card stock.1 Make sure recommended media is being used . Check the media settings in the printer driver. Note: Do not touch the transfer roll except at the proper temperature to fuse the toner to ...
Check the media settings in the printer driver. 2-48 Lexmark™ E250d and E250dn The bearing assemblies should support the transfer roll, applying ...not a FRU) Action Remove the toner cartridge assembly and gently shake the assembly to make sure that the laser light path is not blocked. Variation in the left and right transfer roll bearings. Try changing the setting to...or even card stock.1 Make sure recommended media is being used . Check the media settings in the printer driver. Note: Do not touch the transfer roll except at the proper temperature to fuse the toner to ...

Service Manual
Page 76
... paper path in the User's Guide). • Make sure the paper guides are selected from the printer driver. The Error light alone is installed properly. 2-52 Lexmark™ E250d and E250dn The media fails to feed from Tray 1. The printer does not print after picking. • Make sure the tray is pushed all the way in...
... paper path in the User's Guide). • Make sure the paper guides are selected from the printer driver. The Error light alone is installed properly. 2-52 Lexmark™ E250d and E250dn The media fails to feed from Tray 1. The printer does not print after picking. • Make sure the tray is pushed all the way in...


