
Quick Reference
Page 1
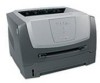
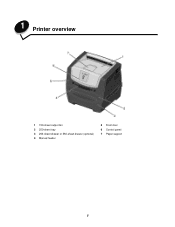
Quick Reference Printer Overview 7 6 5 4 1 1 150-sheet output bin 2 250-sheet tray 3 550-sheet drawer (optional) 4 Manual feeder 5 Front door 6 Control panel 7 Paper support 2 3 1 2 3 4 5 6 7 1 Rear exit 2 Power button 3 Power cord connect 4 Dust cover (not available for some models) 5 USB connect 6 Parallel connect 7 Ethernet connect Quick Reference 1
Quick Reference Printer Overview 7 6 5 4 1 1 150-sheet output bin 2 250-sheet tray 3 550-sheet drawer (optional) 4 Manual feeder 5 Front door 6 Control panel 7 Paper support 2 3 1 2 3 4 5 6 7 1 Rear exit 2 Power button 3 Power cord connect 4 Dust cover (not available for some models) 5 USB connect 6 Parallel connect 7 Ethernet connect Quick Reference 1

Quick Reference
Page 6
...you installed are configured for the sizes and types of memory installed is not listed under "Printer Information." - Verify that the paper trays are correctly listed under "Installed Features." The Load Paper, Toner Low / Replace PC Kit, Ready and Continue lights appear. 8 Release the Continue... button. 9 Turn the printer off the printer, unplug the power cord from the wall outlet, and ...
...you installed are configured for the sizes and types of memory installed is not listed under "Printer Information." - Verify that the paper trays are correctly listed under "Installed Features." The Load Paper, Toner Low / Replace PC Kit, Ready and Continue lights appear. 8 Release the Continue... button. 9 Turn the printer off the printer, unplug the power cord from the wall outlet, and ...

Quick Reference
Page 7
... • Font Priority Paper Settings • Paper Source • Paper Size • Paper Type • Custom Types • Substitute Size • Paper Texture • Paper Weight • Paper Loading Parallel Settings •...Tray Renumber • Auto CR after LF • Auto LF after CR USB Settings • PCL SmartSwitch • PS SmartSwitch • USB Buffer Using the Local Printer Settings Utility 7 To access the Local Printer... Æ Lexmark Æ Local Printer Settings Utility. Using the Local Printer Settings Utility The Local Printer Settings Utility lets you change ...
... • Font Priority Paper Settings • Paper Source • Paper Size • Paper Type • Custom Types • Substitute Size • Paper Texture • Paper Weight • Paper Loading Parallel Settings •...Tray Renumber • Auto CR after LF • Auto LF after CR USB Settings • PCL SmartSwitch • PS SmartSwitch • USB Buffer Using the Local Printer Settings Utility 7 To access the Local Printer... Æ Lexmark Æ Local Printer Settings Utility. Using the Local Printer Settings Utility The Local Printer Settings Utility lets you change ...
Quick Reference
Page 8
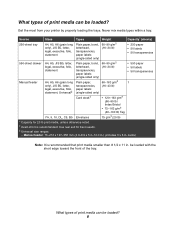
...; 50 labels • 50 transparencies • 550 paper • 50 labels • 50 transparencies 1 * Capacity for best results. ‡ Universal size ranges: - cards) Note: It is recommended. be loaded? 8 What types of the tray. Never mix media types within a tray. Use rear exit for 20 lb print media, unless otherwise noted. † Grain... types of print media can be loaded with the short edge toward the front of print media can be loaded? Get the most from your printer by properly loading the trays.
...; 50 labels • 50 transparencies • 550 paper • 50 labels • 50 transparencies 1 * Capacity for best results. ‡ Universal size ranges: - cards) Note: It is recommended. be loaded? 8 What types of the tray. Never mix media types within a tray. Use rear exit for 20 lb print media, unless otherwise noted. † Grain... types of print media can be loaded with the short edge toward the front of print media can be loaded? Get the most from your printer by properly loading the trays.

Quick Reference
Page 9
... provides a straight-through path to 150 sheets. Use the 250-sheet tray for legal- Where can increase paper capacity by purchasing an optional 550-sheet drawer. Your printer has two standard paper sources: a 250-sheet tray and a single-sheet manual feeder. maximum paper fill indicator maximum paper fill indicator Note: To load legal- Loading the 250-sheet...
... provides a straight-through path to 150 sheets. Use the 250-sheet tray for legal- Where can increase paper capacity by purchasing an optional 550-sheet drawer. Your printer has two standard paper sources: a 250-sheet tray and a single-sheet manual feeder. maximum paper fill indicator maximum paper fill indicator Note: To load legal- Loading the 250-sheet...
Quick Reference
Page 10
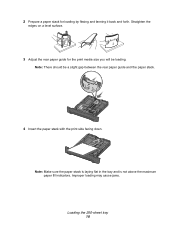
Improper loading may cause jams. Loading the 250-sheet tray 10 Note: Make sure the paper stack is laying flat in the tray and is not above the maximum paper fill indicators. Straighten the edges on a level surface. 3 Adjust the rear paper guide for loading by flexing and fanning it back and forth. Note: There should be loading. 2 Prepare a paper stack for the print media size you will be a slight gap between the rear paper guide and the paper stack. 4 Insert the paper stack with the print side facing down.
Improper loading may cause jams. Loading the 250-sheet tray 10 Note: Make sure the paper stack is laying flat in the tray and is not above the maximum paper fill indicators. Straighten the edges on a level surface. 3 Adjust the rear paper guide for loading by flexing and fanning it back and forth. Note: There should be loading. 2 Prepare a paper stack for the print media size you will be a slight gap between the rear paper guide and the paper stack. 4 Insert the paper stack with the print side facing down.
Quick Reference
Page 11
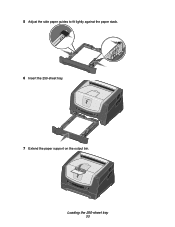
Loading the 250-sheet tray 11 5 Adjust the side paper guides to fit lightly against the paper stack. 6 Insert the 250-sheet tray. 7 Extend the paper support on the output bin.
Loading the 250-sheet tray 11 5 Adjust the side paper guides to fit lightly against the paper stack. 6 Insert the 250-sheet tray. 7 Extend the paper support on the output bin.

Quick Reference
Page 12
... Attaching the dust cover The dust cover helps protect the tray from being knocked out of the tray, and expand the tray until the extender locks into place. Note: This feature may also attach a dust cover (if available on your printer model) on the printer, then snap the cover into place. Attach the dust ... the tabs on the cover to the holes on the back of the printer to protect the tray while it is extended. 1 Press down on the latch at the back of position while it is extended. or folio-size paper To load legal- It also keeps the tray from the environment. or folio-size...
... Attaching the dust cover The dust cover helps protect the tray from being knocked out of the tray, and expand the tray until the extender locks into place. Note: This feature may also attach a dust cover (if available on your printer model) on the printer, then snap the cover into place. Attach the dust ... the tabs on the cover to the holes on the back of the printer to protect the tray while it is extended. 1 Press down on the latch at the back of position while it is extended. or folio-size paper To load legal- It also keeps the tray from the environment. or folio-size...
Quick Reference
Page 13
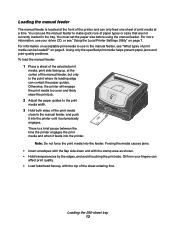
... to use the manual feeder to the manual feeder, and push it into the printer until it feeds into the feeder. Loading the 250-sheet tray 13 You must set the paper size before using the manual feeder. Otherwise, the printer will engage the print media too soon and likely skew the print job.... 2 Adjust the paper guides to the print media width. 3 Hold both sides of the print ...
... to use the manual feeder to the manual feeder, and push it into the printer until it feeds into the feeder. Loading the 250-sheet tray 13 You must set the paper size before using the manual feeder. Otherwise, the printer will engage the print media too soon and likely skew the print job.... 2 Adjust the paper guides to the print media width. 3 Hold both sides of the print ...

Quick Reference
Page 16
For more information, see the Software and Documentation CD that came with your printer. Clearing jams When a paper jam occurs, the printer stops and the control panel Paper Jam and Continue lights come on. Clearing jams 16 We recommend clearing the entire paper path when a paper jam occurs. 1 Remove all paper from the 150-sheet output bin. 2 If you are feeding paper from the 250-sheet tray, remove the tray. 3 Remove the jammed pages.
For more information, see the Software and Documentation CD that came with your printer. Clearing jams When a paper jam occurs, the printer stops and the control panel Paper Jam and Continue lights come on. Clearing jams 16 We recommend clearing the entire paper path when a paper jam occurs. 1 Remove all paper from the 150-sheet output bin. 2 If you are feeding paper from the 250-sheet tray, remove the tray. 3 Remove the jammed pages.
User's Guide
Page 3
...the tray for legal- or folio-size paper 52 Loading the manual feeder ...54 Using the rear exit ...55 Clearing jams ...56 Chapter 5: Printing tasks 60 Manually feeding a print job ...60 Printing on both sides of print media can be loaded? ...41 Where can print media be loaded in the printer ...42 Selecting print media ...43 Paper ...43 Preprinted forms and letterhead ...45 Transparencies ...46 Envelopes ...46 Labels ...46 Card stock ...47 Tips on storing print media and ...
...the tray for legal- or folio-size paper 52 Loading the manual feeder ...54 Using the rear exit ...55 Clearing jams ...56 Chapter 5: Printing tasks 60 Manually feeding a print job ...60 Printing on both sides of print media can be loaded? ...41 Where can print media be loaded in the printer ...42 Selecting print media ...43 Paper ...43 Preprinted forms and letterhead ...45 Transparencies ...46 Envelopes ...46 Labels ...46 Card stock ...47 Tips on storing print media and ...
User's Guide
Page 5
1 Printer overview 1 150-sheet output bin 2 250-sheet tray 3 250-sheet drawer or 550-sheet drawer (optional) 4 Manual feeder 5 Front door 6 Control panel 7 Paper support 5
1 Printer overview 1 150-sheet output bin 2 250-sheet tray 3 250-sheet drawer or 550-sheet drawer (optional) 4 Manual feeder 5 Front door 6 Control panel 7 Paper support 5
User's Guide
Page 15
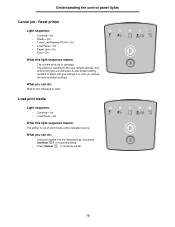
... you can do : • Load print media into the indicated tray, and press Continue to resume printing. • Press Cancel to reset the printer. 15 Any active print jobs are canceled. Load print media Light sequence: • Continue-On • Load Paper-On What this light sequence means: • The current print job...
... you can do : • Load print media into the indicated tray, and press Continue to resume printing. • Press Cancel to reset the printer. 15 Any active print jobs are canceled. Load print media Light sequence: • Continue-On • Load Paper-On What this light sequence means: • The current print job...

User's Guide
Page 21
... is too short to print the formatted data. What you loaded is large enough. • Open the front door, clear the paper path, and close the door to resume printing (see Clearing jams on page56.) • Press Continue to clear the light sequence and continue printing. •... the print job. Understanding the control panel lights Short paper Light sequence: • Continue-On • Error-On What this light sequence means: The output bin is full. This occurs when the printer does not know the print media size loaded in the tray, or when there is a problem feeding the print ...
... is too short to print the formatted data. What you loaded is large enough. • Open the front door, clear the paper path, and close the door to resume printing (see Clearing jams on page56.) • Press Continue to clear the light sequence and continue printing. •... the print job. Understanding the control panel lights Short paper Light sequence: • Continue-On • Error-On What this light sequence means: The output bin is full. This occurs when the printer does not know the print media size loaded in the tray, or when there is a problem feeding the print ...
User's Guide
Page 22
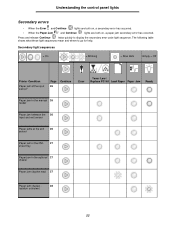
... Off Printer Condition Paper jam at the input sensor* Page Continue 26 Error Toner Low / Replace PC Kit Load Paper Paper Jam Ready Paper jam in the manual 26 feeder Paper jam between the 26 input and exit sensor Paper jams at the exit 26 sensor Paper jam in the 250- 27 sheet tray Paper jam in... the optional 27 drawer Paper jam (duplex rear) 27 Paper jam (duplex - 28 location...
... Off Printer Condition Paper jam at the input sensor* Page Continue 26 Error Toner Low / Replace PC Kit Load Paper Paper Jam Ready Paper jam in the manual 26 feeder Paper jam between the 26 input and exit sensor Paper jams at the exit 26 sensor Paper jam in the 250- 27 sheet tray Paper jam in... the optional 27 drawer Paper jam (duplex rear) 27 Paper jam (duplex - 28 location...

User's Guide
Page 51
Loading the 250-sheet tray 5 Adjust the side paper guides to fit lightly against the paper stack. 6 Insert the 250-sheet paper tray. 51
Loading the 250-sheet tray 5 Adjust the side paper guides to fit lightly against the paper stack. 6 Insert the 250-sheet paper tray. 51

User's Guide
Page 57
Clearing jams 4 With the tray removed, press down on the green duplex flap to remove the jammed pages from the duplex area. 5 Install the 250-sheet paper tray. 57
Clearing jams 4 With the tray removed, press down on the green duplex flap to remove the jammed pages from the duplex area. 5 Install the 250-sheet paper tray. 57
User's Guide
Page 60
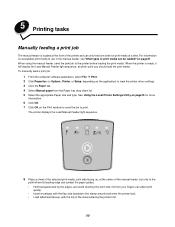
... is ready, it will display the Load Manual Feeder light sequence, at a time. For information on page41. Oil from the Paper tray drop-down list. 5 Select the appropriate Paper size and type. See Using the Local Printer Settings Utility on page75 for more information. 6 Click OK. 7 Click OK on the application) to view the...
... is ready, it will display the Load Manual Feeder light sequence, at a time. For information on page41. Oil from the Paper tray drop-down list. 5 Select the appropriate Paper size and type. See Using the Local Printer Settings Utility on page75 for more information. 6 Click OK. 7 Click OK on the application) to view the...

User's Guide
Page 74
... and types of memory installed is not listed under "Installed Features." Printing a test page from the Ready state. Verify that the paper trays are correctly listed under Installed Features, turn off the printer, unplug the power cord from the wall outlet, and reinstall the option. - On the menu settings page: - Verify the amount...
... and types of memory installed is not listed under "Installed Features." Printing a test page from the Ready state. Verify that the paper trays are correctly listed under Installed Features, turn off the printer, unplug the power cord from the wall outlet, and reinstall the option. - On the menu settings page: - Verify the amount...
User's Guide
Page 88
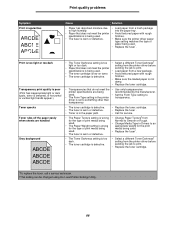
... rough specifications is too • Select a different Toner Darkness† light or too dark. into the paper tray. • Paper that do not meet the • Use only transparencies printer specifications are handled Gray background ABCDE ABCDE ABCDE • The Toner Darkness setting is being used . • ...high humidity. used . • Replace the fuser*. finishes. • The fuser is worn or defective. • Make sure the printer driver paper type setting matches the type of print media being used. • The fuser is worn or defective. • The Toner Darkness ...
... rough specifications is too • Select a different Toner Darkness† light or too dark. into the paper tray. • Paper that do not meet the • Use only transparencies printer specifications are handled Gray background ABCDE ABCDE ABCDE • The Toner Darkness setting is being used . • ...high humidity. used . • Replace the fuser*. finishes. • The fuser is worn or defective. • Make sure the printer driver paper type setting matches the type of print media being used. • The fuser is worn or defective. • The Toner Darkness ...


