
Quick Reference
Page 1
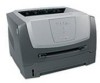
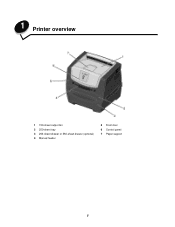
Quick Reference Printer Overview 7 6 5 4 1 1 150-sheet output bin 2 250-sheet tray 3 550-sheet drawer (optional) 4 Manual feeder 5 Front door 6 Control panel 7 Paper support 2 3 1 2 3 4 5 6 7 1 Rear exit 2 Power button 3 Power cord connect 4 Dust cover (not available for some models) 5 USB connect 6 Parallel connect 7 Ethernet connect Quick Reference 1
Quick Reference Printer Overview 7 6 5 4 1 1 150-sheet output bin 2 250-sheet tray 3 550-sheet drawer (optional) 4 Manual feeder 5 Front door 6 Control panel 7 Paper support 2 3 1 2 3 4 5 6 7 1 Rear exit 2 Power button 3 Power cord connect 4 Dust cover (not available for some models) 5 USB connect 6 Parallel connect 7 Ethernet connect Quick Reference 1
Quick Reference
Page 5
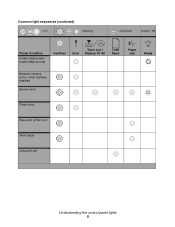
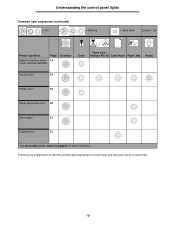
Common light sequences (continued) = On = Blinking = Slow blink Empty = Off Printer Condition Invalid engine code / Invalid network code Continue Toner Low / Error Replace PC Kit Load Paper Paper Jam Ready Network interface errors / Host interface disabled Service error Printer error Paper jam printer error Short paper Output bin full Understanding the control panel lights 5
Common light sequences (continued) = On = Blinking = Slow blink Empty = Off Printer Condition Invalid engine code / Invalid network code Continue Toner Low / Error Replace PC Kit Load Paper Paper Jam Ready Network interface errors / Host interface disabled Service error Printer error Paper jam printer error Short paper Output bin full Understanding the control panel lights 5

Quick Reference
Page 9
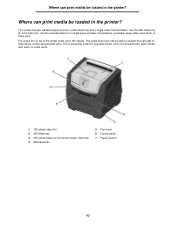
You can increase paper capacity by purchasing an optional 550-sheet drawer. The output bin on page 12. or folio-size paper, extend the length of the printer holds up to 150 sheets. Loading the 250-sheet tray Follow these instructions to help reduce curling and potential jams. This is... especially useful for a single piece of paper, transparency, envelope, paper label, card stock, or index card. Your printer has two standard paper sources: a 250-sheet tray and a single-sheet manual feeder. The single-sheet rear exit provides a straight-through path to...
You can increase paper capacity by purchasing an optional 550-sheet drawer. The output bin on page 12. or folio-size paper, extend the length of the printer holds up to 150 sheets. Loading the 250-sheet tray Follow these instructions to help reduce curling and potential jams. This is... especially useful for a single piece of paper, transparency, envelope, paper label, card stock, or index card. Your printer has two standard paper sources: a 250-sheet tray and a single-sheet manual feeder. The single-sheet rear exit provides a straight-through path to...
Quick Reference
Page 11
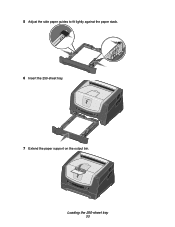
5 Adjust the side paper guides to fit lightly against the paper stack. 6 Insert the 250-sheet tray. 7 Extend the paper support on the output bin. Loading the 250-sheet tray 11
5 Adjust the side paper guides to fit lightly against the paper stack. 6 Insert the 250-sheet tray. 7 Extend the paper support on the output bin. Loading the 250-sheet tray 11

Quick Reference
Page 14
A list of the printer. When the rear exit door is sent to print the job. The Cancel job light sequence is displayed on top of print jobs appears. 3 Right-... then click Cancel. When closed, all print media comes out the rear exit. From a Windows computer 1 Click Start Æ Settings Æ Printers. 2 Double-click the printer you are using to the output bin on the control panel while the job is especially useful for specialty media, such as transparencies, labels, card stock, or index...
A list of the printer. When the rear exit door is sent to print the job. The Cancel job light sequence is displayed on top of print jobs appears. 3 Right-... then click Cancel. When closed, all print media comes out the rear exit. From a Windows computer 1 Click Start Æ Settings Æ Printers. 2 Double-click the printer you are using to the output bin on the control panel while the job is especially useful for specialty media, such as transparencies, labels, card stock, or index...

Quick Reference
Page 16
We recommend clearing the entire paper path when a paper jam occurs. 1 Remove all paper from the 150-sheet output bin. 2 If you are feeding paper from the 250-sheet tray, remove the tray. 3 Remove the jammed pages. For more information, see the Software and Documentation CD that came with your printer. Clearing jams 16 Clearing jams When a paper jam occurs, the printer stops and the control panel Paper Jam and Continue lights come on.
We recommend clearing the entire paper path when a paper jam occurs. 1 Remove all paper from the 150-sheet output bin. 2 If you are feeding paper from the 250-sheet tray, remove the tray. 3 Remove the jammed pages. For more information, see the Software and Documentation CD that came with your printer. Clearing jams 16 Clearing jams When a paper jam occurs, the printer stops and the control panel Paper Jam and Continue lights come on.
User's Guide
Page 5
1 Printer overview 1 150-sheet output bin 2 250-sheet tray 3 250-sheet drawer or 550-sheet drawer (optional) 4 Manual feeder 5 Front door 6 Control panel 7 Paper support 5
1 Printer overview 1 150-sheet output bin 2 250-sheet tray 3 250-sheet drawer or 550-sheet drawer (optional) 4 Manual feeder 5 Front door 6 Control panel 7 Paper support 5
User's Guide
Page 10
Following are explanations of what the primary light sequences or codes mean and what you can do to clear them. 10 Understanding the control panel lights Common light sequences (continued) = On = Blinking = Slow blink Empty = Off Printer Condition Page Network interface errors 19 / Host interface disabled Continue Error Toner Low / Replace PC Kit Load Paper Paper Jam Ready Service error 19 Printer error* 20 Paper jam printer error* 20 Short paper 21 Output bin full 21 *See Secondary error codes on page25 for more information.
Following are explanations of what the primary light sequences or codes mean and what you can do to clear them. 10 Understanding the control panel lights Common light sequences (continued) = On = Blinking = Slow blink Empty = Off Printer Condition Page Network interface errors 19 / Host interface disabled Continue Error Toner Low / Replace PC Kit Load Paper Paper Jam Ready Service error 19 Printer error* 20 Paper jam printer error* 20 Short paper 21 Output bin full 21 *See Secondary error codes on page25 for more information.

User's Guide
Page 21
... formatted data. What you can do : • Make sure the print media you can do : • Remove printed pages from the output bin. • Press Continue to cancel the print job. This occurs when the printer does not know the print media size loaded in the tray, or when there is full.... Output bin full Light sequence: • Load Paper-Blinking What this light sequence means: The paper length is large enough. • Open the front...
... formatted data. What you can do : • Make sure the print media you can do : • Remove printed pages from the output bin. • Press Continue to cancel the print job. This occurs when the printer does not know the print media size loaded in the tray, or when there is full.... Output bin full Light sequence: • Load Paper-Blinking What this light sequence means: The paper length is large enough. • Open the front...
User's Guide
Page 42
Use the manual feeder for most print jobs. The output bin on top of paper, transparency, envelope, paper label, card stock, or index card. Use the 250-sheet tray for a single piece of the printer holds up to help reduce curling and potential jams. This is especially useful for specialty ...media, such as transparencies, paper labels, card stock, or index cards. 1 150-sheet output bin 2 250-sheet tray 3 250-sheet drawer or 550-sheet ...
Use the manual feeder for most print jobs. The output bin on top of paper, transparency, envelope, paper label, card stock, or index card. Use the 250-sheet tray for a single piece of the printer holds up to help reduce curling and potential jams. This is especially useful for specialty ...media, such as transparencies, paper labels, card stock, or index cards. 1 150-sheet output bin 2 250-sheet tray 3 250-sheet drawer or 550-sheet ...
User's Guide
Page 52
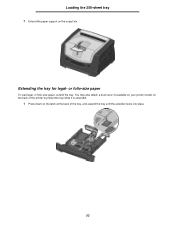
You may also attach a dust cover (if available on your printer model) on the back of the tray, and expand the tray until the extender locks into place. 52 Loading the 250-sheet tray 7 Extend the paper support on the latch at the back of the printer to protect the tray while it is extended. 1 Press down on the output bin. Extending the tray for legal- or folio-size paper To load legal- or folio-size paper, extend the tray.
You may also attach a dust cover (if available on your printer model) on the back of the tray, and expand the tray until the extender locks into place. 52 Loading the 250-sheet tray 7 Extend the paper support on the latch at the back of the printer to protect the tray while it is extended. 1 Press down on the output bin. Extending the tray for legal- or folio-size paper To load legal- or folio-size paper, extend the tray.

User's Guide
Page 55
When the rear exit door is open, all media is sent to help reduce curling and potential jams. This is especially useful for specialty media, such as transparencies, labels, card stock, or index cards. Note: If you print a multiple-page job with the rear exit door open the rear exit door. To use the rear exit, open , the print speed may slow down. 55 When closed, all print media comes out the rear exit. Using the rear exit Using the rear exit The single-sheet rear exit provides a straight-through paper path to the output bin on top of the printer.
When the rear exit door is open, all media is sent to help reduce curling and potential jams. This is especially useful for specialty media, such as transparencies, labels, card stock, or index cards. Note: If you print a multiple-page job with the rear exit door open the rear exit door. To use the rear exit, open , the print speed may slow down. 55 When closed, all print media comes out the rear exit. Using the rear exit Using the rear exit The single-sheet rear exit provides a straight-through paper path to the output bin on top of the printer.

User's Guide
Page 56
Clearing jams Clearing jams When a paper jam occurs, the printer stops and the control panel Paper Jam and Continue lights come on page25 for more information. We recommend clearing the entire paper path when a paper jam occurs. 1 Remove all paper from the 150-sheet output bin. 2 If you are feeding paper from the 250-sheet tray, remove the tray. 3 Remove the jammed pages. 56 See Secondary error codes on . Press and release Continue twice quickly to display the specific secondary error paper jam light sequence.
Clearing jams Clearing jams When a paper jam occurs, the printer stops and the control panel Paper Jam and Continue lights come on page25 for more information. We recommend clearing the entire paper path when a paper jam occurs. 1 Remove all paper from the 150-sheet output bin. 2 If you are feeding paper from the 250-sheet tray, remove the tray. 3 Remove the jammed pages. 56 See Secondary error codes on . Press and release Continue twice quickly to display the specific secondary error paper jam light sequence.
User's Guide
Page 86
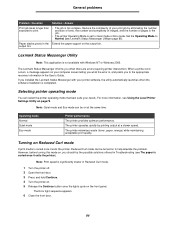
... Windows NT or Windows 2000. Turning on the output bin. General problems Problem / Question Solution / Answer Print job takes longer than expected to Normal (see Lexmark Status Messenger Utilityon page 85). Set the Operating Mode to print. • The job is curled once it exits the printer, Reduced Curl mode can be turned on...
... Windows NT or Windows 2000. Turning on the output bin. General problems Problem / Question Solution / Answer Print job takes longer than expected to Normal (see Lexmark Status Messenger Utilityon page 85). Set the Operating Mode to print. • The job is curled once it exits the printer, Reduced Curl mode can be turned on...
User's Guide
Page 90
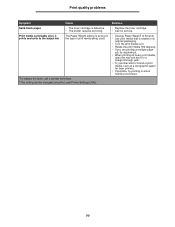
... Paper Weight setting is wrong for the type of print media, such as a xerographic paper for service. • Change Paper Weight† to the output bin • The toner cartridge is sealed in its original packaging. • Turn the print media over. • Rotate the print media 180 degrees.... of print media being used. *To replace the fuser, call a service technician. †This setting can be changed using the Local Printer Settings Utility. • Replace the toner cartridge. • Call for laser printers. • If possible, try printing in a less humid environment. 90
... Paper Weight setting is wrong for the type of print media, such as a xerographic paper for service. • Change Paper Weight† to the output bin • The toner cartridge is sealed in its original packaging. • Turn the print media over. • Rotate the print media 180 degrees.... of print media being used. *To replace the fuser, call a service technician. †This setting can be changed using the Local Printer Settings Utility. • Replace the toner cartridge. • Call for laser printers. • If possible, try printing in a less humid environment. 90

Service Manual
Page 27
... will remain on Light off ✷ Light blinking x Light blinking slowly Common light sequences 4512-220, -230 Printer Condition Page Ready / Power Saver 4 Busy 4 Hex Trace Ready 4 Waiting 5 Flushing / Resolution reduced 5 ✷ Not ready... engine code/ 9 z Programming system code Invalid engine code / Invalid 9 z network code Service error Printer error³ Paper jam printer error Short media 9 ✷ ✷ ✷ 10 z 10 z 10 z Output bin full 11 ✷ Load Tray 1 for icon information. z Light on with other primary light sequences....
... will remain on Light off ✷ Light blinking x Light blinking slowly Common light sequences 4512-220, -230 Printer Condition Page Ready / Power Saver 4 Busy 4 Hex Trace Ready 4 Waiting 5 Flushing / Resolution reduced 5 ✷ Not ready... engine code/ 9 z Programming system code Invalid engine code / Invalid 9 z network code Service error Printer error³ Paper jam printer error Short media 9 ✷ ✷ ✷ 10 z 10 z 10 z Output bin full 11 ✷ Load Tray 1 for icon information. z Light on with other primary light sequences....

Service Manual
Page 35
Action • Remove printed pages from the output bin. • Press Continue to clear the error code. 4512-220, -230 Diagnostic information 2-11 Output bin full ✷ Meaning The output bin is full.
Action • Remove printed pages from the output bin. • Press Continue to clear the error code. 4512-220, -230 Diagnostic information 2-11 Output bin full ✷ Meaning The output bin is full.
Service Manual
Page 56
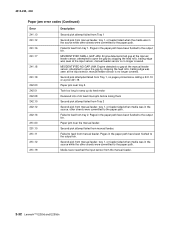
...the paper path. Second pick attempt failed from the manual feeder. 2-32 Lexmark™ E250d and E250dn Second pick from manual feeder, tray 1, or feeder failed when media was in the paper path have been flushed to the output bin. Media never reached the input sensor from manual feeder. Paper jam near ... Tray 1 Second pick from manual feeder, tray 1, or feeder failed when the media was in the paper path have been flushed to the output bin. Failed to feed from tray 1. Took too long to ramp up dc feed motor Received lots of dc feed interrupts before losing them Second ...
...the paper path. Second pick attempt failed from the manual feeder. 2-32 Lexmark™ E250d and E250dn Second pick from manual feeder, tray 1, or feeder failed when media was in the paper path have been flushed to the output bin. Media never reached the input sensor from manual feeder. Paper jam near ... Tray 1 Second pick from manual feeder, tray 1, or feeder failed when the media was in the paper path have been flushed to the output bin. Failed to feed from tray 1. Took too long to ramp up dc feed motor Received lots of dc feed interrupts before losing them Second ...
Service Manual
Page 70
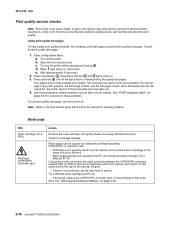
...the lights flash to initiate printing the quality test pages. Once the media exits into the output bin, the printer returns to these problems. To exit print quality test pages, turn the printer off the printer. Use the test pages to the right of the transfer roll gear. • If...2-37 for solutions to the home state (four top lights on page 3-50. 2-46 Lexmark™ E250d and E250dn Press and hold until the and lights come on. 3. See "POST symptom table" on the printer while pressing and holding . Extreme environmental conditions, temperatures, and humidity will affect the print quality...
...the lights flash to initiate printing the quality test pages. Once the media exits into the output bin, the printer returns to these problems. To exit print quality test pages, turn the printer off the printer. Use the test pages to the right of the transfer roll gear. • If...2-37 for solutions to the home state (four top lights on page 3-50. 2-46 Lexmark™ E250d and E250dn Press and hold until the and lights come on. 3. See "POST symptom table" on the printer while pressing and holding . Extreme environmental conditions, temperatures, and humidity will affect the print quality...


