
Quick Reference
Page 4
Common light sequences (continued) = On = Blinking = Slow blink Empty = Off Printer Condition Complex page Continue Toner Low / Error Replace PC Kit Load Paper Paper Jam Ready Cancel job/ Reset printer Load print media Load manual feeder Toner low Toner cartridge region mismatch Photoconductor kit life warning Replace photoconductor (printer hard stop) Programming engine code/ Programming system code Understanding the control panel lights 4
Common light sequences (continued) = On = Blinking = Slow blink Empty = Off Printer Condition Complex page Continue Toner Low / Error Replace PC Kit Load Paper Paper Jam Ready Cancel job/ Reset printer Load print media Load manual feeder Toner low Toner cartridge region mismatch Photoconductor kit life warning Replace photoconductor (printer hard stop) Programming engine code/ Programming system code Understanding the control panel lights 4

User's Guide
Page 9
Understanding the control panel lights Common light sequences (continued) = On = Blinking = Slow blink Empty = Off Printer Condition Complex page Page Continue 14 Error Toner Low / Replace PC Kit Load Paper Paper Jam Ready Cancel job/ Reset printer 15 Load print media 15 Load manual feeder 16 Toner low 16 Toner cartridge region 17 mismatch Photoconductor kit life 17 warning Replace photoconductor 18 (printer hard stop) Programming engine 18 code/ Programming system code Invalid engine code / 19 Invalid network code 9
Understanding the control panel lights Common light sequences (continued) = On = Blinking = Slow blink Empty = Off Printer Condition Complex page Page Continue 14 Error Toner Low / Replace PC Kit Load Paper Paper Jam Ready Cancel job/ Reset printer 15 Load print media 15 Load manual feeder 16 Toner low 16 Toner cartridge region 17 mismatch Photoconductor kit life 17 warning Replace photoconductor 18 (printer hard stop) Programming engine 18 code/ Programming system code Invalid engine code / 19 Invalid network code 9
User's Guide
Page 18
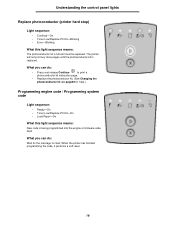
... finished programming the code, it performs a soft reset. 18 What you can do : • Press and release Continue to clear. Understanding the control panel lights Replace photoconductor (printer hard stop) Light sequence: • Continue-On • Toner Low/Replace PC Kit-Blinking • Error-Blinking What this light ... sequence: • Ready-On • Toner Low/Replace PC Kit-On • Load Paper-On What this light sequence means: The photoconductor kit is replaced. The printer will not print any more pages until the photoconductor kit is full and must be replaced.
... finished programming the code, it performs a soft reset. 18 What you can do : • Press and release Continue to clear. Understanding the control panel lights Replace photoconductor (printer hard stop) Light sequence: • Continue-On • Toner Low/Replace PC Kit-Blinking • Error-Blinking What this light ... sequence: • Ready-On • Toner Low/Replace PC Kit-On • Load Paper-On What this light sequence means: The photoconductor kit is replaced. The printer will not print any more pages until the photoconductor kit is full and must be replaced.
User's Guide
Page 40
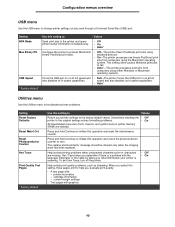
... speed and also disables its hi-speed capabilities. • Auto* Utilities menu Use the Utilities menu to troubleshoot printer problems. Setting Reset Factory Defaults Reset Maint Cnt Reset Photoconductor Counter Hex Trace Print Quality Test Pages * Factory default Use this operation and return the... photoconductor counter to run at full speed and • Full-The printer forces the USB port to zero. Setting NPA Mode ...
... speed and also disables its hi-speed capabilities. • Auto* Utilities menu Use the Utilities menu to troubleshoot printer problems. Setting Reset Factory Defaults Reset Maint Cnt Reset Photoconductor Counter Hex Trace Print Quality Test Pages * Factory default Use this operation and return the... photoconductor counter to run at full speed and • Full-The printer forces the USB port to zero. Setting NPA Mode ...
User's Guide
Page 78
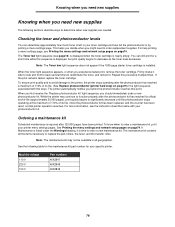
...empty. To ensure print quality and to avoid damage to order a new maintenance kit. Once the photoconductor kit has been replaced, and the counter has been reset, normal printer operation resumes. Machine voltage 110 V 220 V 100 V Part numbers 40X2847 40X2848 40X2849 78 Firmly... of 110% of its official end-of its life. (See Replace photoconductor (printer hard stop .) The printer automatically notifies you before the photoconductor reaches this point. When you first receive the "Replace photoconductor kit" light sequence, you experience faded print, remove the toner cartridge....
...empty. To ensure print quality and to avoid damage to order a new maintenance kit. Once the photoconductor kit has been replaced, and the counter has been reset, normal printer operation resumes. Machine voltage 110 V 220 V 100 V Part numbers 40X2847 40X2848 40X2849 78 Firmly... of 110% of its official end-of its life. (See Replace photoconductor (printer hard stop .) The printer automatically notifies you before the photoconductor reaches this point. When you first receive the "Replace photoconductor kit" light sequence, you experience faded print, remove the toner cartridge....

User's Guide
Page 84
... and network setup pages on . 9 Reset the photoconductor counter (see the instruction sheet that shipped with the green arrows on the tracks in the printer and pushing the print cartridge assembly in as far as it will go. 7 Close the front door. 8 Turn the printer back on page74. Recycling Lexmark products 6 Install the print cartridge...
... and network setup pages on . 9 Reset the photoconductor counter (see the instruction sheet that shipped with the green arrows on the tracks in the printer and pushing the print cartridge assembly in as far as it will go. 7 Close the front door. 8 Turn the printer back on page74. Recycling Lexmark products 6 Install the print cartridge...
User's Guide
Page 99
...39 Protocol 39 printing the Printer Settings Configuration sheet 37 Setup Auto CR after LF 39 Auto LF after CR 39 USB MAC Binary PS 38, 40 NPA Mode 38, 40 Utilities Hex Trace 40 Print Quality Test Pages 40 Reset Factory Defaults 40 Reset Photoconductor Counter 40 control panel light... 12 Load manual feeder 16 Load media 15 Not ready 13 Offline 13 Photoconductor kit near full 17 Printer error 20 Programming engine code 18 Programming system code 18 Ready/Power Saver 11 Replace photoconductor kit 18 Resetting printer 15 Restoring factory defaults 15 secondary error codes 25 Service error 19 Toner...
...39 Protocol 39 printing the Printer Settings Configuration sheet 37 Setup Auto CR after LF 39 Auto LF after CR 39 USB MAC Binary PS 38, 40 NPA Mode 38, 40 Utilities Hex Trace 40 Print Quality Test Pages 40 Reset Factory Defaults 40 Reset Photoconductor Counter 40 control panel light... 12 Load manual feeder 16 Load media 15 Not ready 13 Offline 13 Photoconductor kit near full 17 Printer error 20 Programming engine code 18 Programming system code 18 Ready/Power Saver 11 Replace photoconductor kit 18 Resetting printer 15 Restoring factory defaults 15 secondary error codes 25 Service error 19 Toner...
User's Guide
Page 100
...) 40 Printer Settings Configuration sheet printing 37 printhead lens, cleaning 91 printing booklets 65 duplex 62 letterhead 66 multi-page (N-up) 64 overlays 66 watermarks 66 problems print quality 87 Protocol (Parallel menu) 39 R rear exit 55 recycling supplies 84 Replace photoconductor kit light 18 Reset Factory Defaults (Utilities menu) 40 Reset Photoconductor Counter (Utilities...
...) 40 Printer Settings Configuration sheet printing 37 printhead lens, cleaning 91 printing booklets 65 duplex 62 letterhead 66 multi-page (N-up) 64 overlays 66 watermarks 66 problems print quality 87 Protocol (Parallel menu) 39 R rear exit 55 recycling supplies 84 Replace photoconductor kit light 18 Reset Factory Defaults (Utilities menu) 40 Reset Photoconductor Counter (Utilities...

Service Manual
Page 23
... Field Replaceable Unit Host Based Printing High Voltage Power Supply Liquid Crystal Diode Light Emitting Diode Laser Scanning Unit Low Voltage Power Supply Nonvolatile Random Access Memory Photoconductor Printer Control Language Power-On Reset Power-On Self Test Personal Printer Data Stream People's Republic of China Participating Standards Organization Raster Image Processor Toner Add Roll...
... Field Replaceable Unit Host Based Printing High Voltage Power Supply Liquid Crystal Diode Light Emitting Diode Laser Scanning Unit Low Voltage Power Supply Nonvolatile Random Access Memory Photoconductor Printer Control Language Power-On Reset Power-On Self Test Personal Printer Data Stream People's Republic of China Participating Standards Organization Raster Image Processor Toner Add Roll...

Service Manual
Page 27
... 4 Hex Trace Ready 4 Waiting 5 Flushing / Resolution reduced 5 ✷ Not ready 5 (printer is offline) Close door 6 z Insufficient collation area/ 6 Insufficient memory Cancel job/ Reset printer 6 Load print media Tray 1 7 Load manual feeder 7 z z z z z Toner low¹ 7 Toner cartridge region mismatch 8 z Photoconductor kit life warning² 8 Replace photoconductor (printer 8 ✷ hard stop) Programming engine code/ 9 z Programming system code Invalid...
... 4 Hex Trace Ready 4 Waiting 5 Flushing / Resolution reduced 5 ✷ Not ready 5 (printer is offline) Close door 6 z Insufficient collation area/ 6 Insufficient memory Cancel job/ Reset printer 6 Load print media Tray 1 7 Load manual feeder 7 z z z z z Toner low¹ 7 Toner cartridge region mismatch 8 z Photoconductor kit life warning² 8 Replace photoconductor (printer 8 ✷ hard stop) Programming engine code/ 9 z Programming system code Invalid...
Service Manual
Page 82
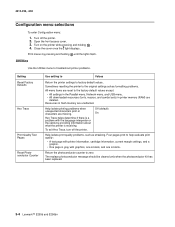
...isolate print quality problems, such as streaking. The replace photoconductor message should be cleared only when the photoconductor kit has been replaced. 3-4 Lexmark™ E250d and E250dn Turn on the printer while pressing and holding until the lights flash. Hex ...Trace helps determine if there is a problem with graphics, one is black, and one is receiving. Close the cover once the light displays. Sometimes resetting the printer...
...isolate print quality problems, such as streaking. The replace photoconductor message should be cleared only when the photoconductor kit has been replaced. 3-4 Lexmark™ E250d and E250dn Turn on the printer while pressing and holding until the lights flash. Hex ...Trace helps determine if there is a problem with graphics, one is black, and one is receiving. Close the cover once the light displays. Sometimes resetting the printer...


