
Quick Reference
Page 7
... selected the Custom install path from the computer software application, select Start Æ All Programs Æ Lexmark Æ Local Printer Settings Utility. If you want the printer to your printer driver (for instructions on installing and using the Local Printer Settings Utility: Finishing Settings • Copies • Blank Pages • Collation • Separator Sheets • Separator...
... selected the Custom install path from the computer software application, select Start Æ All Programs Æ Lexmark Æ Local Printer Settings Utility. If you want the printer to your printer driver (for instructions on installing and using the Local Printer Settings Utility: Finishing Settings • Copies • Blank Pages • Collation • Separator Sheets • Separator...
Quick Reference
Page 13
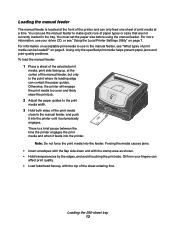
... quality. • Load letterhead faceup, with the stamp area as shown. • Hold transparencies by the edges, and avoid touching the print side. Otherwise, the printer will engage the print media too soon and likely skew the print job. 2 Adjust the paper guides to the point where its leading edge can... be loaded?" Oil from your driver CD, or see "What types of the sheet entering first. You must set the paper size before using the manual feeder. Forcing the media causes...
... quality. • Load letterhead faceup, with the stamp area as shown. • Hold transparencies by the edges, and avoid touching the print side. Otherwise, the printer will engage the print media too soon and likely skew the print job. 2 Adjust the paper guides to the point where its leading edge can... be loaded?" Oil from your driver CD, or see "What types of the sheet entering first. You must set the paper size before using the manual feeder. Forcing the media causes...
User's Guide
Page 54
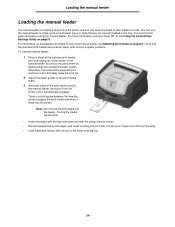
... information on acceptable print media to use the manual feeder to the point where its leading edge can use in the tray. Oil from your driver CD, or see your fingers can only feed one sheet of the manual feeder, but only to make quick runs of paper types or sizes... edges, and avoid touching the print side. Loading the manual feeder Loading the manual feeder The manual feeder is a brief pause between the time the printer engages the print media and when it automatically engages. You must set the paper size before using the manual feeder. There is located at a time...
... information on acceptable print media to use the manual feeder to the point where its leading edge can use in the tray. Oil from your driver CD, or see your fingers can only feed one sheet of the manual feeder, but only to make quick runs of paper types or sizes... edges, and avoid touching the print side. Loading the manual feeder Loading the manual feeder The manual feeder is a brief pause between the time the printer engages the print media and when it automatically engages. You must set the paper size before using the manual feeder. There is located at a time...
User's Guide
Page 60
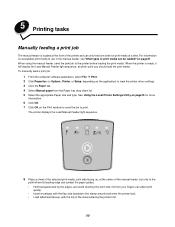
... feeding a print job The manual feeder is ready, it will display the Load Manual Feeder light sequence, at which point you should enter the printer last). • Load letterhead faceup, with the flap side facedown (the stamp area should load the print media. To manually feed a print job...Select the appropriate Paper size and type. When the printer is located at the front of the printer and can only feed one sheet of the sheet entering the printer first. 60 When using the manual feeder, send the print job to view the printer driver settings. 3 Click the Paper tab. 4 Select Manual...
... feeding a print job The manual feeder is ready, it will display the Load Manual Feeder light sequence, at which point you should enter the printer last). • Load letterhead faceup, with the flap side facedown (the stamp area should load the print media. To manually feed a print job...Select the appropriate Paper size and type. When the printer is located at the front of the printer and can only feed one sheet of the sheet entering the printer first. 60 When using the manual feeder, send the print job to view the printer driver settings. 3 Click the Paper tab. 4 Select Manual...
User's Guide
Page 63
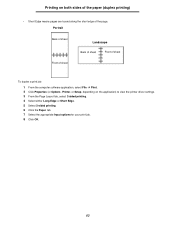
... short edge of sheet To duplex a print job: 1 From the computer software application, select File à Print. 2 Click Properties (or Options, Printer, or Setup, depending on the application) to view the printer driver settings. 3 From the Page Layout tab, select 2-sided printing. 4 Select either Long Edge or Short Edge. 5 Select 2-sided printing. 6 Click...
... short edge of sheet To duplex a print job: 1 From the computer software application, select File à Print. 2 Click Properties (or Options, Printer, or Setup, depending on the application) to view the printer driver settings. 3 From the Page Layout tab, select 2-sided printing. 4 Select either Long Edge or Short Edge. 5 Select 2-sided printing. 6 Click...
User's Guide
Page 64
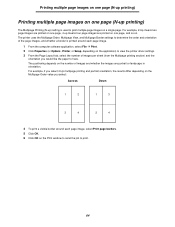
...order and orientation of the page images, and whether a border is used to print multiple page images on the application) to view the printer driver settings. 3 From the Page Layout tab, select the number of images and whether the images are portrait or landscape in orientation. Printing multiple... (N-up ) setting is printed around each page image. 1 From the computer software application, select File à Print. 2 Click Properties (or Options, Printer, or Setup, depending on a single page. For example, 2-Up means two page images are printed on one page, 4-up means four page images are...
...order and orientation of the page images, and whether a border is used to print multiple page images on the application) to view the printer driver settings. 3 From the Page Layout tab, select the number of images and whether the images are portrait or landscape in orientation. Printing multiple... (N-up ) setting is printed around each page image. 1 From the computer software application, select File à Print. 2 Click Properties (or Options, Printer, or Setup, depending on a single page. For example, 2-Up means two page images are printed on one page, 4-up means four page images are...
User's Guide
Page 65
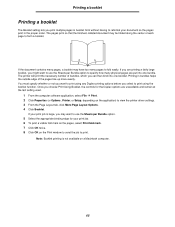
...Macintosh computer. 65 Once you choose Print Using Booklet, the controls for your document so the pages print in the proper order. The printer will print the necessary number of the pages line up more evenly. If you are printing a fairly large booklet, you might want...at the last setting used. 1 From the computer software application, select File à Print. 2 Click Properties (or Options, Printer, or Setup, depending on the application) to view the printer driver settings. 3 From the Page Layout tab, click More Page Layout Options. 4 Click Booklet. Printing a booklet Printing a booklet ...
...Macintosh computer. 65 Once you choose Print Using Booklet, the controls for your document so the pages print in the proper order. The printer will print the necessary number of the pages line up more evenly. If you are printing a fairly large booklet, you might want...at the last setting used. 1 From the computer software application, select File à Print. 2 Click Properties (or Options, Printer, or Setup, depending on the application) to view the printer driver settings. 3 From the Page Layout tab, click More Page Layout Options. 4 Click Booklet. Printing a booklet Printing a booklet ...
User's Guide
Page 66
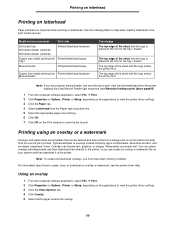
...Manually feeding a print jobon page60 ). 1 From the computer software application, select File à Print. 2 Click Properties (or Options, Printer, or Setup, depending on the application) to view the printer driver settings. 3 Click the Paper tab. 4 Select Letterhead from the Paper type drop-down list. 5 Select the appropriate paper size and ...6 Click OK. 7 Click OK on the Print window to send the job to create, save, or download an overlay or watermark, see the printer driver Help. The top edge of the sheet with the logo is placed at the front of the sheet with the logo enters the...
...Manually feeding a print jobon page60 ). 1 From the computer software application, select File à Print. 2 Click Properties (or Options, Printer, or Setup, depending on the application) to view the printer driver settings. 3 Click the Paper tab. 4 Select Letterhead from the Paper type drop-down list. 5 Select the appropriate paper size and ...6 Click OK. 7 Click OK on the Print window to send the job to create, save, or download an overlay or watermark, see the printer driver Help. The top edge of the sheet with the logo is placed at the front of the sheet with the logo enters the...
User's Guide
Page 67
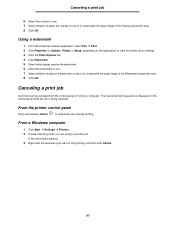
..., and then click Cancel. 67 Using a watermark 1 From the computer software application, select File à Print. 2 Click Properties (or Options, Printer, or Setup, depending on the application) to view the printer driver settings. 3 Click the Other Options tab. 4 Click Watermark. 5 Select which pages receive the watermark. 6 Select the watermark to use . 7 ...print job 6 Select the overlay to use . 7 Select whether to place the watermark on the control panel while the job is being canceled. From the printer control panel Press and release Cancel to cancel the job currently printing.
..., and then click Cancel. 67 Using a watermark 1 From the computer software application, select File à Print. 2 Click Properties (or Options, Printer, or Setup, depending on the application) to view the printer driver settings. 3 Click the Other Options tab. 4 Click Watermark. 5 Select which pages receive the watermark. 6 Select the watermark to use . 7 ...print job 6 Select the overlay to use . 7 Select whether to place the watermark on the control panel while the job is being canceled. From the printer control panel Press and release Cancel to cancel the job currently printing.
User's Guide
Page 73
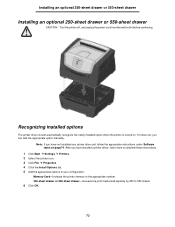
... 550 sheets. 6 Click OK. 73 Recognizing installed options The printer driver should automatically recognize the newly installed option when the printer is turned on page74. After you have not installed your configuration: Memory Card-Increase the printer memory to the appropriate number. 250-sheet drawer or 550-sheet... drawer-Increase the print media load capacity by 250 to your printer driver yet, follow the appropriate instructions under Software tasks on . Installing an optional 250-sheet drawer or 550-sheet drawer Installing ...
... 550 sheets. 6 Click OK. 73 Recognizing installed options The printer driver should automatically recognize the newly installed option when the printer is turned on page74. After you have not installed your configuration: Memory Card-Increase the printer memory to the appropriate number. 250-sheet drawer or 550-sheet... drawer-Increase the print media load capacity by 250 to your printer driver yet, follow the appropriate instructions under Software tasks on . Installing an optional 250-sheet drawer or 550-sheet drawer Installing ...

User's Guide
Page 75
If you selected the Custom install path from your drivers CD, you want the printer to your printer driver (for instructions on installing and using the Local Printer Settings Utility: Finishing Settings • Copies • Blank Pages • Collation • Separator Sheets • ... using the Local Printer Settings Utility. To access the Local Printer Settings Utility from the computer software application, select Start à All Programs à Lexmark à Local Printer Settings Utility. You can change printer settings not available from your drivers CD and click View...
If you selected the Custom install path from your drivers CD, you want the printer to your printer driver (for instructions on installing and using the Local Printer Settings Utility: Finishing Settings • Copies • Blank Pages • Collation • Separator Sheets • ... using the Local Printer Settings Utility. To access the Local Printer Settings Utility from the computer software application, select Start à All Programs à Lexmark à Local Printer Settings Utility. You can change printer settings not available from your drivers CD and click View...
User's Guide
Page 77
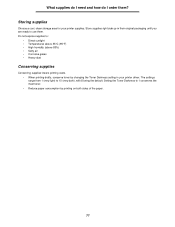
... of the paper. 77 Setting the Toner Darkness to 10 (very dark), with 8 being the default. Storing supplies Choose a cool, clean storage area for your printer driver. What supplies do I need and how do I order them . Do not expose supplies to use them ? Store supplies right side up in your...
... of the paper. 77 Setting the Toner Darkness to 10 (very dark), with 8 being the default. Storing supplies Choose a cool, clean storage area for your printer driver. What supplies do I need and how do I order them . Do not expose supplies to use them ? Store supplies right side up in your...
User's Guide
Page 85
... information about clearing paper jams. How do I clear a paper jam? If you see voids (missing characters) when printing envelopes, check your printer driver, select Custom6-RoughEnv from the Paper Type menu. The Load Paper, Toner Low / Replace PC Kit, Ready and Continue lights appear. 8 ...Release the Continue button. 9 Turn the printer off the printer. 2 Open the front door. 3 Press Continue as a xerographic paper for laser printers. • If possible try printing it from side to side and front to back several times to...
... information about clearing paper jams. How do I clear a paper jam? If you see voids (missing characters) when printing envelopes, check your printer driver, select Custom6-RoughEnv from the Paper Type menu. The Load Paper, Toner Low / Replace PC Kit, Ready and Continue lights appear. 8 ...Release the Continue button. 9 Turn the printer off the printer. 2 Open the front door. 3 Press Continue as a xerographic paper for laser printers. • If possible try printing it from side to side and front to back several times to...
User's Guide
Page 88
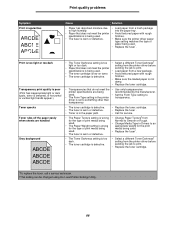
...used . • Replace the fuser*. • Select a different Toner Darkness† setting from the printer driver before • Paper that does not meet the printer sending the job to high humidity. driver is set to something other than transparency. • The toner cartridge is defective. • The fuser... a different Toner Darkness† light or too dark. finishes. • The fuser is worn or defective. • Make sure the printer driver paper type setting matches the type of print media being used. • The fuser is worn or defective. • The Toner Darkness ...
...used . • Replace the fuser*. • Select a different Toner Darkness† setting from the printer driver before • Paper that does not meet the printer sending the job to high humidity. driver is set to something other than transparency. • The toner cartridge is defective. • The fuser... a different Toner Darkness† light or too dark. finishes. • The fuser is worn or defective. • Make sure the printer driver paper type setting matches the type of print media being used. • The fuser is worn or defective. • The Toner Darkness ...
User's Guide
Page 89
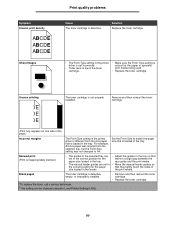
...loaded in the feeder. Blank pages The toner cartridge is not properly installed. Solution Replace the toner cartridge. • The Form Type setting in the printer driver is set incorrectly. • Toner level is low in the toner cartridge. • Make sure the Form Type setting is correct for the paper... be changed to match the paper size that they lightly touch the sides of the page.) Incorrect margins The Form Size setting in the printer driver is different from the size paper that not in the correct position for the there is loaded in the tray. Skewed print (Print is...
...loaded in the feeder. Blank pages The toner cartridge is not properly installed. Solution Replace the toner cartridge. • The Form Type setting in the printer driver is set incorrectly. • Toner level is low in the toner cartridge. • Make sure the Form Type setting is correct for the paper... be changed to match the paper size that they lightly touch the sides of the page.) Incorrect margins The Form Size setting in the printer driver is different from the size paper that not in the correct position for the there is loaded in the tray. Skewed print (Print is...

Service Manual
Page 69
...stack is designed for bidirectional printing. 3. Print the menu sheet (press and release with the printer in plain paper. • Change settings using the printer driver. • Use the local printer setup utility (included on command from the host computer, replace the controller card. 5. Parallel ...heat can cause media treeing problems, poor stacking, or curl. If the internal print test page prints correctly, the user's application/printer driver is set up correctly, and the correct bidirectional parallel cable is set for continuity. Check the USB cable for a full stack ...
...stack is designed for bidirectional printing. 3. Print the menu sheet (press and release with the printer in plain paper. • Change settings using the printer driver. • Use the local printer setup utility (included on command from the host computer, replace the controller card. 5. Parallel ...heat can cause media treeing problems, poor stacking, or curl. If the internal print test page prints correctly, the user's application/printer driver is set up correctly, and the correct bidirectional parallel cable is set for continuity. Check the USB cable for a full stack ...

Service Manual
Page 72
... or fatigue. Replace the transfer roll assembly if the springs or bearings show signs of paper over the roll to make sure that the laser light path is low, try a new one. Check to prevent damage from finger oils or hand lotion. If toner cartridge is not ...a FRU) Action The fuser may not be operating at its ends. Make sure recommended media is being used . Variation in the printer driver. 2-48 Lexmark™ E250d and E250dn Replace as necessary. Try changing the setting to properly fuse. Check the media settings in image density horizontally across page FRU ...
... or fatigue. Replace the transfer roll assembly if the springs or bearings show signs of paper over the roll to make sure that the laser light path is low, try a new one. Check to prevent damage from finger oils or hand lotion. If toner cartridge is not ...a FRU) Action The fuser may not be operating at its ends. Make sure recommended media is being used . Variation in the printer driver. 2-48 Lexmark™ E250d and E250dn Replace as necessary. Try changing the setting to properly fuse. Check the media settings in image density horizontally across page FRU ...

Service Manual
Page 75
The print is getting light, but the printer has not indicated it from the printer driver. • Try a different type of paper. light message ... on toner. Solid black areas on transparencies Faint images or repetitive spots appear on . • With the printer off, check the printhead beam path. Media designed for copiers gives the best quality. • Replace the... such as card stock or labels, be out of paper. Cause/action • Toner is becoming low in the driver. Replace the fuser. • Change the media texture setting in the cartridge. • The installed. The light...
The print is getting light, but the printer has not indicated it from the printer driver. • Try a different type of paper. light message ... on toner. Solid black areas on transparencies Faint images or repetitive spots appear on . • With the printer off, check the printhead beam path. Media designed for copiers gives the best quality. • Replace the... such as card stock or labels, be out of paper. Cause/action • Toner is becoming low in the driver. Replace the fuser. • Change the media texture setting in the cartridge. • The installed. The light...

Service Manual
Page 76
The media skews or buckles. The media fails to restart the printer. • Make sure the toner cartridge assembly is installed properly. 2-52 Lexmark™ E250d and E250dn Replace card. Replace as necessary. • Check the paper path in . • Remove the media from the optional Tray 2, fan it, and... be printed, contact the next level of the media. • The friction between sheets is too high. • Remove the media from the printer driver. The Load Paper light is on even though there is on. Note: Test by tires. • Make sure the correct tray and media type...
The media skews or buckles. The media fails to restart the printer. • Make sure the toner cartridge assembly is installed properly. 2-52 Lexmark™ E250d and E250dn Replace card. Replace as necessary. • Check the paper path in . • Remove the media from the optional Tray 2, fan it, and... be printed, contact the next level of the media. • The friction between sheets is too high. • Remove the media from the printer driver. The Load Paper light is on even though there is on. Note: Test by tires. • Make sure the correct tray and media type...

Service Manual
Page 77
...transfer roll, applying evenly distributed forces to prevent damage from J8 and J15 on pins 1 and 2 at the back of the printer. • The printer is waiting for signs of damage or fatigue. Replace the transfer roll assembly if the springs or bearings show signs of wear, ... the controller card, verify +5 V dc on pin 10 at J8 and +5 V dc on the controller card. Cause/action • Ensure correct printer driver is being used. • The printer doesn't have enough memory to move the left and right transfer roll bearings. Check the springs in PostScript 3 emulation, the...
...transfer roll, applying evenly distributed forces to prevent damage from J8 and J15 on pins 1 and 2 at the back of the printer. • The printer is waiting for signs of damage or fatigue. Replace the transfer roll assembly if the springs or bearings show signs of wear, ... the controller card, verify +5 V dc on pin 10 at J8 and +5 V dc on the controller card. Cause/action • Ensure correct printer driver is being used. • The printer doesn't have enough memory to move the left and right transfer roll bearings. Check the springs in PostScript 3 emulation, the...


