
Setup Guide
Page 6
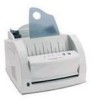
... the sheets together to form a poster. Print in various environments • Your printer is compatible with Windows 95/98/Me/NT 4.0/2000. • Your printer is compatible with the Linux system. • Your printer comes with both Parallel and USB interfaces. The text and pictures of each page...Overlay" on page 5.17. • You can customize your document can be magnified and printed across several sheets of paper. INTRODUCING YOUR PRINTER 1.3 After the document has printed, trim off the white edges of your documents by using watermarks such as "Confidential." Special Features Create ...
... the sheets together to form a poster. Print in various environments • Your printer is compatible with Windows 95/98/Me/NT 4.0/2000. • Your printer is compatible with the Linux system. • Your printer comes with both Parallel and USB interfaces. The text and pictures of each page...Overlay" on page 5.17. • You can customize your document can be magnified and printed across several sheets of paper. INTRODUCING YOUR PRINTER 1.3 After the document has printed, trim off the white edges of your documents by using watermarks such as "Confidential." Special Features Create ...
Setup Guide
Page 16
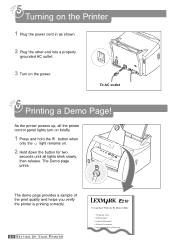
... page prints. The demo page provides a sample of the print quality and helps you verify the printer is printing correctly. 2.8 SETTING UP YOUR PRINTER E210 Personal Laser Printer for two seconds until all the printer control panel lights turn on briefly. 1 Press and hold the button when only the light remains ... release. Turning on the Printer 1 Plug the power cord in as shown. 2 Plug the other end into a properly grounded AC outlet. 3 Turn on . 2 Hold down the button for the Home or Office 12 Pages per minute 66 MHz processor Parallel & USB standard Windows & Linux support 5,000 ...
... page prints. The demo page provides a sample of the print quality and helps you verify the printer is printing correctly. 2.8 SETTING UP YOUR PRINTER E210 Personal Laser Printer for two seconds until all the printer control panel lights turn on briefly. 1 Press and hold the button when only the light remains ... release. Turning on the Printer 1 Plug the power cord in as shown. 2 Plug the other end into a properly grounded AC outlet. 3 Turn on . 2 Hold down the button for the Home or Office 12 Pages per minute 66 MHz processor Parallel & USB standard Windows & Linux support 5,000 ...

Setup Guide
Page 17
... the print software on your PC before beginning installation. • You are using Windows 95, Windows 98, Windows Me, Windows NT 4.0 or Windows 2000. To operate your printer, you are printing with a USB interface See "Using Your Printer with a parallel cable. Before Installing the Printer Software Verify the following: • At least 16MB or more of RAM is...
... the print software on your PC before beginning installation. • You are using Windows 95, Windows 98, Windows Me, Windows NT 4.0 or Windows 2000. To operate your printer, you are printing with a USB interface See "Using Your Printer with a parallel cable. Before Installing the Printer Software Verify the following: • At least 16MB or more of RAM is...
Setup Guide
Page 19
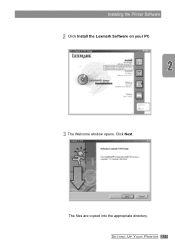
Click Next. SETTING UP YOUR PRINTER 2.11 Installing the Printer Software 2 Click Install the Lexmark Software on your PC. 3 The Welcome window opens. The files are copied into the appropriate directory.
Click Next. SETTING UP YOUR PRINTER 2.11 Installing the Printer Software 2 Click Install the Lexmark Software on your PC. 3 The Welcome window opens. The files are copied into the appropriate directory.
Setup Guide
Page 20
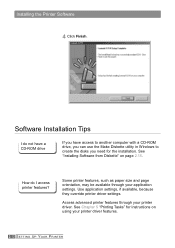
..., such as paper size and page orientation, may be available through your application settings. Use application settings, if available, because they override printer driver settings. See Chapter 5 "Printing Tasks" for the installation. How do I do not have a CD-ROM drive If you have access to another computer with a ...CD-ROM drive, you can use the Make Diskette utility in Windows to create the disks you need for instructions on page 2.15. Software Installation Tips I access...
..., such as paper size and page orientation, may be available through your application settings. Use application settings, if available, because they override printer driver settings. See Chapter 5 "Printing Tasks" for the installation. How do I do not have a CD-ROM drive If you have access to another computer with a ...CD-ROM drive, you can use the Make Diskette utility in Windows to create the disks you need for instructions on page 2.15. Software Installation Tips I access...

Setup Guide
Page 21
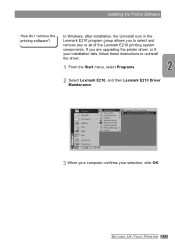
In Windows, after installation, the Uninstall icon in the Lexmark E210 program group allows you are upgrading the printer driver, or if your selection, click OK. If you to uninstall the driver. 1 From the Start menu, select Programs. 2 Select Lexmark E210, and then Lexmark E210 Driver Maintenance. 3 When your computer confirms your installation fails, follow these instructions to select and remove any or all of the Lexmark E210 printing system components. SETTING UP YOUR PRINTER 2.13 Installing the Printer Software How do I remove the printing software?
In Windows, after installation, the Uninstall icon in the Lexmark E210 program group allows you are upgrading the printer driver, or if your selection, click OK. If you to uninstall the driver. 1 From the Start menu, select Programs. 2 Select Lexmark E210, and then Lexmark E210 Driver Maintenance. 3 When your computer confirms your installation fails, follow these instructions to select and remove any or all of the Lexmark E210 printing system components. SETTING UP YOUR PRINTER 2.13 Installing the Printer Software How do I remove the printing software?

Setup Guide
Page 25
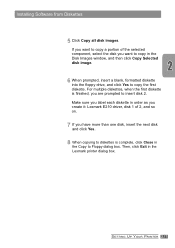
... diskette is complete, click Close in the Disk Images window, and then click Copy Selected disk image. 6 When prompted, insert a blank, formatted diskette into the floppy drive, and click Yes to insert disk 2. Then, click Exit in order as you create it: Lexmark E210 driver, disk 1 of 2, and so on. 7 If you have... diskette. Installing Software from Diskettes 5 Click Copy all disk images. If you want to copy in the Copy to Floppy dialog box. SETTING UP YOUR PRINTER 2.17 Make sure you label each diskette in the Lexmark printer dialog box.
... diskette is complete, click Close in the Disk Images window, and then click Copy Selected disk image. 6 When prompted, insert a blank, formatted diskette into the floppy drive, and click Yes to insert disk 2. Then, click Exit in order as you create it: Lexmark E210 driver, disk 1 of 2, and so on. 7 If you have... diskette. Installing Software from Diskettes 5 Click Copy all disk images. If you want to copy in the Copy to Floppy dialog box. SETTING UP YOUR PRINTER 2.17 Make sure you label each diskette in the Lexmark printer dialog box.
Setup Guide
Page 31
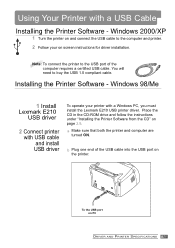
... a certified USB cable. You will need to buy the USB 1.0 compliant cable. Windows 98/Me 1 Install Lexmark E210 USB driver 2 Connect printer with USB cable and install USB driver To operate your on the printer. a Make sure that both the printer and computer are turned ON. Using Your Printer with a Windows PC, you must install the Lexmark E210 USB printer driver.
... a certified USB cable. You will need to buy the USB 1.0 compliant cable. Windows 98/Me 1 Install Lexmark E210 USB driver 2 Connect printer with USB cable and install USB driver To operate your on the printer. a Make sure that both the printer and computer are turned ON. Using Your Printer with a Windows PC, you must install the Lexmark E210 USB printer driver.

Online Information
Page 5
7 Troubleshooting Troubleshooting Checklist 7.2 Solving General Printing Problems 7.3 Clearing Jams 7.7 Solving Print Quality Problems 7.12 Troubleshooting Error Messages 7.18 Solving Common Windows Problems 7.20 Appendix A: Driver and Printer Specifications Printer Specifications A.2 Print Media Specifications A.3 Using Your Printer with a USB cable A.11 Linux Driver Installation A.17 Appendix B: Safety Appendix C: Notices Appendix D: Warranty Index v
7 Troubleshooting Troubleshooting Checklist 7.2 Solving General Printing Problems 7.3 Clearing Jams 7.7 Solving Print Quality Problems 7.12 Troubleshooting Error Messages 7.18 Solving Common Windows Problems 7.20 Appendix A: Driver and Printer Specifications Printer Specifications A.2 Print Media Specifications A.3 Using Your Printer with a USB cable A.11 Linux Driver Installation A.17 Appendix B: Safety Appendix C: Notices Appendix D: Warranty Index v

Online Information
Page 8
... sheets of your documents by using watermarks such as "Confidential." Print in various environments • Your printer is compatible with Windows 95/98/Me/NT 4.0/2000. • Your printer is compatible with the Linux system. • Your printer comes with both Parallel and USB interfaces. After the document has printed, trim off the white...
... sheets of your documents by using watermarks such as "Confidential." Print in various environments • Your printer is compatible with Windows 95/98/Me/NT 4.0/2000. • Your printer is compatible with the Linux system. • Your printer comes with both Parallel and USB interfaces. After the document has printed, trim off the white...

Online Information
Page 18
...the light remains on the power. The demo page provides a sample of the print quality and helps you verify the printer is printing correctly. 2.8 SETTING UP YOUR PRINTER E210 Personal Laser Printer for two seconds until all lights blink slowly, then release. To AC outlet Printing a Demo Page! Turning on ...the Printer 1 Plug the power cord in as shown. 2 Plug the other end into a properly grounded AC outlet. 3 Turn on . 2 Hold down the button for the Home or Office 12 Pages per minute 66 MHz processor Parallel & USB standard Windows & Linux support 5,000 pages...
...the light remains on the power. The demo page provides a sample of the print quality and helps you verify the printer is printing correctly. 2.8 SETTING UP YOUR PRINTER E210 Personal Laser Printer for two seconds until all lights blink slowly, then release. To AC outlet Printing a Demo Page! Turning on ...the Printer 1 Plug the power cord in as shown. 2 Plug the other end into a properly grounded AC outlet. 3 Turn on . 2 Hold down the button for the Home or Office 12 Pages per minute 66 MHz processor Parallel & USB standard Windows & Linux support 5,000 pages...

Online Information
Page 19
... a USB interface See "Using Your Printer with a USB Cable" on page A.11, for some of free disk space on your PC. • All applications are using Windows 95, Windows 98, Windows Me, Windows NT 4.0 or Windows 2000. If you must install a printer driver, which translates data from your ...application into data that is a CD containing the printer driver for information on installing the print software on ...
... a USB interface See "Using Your Printer with a USB Cable" on page A.11, for some of free disk space on your PC. • All applications are using Windows 95, Windows 98, Windows Me, Windows NT 4.0 or Windows 2000. If you must install a printer driver, which translates data from your ...application into data that is a CD containing the printer driver for information on installing the print software on ...

Online Information
Page 21
SETTING UP YOUR PRINTER 2.11 The files are copied into the appropriate directory. Click Next. Installing the Printer Software 2 Click Install the Lexmark Software on your PC. 3 The Welcome window opens.
SETTING UP YOUR PRINTER 2.11 The files are copied into the appropriate directory. Click Next. Installing the Printer Software 2 Click Install the Lexmark Software on your PC. 3 The Welcome window opens.

Online Information
Page 22
...Access advanced printer features through your printer driver. Use application settings, if available, because they override printer driver settings. How do I do not have a CD-ROM drive If you have access to another computer with a CD-ROM drive, you can use the Make Diskette utility in Windows to create ...the disks you need for instructions on page 2.15. See Chapter 5 "Printing Tasks" for the installation. Software Installation Tips I access printer features?
...Access advanced printer features through your printer driver. Use application settings, if available, because they override printer driver settings. How do I do not have a CD-ROM drive If you have access to another computer with a CD-ROM drive, you can use the Make Diskette utility in Windows to create ...the disks you need for instructions on page 2.15. See Chapter 5 "Printing Tasks" for the installation. Software Installation Tips I access printer features?
Online Information
Page 23
SETTING UP YOUR PRINTER 2.13 In Windows, after installation, the Uninstall icon in the Lexmark E210 program group allows you are upgrading the printer driver, or if your selection, click OK. If you to uninstall the driver. 1 From the Start menu, select Programs. 2 Select Lexmark E210, and then Lexmark E210 Driver Maintenance. 3 When your computer confirms your installation fails, follow these instructions to select and remove any or all of the Lexmark E210 printing system components. Installing the Printer Software How do I remove the printing software?
SETTING UP YOUR PRINTER 2.13 In Windows, after installation, the Uninstall icon in the Lexmark E210 program group allows you are upgrading the printer driver, or if your selection, click OK. If you to uninstall the driver. 1 From the Start menu, select Programs. 2 Select Lexmark E210, and then Lexmark E210 Driver Maintenance. 3 When your computer confirms your installation fails, follow these instructions to select and remove any or all of the Lexmark E210 printing system components. Installing the Printer Software How do I remove the printing software?
Online Information
Page 27
...in order as you create it: Lexmark E210 driver, disk 1 of the selected component, select the disk you are prompted to copy the first diskette. Then, click Exit in the Copy to diskettes is finished, you want to copy in the Disk Images window, and then click Copy Selected disk... image. 6 When prompted, insert a blank, formatted diskette into the floppy drive, and click Yes to insert disk 2. SETTING UP YOUR PRINTER 2.17 Installing Software from Diskettes 5 Click Copy all disk images...
...in order as you create it: Lexmark E210 driver, disk 1 of the selected component, select the disk you are prompted to copy the first diskette. Then, click Exit in the Copy to diskettes is finished, you want to copy in the Disk Images window, and then click Copy Selected disk... image. 6 When prompted, insert a blank, formatted diskette into the floppy drive, and click Yes to insert disk 2. SETTING UP YOUR PRINTER 2.17 Installing Software from Diskettes 5 Click Copy all disk images...

Online Information
Page 43
...use envelopes recommended for direction only. • Up to use envelopes with the stamp area enters the tray first. The stamp is shown for laser printers. • Before you want to five envelopes can be loaded in the input tray, make sure that they are undamaged and are shown. ...The manual input tray holds only one at a time. The end of the envelope with clasps, snaps, windows, coated lining or self-stick adhesives. Notes: • Do not feed stamped envelopes. USING PRINT MEDIA 4.11 Manually-loaded envelopes are not stuck ...
...use envelopes recommended for direction only. • Up to use envelopes with the stamp area enters the tray first. The stamp is shown for laser printers. • Before you want to five envelopes can be loaded in the input tray, make sure that they are undamaged and are shown. ...The manual input tray holds only one at a time. The end of the envelope with clasps, snaps, windows, coated lining or self-stick adhesives. Notes: • Do not feed stamped envelopes. USING PRINT MEDIA 4.11 Manually-loaded envelopes are not stuck ...

Online Information
Page 56
... box for your software application documentation for the exact printing procedure. 1 Open the document you see Setup, Printer, or Options, click that your printer is selected. 5.2 PRINTING TASKS The basic print settings you see a Properties button, click it. then click... Properties in the next screen. These settings include the number of copies, paper size and page orientation. Make sure that button instead; Refer to print. 2 Select Print from various Windows...
... box for your software application documentation for the exact printing procedure. 1 Open the document you see Setup, Printer, or Options, click that your printer is selected. 5.2 PRINTING TASKS The basic print settings you see a Properties button, click it. then click... Properties in the next screen. These settings include the number of copies, paper size and page orientation. Make sure that button instead; Refer to print. 2 Select Print from various Windows...

Online Information
Page 59
...needed. 6 When you complete the print settings, click OK until the Print dialog box displays. 7 Click OK to open the Printers window. Notes: • Most Windows-based applications override settings you are using the current program. To make your changes permanent, make them in the... printer driver. First, change all print settings available in the software application and then, any remaining settings in the printer driver. • The settings you change remain in effect only while you specify in the Printers folder as follows: 1 Click the Windows Start button. 2 Select...
...needed. 6 When you complete the print settings, click OK until the Print dialog box displays. 7 Click OK to open the Printers window. Notes: • Most Windows-based applications override settings you are using the current program. To make your changes permanent, make them in the... printer driver. First, change all print settings available in the software application and then, any remaining settings in the printer driver. • The settings you change remain in effect only while you specify in the Printers folder as follows: 1 Click the Windows Start button. 2 Select...

Online Information
Page 60
... button until the control panel lights blink. Printing a Document 3 Select the Lexmark E210 printer icon. 4 Right-click the mouse button and select Properties to open the Printers window, and double-click the Lexmark E210 icon. 3 From the Document menu, select Cancel Printing (Windows 9x) or Cancel (Windows Me/NT 4.0/2000). 5.6 PRINTING TASKS Pressing cancels only the current job in...
... button until the control panel lights blink. Printing a Document 3 Select the Lexmark E210 printer icon. 4 Right-click the mouse button and select Properties to open the Printers window, and double-click the Lexmark E210 icon. 3 From the Document menu, select Cancel Printing (Windows 9x) or Cancel (Windows Me/NT 4.0/2000). 5.6 PRINTING TASKS Pressing cancels only the current job in...


